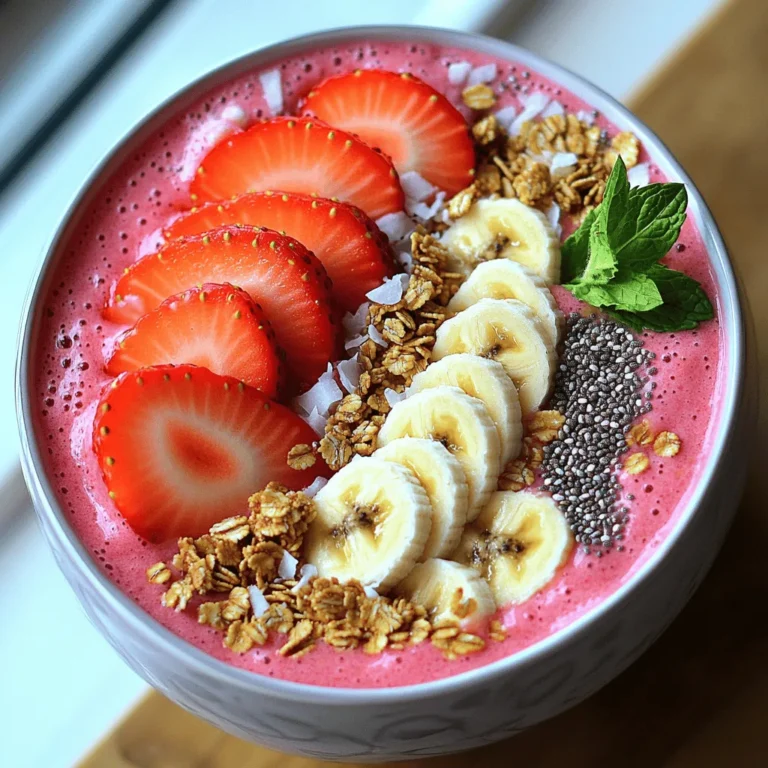
Latest & Greatest

Harry Potter Pumpkin Juice Refreshing Fall Beverage
If you love Harry Potter and fall flavors, you’ll adore making pumpkin juice at home! This fun and easy drink
Read more…
Cinnamon Roll Mug Cake Simple and Tasty Dessert
Craving something sweet but short on time? This Cinnamon Roll Mug Cake is your quick fix! With just a few
Read more…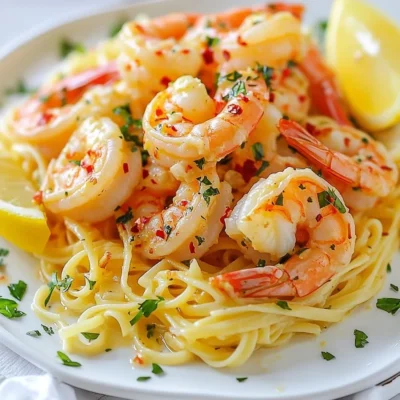
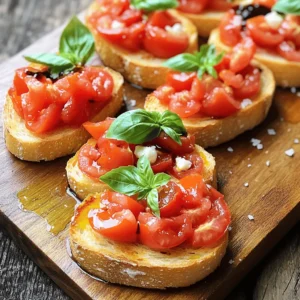
Garlic Butter Shrimp Scampi Flavorful and Quick Dish
If you crave a dish that’s quick, tasty, and easy to make, look no further! Garlic Butter Shrimp Scampi is
Read more…
Delicious Mini Lemon Meringue Pies Easy Recipe Guide
Are you ready to whip up a treat that’s both fun and delicious? Mini lemon meringue pies are the perfect
Read more…
Mediterranean Baked Feta Breakfast Delightful Meal
Start your day with a burst of flavor! This Mediterranean Baked Feta Breakfast is a simple, tasty meal that will
Read more…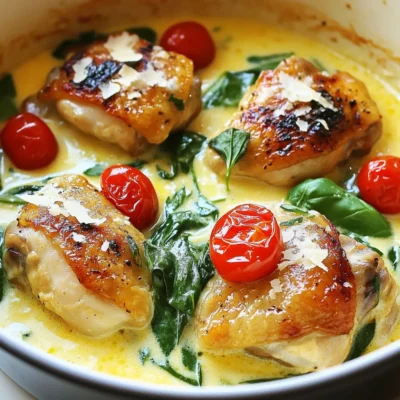
One-Pot Creamy Tuscan Chicken Simple Dinner Delight
If you’re craving a quick and tasty meal, this One-Pot Creamy Tuscan Chicken is for you. In just a single
Read more…
Thai Peanut Noodle Salad Fresh and Flavorful Recipe
Craving a dish that bursts with flavor and freshness? Dive into my Thai Peanut Noodle Salad recipe! This vibrant dish
Read more…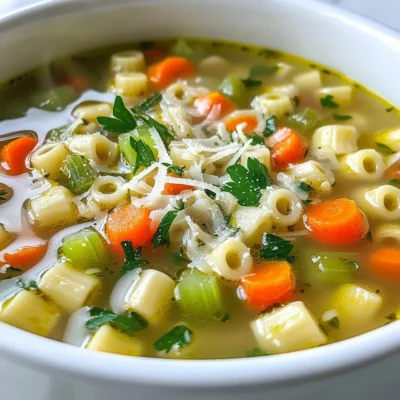
Italian Pastina Soup Nourishing and Simple Recipe
Looking for a warm, comforting dish that’s easy to make? Italian Pastina Soup is the answer! This simple recipe combines
Read more…browse recipes


Rustic Lentil Vegetable Stew Slow Cooker Delight
Welcome to your new favorite slow cooker recipe! My Rustic Lentil Vegetable Stew is hearty, healthy, and full of flavor. With just a few…
My Latest Desserts
My Latest Recipes

hey,
i’m !
I’m so happy you’re here!
I’m not just sharing recipes I’m sharing a piece of my heart. I hope these dishes bring you comfort, joy, and maybe even a new favorite.
![- Fresh clams vs. canned clams: Fresh clams bring a bright and briny taste. They add a lovely texture and flavor to the chowder. If fresh clams are hard to find, canned clams are a good option. They are easy to use and still offer great taste. Just make sure to use the juice from the can for added flavor. - Importance of heavy cream and clam juice: Heavy cream makes the chowder rich and smooth. It gives the soup a luxurious feel. Clam juice is key for that ocean flavor. It enhances the taste and ties all the ingredients together. - Optional ingredients for enhanced flavors: You can add bacon for a smoky kick. Fresh herbs like thyme or dill can add depth. A splash of sherry can brighten the dish, too. Experiment with these extras to find your perfect bowl. - Necessary kitchen tools for preparation: You need a large pot to cook the chowder. A sharp knife will help with chopping onions and veggies. A ladle makes serving easy. Don’t forget a cutting board for safe prep work. - Tips for selecting the freshest ingredients: Always look for clams that are closed. This means they are fresh. Choose firm potatoes and bright celery. For onions, pick ones that feel heavy for their size. Fresh herbs should smell strong and fragrant. These small choices make a big difference in your chowder. For the full recipe, check out the Creamy Coastal Clam Chowder. To start, gather your clams and vegetables. If using fresh clams, rinse them under cold water. This removes sand and grit. For canned clams, just open the can and set them aside. Next, chop your onion and celery finely. Dice the potatoes into even cubes. This ensures they cook evenly. If you choose to use bacon, chop it into small pieces. In a large pot, add the chopped bacon. Cook it over medium heat until it turns crispy. This adds a deep flavor. If you prefer a bacon-free version, skip this step and melt butter in the pot. Now it's time to simmer. Add the chopped onion and celery to the pot. Sauté them for about five minutes until they soften. Stir them occasionally to prevent sticking. Next, add your cubed potatoes, clam juice, and a bay leaf. Bring this mixture to a boil. Once boiling, lower the heat and let it simmer for 15 minutes. Check the potatoes to see if they are tender. If you're using fresh clams, add them in the last five minutes of cooking. For canned clams, stir them in during the last two minutes. Remember to remove the bay leaf before adding the cream. This step is crucial for the best taste. To finish, pour in the heavy cream and Worcestershire sauce. Let it heat through for about three to five minutes. Taste your chowder and add salt and pepper as needed. When serving, ladle the chowder into bowls. Garnish each bowl with chopped parsley for a fresh touch. Enjoy your thick and creamy clam chowder! For the full recipe, check the reference. To balance flavors in clam chowder, use fresh clams. Their natural brininess brings depth. Add bacon for a smoky touch, if you like. Bacon also gives a nice umami flavor. Use Worcestershire sauce for a hint of tang. To enhance creaminess, use heavy cream as your base. It makes the soup rich and velvety. Stir in the cream slowly to keep the texture smooth. Don’t rush this step; let it warm gently. One big mistake is overcooking clams. They can become tough and chewy. Add them near the end of cooking. This keeps them tender and flavorful. Another common error is under-seasoning. Always taste your chowder before serving. Add salt and pepper to your liking. A pinch of herbs can also brighten the dish. For a creative touch, use chopped fresh parsley as a garnish. It adds color and freshness. You can also sprinkle crispy bacon bits on top for extra crunch. When serving, use a nice bowl to show off your chowder. A sprinkle of paprika can add color and a hint of spice. Consider adding a slice of warm bread on the side for a complete meal. For the full recipe, click here: [Full Recipe]. {{image_2}} New England and Manhattan clam chowders differ a lot. New England chowder is creamy and rich. It uses milk or cream and has a smooth texture. You can find potatoes and bacon in this version. Manhattan chowder, on the other hand, is a tomato-based soup. It has a brighter taste and includes vegetables like carrots and green peppers. Both are delicious but offer different flavors. If you want to give your chowder a twist, try adding spices. A pinch of cayenne pepper gives it heat. Old Bay seasoning adds a nice seafood flavor. For a fresh touch, consider herbs like thyme or dill. These spices can make your chowder unique while keeping it comforting. You can easily make clam chowder gluten-free. Just swap flour for cornstarch or a gluten-free blend. This keeps the chowder thick without using gluten. Always check labels on broth or clam juice, as some brands add gluten. For a vegan chowder, omit clams and use vegetable broth. You can add mushrooms for a meaty texture. Use coconut milk instead of heavy cream for creaminess. This way, you still enjoy a rich flavor without animal products. Both options let everyone savor clam chowder’s warmth and comfort. For the full recipe, check out the [Full Recipe]. To keep your clam chowder fresh, store it in an airtight container. Make sure it cools down first. Place it in the fridge within two hours after cooking. This helps prevent bacteria growth. Clam chowder lasts about three to four days in the fridge. If you want to enjoy it later, you might want to freeze some. Freezing clam chowder can keep it tasty for months. First, let it cool completely. Then, pour it into freezer-safe containers. Leave some space at the top for expansion. Avoid adding cream before freezing. Cream can change texture when thawed. When ready to eat, thaw it in the fridge overnight. Reheat gently on the stove, stirring often. If the chowder seems thick, add a bit of water or broth to thin it out. Enjoy this creamy comfort food anytime! For a detailed recipe, check the Full Recipe. The best clams for chowder are usually soft-shell clams, also called steamers. They have a soft, sweet taste that works well in soups. Littleneck clams are another great choice. They are small and tender, giving your chowder a nice texture. You can also use canned clams if fresh ones are hard to find. Just make sure to use the juice from the can for extra flavor. Yes, you can make clam chowder ahead of time. It tastes even better after sitting for a bit. Just let it cool, then store it in the fridge. When you reheat it, do it slowly on low heat. This will help keep the cream from separating. Keep in mind, if you add potatoes, they might soak up some of the soup. You may need to add a bit more clam juice or cream when reheating. To thicken clam chowder, you can use a few methods. One way is to mash some of the potatoes in the pot. This adds body and creaminess to the chowder. Another method is to add a bit of flour or cornstarch mixed with water. Stir this mixture in and let it cook a few minutes. This will help thicken your chowder without changing the flavor. - Additional tips for perfecting consistency: - Use heavy cream for a rich texture. - Don’t rush the simmering process; let the flavors meld. - Avoid overcooking the clams; add them near the end. In this post, we explored how to create classic clam chowder. We talked about the main ingredients, cooking essentials, and step-by-step instructions. I shared tips for great flavor and common mistakes to avoid. You also learned about regional variations and how to store leftovers properly. My final thoughts? With fresh ingredients and the right techniques, you can make delicious clam chowder at home. It's a comforting dish that warms hearts and homes. So roll up your sleeves and dive in!](https://emmasdish.com/wp-content/uploads/2025/06/7eaefe05-0965-49ec-8939-bda799775bcf-300x300.webp)

![- 200g pasta (penne or fusilli) - 200g feta cheese block - 2 cups cherry tomatoes - 3 cloves garlic, minced - 1/4 cup extra-virgin olive oil - 1 teaspoon dried oregano - 1 teaspoon red chili flakes - Salt and pepper to taste - Fresh basil leaves, for garnish - Zest of 1 lemon To make this baked feta pasta, gather your ingredients. You need 200 grams of pasta. Penne or fusilli works best. You will also need a block of feta cheese. This cheese adds creaminess and flavor. Next, grab two cups of cherry tomatoes. They burst and add sweetness when baked. For extra flavor, use three cloves of minced garlic. Garlic brings a nice aroma. You will also need a quarter cup of extra-virgin olive oil. This oil helps blend the flavors. Add one teaspoon of dried oregano for a herby taste. If you want a kick, include one teaspoon of red chili flakes. Adjust salt and pepper to your liking. Fresh basil leaves make a lovely garnish. Finally, lemon zest adds brightness. You can find the Full Recipe at the end of this section. Enjoy creating a delicious meal! - Preheat your oven to 400°F (200°C). - Mince garlic and prepare your baking dish. Start by gathering all your ingredients. This makes cooking easier. Chop the garlic into tiny pieces. This lets the flavor mix well with the tomatoes. Set your baking dish nearby to save time. - Combine cherry tomatoes, garlic, olive oil, oregano, chili flakes, salt, and pepper in the dish. - Place the feta cheese block in the center and drizzle with olive oil. In the baking dish, add your cherry tomatoes and minced garlic. Pour in the olive oil, then sprinkle the oregano, chili flakes, salt, and pepper. Mix it gently. Next, put the block of feta cheese right in the middle. Drizzle a bit more olive oil on top. This will make it rich and creamy. - Boil pasta according to package instructions until al dente. - Drain and set aside. Now, fill a pot with water and bring it to a boil. Add your pasta and cook it until it’s al dente, which means it should be firm but not hard. Once done, drain the pasta in a colander and keep it aside. - Mash feta and tomatoes after baking. - Toss with cooked pasta and lemon zest. After baking for 25-30 minutes, take the dish out of the oven. The tomatoes should be burst and slightly charred, and the feta should be soft and golden. Use a fork to mash the feta and mix it with the tomatoes. This creates a creamy sauce. Next, add the cooked pasta to the dish and toss everything together. Finally, add lemon zest for a fresh flavor. With these steps, you create a warm and tasty meal that is sure to impress. For the full recipe, check the detailed version to ensure perfect results. To make your baked feta pasta shine, start with high-quality feta cheese. This will give your dish a creamy texture and rich taste. Next, don't be shy with fresh herbs and spices. Try adding basil, thyme, or even a hint of rosemary. These can elevate the flavor and add a fresh twist to your meal. Baking time is key. If you want a creamy feta, bake it for 25 minutes. For a firmer texture, give it an extra five minutes. The tomatoes should burst and create a sauce. When cooking your pasta, ensure it's perfectly al dente. This will help it soak up the delicious sauce later on. To make your dish look great, use fresh basil leaves as a garnish. They add color and a lovely aroma. For an extra zing, sprinkle some lemon zest or parmesan on top before serving. This touch will impress your guests and enhance the flavors. {{image_2}} You can change up the vegetables in baked feta pasta for more flavor. - Add spinach or arugula for greenery. They bring a fresh taste. - Incorporate roasted bell peppers for added flavor. They add sweetness and color. Adding protein makes this dish more filling and hearty. - Include grilled chicken or shrimp for a hearty meal. They pair well with feta. - Try adding chickpeas for a vegetarian protein source. They add fiber and taste. Switching cheese can create a new taste. - Substitute with goat cheese for a tangy twist. It melts beautifully and adds depth. - Use vegan feta for a dairy-free option. It keeps the dish creamy without dairy. Feel free to explore these variations to make the dish your own! For the full recipe, check out the [Full Recipe]. Store your leftovers in an airtight container. They stay fresh for up to 3 days. This helps keep flavors intact. Make sure to let it cool before sealing. You can freeze baked feta pasta for later use. First, let it cool completely. Then, put it in a freezer-safe container. Label it with the date for easy tracking. To reheat, thaw it overnight in the fridge. Then, bake it in the oven at 350°F (175°C) until heated through. This method keeps the pasta tasty and creamy. To keep your pasta fresh, use good storage methods. Always store it in a clean, dry container. Avoid adding fresh basil before storing. It wilts quickly and can affect the dish's look. You can add fresh basil just before serving for the best flavor. Yes, you can use many types of pasta! Spaghetti, rotini, or penne work well. Each type brings its own charm to the dish. I like to use penne or fusilli for their ability to hold onto the creamy sauce. Feel free to experiment with your favorites! Baked feta pasta stays fresh for about three days in the fridge. Store it in an airtight container to keep it tasty. When you're ready to eat, just reheat it in the oven or microwave until it's warm. This dish pairs well with many sides. A fresh salad adds crunch and balance. Garlic bread brings warmth and flavor, making it a perfect match. You could also serve it with roasted veggies for a colorful plate. Yes, you can prep baked feta pasta in advance! Assemble the dish but skip the baking. Cover it well and store it in the fridge. When ready to eat, just bake it as instructed. This saves time on busy days! Baked feta pasta is easy and delicious. You only need pasta, feta, and cherry tomatoes. With garlic, olive oil, and spices, you create a tasty dish. Remember to use quality ingredients for the best flavor. Feel free to add veggies or protein for variety. Store leftovers properly to enjoy later. This dish is sure to impress anyone. Now it’s your turn to try this simple recipe and wow your friends and family! Enjoy your cooking adventure!](https://emmasdish.com/wp-content/uploads/2025/05/36221340-78a7-4853-8ecc-889c48d478df-300x300.webp)

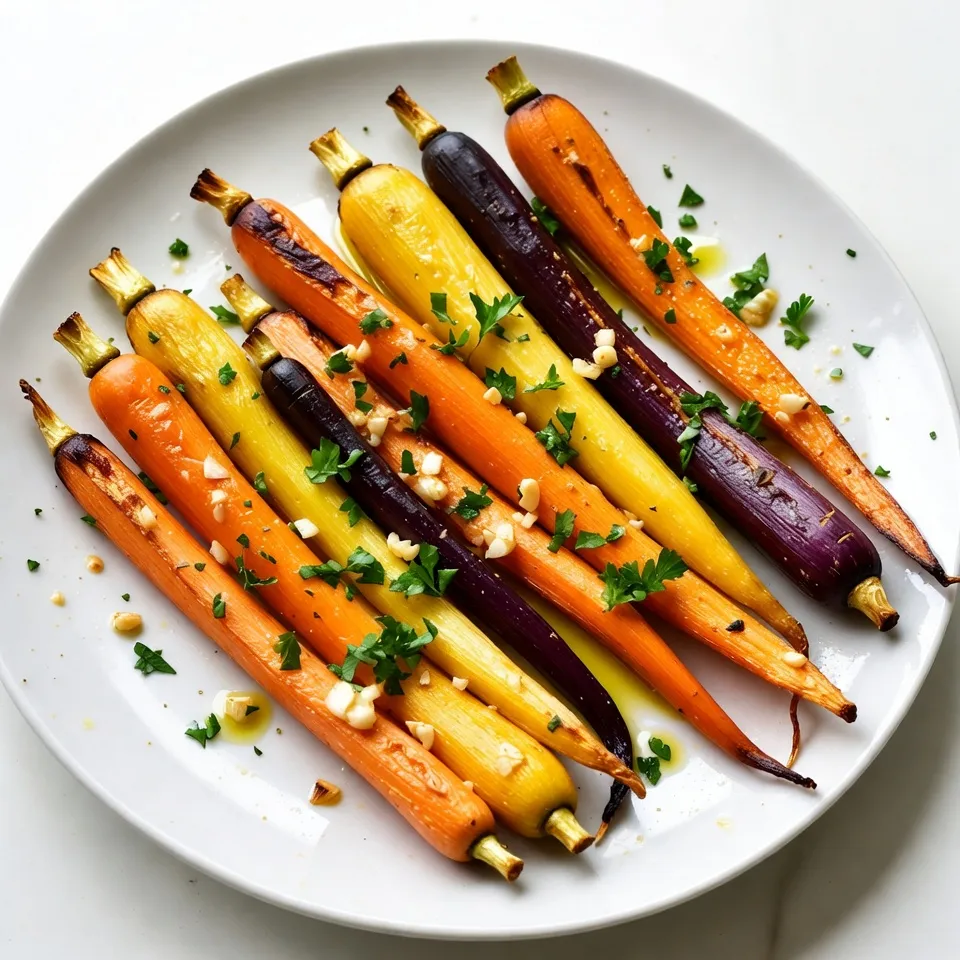
Garlic Herb Roasted Rainbow Carrots Delightful Dish
Are you ready to transform simple carrots into a colorful, tasty dish? In my latest recipe, I’ll show you how to make Garlic Herb…