Latest & Greatest
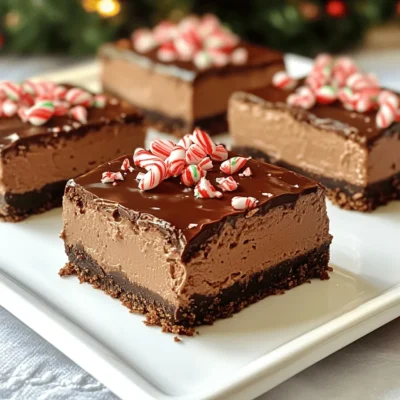
No Bake Chocolate Peppermint Cheesecake Bars Delight
Are you ready to whip up a tasty treat that requires no oven? These No Bake Chocolate Peppermint Cheesecake Bars
Read more…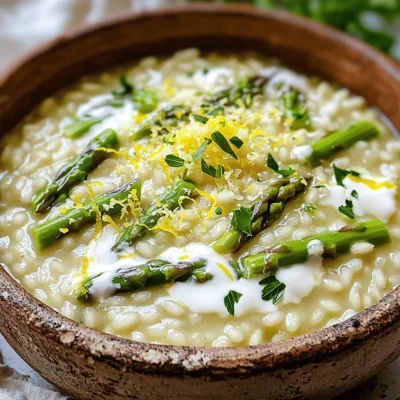
Creamy Lemon Asparagus Risotto Simple and Savory Dish
Are you craving a dish that’s both creamy and tangy? This Creamy Lemon Asparagus Risotto is your answer! With simple
Read more…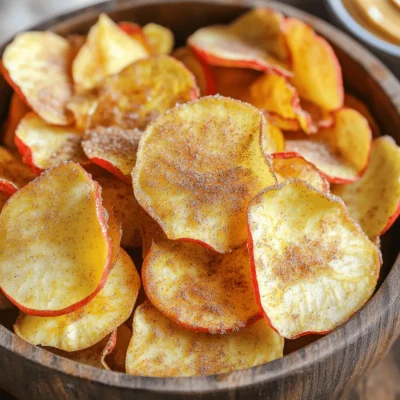
Air Fryer Cinnamon Apple Chips Easy to Make Snack
Craving a tasty snack that’s both easy to make and healthy? Air fryer cinnamon apple chips are the answer! You’ll
Read more…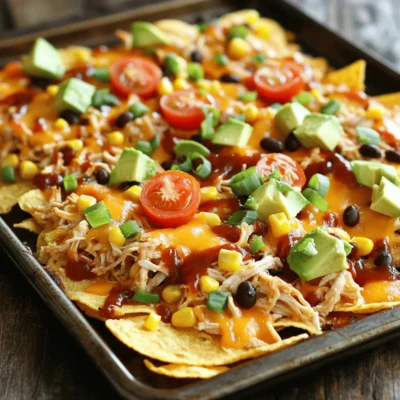
Sheet Pan BBQ Chicken Nachos Flavorful Game Day Dish
Game day just got a lot more exciting with my Sheet Pan BBQ Chicken Nachos! This dish brings bold flavors
Read more…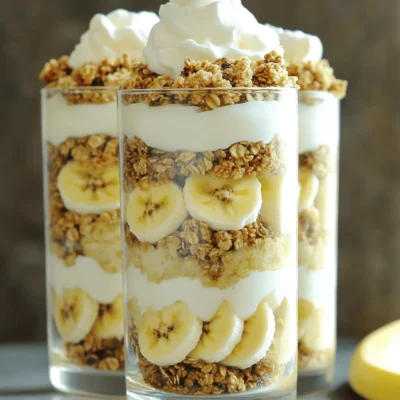
Protein Banana Cream Pie Parfaits Deliciously Easy Treat
Craving a sweet treat that fuels your day? Let me introduce you to Protein Banana Cream Pie Parfaits! This easy
Read more…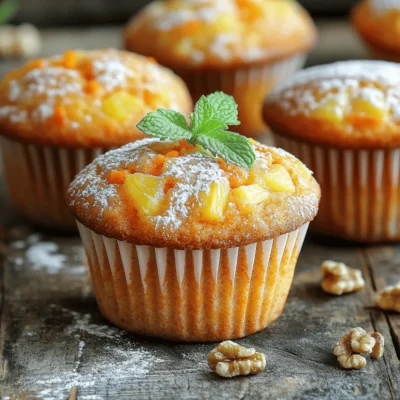
Carrot Cake Muffins Delightful and Easy Recipe
If you love the warm, sweet flavors of carrot cake, you’re in for a treat! These Carrot Cake Muffins are
Read more…
Slow Cooker Loaded Baked Potato Soup Delightful and Creamy
Are you ready to enjoy a warm bowl of Slow Cooker Loaded Baked Potato Soup? This creamy delight is perfect
Read more…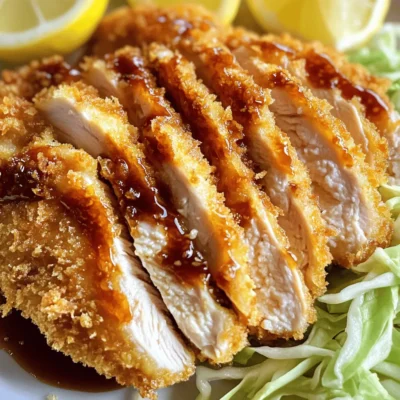
Air Fryer Chicken Katsu Crispy and Flavorful Recipe
Are you ready to make a crispy and flavorful Air Fryer Chicken Katsu? This dish combines juicy chicken with a
Read more…browse recipes


![- Ripe Bananas You need three ripe bananas. They should be soft and brown. The riper, the better! This adds natural sweetness. - Unsweetened Applesauce Use half a cup of unsweetened applesauce. This keeps the bread moist. It also adds a nice flavor. - Sugars: Brown and Granulated Combine half a cup of brown sugar and a quarter cup of granulated sugar. Brown sugar gives a deeper taste. Granulated sugar adds sweetness. - Eggs and Vanilla Extract You will need two large eggs and one teaspoon of vanilla extract. The eggs help bind the mix. Vanilla gives a warm, comforting flavor. - Baking Components: Baking Soda, Baking Powder, Salt Use one teaspoon of baking soda, half a teaspoon of baking powder, and a quarter teaspoon of salt. These help the bread rise and flavor the recipe. - All-Purpose Flour and Semi-Sweet Chocolate Chips You need one and a half cups of all-purpose flour. Add one cup of semi-sweet chocolate chips. The flour gives structure, and the chocolate adds richness. - Optional Ingredients: Cinnamon, Toppings If you like, add half a teaspoon of cinnamon for warmth. You can also top the bread with nuts or extra chocolate chips before baking. This adds texture and looks great! For the complete recipe, check the [Full Recipe]. First, you need to preheat your oven. Set it to 350°F (175°C). This ensures even baking. Next, grab a 9x5-inch loaf pan. Grease it well so the bread does not stick. You can use butter or cooking spray for this. In a large bowl, mash 3 ripe bananas until smooth. Add 1/2 cup of unsweetened applesauce. Then, mix in 1/2 cup of brown sugar and 1/4 cup of granulated sugar. Stir until the mixture is well blended. Now, crack in 2 large eggs and pour in 1 teaspoon of vanilla extract. Mix again until everything is combined. In a separate bowl, whisk together your dry ingredients. You need 1 teaspoon of baking soda, 1/2 teaspoon of baking powder, and 1/4 teaspoon of salt. If you like, add 1/2 teaspoon of cinnamon for warmth. Gradually fold this mix into your wet ingredients. Be careful not to overmix; just combine until you can’t see the flour. Now, gently fold in 1 cup of semi-sweet chocolate chips. Save a handful to sprinkle on top later. Pour the batter into your greased loaf pan. Smooth the top with a spatula and sprinkle the reserved chocolate chips. Bake it in the preheated oven for 60-65 minutes. Check doneness with a toothpick; it should come out clean. Once done, let it cool in the pan for 10 minutes. Then, move it to a wire rack to cool completely before slicing. For the full recipe, check the section above! Alternatives to Eggs and Sugars If you want to skip the eggs, use flaxseed meal. Mix 1 tablespoon of flaxseed meal with 2.5 tablespoons of water. Let it sit for a few minutes to thicken. For sugar, try maple syrup or coconut sugar. This keeps the flavors rich while making it healthier. Gluten-Free Flours and Chocolate Options For a gluten-free version, use almond flour or a gluten-free baking mix. These flours work well and keep the bread moist. As for chocolate, dark chocolate chips are a great swap. They add a deeper flavor. Look for dairy-free options if you want to keep it vegan. Avoiding Overmixing Mix your batter gently. Overmixing can make your banana bread tough. Blend just until the dry and wet ingredients combine. This keeps your bread light and fluffy. Checking Doneness and Cooling Tips To check if your bread is ready, stick a toothpick in the center. If it comes out clean, it’s perfect. Let the bread cool in the pan for 10 minutes before moving it to a wire rack. This helps keep the crust nice. Serving Suggestions Slice your banana bread and serve it warm. It pairs well with cream cheese or butter. You can also enjoy it with a cup of coffee or tea. Adding Toppings for Extra Flavor For a special touch, add chopped nuts or a sprinkle of cinnamon on top. You can even drizzle melted chocolate for a sweet finish. This makes your banana bread look and taste amazing. Check out the Full Recipe for more ideas! {{image_2}} You can make this tasty banana bread gluten-free. Use a gluten-free flour blend. Look for blends that have a mix of rice flour, tapioca starch, and potato starch. These blends work best for baking. Baking time may change slightly. Start checking for doneness a few minutes early. Use a toothpick to test the center. If it comes out clean, your bread is ready. To make this recipe vegan, swap the eggs. Use flax eggs or chia eggs. Mix one tablespoon of flaxseed meal or chia seeds with three tablespoons of water. Let it sit for a few minutes until it thickens. You can also use unsweetened plant milk in place of dairy. Add some extra flavor with vanilla or almond extract. This gives a nice twist while keeping it plant-based. Want to customize your banana bread? You have many options! Add nuts like walnuts or pecans for a crunchy bite. Dried fruits like raisins or cranberries can add sweetness. You can also sprinkle in spices like nutmeg or allspice. Adjust the flavors to suit your taste. This makes your banana bread unique and personal. Try the Full Recipe for more details! To keep chocolate chip banana bread fresh, store it in an airtight container. This helps maintain moisture and flavor. Keep it at room temperature, away from direct sunlight. For best taste, enjoy it within three days. To freeze your banana bread, first let it cool completely. Then, wrap it tightly in plastic wrap. For extra protection, place it in a freezer bag. This helps prevent freezer burn. Your bread will stay fresh for about three months. When you're ready to eat, thaw the bread in the fridge overnight. For quick defrosting, you can use the microwave. Just set it on low power for a few minutes. Chocolate chip banana bread lasts about a week at room temperature. If stored in the fridge, it can last up to two weeks. Check for signs of spoilage. Look for mold or a sour smell. If the bread feels dry and crumbly, it might be past its prime. Always trust your senses! Yes, you can use frozen bananas. They work great in banana bread. Just thaw them first. Their soft texture makes them easy to mash. This helps blend into the batter. Plus, frozen bananas are often sweeter. They add more flavor to your bread. Just remember to drain any extra liquid after thawing. This keeps your bread from being too wet. If you don’t have applesauce, try these options: - Mashed ripe bananas - Yogurt (plain or Greek) - Pureed pumpkin or sweet potato These choices also add moisture. They keep your banana bread soft and tasty. Each option has a unique flavor. You can experiment with what you have on hand. To check if your banana bread is ready, follow these tips: - Insert a toothpick in the center. - If it comes out clean, the bread is done. - If it has wet batter, bake a bit longer. Also, look for a golden-brown top. The edges may pull away from the pan slightly. These signs mean your banana bread is perfect. Enjoy the delicious aroma while it bakes! In this post, we covered how to make delicious chocolate chip banana bread. You learned about the key ingredients, like ripe bananas and unsweetened applesauce. We also walked through simple steps to mix, bake, and customize your bread. Don't forget the great tips for storage and variations. Whether you want gluten-free or vegan options, you can tweak the recipe to fit your needs. Enjoy your baking journey, and share this delightful treat with others!](https://emmasdish.com/wp-content/uploads/2025/05/475bee4b-eacd-4984-83f8-73c9916382a2.webp)
Chocolate Chip Banana Bread Tasty and Simple Recipe
If you love the sweet taste of chocolate and the soft texture of banana bread, you’re in for a treat! In this simple recipe,…
My Latest Desserts
My Latest Recipes

hey,
i’m !
I’m so happy you’re here!
I’m not just sharing recipes I’m sharing a piece of my heart. I hope these dishes bring you comfort, joy, and maybe even a new favorite.


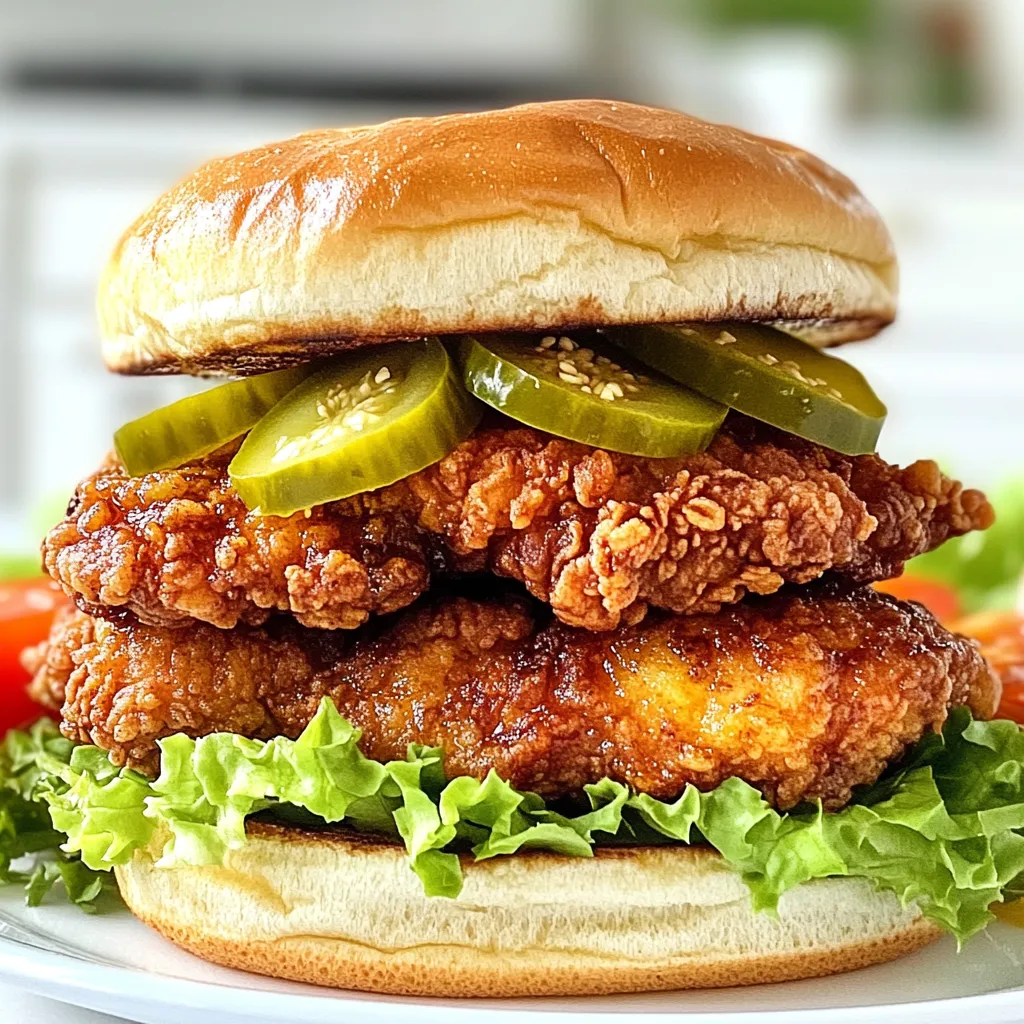
Jalapeño Honey Fried Chicken Sandwich Delight
Get ready to spice up your meal with the Jalapeño Honey Fried Chicken Sandwich! This sandwich brings crispy, juicy chicken together with a sweet…