

Latest & Greatest

Chocolate Peanut Butter Oat Squares No Bake Delight
If you love a quick and tasty treat, you’re in for a delight! My Chocolate Peanut Butter Oat Squares are
Read more…
Maple Pecan Sticky Buns Bakery Style Delight Recipe
Craving a sweet treat that rivals your favorite bakery? Try my Maple Pecan Sticky Buns! They’re warm, gooey, and packed
Read more…
Cheesy Broccoli Chicken Rice Casserole One Pot Recipe
Ready to impress your family with a simple, tasty meal? This Cheesy Broccoli Chicken Rice Casserole is the one-pot wonder
Read more…
Angel Food Churro Bites Irresistible Sweet Treats
Get ready for a sweet treat that you won’t be able to resist! Angel Food Churro Bites are light, fluffy,
Read more…
Instant Pot Beef Stew Hearty and Simple Recipe
Are you ready for a warm and hearty meal? My Instant Pot Beef Stew recipe is simple, quick, and oh-so-delicious.
Read more…
Bang Bang Ground Turkey Bowls Flavorful Meal Idea
Craving a tasty, quick meal? You’ll love these Bang Bang Ground Turkey Bowls! They mix ground turkey, fresh veggies, and
Read more…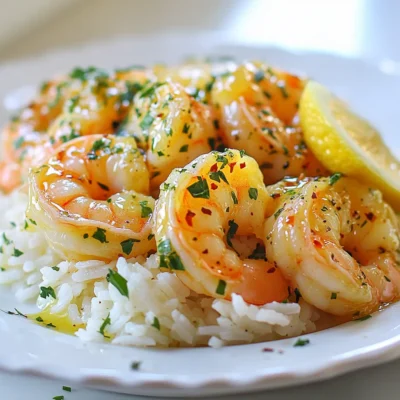
Garlic Butter Shrimp & Rice Flavorful and Easy Meal
If you’re looking for a quick yet delicious meal, Garlic Butter Shrimp & Rice is perfect for you. In this
Read more…
No-Bake Chocolate Hazelnut Mousse Cups Delight
If you love a rich, creamy dessert, you’re in for a treat! My No-Bake Chocolate Hazelnut Mousse Cups are perfect
Read more…browse recipes


Air Fryer Apple Hand Pies Simple and Tasty Recipe
If you love sweet treats but want to keep it simple, Air Fryer Apple Hand Pies are for you! You can whip together these…
My Latest Desserts
My Latest Recipes

hey,
i’m !
I’m so happy you’re here!
I’m not just sharing recipes I’m sharing a piece of my heart. I hope these dishes bring you comfort, joy, and maybe even a new favorite.

![To make pulled chicken tacos, you need some key ingredients. Here’s what you will need: - 1 lb boneless, skinless chicken thighs - 1 tablespoon olive oil - 1 tablespoon taco seasoning - 1 cup chicken broth - 1 tablespoon lime juice - 8 small corn tortillas - 1 cup shredded cabbage (green or purple or both) - 1 carrot, grated - 1/4 cup fresh cilantro, chopped These ingredients come together to create a tasty meal. The chicken thighs are perfect for shredding. They stay juicy and absorb all the flavors. The tacos are also light with the crunchy slaw. You can add some fun flavors to make your tacos unique. Here are some optional ingredients: - 1 jalapeño, thinly sliced - Salt and pepper to taste - 1/4 cup Greek yogurt or sour cream (for topping) - Lime wedges (for serving) These optional ingredients allow you to adjust the heat and creaminess. You can add jalapeños for spice. The yogurt or sour cream gives a cool touch to the tacos. Seasonings can change your taco game. The best choice is taco seasoning. You can also use: - Cumin - Paprika - Garlic powder - Onion powder When it comes to toppings, fresh herbs make a big difference. Cilantro adds a bright flavor. You can also use avocado slices or fresh salsa for more taste. For the complete recipe, check out the Full Recipe. Enjoy your cooking and have fun with these flavors! To start, gather your chicken thighs and season them. Use taco seasoning, salt, and pepper. Heat one tablespoon of olive oil in a large skillet over medium-high heat. Once hot, add the chicken thighs. Sear them for about 3 to 4 minutes on each side. You want them golden brown. This step gives flavor and texture. Next, it’s time to cook the chicken. Pour in one cup of chicken broth. Bring it to a boil, then lower the heat to a simmer. Cover the skillet and let it cook for 20 to 25 minutes. The chicken should be tender and easy to shred. After cooking, remove the chicken from the skillet. Use two forks to shred the chicken into pieces. Return the shredded chicken to the skillet. Add one tablespoon of lime juice and mix well. Let it simmer for another 5 minutes, allowing the flavors to blend. While the chicken cooks, prepare the slaw. In a bowl, combine one cup of shredded cabbage and one grated carrot. If you like heat, add a thinly sliced jalapeño. Throw in a quarter cup of chopped cilantro for freshness. Drizzle with lime juice and season with salt and pepper. Toss everything together. This slaw adds crunch and brightness to your tacos. You can find the complete recipe [Full Recipe] for more details on the cooking process. To shred chicken perfectly, start by cooking it until tender. I use chicken thighs for their rich flavor. After cooking, remove the chicken from the pan. Let it cool for a few minutes. Then, take two forks and pull the chicken apart. This method keeps the chicken juicy and flavorful. Warming tortillas adds great taste. I prefer using a skillet for this. Heat the skillet on medium heat. Place the tortillas in the skillet for about 30 seconds. Flip them and warm for another 30 seconds. You can also warm them over an open flame for a smoky flavor. Just be careful not to burn them! For a great look and taste, serve your tacos on a colorful platter. Add lime wedges for a fresh pop. A small bowl of extra slaw lets guests customize their tacos. Top each taco with a dollop of Greek yogurt or sour cream. This adds creaminess and helps balance the spices. Enjoy every bite! For the full recipe, check out the Zesty Pulled Chicken Tacos with Crunchy Slaw. {{image_2}} You can swap chicken for other proteins. Try pork, beef, or turkey. For a plant-based option, use jackfruit or tofu. These choices keep the dish fun and tasty. Each protein absorbs flavors well, making it versatile. While cabbage is great, you can mix it up. Use kale, broccoli slaw, or even carrots only. Add fruits like apples or pineapple for a sweet twist. You can also toss in nuts for crunch. Each slaw variation brings its own flair to the tacos. To make these tacos gluten-free, select corn tortillas. Many brands are safe for those with gluten issues. For a vegan option, use tofu or tempeh instead of chicken. Replace Greek yogurt with avocado or a cashew cream. These swaps ensure everyone can enjoy this dish. To store leftover pulled chicken tacos, wrap them in plastic wrap or foil. You can also use an airtight container. Make sure to keep the tacos and slaw separate. This helps maintain their crunch and flavor. Refrigerate the leftovers for up to three days. To reheat the pulled chicken, place it in a skillet over medium heat. Add a splash of chicken broth to keep it moist. Stir until heated through, about five minutes. For the tortillas, warm them on a skillet for a few seconds on each side. This keeps them soft and pliable. The pulled chicken can last up to three days in the fridge. The slaw should be eaten within two days for the best texture. If you freeze the chicken, it can last for up to three months. Just thaw it in the fridge before reheating. For the best flavor, always check your ingredients before use. You can find the full recipe to enjoy this meal again. Yes, you can use chicken breasts. They may cook faster than thighs. Breasts are leaner, so they may dry out. Keep an eye on them while cooking. Adjust the cooking time to about 15-20 minutes. You can still enjoy great flavor with chicken breasts. To add heat, use more jalapeños. You can also add hot sauce to the chicken. Another option is to sprinkle chili powder into the slaw. Try using spicy taco seasoning for extra kick. Mix in diced fresh peppers for more flavor. Adjust the spice to your taste for a perfect meal. Great sides include Mexican rice or black beans. You can also serve with corn on the cob. A fresh avocado salad pairs well too. Consider tortilla chips with salsa or guacamole for crunch. These sides balance the meal and add fun flavors. Try them with your tacos for a full spread. For the full recipe, check the details above and get started on your delicious tacos! You now have all you need to make delicious pulled chicken tacos. Remember the main ingredients and spices for great flavor. Follow the step-by-step guide for cooking and making slaw. Use tips for perfect chicken and warming tortillas. Explore variations to suit your taste and dietary needs. Store leftovers properly to enjoy later. Pulled chicken tacos are fun, easy, and can fit any meal. Your friends and family will love them. Get creative and make this dish your own!](https://emmasdish.com/wp-content/uploads/2025/05/f8160176-a955-4d39-a153-cbc3848921f9-300x300.webp)


Chili Pineapple Grilled Chicken Flavorful Dinner Recipe
Are you ready for a dinner that bursts with flavor? My Chili Pineapple Grilled Chicken combines sweet pineapple and spicy chili for a tasty…
![- 4 boneless, skinless chicken breasts - 1 cup fresh pineapple, diced - 1/4 cup soy sauce - 3 tablespoons honey - 2 tablespoons chili paste - 2 cloves garlic, minced - 1 teaspoon fresh ginger, grated - 1 tablespoon sesame oil - 1/2 teaspoon black pepper - 1 tablespoon lime juice - Chopped green onions - Sesame seeds For my Chili Pineapple Grilled Chicken, I focus on simple yet fresh ingredients. The chicken breasts provide a great base. Pineapple adds a sweet and tangy kick. The soy sauce and honey create a rich marinade. Chili paste gives it a spicy edge. Fresh garlic and ginger enhance the flavor profile. I love to use fresh ingredients. They make a big difference in taste. You can adjust the chili paste to match your spice level. If you want more heat, add more. For a milder version, reduce it. The optional garnishes, like green onions and sesame seeds, offer a nice touch. They add color and crunch to your dish. This recipe is all about balance. Sweet, spicy, and savory come together to create a delicious meal. You can find the full recipe to guide you step-by-step in making this dish at home. Start by making the marinade. In a bowl, whisk together these ingredients: - 1/4 cup soy sauce - 3 tablespoons honey - 2 tablespoons chili paste - 2 cloves garlic, minced - 1 teaspoon fresh ginger, grated - 1 tablespoon sesame oil - 1/2 teaspoon black pepper - 1 tablespoon lime juice This mix brings a sweet and spicy flavor. Once mixed, coat the chicken breasts well. Make sure every piece is covered. Cover the bowl and refrigerate the chicken. Let it marinate for at least 30 minutes. For a stronger taste, marinate up to 2 hours. Next, heat your grill. If you use a gas grill, set it to medium-high heat. For a charcoal grill, light the coals and let them get hot. Spread the coals evenly across the grill. This ensures even cooking. Remove the chicken from the marinade, letting the extra drip off. Place the chicken on the grill. Cook for about 6-7 minutes on each side. Use a meat thermometer to check the internal temperature. It should read 165°F (75°C). This means the chicken is ready to eat. You want nice grill marks on the outside too. While the chicken cooks, prepare the pineapple. Cut the pineapple into small chunks. In the last few minutes of cooking the chicken, place the pineapple on the grill. Grill for about 2-3 minutes. You want it to be caramelized and soft. This adds a sweet touch to your dish. Once the chicken is cooked, take it off the grill. Let it rest for a couple of minutes. This helps the juices stay inside. Slice the chicken and serve it topped with the grilled pineapple. For a fun presentation, add chopped green onions and sesame seeds on top. They add a nice color and flavor. For the full recipe, check the section above. - The best marination time is at least 30 minutes. - For more flavor, marinate up to 2 hours. - Adjust spice levels by adding more or less chili paste. - Taste the marinade before adding chicken to find your spice sweet spot. - To prevent chicken from sticking, oil the grill grates first. - Use tongs to flip the chicken, not a fork, to keep juices in. - For nice grill marks, place the chicken at a 45-degree angle on the grates. - Cook until the chicken reaches 165°F (75°C) for safety and juiciness. - Serve with coconut rice or a fresh green salad for balance. - Grilled vegetables like zucchini or corn add great texture. - Pair with a light beer or a fruity white wine. - For a non-alcoholic option, try iced tea with lemon. You can find the Full Recipe to make this delightful dish. {{image_2}} You can change the main protein in this dish. Try using tofu for a vegetarian option. Tofu absorbs flavors well and soaks up the marinade. Shrimp is another tasty choice if you like seafood. Just grill shrimp for a few minutes until they turn pink. Switching fruits can also add fun flavors. Grilled mango or peaches can work instead of pineapple. Each fruit brings its own sweetness and texture. You can even mix fruits to add more taste. You can explore different spice blends to give this dish a unique twist. Try adding cumin or smoked paprika for a smoky flavor. If you like a kick, add cayenne or chipotle powder. Each spice can change the taste and make it special. Different cultures have great ideas for this dish. Add teriyaki sauce for a Japanese twist. Or try a Caribbean jerk spice blend for a fun kick. These changes will give your meal a fresh feel. If you're watching your sodium intake, use low-sodium soy sauce. It helps keep the dish tasty without too much salt. For those who are gluten-free, make sure to use gluten-free soy sauce. It keeps the flavor intact while meeting dietary needs. You can still enjoy this dish without the gluten. For more details on the full recipe, check out the [Full Recipe]. To keep your Chili Pineapple Grilled Chicken fresh, follow these simple steps: - Refrigeration: Place leftover chicken in an airtight container. Store it in the fridge for up to four days. This helps keep it juicy and tasty. - Freezing: If you want to save it longer, freeze the chicken. Wrap it tightly in foil or plastic wrap, then place it in a freezer bag. It can last up to three months in the freezer. To enjoy your leftovers again, reheating is key: - Safe Methods: Use a microwave, oven, or stovetop to reheat. If using a microwave, cover the chicken to keep moisture in. - Texture and Flavor: For the best taste, reheat in the oven at 350°F (175°C) for about 15 minutes. This helps keep the chicken from drying out and helps it taste fresh again. Knowing when your dish is no longer good is important: - Duration: When stored properly, your Chili Pineapple Grilled Chicken lasts about four days in the fridge and three months in the freezer. - Spoilage Signs: Look for changes in color or smell. If it smells sour or looks off, it's best to throw it away. Always trust your senses to keep you safe. For the full recipe, check out the [Full Recipe]. Chili Pineapple Grilled Chicken combines sweet and spicy flavors. The chicken absorbs a marinade made of soy sauce, honey, chili paste, and fresh ginger. Grilling adds a smoky taste while the pineapple becomes sweet and caramelized. This dish is colorful and full of flavor, making it a favorite. Yes, you can make this recipe ahead. Marinate the chicken for at least 30 minutes. For more flavor, go up to 2 hours. This allows the chicken to soak up the marinade. You can also prep the pineapple in advance. Just grill it fresh when you cook the chicken. Great side dishes for this chicken include: - Steamed rice - Grilled vegetables - Simple green salad - Quinoa salad These sides complement the sweet and spicy taste of the chicken. They also add color to your plate. To adjust the spice level, you can: - Reduce the chili paste for less heat - Add more honey to balance the spice - Serve with a cooling side, like yogurt sauce These tips help you make the dish just right for your taste. Avoid these common mistakes: - Not marinating long enough - Overcooking the chicken - Skipping the pineapple grilling Each step is key to a delicious meal. Pay attention to these details to make the best dish possible. For the full recipe, check out the Chili Pineapple Grilled Chicken section! This blog post gave you a complete guide to making Chili Pineapple Grilled Chicken. You learned about the essential ingredients and how to grill to perfection. I shared tips for marinating, grilling, and storing leftovers. This dish offers great flavor, and you can tweak it to fit your tastes. Enjoy this simple and tasty recipe with your favorite sides. Get ready to impress friends and family with your grilling skills. Dive into this delicious meal and savor every bite!](https://emmasdish.com/wp-content/uploads/2025/04/26bef91c-0a7a-49cf-a30c-138c99890a34.webp)
