


Latest & Greatest
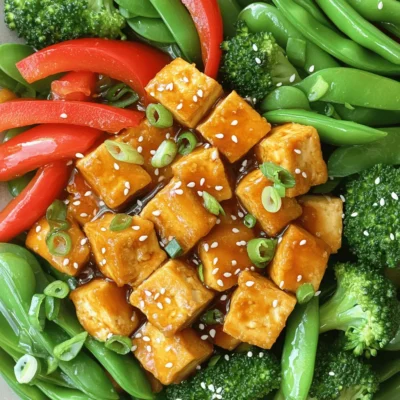
Teriyaki Tofu Stir Fry Easy and Flavorful Meal
Are you ready to whip up a delicious and easy meal? This Teriyaki Tofu Stir Fry brings bold flavors and
Read more…
Cinnamon Roll French Toast Bake Simple and Tasty Dish
Looking for a fun twist on breakfast? You’ll love this Cinnamon Roll French Toast Bake! It combines soft, gooey cinnamon
Read more…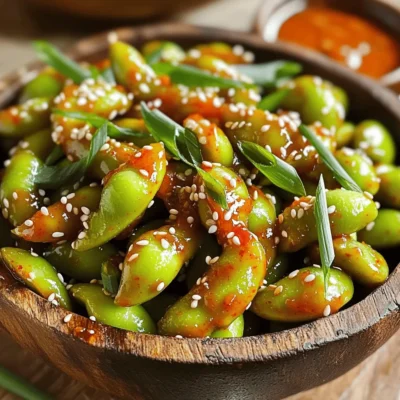
Sweet Chili Garlic Edamame Flavorful and Easy Snack
Looking for a quick snack that bursts with flavor? You’ve found it! Sweet Chili Garlic Edamame is simple to make
Read more…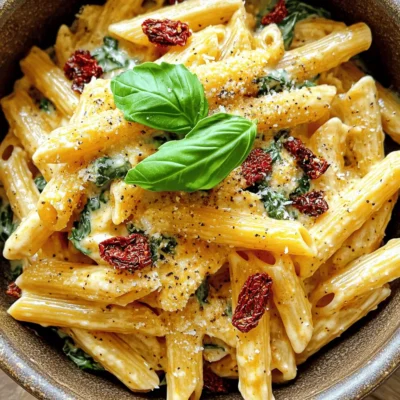
Creamy Sun-Dried Tomato Penne Irresistible Delight
Looking for a pasta dish that’s delicious and simple? Look no further than Creamy Sun-Dried Tomato Penne. This recipe blends
Read more…
Air Fryer Coconut Shrimp Crispy and Flavorful Delight
Get ready to dive into a crispy, flavorful delight with my Air Fryer Coconut Shrimp recipe! This dish combines juicy
Read more…
Quick Kimchi Fried Rice Savory Delight for Lunch
Are you craving a quick, tasty lunch that packs a flavorful punch? Look no further than this Quick Kimchi Fried
Read more…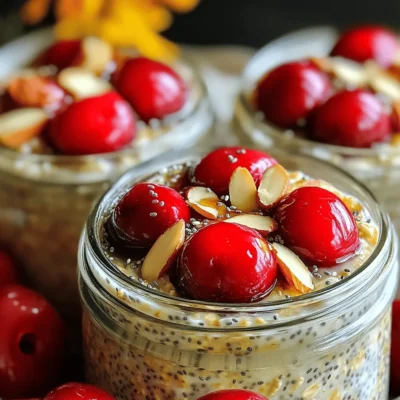
Cherry Almond Overnight Oats Easy and Healthy Recipe
Looking for a quick, tasty breakfast? Try my Cherry Almond Overnight Oats. Packed with healthy ingredients, this easy recipe gives
Read more…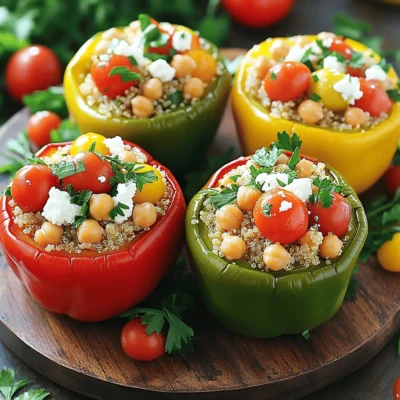
Mediterranean Quinoa Stuffed Peppers Tasty Delight
If you’re looking for a healthy yet delicious meal, you’ll love Mediterranean Quinoa Stuffed Peppers! These bright and colorful peppers
Read more…browse recipes


Air Fryer Garlic Parmesan Brussels Sprouts Flavor Boost
Looking for a delicious way to enjoy Brussels sprouts? My Air Fryer Garlic Parmesan Brussels Sprouts will change your mind about this veggie! They…
My Latest Desserts
My Latest Recipes

hey,
i’m !
I’m so happy you’re here!
I’m not just sharing recipes I’m sharing a piece of my heart. I hope these dishes bring you comfort, joy, and maybe even a new favorite.

. Set your oven to 425°F (220°C). This high heat helps the Brussels sprouts become crispy and golden. Preheating is key for even cooking. Take 1 pound of Brussels sprouts and cut them in half. Place them in a large bowl. Add 3 tablespoons of olive oil. Toss them well, so every piece gets coated. This oil helps with cooking and adds flavor. Now, add 4 minced cloves of garlic, ½ teaspoon salt, and ¼ teaspoon black pepper to the bowl. Mix everything together. Then, spread the Brussels sprouts on a baking sheet. Make sure they are not crowded. This space helps them roast well. Roast them in the hot oven for 20-25 minutes. Halfway through, shake the pan a bit. This helps them cook evenly. They should be golden brown and crispy when done. For an extra touch, sprinkle ¼ cup of grated Parmesan cheese on top right after you take them out. If you like, drizzle some balsamic vinegar for added flavor. Garnish with chopped parsley before serving for a fresh look. Enjoy your Easy Roasted Brussels Sprouts! For the complete recipe, check out the [Full Recipe]. To make your Brussels sprouts crispy, avoid overcrowding on the baking sheet. If they are too close, they will steam instead of roast. Give each sprout space to breathe. Shake the pan halfway through cooking. This helps them brown evenly and get that nice crunch. You can experiment with spices and herbs to boost flavor. Try adding paprika, chili flakes, or even Italian herbs. These can add depth and warmth to your dish. Consider adding lemon juice or zest for a fresh twist. The acidity brightens the dish and balances the richness of the cheese. Serving is key to enjoying your meal. Place the Brussels sprouts on a large platter. Garnish with fresh parsley for color and flavor. Add extra grated Parmesan on top for a cheesy finish. You can drizzle a bit of balsamic vinegar for a glossy look and added taste. For the full recipe, check out the Crispy Garlic Parmesan Roasted Brussels Sprouts. {{image_2}} You can easily switch up the flavor of your roasted Brussels sprouts. Add paprika or chili flakes for a nice kick. If you love cheese, try different options like feta or goat cheese. These changes can make the dish more exciting and unique. You can even mix different cheeses for a rich flavor. Roasted Brussels sprouts pair well with many main dishes. Serve them with proteins like chicken or fish for a balanced meal. They also make a great side for holiday meals. Imagine how lovely they look on your table! You can even serve them with a drizzle of balsamic vinegar for a touch of sweetness. For full details, check out the Full Recipe. After enjoying your Easy Roasted Brussels Sprouts, store any leftovers right. Place them in an airtight container. This keeps them fresh and tasty. You can store them in the fridge for up to three days. When it's time to enjoy your leftovers, the oven is your best friend. Preheat the oven to 350°F (175°C). Spread the Brussels sprouts on a baking sheet. Heat for about 10-15 minutes. This way, they stay crispy and delicious. Avoid the microwave, as it makes them soggy. Can Brussels sprouts be frozen after cooking? Yes, you can freeze them. However, they taste best fresh. If you want to freeze, let them cool first. Place them in a freezer-safe bag or container. They can last for up to three months in the freezer. When ready to eat, thaw in the fridge overnight and reheat in the oven. For the full recipe, check out Crispy Garlic Parmesan Roasted Brussels Sprouts. To make Brussels sprouts less bitter, trim the ends and remove the outer leaves. This helps reduce some of their strong taste. Soaking them in cold water for 10-15 minutes can also help. After soaking, dry them well before cooking. Roasting with garlic and olive oil adds flavor and can mask bitterness. You can serve roasted Brussels sprouts with many dishes. They pair well with proteins like chicken, fish, or pork. Try them beside a hearty steak or as part of a vegetarian meal. You can also serve them with grains, like quinoa or rice. For a complete meal, add a simple salad or some crusty bread. Yes, you can use frozen Brussels sprouts. However, fresh ones taste better. Frozen sprouts may not get as crispy. If you use frozen, thaw and drain them first. Then, dry them well before roasting. This improves texture and flavor. Brussels sprouts are best in fall and winter. They are in season from September to March. Eating them in season means they taste better and are more fresh. They are rich in vitamins and nutrients, making them a healthy choice year-round. Roasting Brussels sprouts is simple with just a few key ingredients. We covered how to preheat the oven, prepare the sprouts, and roast them to crispy perfection. Remember, adjusting seasonings and using fresh herbs can enhance flavor. Serve them with proteins or during holidays for a delightful side dish. Store any leftovers properly and enjoy them later. With these tips, you'll enjoy Brussels sprouts like never before. Trust me, you can make this dish a hit at any meal!](https://emmasdish.com/wp-content/uploads/2025/06/28c224e5-da10-48a0-90d9-a13d2016e7c4-300x300.webp)
Sweet Maple Sausage Breakfast Casserole Delight
Start your day with a warm, flavorful treat: Sweet Maple Sausage Breakfast Casserole. This dish combines savory sausage, creamy eggs, and a hint of…

