

Latest & Greatest
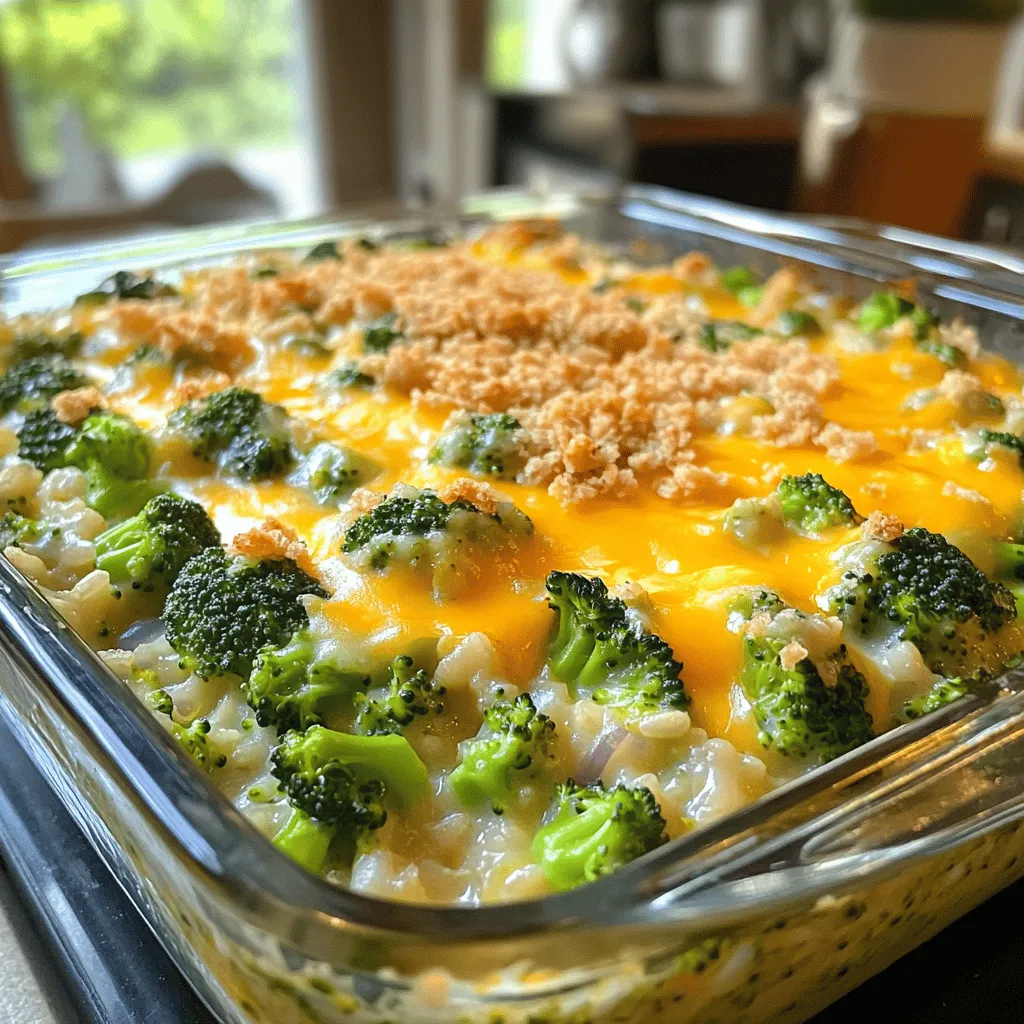
Cheesy Broccoli Rice Casserole Creamy and Flavorful Dish
Are you ready to dive into a dish that’s creamy, cheesy, and packed with flavor? My Cheesy Broccoli Rice Casserole
Read more…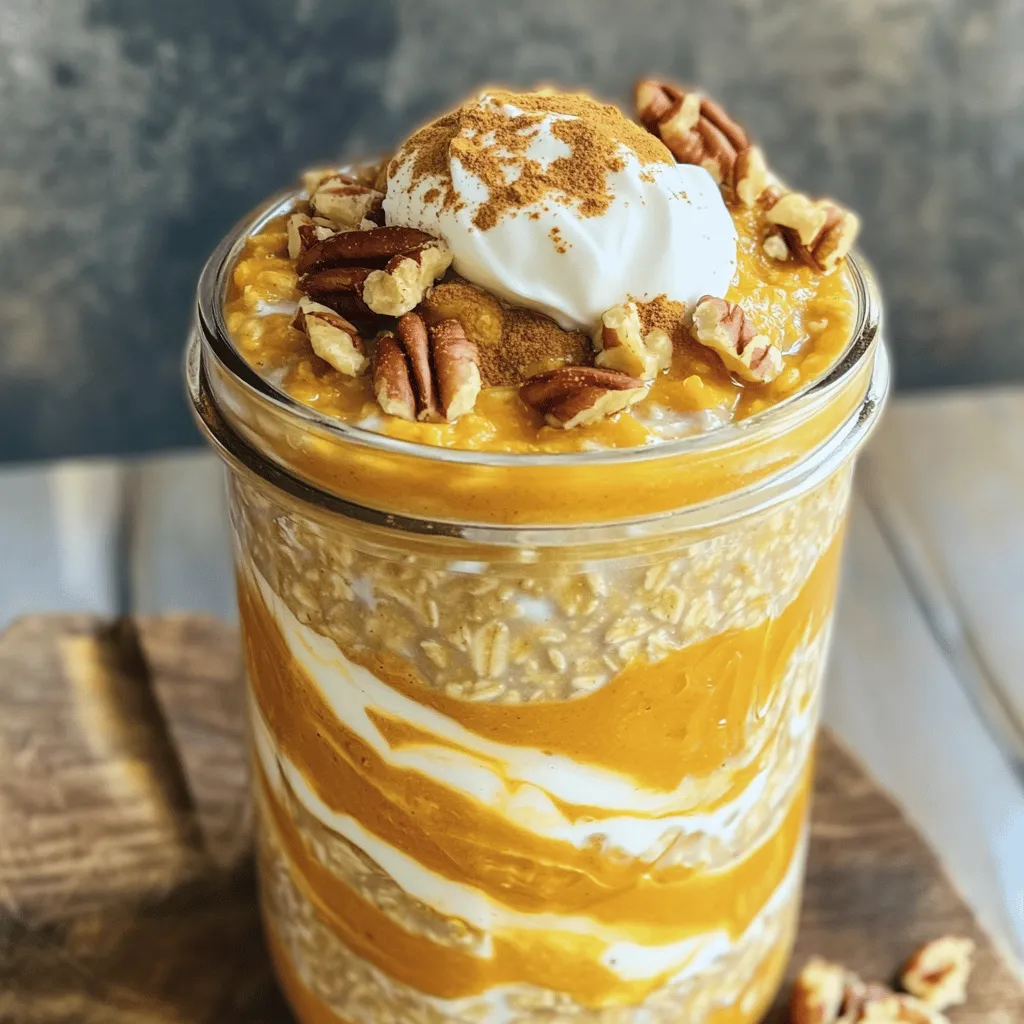
Pumpkin Spice Overnight Oats Cozy and Healthy Delight
Fall is here, and what better way to embrace the season than with Pumpkin Spice Overnight Oats? These cozy and
Read more…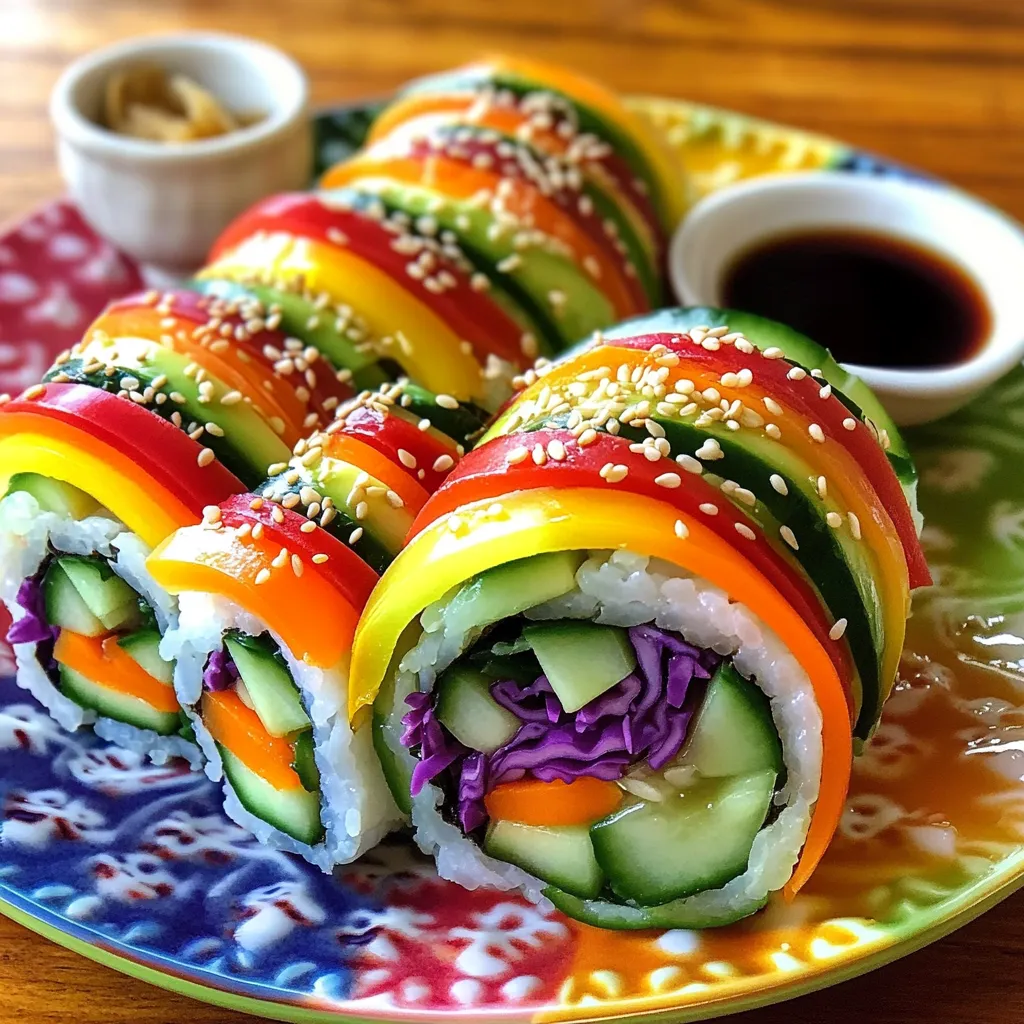
Rainbow Veggie Sushi Rolls Fresh and Colorful Delight
If you crave something fresh and colorful, let’s make Rainbow Veggie Sushi Rolls! These vibrant treats are packed with flavor
Read more…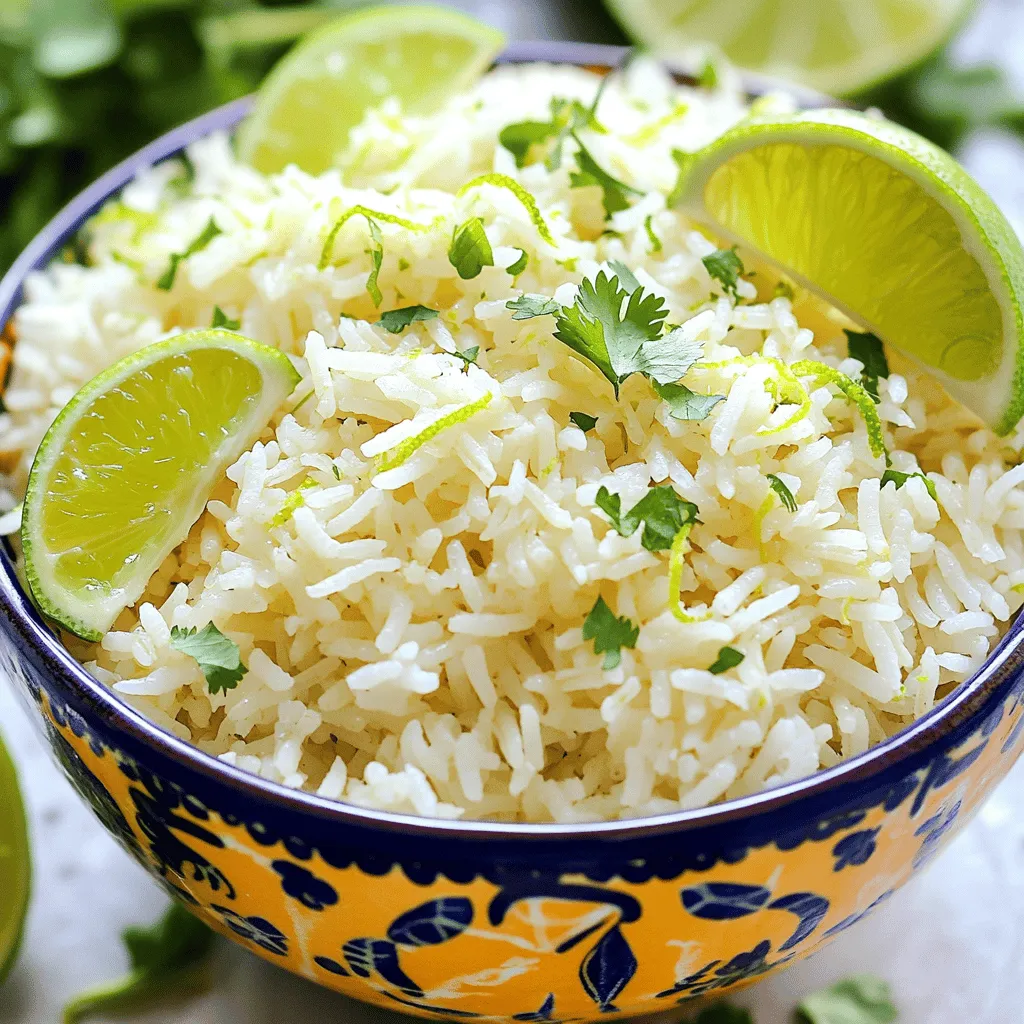
Coconut Lime Rice Flavorful and Easy Side Dish
If you’re looking for a quick and tasty side dish, you’ve come to the right place! Coconut Lime Rice is
Read more…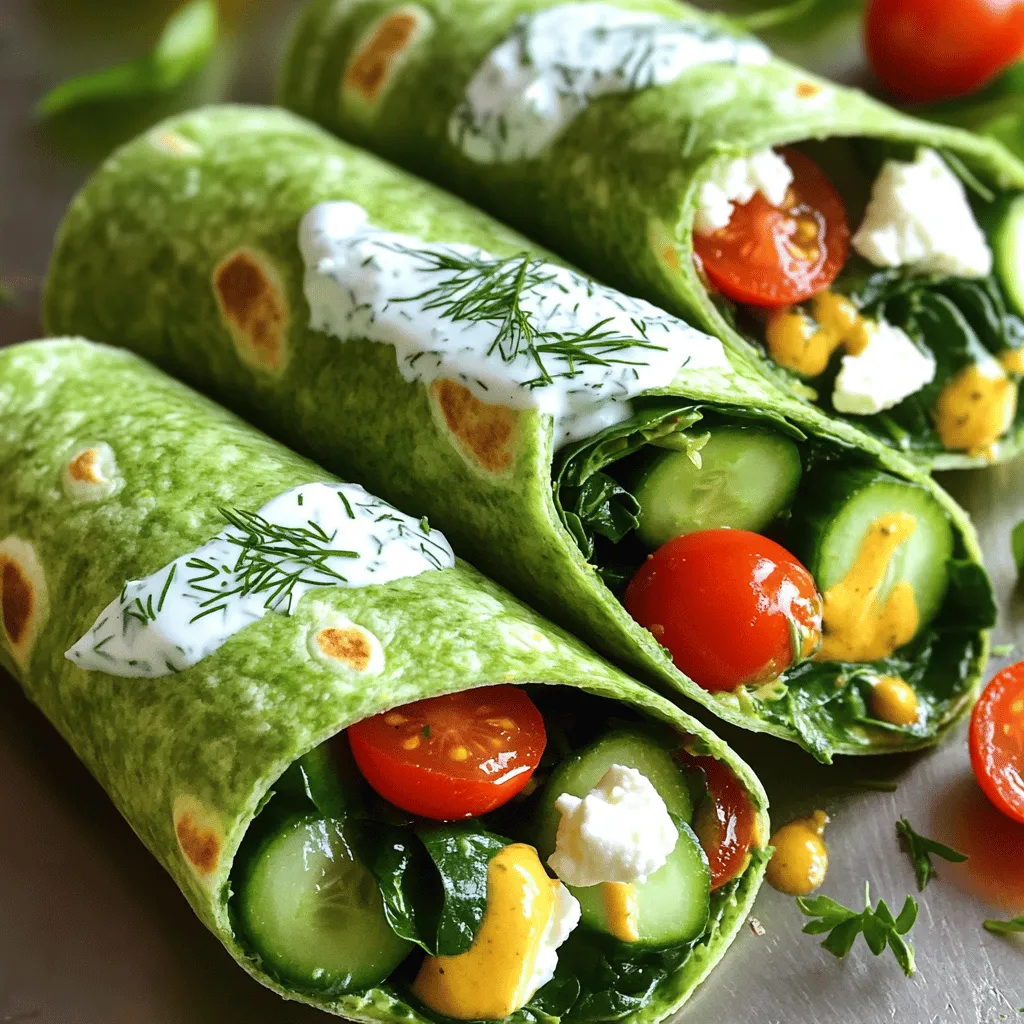
Healthy Spinach and Feta Wraps Tasty and Simple Meal
Do you want a quick, healthy meal that bursts with flavor? These Healthy Spinach and Feta Wraps are perfect for
Read more…
Nutella Rolls with Cream Cheese Irresistible Treat
Looking for a sweet treat that combines gooey Nutella and creamy goodness? Nutella Rolls with Cream Cheese are your answer!
Read more…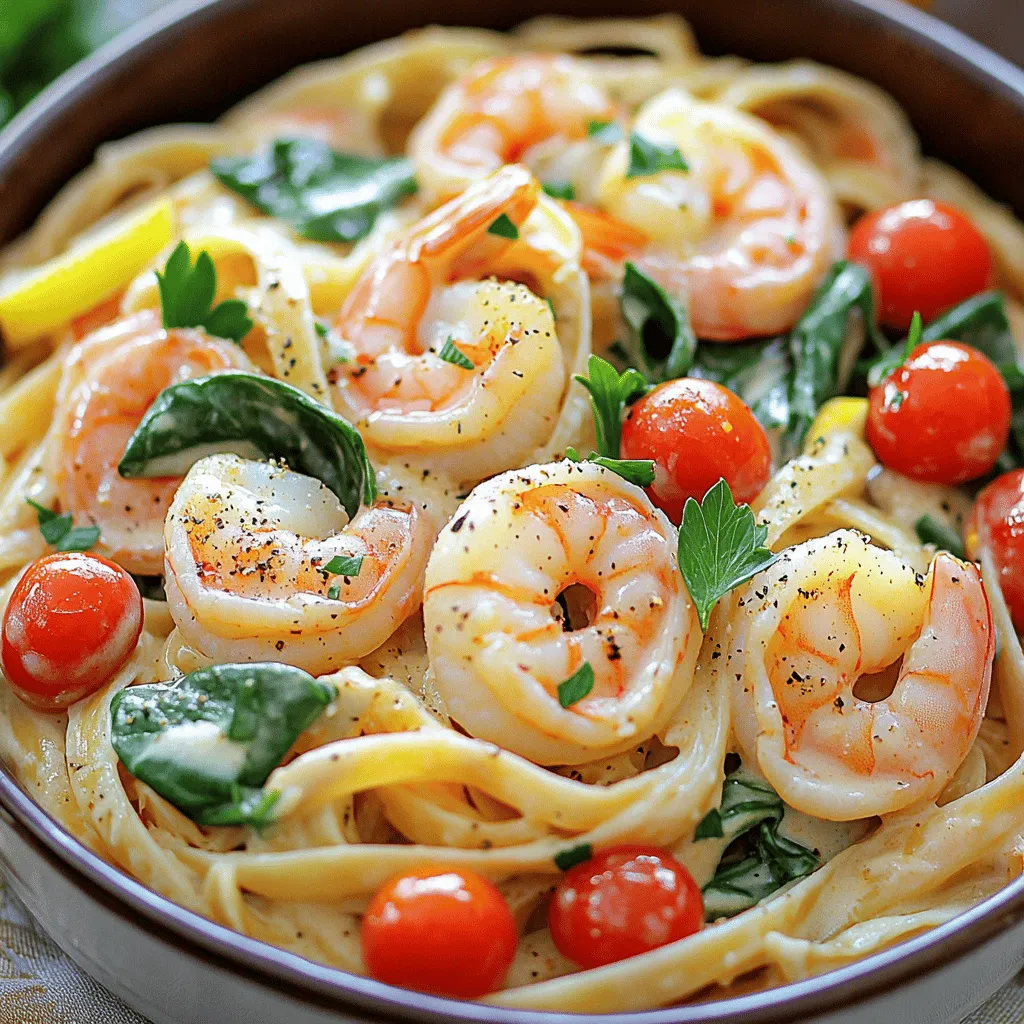
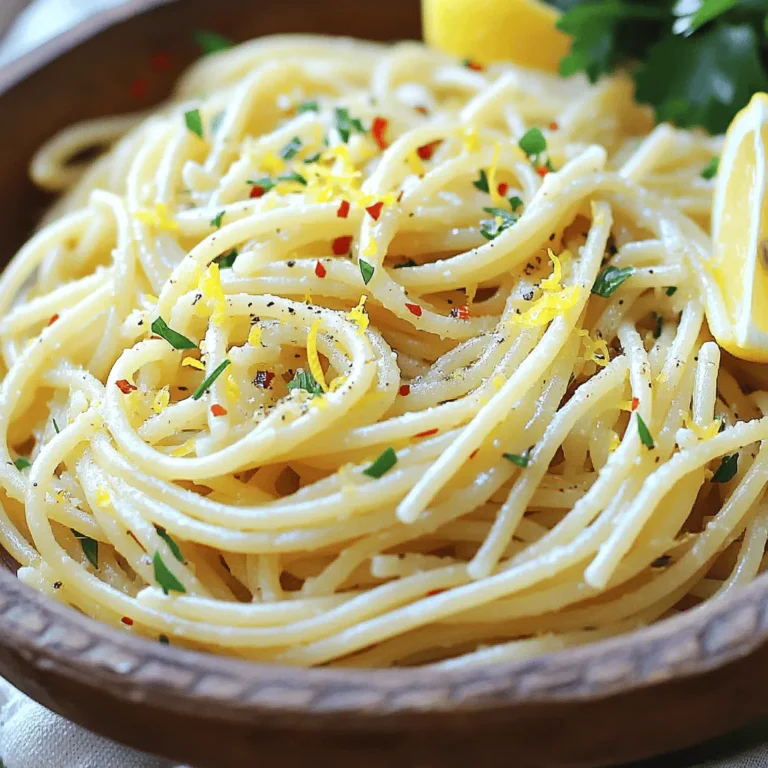
Creamy Shrimp Pasta Quick and Tasty Dinner Option
Looking for a quick and tasty dinner option that impresses? Try my creamy shrimp pasta! It’s simple, rich, and packed
Read more…
Pineapple Heaven Cake Delightful and Easy Recipe
Welcome to your new favorite dessert: Pineapple Heaven Cake! If you love fluffy, fruity treats, this recipe checks all the
Read more…browse recipes


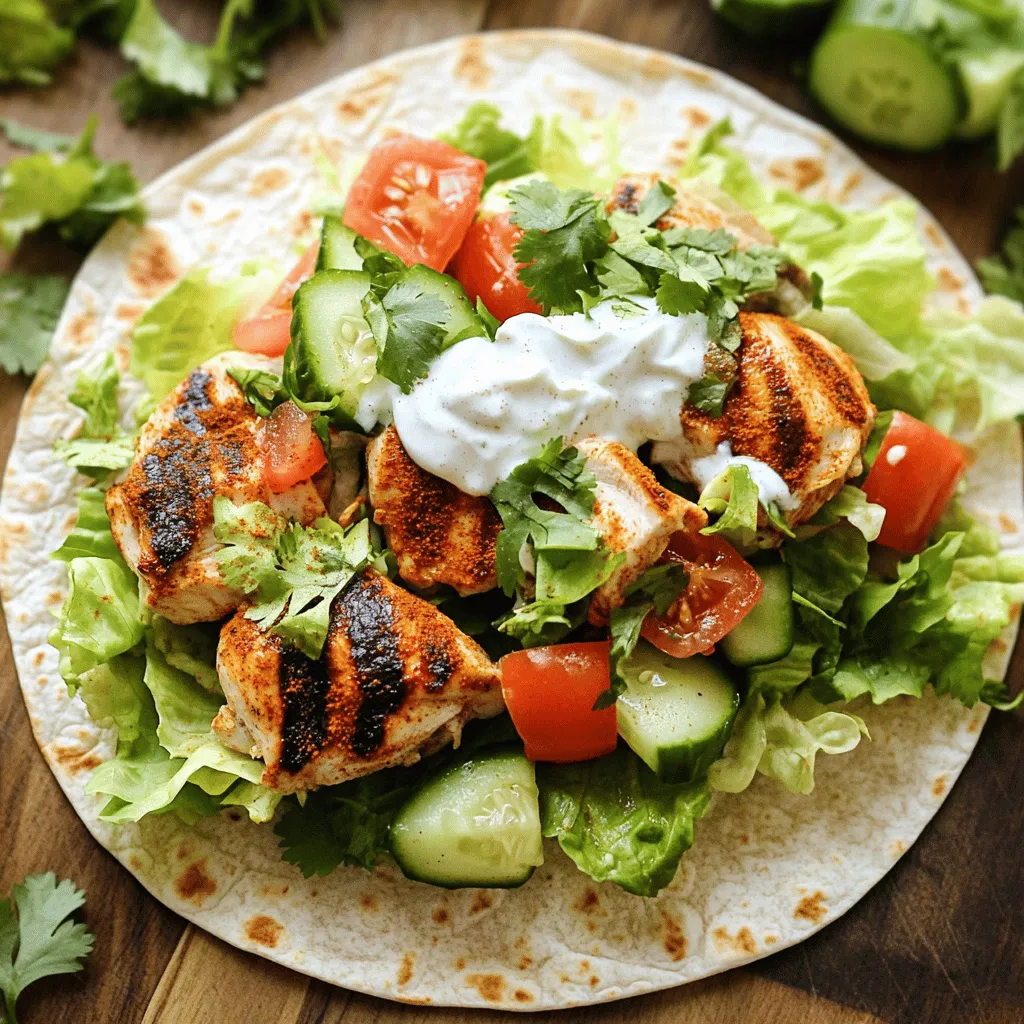
Easy Chicken Shawarma Wraps Flavorful and Quick Meal
Looking for a quick and tasty meal? My Easy Chicken Shawarma Wraps are perfect! With juicy marinated chicken, fresh veggies, and a creamy sauce,…
My Latest Desserts
-

No-Bake Lemon Cheesecake Bites Tasty and Simple Dessert
Are you ready to indulge in a creamy treat without turning on the oven? No-Bake Lemon Cheesecake Bites are your Read Full Recipe -

Healthy Banana Oat Pancakes Simple and Quick Recipe
Are you ready to flip the perfect pancake? In just minutes, you can whip up healthy banana oat pancakes that Read Full Recipe -

No-Bake Oreo Cheesecake Delightful and Easy Recipe
Are you craving a dessert that’s both easy and delicious? Look no further than this No-Bake Oreo Cheesecake! With just Read Full Recipe -
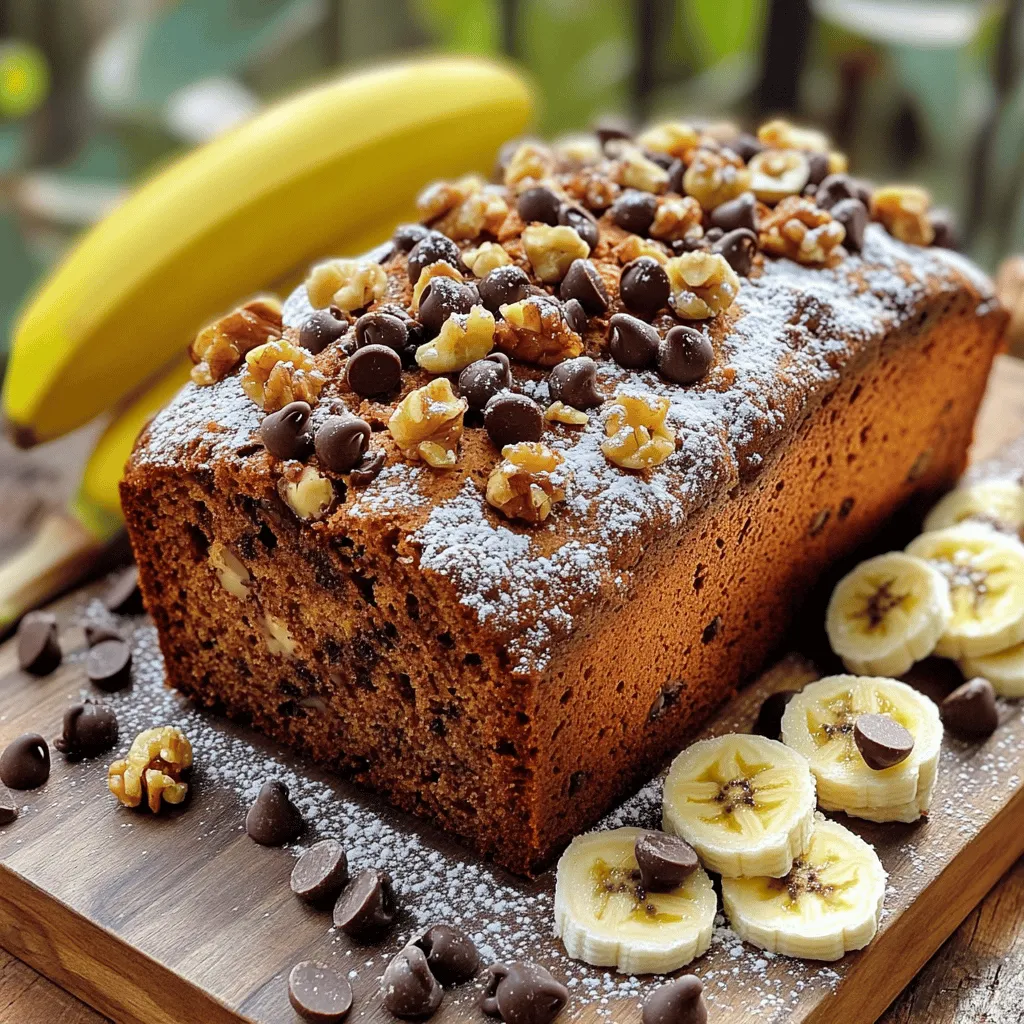
Chocolate Chip Banana Bread Irresistible Flavor Treat
If you love the sweet, comforting taste of banana bread, you’re in for a treat! This Chocolate Chip Banana Bread Read Full Recipe -

Lemon Blueberry Scones Flavorful and Easy Recipe
If you’re craving a delightful treat that’s both zesty and sweet, you’re in the right place. Lemon Blueberry Scones are Read Full Recipe -
Healthy Peanut Butter Energy Bites Simple Snack Delight
Are you looking for a quick, tasty snack that packs a nutritious punch? Healthy Peanut Butter Energy Bites are the Read Full Recipe -

No-Bake Chocolate Oat Bars Simple and Tasty Snack
Looking for a quick and tasty snack? Try my No-Bake Chocolate Oat Bars! With simple ingredients like oats, nut butter, Read Full Recipe -

S’mores Cookie Bars Irresistible Dessert Recipe
Get ready to satisfy your sweet tooth with my S’mores Cookie Bars! This easy dessert combines soft cookie goodness with Read Full Recipe -

Strawberry Shortcake Trifle Delicious Dessert Delight
Ready for a dessert that wows your guests? Strawberry Shortcake Trifle combines fresh strawberries, whipped cream, and ladyfingers into a Read Full Recipe -

Lemon Blueberry Pound Cake Delightful and Easy Recipe
Looking for a sweet treat that’s simple to make? This Lemon Blueberry Pound Cake combines bright citrus flavors and juicy Read Full Recipe
My Latest Recipes

hey,
i’m !
I’m so happy you’re here!
I’m not just sharing recipes I’m sharing a piece of my heart. I hope these dishes bring you comfort, joy, and maybe even a new favorite.
![- 4 boneless, skinless chicken breasts - 1 cup fresh spinach, chopped - 1/2 cup feta cheese, crumbled - 1/4 cup cream cheese, softened - 1/4 cup sun-dried tomatoes, chopped - 2 cloves garlic, minced - 1 teaspoon dried oregano - 1 teaspoon lemon zest - 1 tablespoon olive oil - Salt and pepper, to taste - Toothpicks or kitchen twine To make Spinach Feta Stuffed Chicken Breast, you need fresh items. Start with the chicken breasts. They form the base of the dish. Next, gather your greens. Fresh spinach adds color and nutrition. Feta cheese gives a salty and creamy touch. Cream cheese makes the filling rich and smooth. Sun-dried tomatoes bring sweetness and depth. Don't forget garlic; it adds a warm flavor. Dried oregano gives an herbal note. A dash of lemon zest brightens the filling. Olive oil helps when searing the chicken. Lastly, have salt and pepper on hand to season the mix. You can find the full recipe with step-by-step instructions. This dish is not just tasty; it’s also fun to make. To start, you need to prepare the chicken breasts. Place each chicken breast flat on a cutting board. Using a sharp knife, cut a pocket into the side of each breast. Make sure not to cut all the way through. This step is important so that your filling stays inside. If you cut through, the filling can spill out while cooking. Now, let’s make the filling. In a mixing bowl, combine the chopped spinach, crumbled feta, and softened cream cheese. Add in the chopped sun-dried tomatoes, minced garlic, dried oregano, lemon zest, salt, and pepper. Mix everything well until it is fully combined. This filling is what makes the chicken so tasty. Next, it’s time to stuff the chicken. Take your filling and divide it evenly among the chicken pockets. Press down gently to pack it inside. Now, you need to secure each pocket. You can use toothpicks or kitchen twine to keep the filling from spilling out. If you use toothpicks, make sure to remove them before serving. For cooking, I recommend two methods: searing and baking. First, heat olive oil in an oven-safe skillet over medium-high heat. Sear the stuffed chicken breasts for 3-4 minutes on each side until they are golden brown. Then, transfer the skillet to a preheated oven set at 375°F (190°C). Bake for 20-25 minutes until the chicken is cooked through. This two-step method ensures a nice crust while keeping the inside juicy and flavorful. For the full recipe, refer to the [Full Recipe]. To keep chicken juicy, always use a meat thermometer. The safe internal temp is 165°F. Use medium heat when cooking to avoid burning the outside. Sear each side for 3-4 minutes. Then finish cooking in the oven. This method locks in moisture and flavor. To avoid overcooking, set a timer. Check the chicken's temperature after 20 minutes in the oven. If it needs more time, check every 5 minutes. This way, you won’t dry out your chicken. You can add more herbs for extra flavor. Fresh basil or parsley works well. A pinch of red pepper flakes adds a nice kick. Try marinating the chicken for at least 30 minutes. Olive oil, lemon juice, and garlic make great marinades. This adds depth to the dish. For a beautiful plate, garnish with fresh herbs. Chopped parsley or basil adds color. Serve with roasted vegetables or a side salad. A scoop of rice or quinoa pairs well too. This adds balance and makes the meal more filling. For a special touch, drizzle balsamic glaze over the chicken before serving. For the complete recipe, check out the Full Recipe section. {{image_2}} You can change the cheese in this dish for fun. Try goat cheese or mozzarella. Each cheese brings a new taste. You can also use ricotta if you want a creamier filling. For veggies, think outside the box! You can add mushrooms, roasted red peppers, or artichokes. They all work well with spinach and cheese. Mix and match to find your favorite flavor. If you need this dish gluten-free, you are in luck! The recipe is already gluten-free. Just check your ingredients, especially the cream cheese and sun-dried tomatoes, to ensure they are certified gluten-free. For a low-carb option, skip the cream cheese or choose a lower-carb cheese. You can also serve it with a fresh salad instead of grains. This gives you more flavor without the carbs. Pair this dish with sides that complement its rich flavors. Roasted vegetables work well, as do garlic mashed potatoes. A simple side salad adds freshness to the meal. For sauces, a lemon butter sauce is perfect. It brightens the dish and adds zing. You could also try a yogurt dip, which cools the heat. A nice sauce can elevate the whole experience. Explore more details in the Full Recipe for Spinach Feta Stuffed Chicken Breast! You can store leftovers of Spinach Feta Stuffed Chicken Breast in the fridge for 3-4 days. To keep it fresh, place the chicken in an airtight container. This helps maintain its flavor and moisture. When you are ready to enjoy it again, reheat the chicken in the oven or microwave. If using an oven, set it to 350°F (175°C) and warm the chicken for about 15-20 minutes. If using a microwave, heat for about 2-3 minutes, checking to ensure it heats evenly. To freeze stuffed chicken, follow these steps: 1. Cool Completely: Let the cooked chicken cool down to room temperature. 2. Wrap Properly: Wrap each chicken breast tightly in plastic wrap. Then, place it in a freezer-safe bag or container. 3. Label and Date: Write the date on the bag so you remember when you froze it. You can freeze the stuffed chicken for up to 3 months. To defrost, move the chicken to the fridge for 24 hours before cooking. When ready to reheat, you can use the oven. Preheat to 375°F (190°C) and bake for 30-35 minutes. Check the internal temperature to ensure it reaches 165°F (74°C) for safe eating. How long should I bake Spinach Feta Stuffed Chicken Breast? You should bake the stuffed chicken for 20-25 minutes. Always check that the chicken is cooked through. The outside should be golden brown, and the filling should be hot. What is the internal temperature for cooked chicken? The safe internal temperature for cooked chicken is 165°F (74°C). Use a meat thermometer to check this. This step ensures your meal is safe to eat. Can I make this dish ahead of time? Yes, you can prepare the stuffed chicken ahead of time. Stuff and sear the chicken, then store it in the fridge. Bake it when you are ready to serve. What can I serve with Spinach Feta Stuffed Chicken Breast? This dish pairs well with many sides. Consider serving it with a fresh salad, roasted vegetables, or garlic mashed potatoes. You can also serve it with rice or quinoa for a complete meal. For the full recipe, check out the details above. This article covers how to make Spinach Feta Stuffed Chicken Breast, from ingredients to cooking tips. You learned to prepare the chicken, create a tasty filling, and explore cooking methods. Remember, juicy chicken comes from careful attention to cooking time. Use fresh flavors and try different ingredients to keep it exciting. Leftovers can be stored or frozen for later. Enjoy mastering this dish, and impress your family with your new skills!](https://emmasdish.com/wp-content/uploads/2025/05/90bf9593-797a-49c0-aef5-9181852d221f-300x300.webp)
![Fresh spinach is the star of this salad. I use 4 cups of washed and dried spinach leaves. Spinach adds a vibrant green color and a mild flavor. It is rich in vitamins A and C, iron, and fiber. This base gives the salad its fresh and nutritious feel. Next, I add 1 cup of mixed berries. I love using strawberries, blueberries, and raspberries. They not only taste great, but they also bring antioxidants to the dish. Berries add sweetness and a pop of color. They brighten up each bite and make the salad exciting. I like to include a variety of other ingredients for texture and flavor. Here’s what I use: - 1/2 cup cooked quinoa, cooled - 1/4 cup walnuts, chopped - 1/4 cup feta cheese, crumbled - 2 tablespoons chia seeds - 1/4 cup red onion, thinly sliced - 3 tablespoons balsamic vinaigrette - Salt and pepper to taste Quinoa gives the salad protein and a nutty taste. Walnuts add crunch, while feta cheese brings a creamy element. Chia seeds are small but mighty, packed with nutrients. The red onion adds a slight bite, and the balsamic vinaigrette ties everything together. You can find the full recipe with preparation instructions to make this delicious salad. Start by washing and drying four cups of fresh spinach leaves. Place them in a large salad bowl. This leafy green is your salad's foundation. It offers vitamins and minerals, making it healthy and crunchy. Next, take half a cup of cooked quinoa. Make sure it's cooled down. Sprinkle it evenly over the spinach. Quinoa adds protein and fiber to your salad. Now, let's add the fun part: the superfoods! Grab one cup of mixed berries, like strawberries, blueberries, and raspberries. Scatter them across the top of your salad. These fruits bring sweetness and vibrant colors. After that, chop a quarter cup of walnuts. Add these to the bowl for a nice crunch. Then, crumble a quarter cup of feta cheese and sprinkle it on top. Feta adds a tangy taste. Add a quarter cup of thinly sliced red onion for some zing. Finally, sprinkle two tablespoons of chia seeds over everything. Chia seeds are tiny but packed with nutrition. Drizzle three tablespoons of balsamic vinaigrette over your salad. This dressing ties all the flavors together. Gently toss the salad to mix everything. Be careful not to bruise the spinach leaves. Season with salt and pepper to taste. Adjust it to your liking. You can serve the salad in a large bowl or divide it into individual servings. For a fancy touch, garnish each plate with extra berries and chia seeds. Enjoy your Berry Spinach Superfood Salad! For the full recipe, check out the details above. When making your Berry Spinach Superfood Salad, fresh ingredients matter. Look for bright, crisp spinach leaves. They should be deep green and free from brown spots. When it comes to berries, choose ones that are plump and firm. Strawberries should be red all over, while blueberries and raspberries should be vibrant and juicy. Fresh quinoa adds a nice texture, so use it right after cooking. Finally, select walnuts that are crunchy and not stale. For this salad, a balsamic vinaigrette works wonders. It adds a sweet and tangy flavor that pairs well with the berries. You can also try a lemon vinaigrette for a zesty touch. If you prefer creamier dressings, a light yogurt dressing is a great choice. Just remember to keep it light, so it doesn’t overpower the fresh flavors. To make your salad pop, add a mix of textures. The crunch of walnuts complements the soft berries perfectly. You can also toss in some seeds, like pumpkin or sunflower seeds, for extra crunch. For a burst of flavor, add thin slices of red onion. If you want a bit more saltiness, crumbled feta cheese is a great addition. These simple tweaks can elevate your Berry Spinach Superfood Salad to a whole new level. For the full recipe, check the details above. {{image_2}} You can boost the protein in your Berry Spinach Superfood Salad. Try adding grilled chicken or shrimp for a heartier meal. Tofu is a great option for a plant-based source. You can also mix in hard-boiled eggs or chickpeas. Each option adds flavor and nutrition. Switch up the fruits based on what is in season. In the spring, use fresh strawberries. Summer might call for peaches or cherries. In the fall, consider adding apples or pears. Each fruit will change the taste and keep the salad exciting. While balsamic vinaigrette is my go-to, you can change it up. A lemon vinaigrette can add brightness. Honey mustard dressing gives a sweet and tangy kick. For a creamy touch, try yogurt-based dressings. Each dressing will give the salad a unique flavor profile. For the complete recipe, check out the [Full Recipe]. You should store your Berry Spinach Superfood Salad in the fridge. Use an airtight container to keep it fresh. This salad stays good for about three days. If you see any wilting, eat it soon. For the best taste, enjoy it within 24 hours. To keep your ingredients fresh, store spinach and berries separately. Spinach wilts quickly, while berries can mold. Wash and dry spinach right before use. For berries, rinse them under cold water just before serving. This way, they remain crisp and juicy. You can prep ingredients the night before. Wash and chop everything except the spinach. Store each ingredient in separate containers. When you’re ready to eat, mix them together. This saves time and makes meal prep easy. Enjoy a fresh salad without the fuss! For the full recipe, check out the Berry Spinach Superfood Salad. This salad packs a powerful punch of nutrients. Spinach is rich in vitamins A, C, and K. It also has iron and calcium. Berries are full of antioxidants, which help protect your cells. They can boost your heart health and improve brain function. Quinoa adds protein and fiber, making it a complete meal. Walnuts provide healthy fats, which are good for your heart. Chia seeds are great for digestion and help you feel full. To make the Berry Spinach Superfood Salad vegan, simply leave out the feta cheese. You can replace it with a vegan cheese or skip it entirely. The salad still tastes great without it. You can enhance the flavors with extra nuts or seeds. This keeps the salad satisfying and nutritious. Yes, you can use frozen berries in this salad. Just make sure to thaw them first. Drain any excess liquid to avoid making the salad soggy. Frozen berries can be just as nutritious as fresh ones. They work well and save time, especially when fresh berries are not in season. Using frozen berries can also add a fun twist to your salad. For the full recipe, check the main section. This blog post showed how to make a Berry Spinach Superfood Salad. You learned about the key ingredients: fresh spinach, mixed berries, and extras that boost flavor. We covered step-by-step instructions for prepping and serving. Tips for selecting ingredients and dressing options helped you enhance your salad. Variations let you customize with proteins and seasonal fruits. We also shared storage tips to keep your salad fresh. Enjoy making this healthy dish. It’s easy and tasty! Now, you can impress your friends and family with your new skills.](https://emmasdish.com/wp-content/uploads/2025/06/ed68670f-61e3-4ee1-9cf1-77221924be16-300x300.webp)

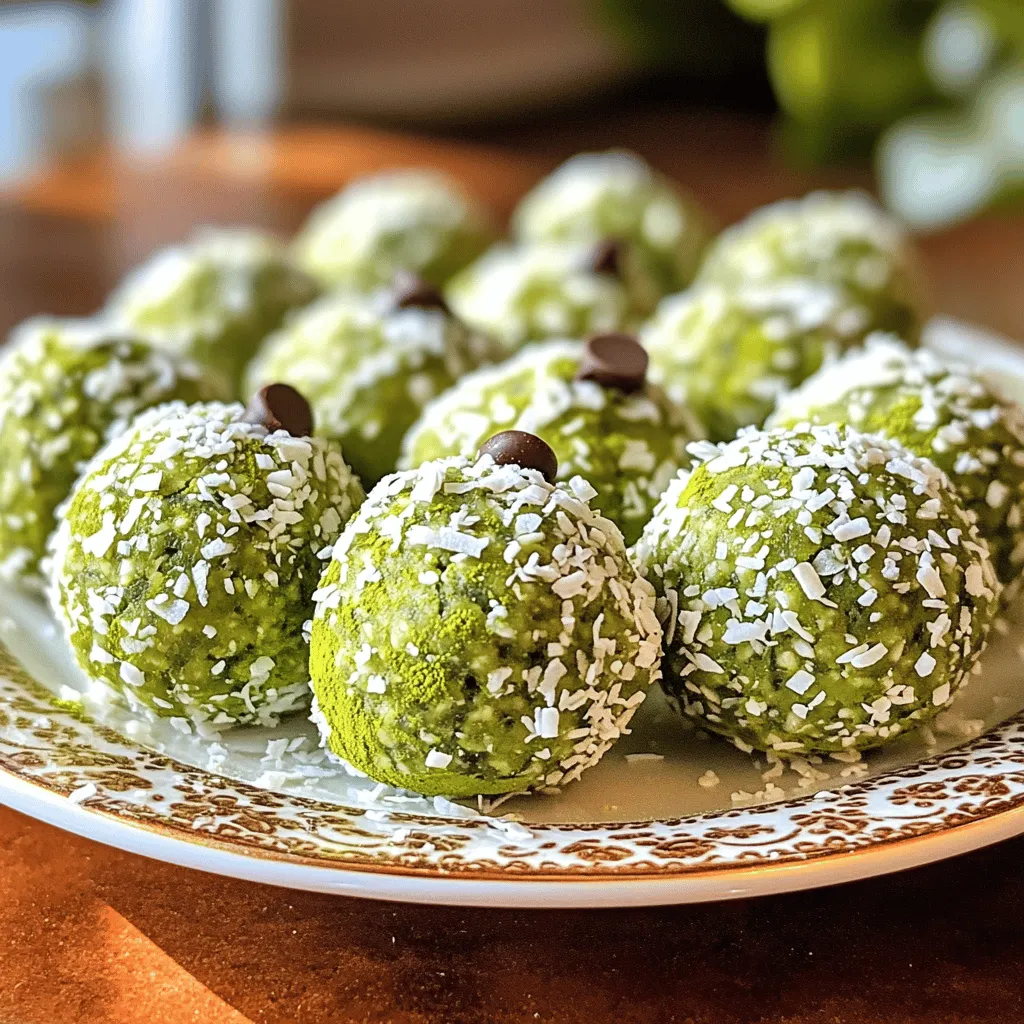
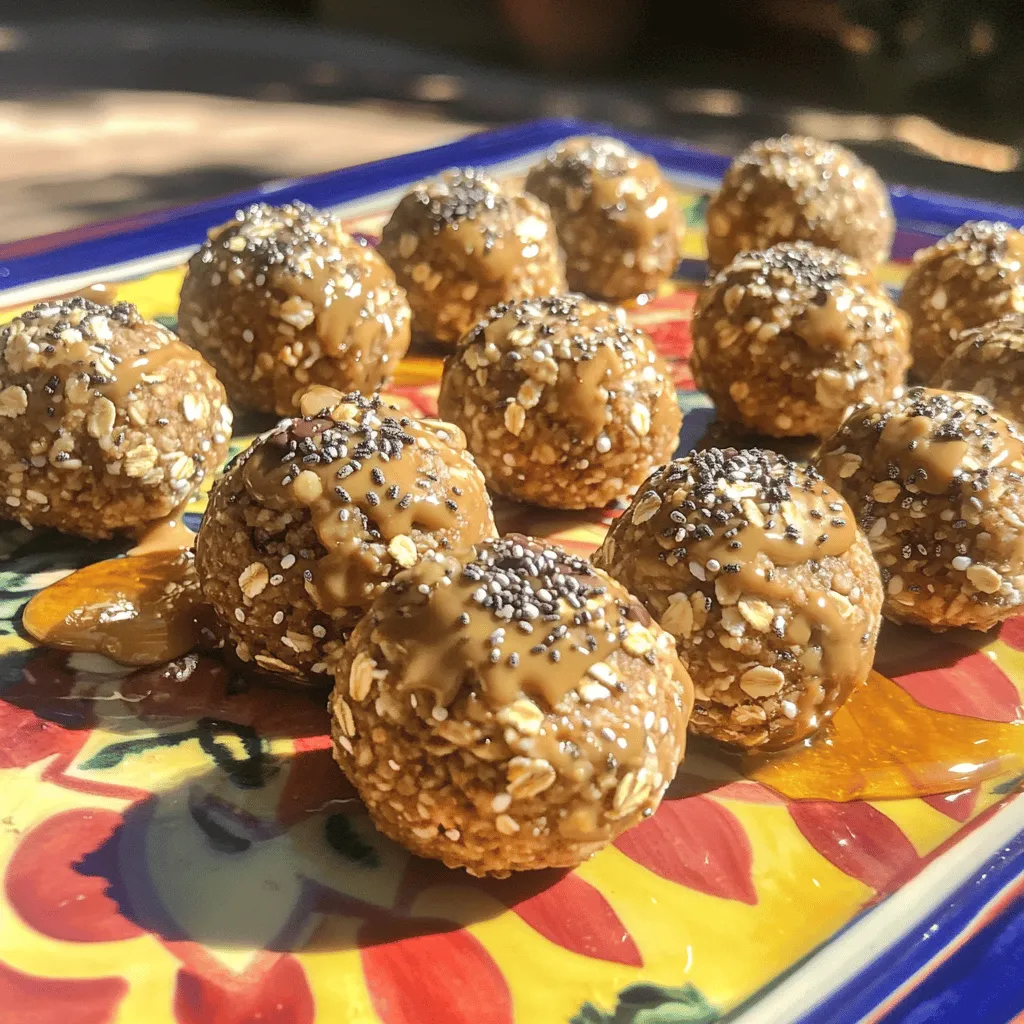
Matcha Energy Bliss Balls Easy and Nutritious Snack
Looking for a quick and healthy snack? Matcha Energy Bliss Balls are a game changer! Packed with the goodness of matcha and other nutritious…