


Latest & Greatest

Coconut Cream Pie Delightful and Easy Recipe Guide
Welcome to your ultimate guide for Coconut Cream Pie! If you crave a creamy, dream-like dessert that’s easy to make,
Read more…
Crispy Fried Chicken Irresistible Flavor At Home
Are you ready to master the art of crispy fried chicken at home? This recipe packs irresistible flavors and gives
Read more…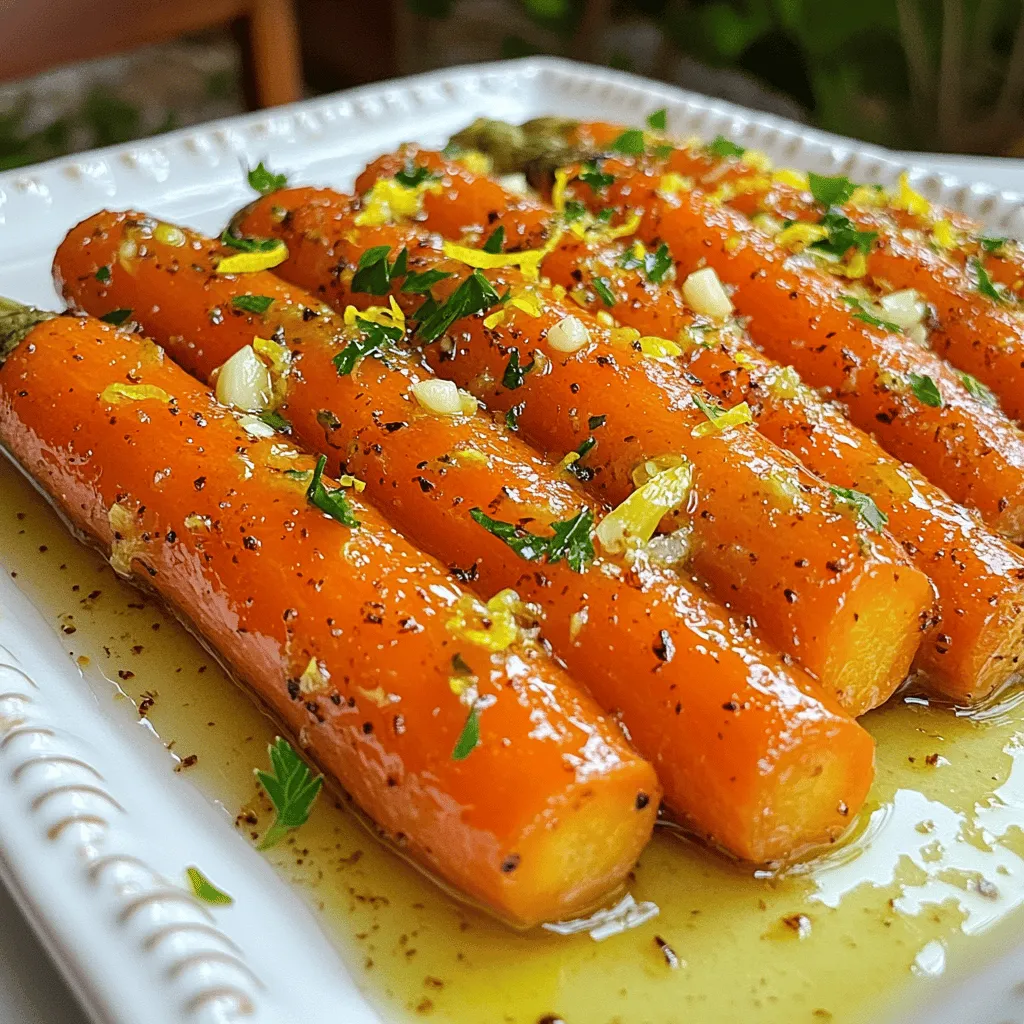
Tangy Lemon Garlic Roasted Carrots Flavorful Side Dish
Looking for a vibrant side dish that adds zest to your meals? Try my Tangy Lemon Garlic Roasted Carrots! With
Read more…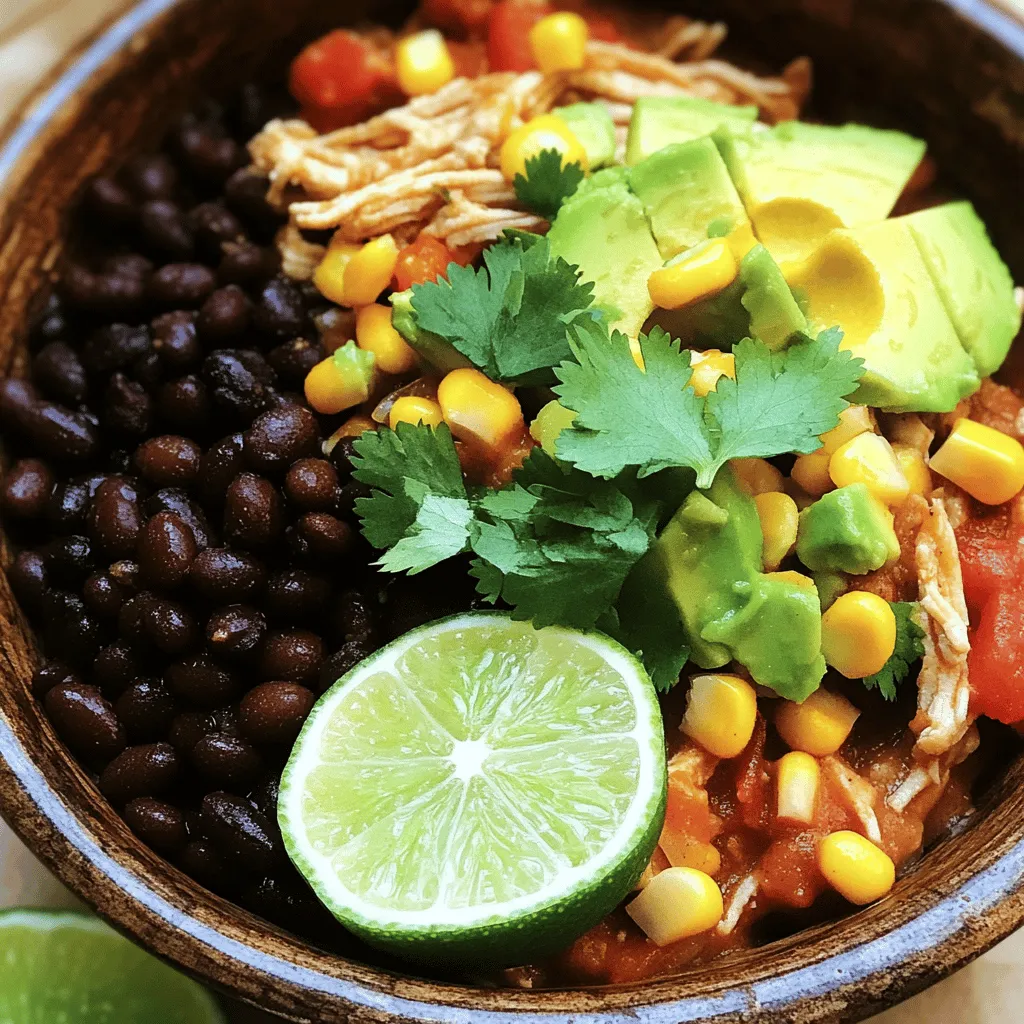
Crockpot Mexican Chicken Flavorful and Easy Meal
Are you in search of a simple yet delicious dinner idea? Look no further than my Crockpot Mexican Chicken! With
Read more…
Spring Hash Brown Crust Quiche Flavorful Easy Recipe
Looking for a delicious and easy recipe to brighten your spring brunch? This Spring Hash Brown Crust Quiche is just
Read more…browse recipes


![For a vibrant Summer Veggie Pasta Salad, you need fresh and colorful ingredients. This salad is easy to make and packed with flavor. - 2 cups whole wheat fusilli pasta - 1 cup cherry tomatoes, halved - 1 medium cucumber, diced - 1 bell pepper (red or yellow), diced - 1 cup corn kernels (fresh or frozen) - 1 medium zucchini, diced - 1/4 cup red onion, finely chopped - 1/4 cup fresh basil, chopped - 1/4 cup feta cheese, crumbled (optional) - 3 tablespoons olive oil - 2 tablespoons lemon juice - Salt and pepper to taste Using whole wheat fusilli gives the salad a nutty flavor and a nice bite. Fresh summer vegetables like tomatoes, cucumbers, bell peppers, and zucchini add crunch and color. Corn kernels bring sweetness, while basil adds a fresh, aromatic touch. If you like, you can sprinkle feta cheese on top for a creamy texture. The dressing is simple yet packed with flavor. Olive oil provides richness, and lemon juice adds a zesty kick. Salt and pepper balance all the flavors perfectly. For the Full Recipe, check the detailed cooking instructions. This mix of ingredients creates a delightful dish perfect for warm summer days. To start, boil water in a large pot. Add salt to the water; it helps flavor the pasta. Once boiling, drop in 2 cups of whole wheat fusilli pasta. Cook it until it is al dente, which means it should be firm but not hard. This usually takes about 8 to 10 minutes. After cooking, drain the pasta and rinse it under cold water. This stops the cooking process and cools it down quickly. While the pasta cools, it's time to prepare the veggies. Start by washing all your fresh summer vegetables. For a great salad, I like to dice the cucumber, bell pepper, and zucchini into bite-sized pieces. Cut the cherry tomatoes in half for easy eating. Use a sharp knife for clean cuts. When selecting vegetables, look for bright colors and firm textures. Fresh veggies make a big difference in taste. Now, let’s mix it all together. In a large mixing bowl, combine the cooled pasta with the diced vegetables. Toss gently to mix everything well. For the dressing, whisk together 3 tablespoons of olive oil and 2 tablespoons of lemon juice in a small bowl. Add salt and pepper to taste. Drizzle the dressing over the pasta and vegetables, then toss gently until everything is coated evenly. For extra flavor, add 1/4 cup of chopped fresh basil and some crumbled feta cheese if you like. These add creaminess and freshness. It’s best to chill the salad in the fridge for at least 30 minutes before serving. Chilling allows the flavors to blend nicely, making every bite delicious. Enjoy your Summer Veggie Pasta Salad! For the full recipe, check out the details above. To make your pasta salad shine, start with fresh herbs and spices. Fresh basil adds a bright touch. Use salt and pepper to enhance flavors. A pinch of garlic powder or onion powder can add depth. For texture, cook your pasta just right. Al dente pasta holds its shape and won't get soggy. Rinse it under cold water to stop the cooking. This keeps it firm and adds a refreshing bite. Serve your salad cold or at room temperature. The flavors are best when they mix well. You can make it a few hours ahead. This lets the ingredients blend fully. Pair it with grilled chicken or fish for a full meal. It also goes well with crusty bread or a light soup. Use a clear glass bowl to show off those colorful veggies. This adds visual appeal and makes the dish pop. Garnish with extra basil leaves and a sprinkle of feta cheese. This not only looks great but adds a tasty finish. For a fun twist, try serving in individual cups for easy sharing. Refer to the [Full Recipe] for all the details on creating this delightful dish. {{image_2}} You can switch up the pasta in your salad. Try using gluten-free pasta if you need. You can also use other shapes like penne or rotini. These changes keep the dish fresh. For vegetables, think about what’s in season. Bell peppers can change to snap peas or asparagus. Use whatever looks good at the market. Zucchini can be swapped for yellow squash, too. The key is to keep it colorful and tasty. The dressing makes a big difference. If you want a change, try a balsamic vinaigrette. Mix balsamic vinegar, olive oil, and a bit of honey for a sweet touch. A creamy dressing like ranch or yogurt-based can also work well. You can add spices to your dressing. Try garlic powder or crushed red pepper for a kick. Flavored oils, like chili oil or herb-infused oil, can also elevate the taste. For vegan options, skip the feta cheese. Instead, use avocado for creaminess. You can also add nuts or seeds for extra texture. If you need a gluten-free version, use gluten-free pasta. Many brands offer great options that taste good. You can still enjoy all the flavors without the gluten. This Summer Veggie Pasta Salad can fit many diets and tastes. With these variations, you can make it your own! To keep your Summer Veggie Pasta Salad fresh, I recommend using airtight containers. This helps to lock in flavors and moisture. Make sure the salad is completely cool before sealing it. If you have leftovers, divide them into smaller portions. This way, you can grab just what you need without exposing the whole batch. In the refrigerator, this salad lasts about 3-5 days. Check for signs of spoilage before eating. If you see any mold or a sour smell, it's best to toss it out. Fresh ingredients can lose their crunch over time, so enjoy it sooner than later! Serving leftovers can be fun and easy. For best results, enjoy the salad cold. If you prefer it warm, gently heat it in a pan over low heat. This helps maintain the texture of the pasta and veggies. Avoid high heat, which can make them mushy. You want to enjoy every bite! For more details, check the Full Recipe. To make this dish vegan, swap out feta cheese with avocado or leave it out. Use a non-dairy dressing made from tahini or cashew cream. You can also try using nutritional yeast for a cheesy flavor without dairy. Yes, you can make this salad a day in advance. This helps the flavors mix well. Just store it in the fridge in an airtight container. Whole wheat fusilli works great for this salad. It holds dressing well and adds fiber. You can also use rotini, penne, or bowtie pasta for fun shapes. To make this dish gluten-free, choose gluten-free pasta. Options like brown rice pasta or quinoa pasta work well. They maintain texture and absorb flavors nicely. Yes! You can add cooked chicken, chickpeas, or black beans for protein. For a plant-based option, try diced tofu or tempeh. These additions make the salad heartier and more filling. For the complete recipe, check out the [Full Recipe]. This blog post guides you through an easy Summer Veggie Pasta Salad recipe. We covered key ingredients, step-by-step instructions, handy tips, and various adaptations. You can customize your salad with fresh veggies and different dressings, making it perfect for anyone. Remember to store it well to keep it fresh. Enjoy your delicious, colorful dish this summer!](https://emmasdish.com/wp-content/uploads/2025/07/463fff92-f267-4ea1-a8b9-2e33b9d7bc2e.webp)
Summer Veggie Pasta Salad Fresh and Flavorful Delight
Summer is here, and that means it’s time for bright, fresh meals! I’m excited to share my Summer Veggie Pasta Salad that bursts with…
My Latest Desserts
-
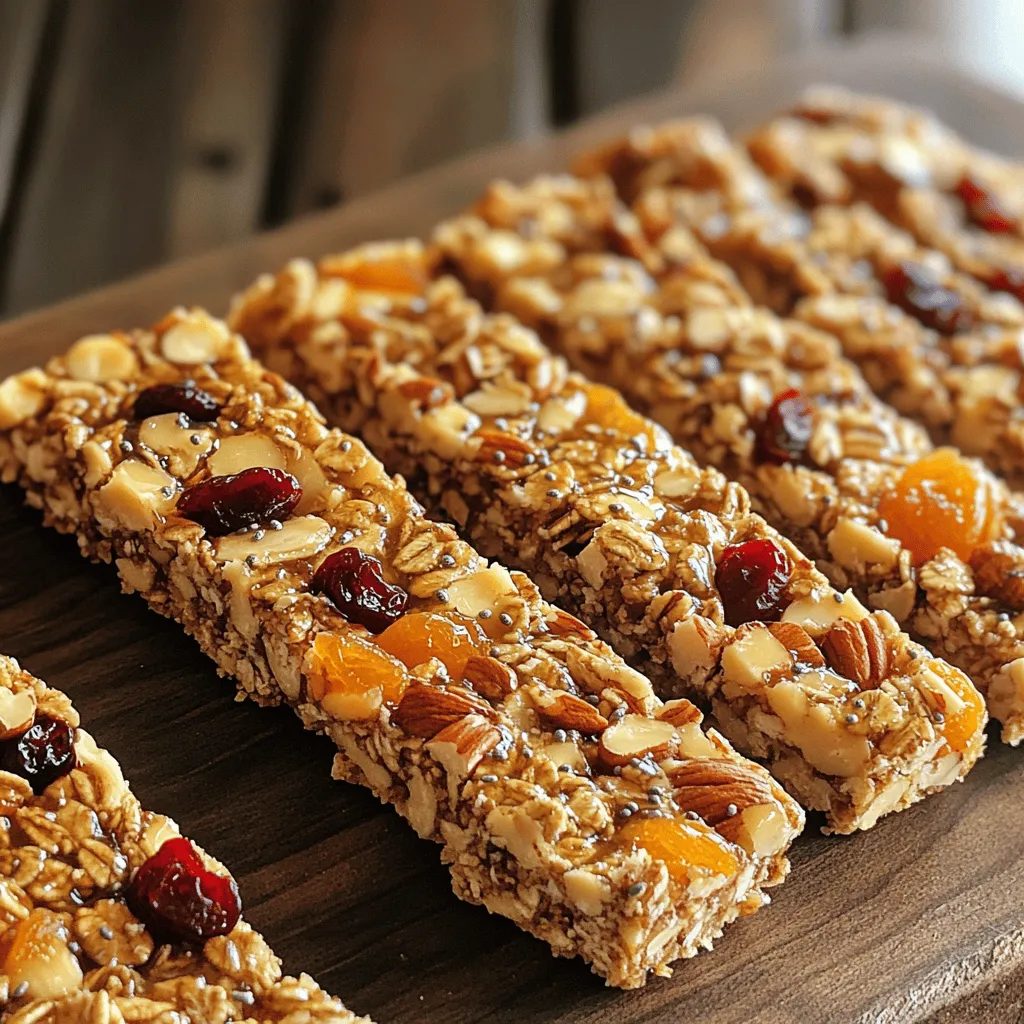
Homemade Granola Bars Tasty and Nutritious Snack
Are you ready to whip up a delicious snack that’s both tasty and healthy? Homemade granola bars are the perfect Read Full Recipe -

Lemon Poppy Seed Zucchini Muffins Fresh and Tasty Treat
Looking for a tasty and fresh treat? My Lemon Poppy Seed Zucchini Muffins are just what you need! Packed with Read Full Recipe -

Homemade Peach Ice Cream Fresh and Creamy Delight
Craving a sweet, chilly treat? Let’s make homemade peach ice cream! This fresh and creamy delight is packed with real Read Full Recipe -
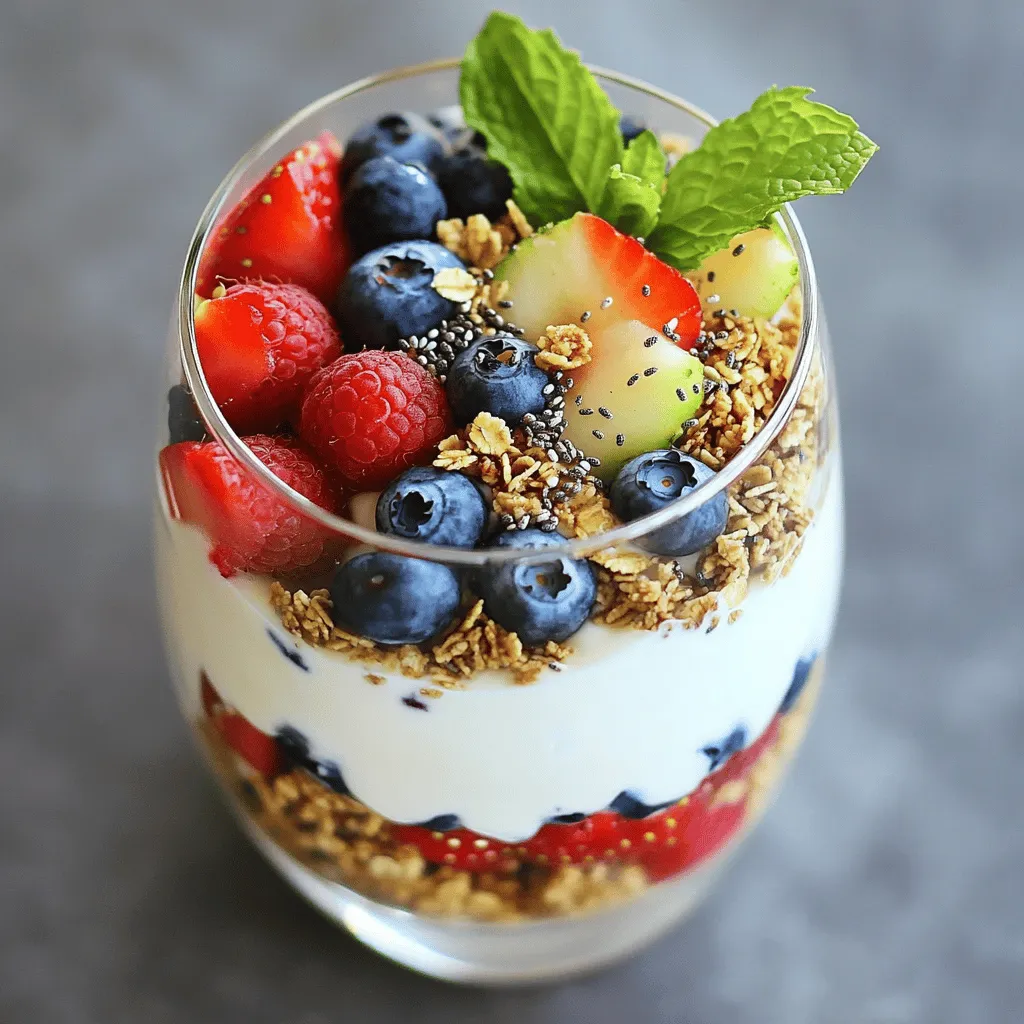
Healthy Greek Yogurt Parfaits Easy and Delicious Recipe
Are you ready to transform breakfast with a Healthy Greek Yogurt Parfait? This easy and delicious recipe combines creamy Greek Read Full Recipe -
Chocolate Chip Banana Bread Irresistible Comfort Food
If you love comfort food, then Chocolate Chip Banana Bread is for you! It combines soft, ripe bananas with sweet Read Full Recipe -

Lemon Blueberry Scones Irresistible Morning Treat
Start your day with a burst of flavor! These Lemon Blueberry Scones are a delightful morning treat. With tender crumb Read Full Recipe -

Lemon Blueberry Scones Delightfully Fluffy Recipe
Get ready to bake the flakiest, most flavorful Lemon Blueberry Scones you’ll ever taste! This easy recipe combines the bright Read Full Recipe -
Easy Homemade Granola Bars Healthy and Simple Recipe
Are you ready to whip up some easy homemade granola bars? I’ll show you a simple recipe that’s healthy and Read Full Recipe -
Tropical Fruit Salad Refreshing and Healthy Mix
Dive into a colorful world of flavors with my Tropical Fruit Salad! This healthy mix is bursting with fresh, tropical Read Full Recipe -

No-Bake Lemon Cheesecake Bites Tasty and Simple Dessert
Are you ready to indulge in a creamy treat without turning on the oven? No-Bake Lemon Cheesecake Bites are your Read Full Recipe
My Latest Recipes

hey,
i’m !
I’m so happy you’re here!
I’m not just sharing recipes I’m sharing a piece of my heart. I hope these dishes bring you comfort, joy, and maybe even a new favorite.

![- 6 large eggs - 1/2 cup milk - 1 cup spinach, chopped - 1/2 cup cherry tomatoes, halved - 1/2 cup bell pepper, diced - 1/4 cup red onion, finely chopped - 1/2 cup feta cheese, crumbled - 1 teaspoon garlic powder - 1 teaspoon dried oregano - Salt and pepper to taste - 2 tablespoons olive oil When I make a vegetable frittata, I focus on fresh ingredients. Fresh veggies bring out great flavors. I love using a mix of bell peppers for color and taste. Cherry tomatoes add a nice sweetness. Spinach gives it a bright green look and packs in nutrients. For the eggs, I choose large ones. They hold up well in the frittata. The milk adds creaminess but is not too heavy. Feta cheese crumbles add a salty kick. - Choose Seasonal Vegetables: This gives your frittata the best flavor. Look for local produce at farmers' markets. - Inspect for Freshness: Check for firm, bright vegetables. Avoid any that feel soft or look dull. - Store Properly: Keep eggs and veggies in the fridge. This keeps them fresh longer. - Prep Ahead: Wash and chop your veggies before cooking. This saves time and makes cooking easier. Using fresh, high-quality ingredients sets the stage for a delicious vegetable frittata. If you want to try this recipe, check out the Full Recipe for more details! Start by preheating your oven to 375°F (190°C). This step ensures the frittata cooks evenly. In a large bowl, mix together six large eggs, 1/2 cup of milk, garlic powder, oregano, and salt and pepper. Whisk these ingredients well until they blend smoothly. Next, heat two tablespoons of olive oil in an oven-safe skillet over medium heat. I prefer using a cast iron skillet for better heat retention. Add 1/4 cup of finely chopped red onion and 1/2 cup of diced bell pepper. Sauté them for about 3-4 minutes until the onions are soft. Then, toss in 1 cup of chopped spinach and 1/2 cup of halved cherry tomatoes. Cook for another 2 minutes, stirring often, until the spinach wilts. Pour the egg mixture over the sautéed vegetables. Stir gently to mix everything well. Sprinkle 1/2 cup of crumbled feta cheese on top. Cook on the stove for 2 minutes to set the edges. Then, transfer the skillet to the oven. Bake for 15-20 minutes until the frittata is puffed and the center is set. Once done, remove it from the oven and let it cool for a few minutes before slicing. For more details, refer to the Full Recipe. To make a great vegetable frittata, you need to focus on texture. A frittata should be soft but firm. Start by cooking the vegetables just enough. This way, they stay tender and keep their flavor. Sauté them on medium heat for about 5-6 minutes. This helps to release their juices without making them mushy. Using an oven-safe skillet is key. A cast iron skillet works best. It heats evenly and keeps the frittata warm. Plus, it can go straight from the stove to the oven. This makes cooking easier and helps the frittata rise nicely. Feel free to switch up the veggies. You can use zucchini, mushrooms, or even broccoli. Just remember to chop them small for even cooking. If you have leftover veggies, throw them in too! This makes the dish fun and unique each time. Cheese can change the whole taste. Feta is a great choice, but try cheddar or goat cheese for something different. You can also add spices. A pinch of paprika or red pepper flakes can give a nice kick. Herbs like basil or thyme can add freshness. Use what you love! For more ideas, check out the Full Recipe for inspiration. {{image_2}} You can easily make this vegetable frittata fit many diets. For a vegetarian version, just leave out any meat. The recipe is already vegetarian-friendly because it uses eggs and fresh veggies. If you want to make it vegan, replace the eggs with a mixture of chickpea flour and water. This mix gives a nice texture and taste. Also, skip the cheese or use a vegan cheese alternative. For gluten-free options, you don’t need to worry at all! The frittata is naturally gluten-free since it uses no flour. Just make sure all your ingredients, like cheese or any added spices, are gluten-free. This way, everyone can enjoy a hearty and healthy breakfast. To make your frittata even more special, try adding different herbs. For a fresh twist, mix in basil, thyme, or rosemary. These herbs add a burst of flavor that brightens the dish. You can also try a blend of herbs for a unique taste. If you want to include meats, think about adding cooked bacon, ham, or sausage. These meats add a savory note that pairs well with the eggs. You can also add cooked chicken for a protein boost. Just remember to cook the meat before adding it to the frittata mix. This helps ensure everything cooks evenly. For the complete recipe, check out the [Full Recipe]. To keep your vegetable frittata fresh, store it in the fridge. Place it in an airtight container. This helps prevent it from drying out. You can keep it for up to three days. If you want to save it longer, consider freezing it. For freezing, let the frittata cool completely. Then, wrap it tightly in plastic wrap and place it in a freezer-safe bag. This way, it can stay fresh for up to two months. When you're ready to eat, just thaw it in the fridge overnight. Reheating frittata requires care to maintain its texture and flavor. The best method is using the oven. Preheat your oven to 350°F (175°C). Place the frittata on a baking sheet. Heat it for about 10-15 minutes. This warms it evenly without making it rubbery. You can also use a microwave if you’re in a hurry. Cut a slice and place it on a microwave-safe plate. Heat it for 30 seconds to 1 minute. Check it often to avoid overheating. Enjoy your frittata warm and tasty, just like when you first made it! Can you make frittata ahead of time? Yes, you can make a frittata ahead of time. It keeps well in the fridge. After baking, let it cool. Store it in an airtight container. It will stay fresh for up to three days. To serve, simply reheat it in the oven or microwave. This makes it a great choice for busy mornings. What vegetables work best in a frittata? Many vegetables work well in a frittata. Spinach and bell peppers add great flavor. Tomatoes bring juiciness, while onions add depth. You can also use zucchini, mushrooms, or broccoli. The key is to sauté them first. This enhances their taste and texture. Nutritional Information Overview A vegetable frittata is a healthy meal option. It is packed with protein from eggs. Each serving offers vitamins from fresh vegetables. It is also a good source of healthy fats, especially from feta and olive oil. This dish can be low in carbs, making it suitable for various diets. Benefits of Eating Vegetables in Breakfast Dishes Eating vegetables at breakfast offers many benefits. It helps you start the day with energy. Veggies provide fiber, which aids digestion. Having them in the morning can also support weight management. Plus, they boost your immune system with essential nutrients. Enjoying a vegetable frittata gives your body a healthy kick. For a tasty frittata, check out the Full Recipe. In this article, we explored the key ingredients and steps for a delicious vegetable frittata. We covered techniques to ensure the right texture and shared customization options for various diets. You learned how to store leftovers for freshness and reheating tips. A vegetable frittata is not just tasty; it’s also packed with nutrients. Enjoy making this dish and feel great about the healthy choices you’re making. Keep experimenting with flavors and vegetables!](https://emmasdish.com/wp-content/uploads/2025/06/d0c92555-845c-40a8-b349-d0793884ec67-300x300.webp)
![Choose firm cucumbers for the salad. Look for ones that are dark green. I prefer English cucumbers. They are long and have fewer seeds. You can also use Persian cucumbers. They are smaller and very crunchy. Wash them well before slicing. You will need a few more veggies to make this salad shine. Carrots add color and sweetness. Slice them into thin matchsticks, called julienne. Red bell peppers give a nice crunch and a pop of color. Green onions add a mild onion flavor. Lastly, fresh cilantro adds a bright taste. You can leave it out if you don’t like it. The dressing is simple but full of flavor. You will need rice vinegar, soy sauce, and sesame oil. These give the salad a tangy and savory kick. You also add sugar for a hint of sweetness. Chili flakes add heat, but you can adjust the amount. Don’t forget to toss in a little salt to enhance the flavors. For the full recipe, check out the details above! Start by washing the cucumbers well. Use two large cucumbers. Next, thinly slice them. You want nice, round pieces. Then, take one carrot and julienne it. This means cutting it into thin strips. Now, slice one red bell pepper into thin pieces. It adds color and crunch. Finally, chop three green onions and roughly chop a quarter cup of fresh cilantro. Mix all these veggies in a large bowl. In a small bowl, whisk together the dressing. Use three tablespoons of rice vinegar for tanginess. Add two tablespoons of soy sauce for some saltiness. Pour in one tablespoon of sesame oil for a nutty flavor. Then, add one teaspoon of sugar to balance it out. If you like spice, add half a teaspoon of chili flakes. Stir until the sugar dissolves completely. Now, pour the dressing over the mixed veggies. Toss gently to coat everything. Make sure all the vegetables get some dressing. Let the salad sit at room temperature for 15-20 minutes. This helps the flavors mix well. Just before serving, sprinkle toasted sesame seeds on top. Give it another light toss. Your Asian cucumber salad is now ready to enjoy! For a full recipe, check out the detailed instructions above. To boost the taste of your salad, consider adding fresh herbs. Mint and basil add bright notes. You can also mix in some garlic or ginger for extra depth. Adding a splash of lime juice gives it a fresh twist. Adjust the chili flakes based on your heat level. More chili means more kick! This salad pairs well with grilled meats or fish. Serve it as a side dish at barbecues. You can also use it as a filling in wraps or on rice bowls. It's great for summer picnics or potlucks. You can even serve it as a light lunch topped with protein. Serve the salad in a clear bowl to show off its colors. Use large, vibrant bowls or plates for impact. Garnish with extra cilantro and toasted sesame seeds. A sprinkle of chili flakes adds color and spice. These small touches make your dish look gourmet. For a fun twist, consider using small jars for individual servings. Try these tips to make your Asian Cucumber Salad shine. Check out the Full Recipe for all the details! {{image_2}} You can make this salad heartier by adding proteins. Grilled chicken or shrimp pairs well with the crisp veggies. Tofu is a great option for a plant-based choice. Simply cube it and toss it in with the salad. Adding proteins not only boosts the taste but also adds nutrition. Feel free to switch up the dressing for your taste. You can use peanut sauce for a nutty flavor. A sweet soy dressing can add richness. For a tangy kick, try a lime vinaigrette. Each option will change the flavor and make the salad unique. Experiment with different dressings to find your favorite! Using seasonal ingredients can elevate your salad. In summer, add fresh radishes or sliced mango for a sweet twist. In fall, try adding thin apple slices for crunch. You can also include fresh herbs like mint or basil for extra flavor. Seasonal ingredients keep your salad fresh and exciting. For the full recipe and more details, check out the complete guide to Crisp and Zesty Asian Cucumber Salad. To keep your Asian cucumber salad fresh, place it in an airtight container. This keeps air out and protects the salad from drying out. You should store it in the fridge. Glass or plastic containers work well. Avoid leaving it out at room temperature for too long, as it can spoil quickly. Your salad will last about 2 to 3 days in the fridge. After that, the cucumbers may become soggy. To enjoy it at its best, eat it within this time frame. If you notice any off smells or changes in texture, it's best to toss it. If you have leftover salad, you can repurpose it in various dishes. Toss it into a wrap for a crunchy bite. You can also add it to a rice bowl or mix it into a stir-fry for extra flavor. Just remember, the fresher the ingredients, the better the taste! For the full recipe, check out the details above. Yes, you can use different types of cucumbers. English cucumbers are great. They are long and have fewer seeds. Persian cucumbers work well too. They are small and very crunchy. You can even use pickling cucumbers if you want a more tangy taste. Just remember to slice them thinly for the best texture. To make your salad less spicy, simply reduce the chili flakes. Start with a pinch and taste. You can also skip them altogether if you prefer no heat. Adding a bit more sugar can balance the flavors too. If you like, you can mix in some extra veggies like bell peppers, which add sweetness. Yes, you can prepare the salad ahead of time. Just keep the dressing separate until you are ready to serve. Mix the vegetables and store them in the fridge. When you want to eat, pour the dressing over and toss. This keeps the salad crisp and fresh. For the best taste, serve within a day or two. Check the [Full Recipe] for more tips on prep time! In this post, we explored cucumbers, fresh veggies, and delicious dressings. You learned how to prepare, mix, and enhance your salad's flavor. I shared tips for serving and storing your dish. Variations allow for personal touches while fitting seasonal finds. Remember, great salads can be simple and fun. Use the ideas here to craft your unique creation. Enjoy your fresh salad today and boost your meals with more flavors!](https://emmasdish.com/wp-content/uploads/2025/06/ec355424-4335-4c9e-817d-5cfd4eb3a0ec-300x300.webp)
. How to mash avocado To start, take a ripe avocado. Cut it in half and remove the pit. Scoop the green flesh into a medium bowl. Use a fork to mash the avocado. Aim for a smooth consistency, but leave some small chunks for texture. This adds a nice feel to your toast. Preparing chickpea mixture Next, grab another bowl. Add 1 cup of drained canned chickpeas. Use a fork to mash them slightly. You want some chickpeas whole for a nice bite. Then, add 1 tablespoon of tahini, 1 tablespoon of lemon juice, and 1 minced garlic clove. Season with salt and pepper. Mix everything well until it looks creamy. Combining avocado and chickpeas Now it’s time to mix the two. Add the mashed avocado to the chickpea mixture. Stir until it’s well combined. Taste it and adjust the seasoning if needed. Your chickpea-avocado mixture is ready! Best methods for toasting For the best toast, I recommend using a non-stick skillet. Heat the skillet over medium heat. Add a little olive oil to help crisp the bread. This method gives a nice golden-brown finish. You can also use a toaster if you prefer. Tips for achieving golden-brown toast Toast each slice for about 2-3 minutes on each side. Keep an eye on it to avoid burning. If you like extra crispiness, you can toast it longer. Just remember, you want a nice crunch without losing flavor. Spreading the mixture Once your bread is toasted, take it off the heat. Use a knife to spread the chickpea-avocado mix on each slice. Be generous! You want every bite to be packed with flavor. Adding final touches for presentation To finish, sprinkle red pepper flakes on top for a bit of spice. You can also add fresh herbs like cilantro or parsley for color and flavor. For a beautiful presentation, serve your toast on a wooden board or a bright plate. This makes it look as good as it tastes! For the full recipe, check out Chickpea Avocado Toast Delight 🥑. - Adding extra toppings: You can add sliced hard-boiled eggs for protein. Cherry tomatoes or radishes add color and crunch. Try feta cheese for a salty kick. You can also sprinkle nuts or seeds for texture. - Seasoning suggestions: Experiment with cumin or smoked paprika for warmth. Fresh herbs like basil or dill can brighten the flavor. A drizzle of balsamic glaze adds sweetness and depth. - Best side dishes: Serve with a simple green salad for freshness. Fresh fruit, like berries or melon, makes a great side too. You can also pair it with sweet potato fries for contrast. - Pairing drinks: A fresh juice, like orange or green apple, complements the toast well. Herbal tea is a nice choice for a lighter option. If you prefer, a sparkling water with lemon adds a refreshing touch. - Health advantages of chickpeas and avocados: Chickpeas are high in fiber and protein, which help with digestion and fullness. They also contain essential vitamins and minerals. Avocados are rich in healthy fats, good for heart health. They provide vitamins E, K, and B6, which support overall health. - Caloric breakdown: One serving of this toast has about 300-350 calories. The healthy fats in avocados provide energy, while chickpeas offer protein and fiber. This makes it a balanced meal that keeps you satisfied longer. {{image_2}} You can change up your chickpea avocado toast with fun toppings. Consider adding fresh veggies like sliced tomatoes, radishes, or cucumbers. They add crunch and color. You could also try some roasted red peppers or sautéed spinach for extra flavor. Cheese is another great option. Feta cheese adds a salty kick. If you prefer creaminess, try goat cheese or ricotta. Sprinkle some on top to make your toast even tastier. To spice things up, think about using different herbs and spices. You can mix in cumin for a warm flavor or a pinch of smoked paprika for a smoky twist. Fresh herbs like basil, dill, or chives can brighten each bite. Switching up the bread can also change the taste. Use sourdough for a tangy flavor or rye for a hearty option. Gluten-free bread is great for those with dietary needs. Each type of bread gives your toast a unique character. If you're vegan, good news! This recipe is already vegan-friendly. You can enjoy it without any animal products. For gluten-free folks, just use gluten-free bread. It works well and keeps the dish delicious. If you want a low-carb version, skip the bread altogether. You can serve the chickpea and avocado mix in lettuce wraps or on cucumber slices. Both options keep it light and fun while still packed with flavor. To store your leftover chickpea avocado toast, place it in an airtight container. This keeps it fresh. You can also wrap it tightly in plastic wrap. Make sure to eat it within two days for the best taste. If you store it too long, the bread may get soggy. To prevent this, store the mixture and bread separately. To safely reheat your toast, use a toaster or an oven. Set the oven to 350°F (175°C) and warm the toast for about 5-7 minutes. This keeps the bread crispy. Avoid using the microwave, as it makes the bread soggy. If you must use a microwave, try it for just 10-15 seconds. You can freeze the chickpea mixture, but not the toast itself. To freeze, put the mixture in a freezer-safe bag. Remove as much air as possible before sealing. It stays fresh for about a month. When you're ready, thaw it in the fridge overnight. To reassemble, toast fresh bread and spread the thawed chickpea mixture on top. This method keeps the dish flavorful and fresh. Enjoy your tasty meal! To make Chickpea Avocado Toast, start by mashing a ripe avocado. In a bowl, mix rinsed chickpeas with tahini, lemon juice, garlic, salt, and pepper. Mash this mix slightly for texture. Then, combine the avocado with the chickpea mixture. Toast slices of whole-grain bread in olive oil until golden. Spread the chickpea-avocado mix on the toast. For the full recipe, check the details above. Yes, you can use various bread types. Here are some great options: - Sourdough - Rye - Gluten-free bread - Pita bread These choices can add unique flavors and textures to your toast. You can add many tasty mix-ins and toppings. Consider trying: - Cherry tomatoes, sliced - Radishes, thinly sliced - Cucumber, diced - Feta cheese, crumbled - A drizzle of balsamic glaze These additions can boost flavor and nutrition. Yes, Chickpea Avocado Toast is very healthy. Here are some benefits: - Chickpeas provide protein and fiber, helping you feel full. - Avocado is rich in healthy fats, good for your heart. - Whole-grain bread adds complex carbs for energy. Together, these ingredients create a balanced meal. Chickpea Avocado Toast is best enjoyed fresh but can last about one day in the fridge. Store any leftovers in an airtight container. The bread may get soggy, so eat it quickly for the best taste. Chickpea avocado toast is simple to make and full of flavor. You start with ripe avocados and canned chickpeas, then mash, mix, and spread. Toast your bread for the perfect crunch. Don’t forget to add your own toppings and enjoy it with fresh herbs. This dish is flexible, so try new flavors! Whether you want to eat healthy or need a quick meal, this toast fits the bill. Make a batch, share it, and enjoy every bite. Happy cooking!](https://emmasdish.com/wp-content/uploads/2025/07/272c5bbc-f1a7-4dd0-b647-af222511af36-300x300.webp)
Southwest Chicken Soup Flavorful and Easy Recipe
Looking for a soup that warms you up and excites your taste buds? Dive into this flavorful Southwest Chicken Soup recipe! It’s not only…