
Latest & Greatest
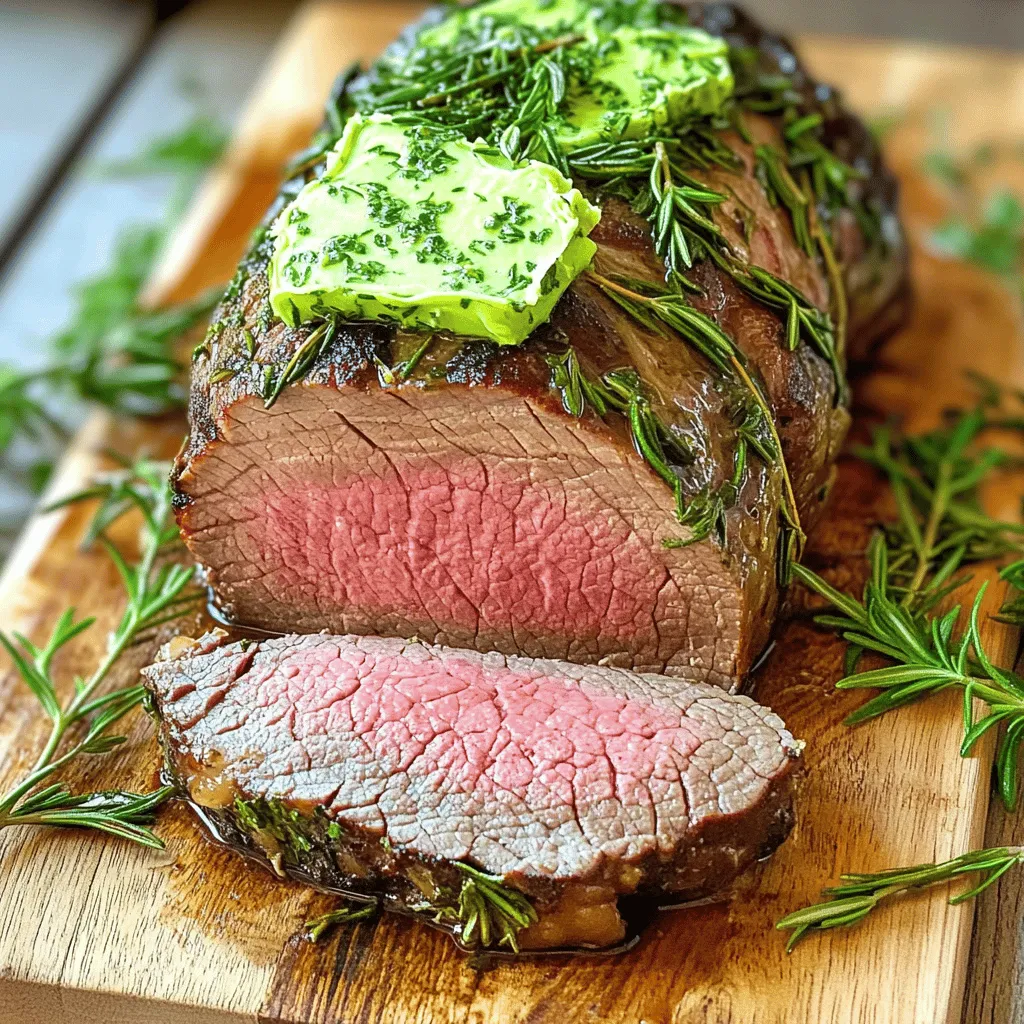
Herb Butter Beef Tenderloin Roast Deliciously Tender
Get ready for a mouthwatering experience with my Herb Butter Beef Tenderloin Roast! This dish stands out with its rich
Read more…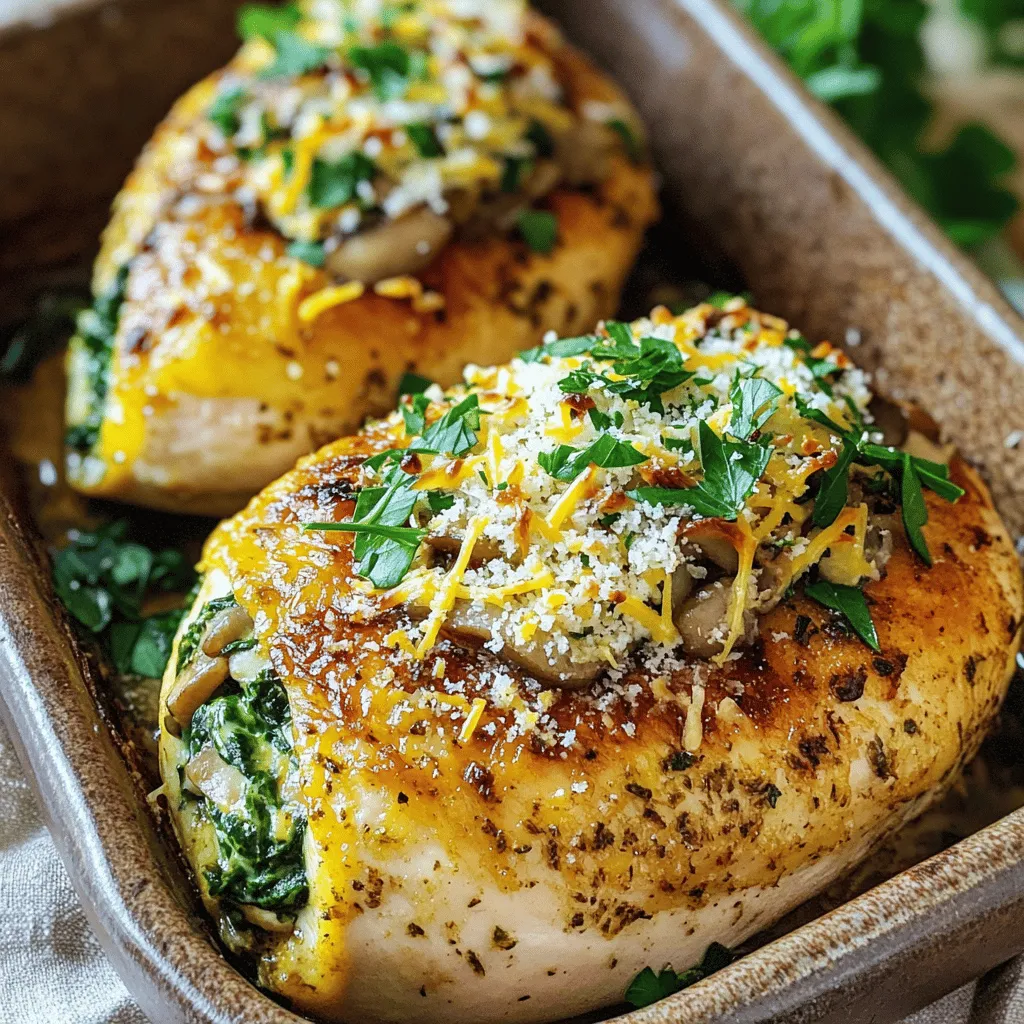
Healthy Mushroom Stuffed Chicken Breast Easy Dinner Recipe
Looking for a simple and tasty dinner? Try my Healthy Mushroom Stuffed Chicken Breast recipe! Packed with fresh mushrooms, spinach,
Read more…
Easy Stromboli Dinner Quick and Tasty Meal Idea
Looking for a quick and tasty dinner idea? This Easy Stromboli is just what you need! With simple ingredients like
Read more…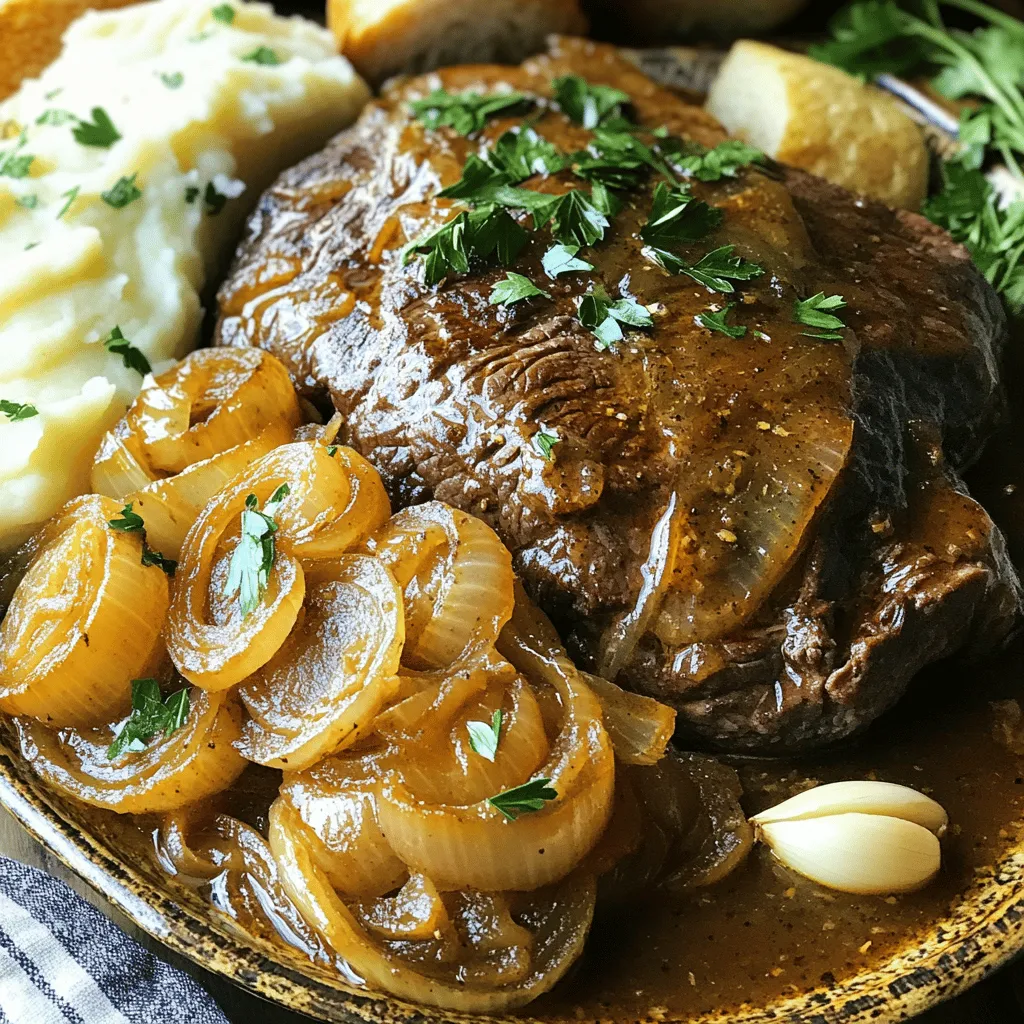
Savory French Onion Pot Roast Easy and Flavorful Recipe
If you’re craving a warm, hearty meal, look no further than this Savory French Onion Pot Roast. This dish combines
Read more…
Lobster Tails with Garlic Herb Butter Sauce Delight
Are you ready to impress your dinner guests? Let’s dive into the rich, buttery world of Lobster Tails with Garlic
Read more…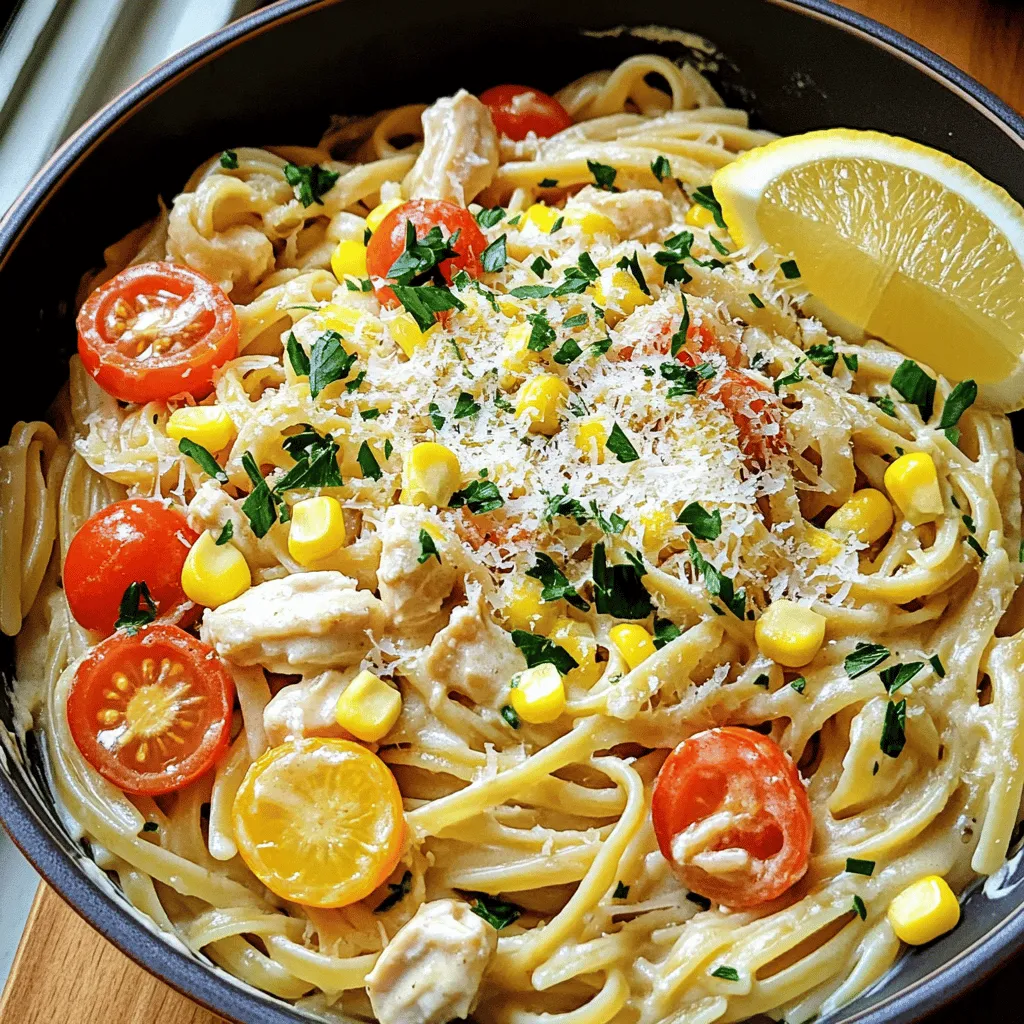
Cowboy Butter Chicken Linguine Flavorful Dinner Dish
Looking to elevate your dinner game? Try Cowboy Butter Chicken Linguine! This dish blends juicy chicken, rich flavors, and creamy
Read more…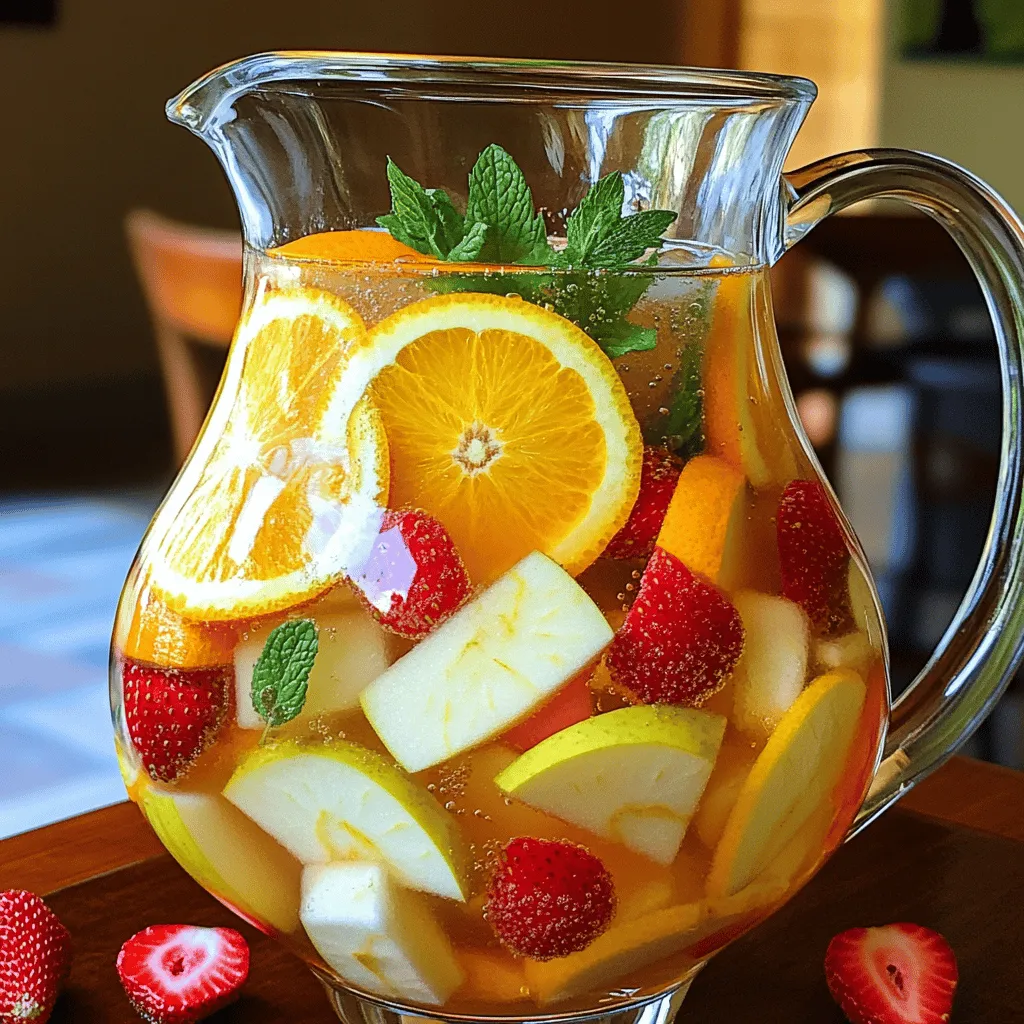
White Sangria Refreshing and Fruity Recipe Guide
Are you ready to beat the heat with a glass of refreshing white sangria? This fruity drink combines sparkling water,
Read more…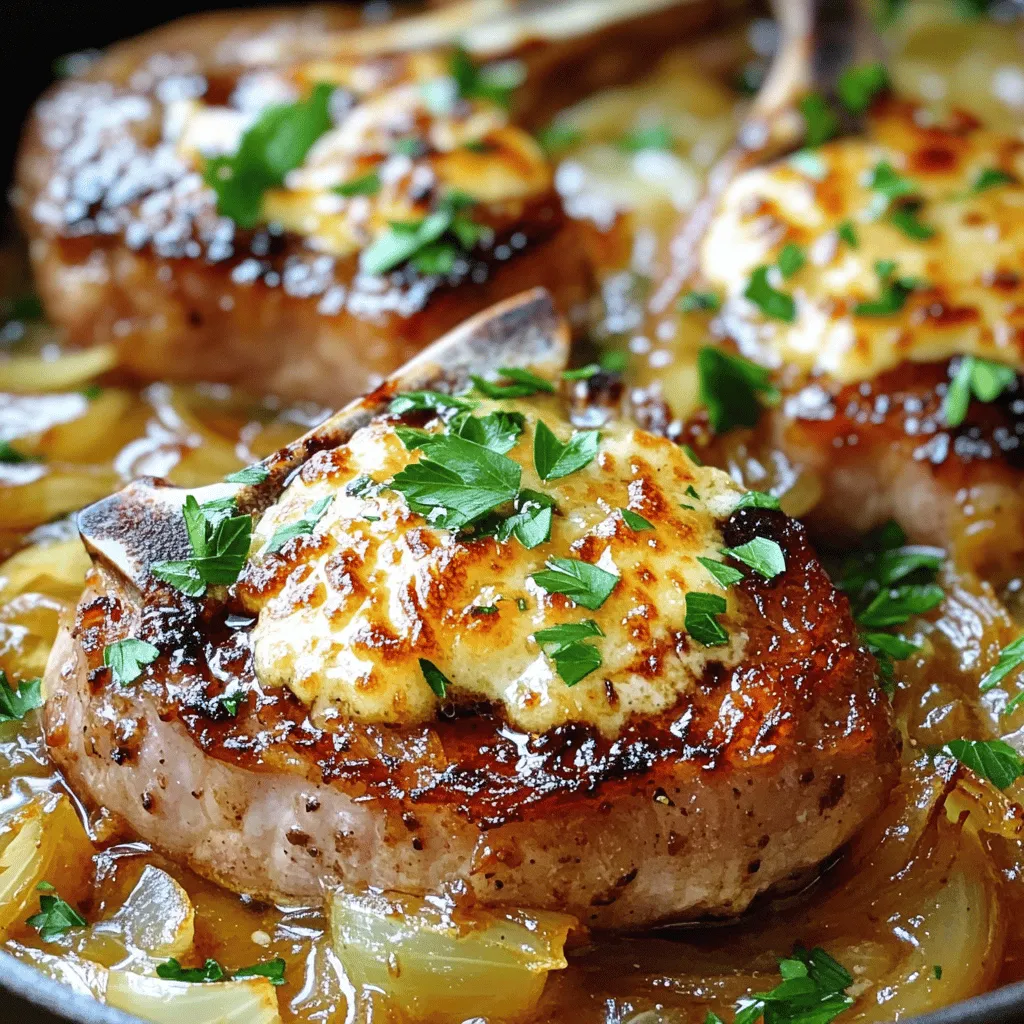
French Onion Smothered Pork Chops Flavorful Comfort Dish
Welcome to the cozy world of French Onion Smothered Pork Chops! This dish brings rich flavors and warmth to your
Read more…browse recipes


Candy Corn Snack Mix Tasty Fall Treat for Everyone
Looking for a fun fall treat? Candy Corn Snack Mix is perfect for you! It combines sweet candy corn with crunchy snacks for a…
My Latest Desserts
-

Lemon Blueberry Pound Cake Delightful Easy Recipe
Are you ready to indulge in a sweet treat that’s as bright as a sunny day? This Lemon Blueberry Pound Read Full Recipe -

Chocolate Chip Banana Bread Muffins Delightful Treat
Are you ready to bake something scrumptious? These Chocolate Chip Banana Bread Muffins are a delightful treat you won’t want Read Full Recipe -

Apple Cinnamon French Toast Bake Deliciously Simple
Are you ready to whip up a cozy breakfast that will impress everyone? My Apple Cinnamon French Toast Bake is Read Full Recipe -
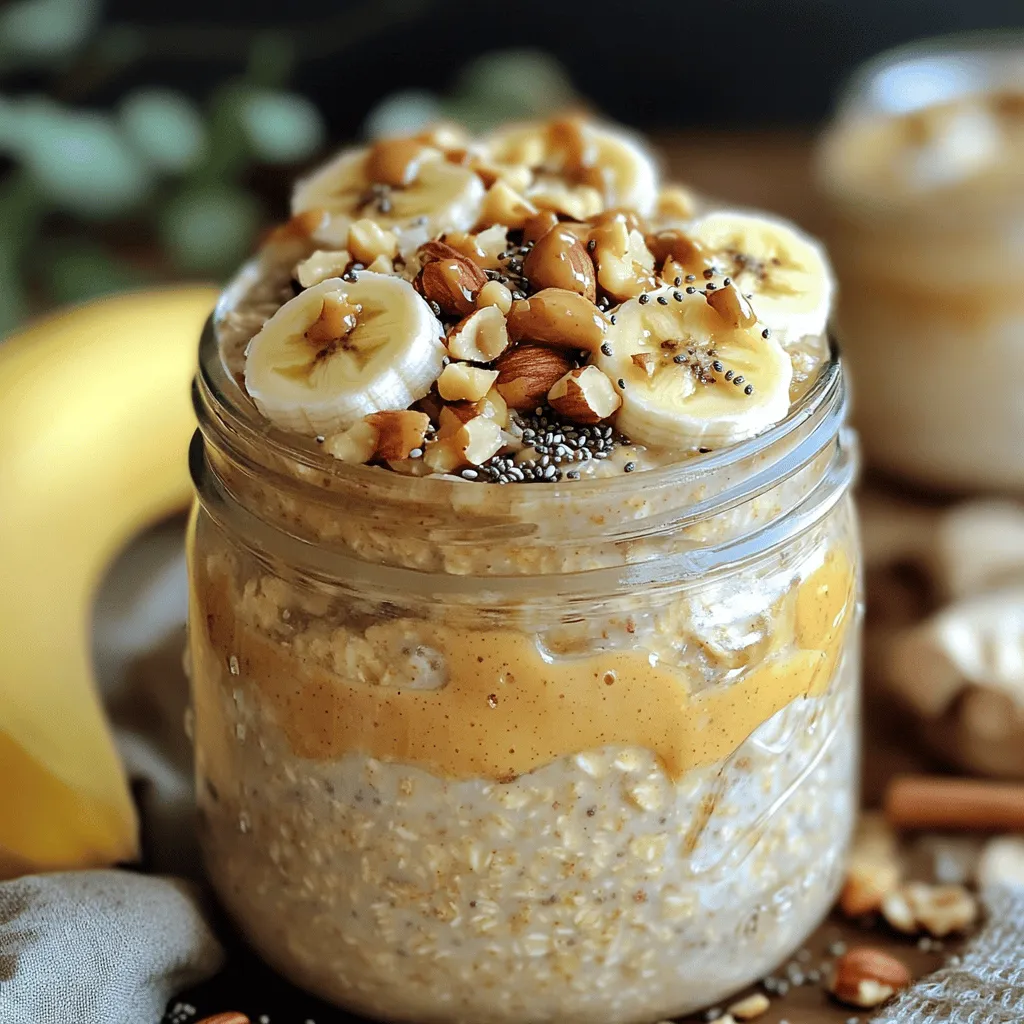
Peanut Butter Banana Overnight Oats Simple Breakfast Recipe
Start your day right with my Peanut Butter Banana Overnight Oats recipe! This simple, tasty meal takes just minutes to Read Full Recipe -

Chocolate Dipped Pretzel Rods Irresistible Treat Recipe
Are you ready to create a fun and delicious treat? Let’s dive into making chocolate dipped pretzel rods! This easy Read Full Recipe -
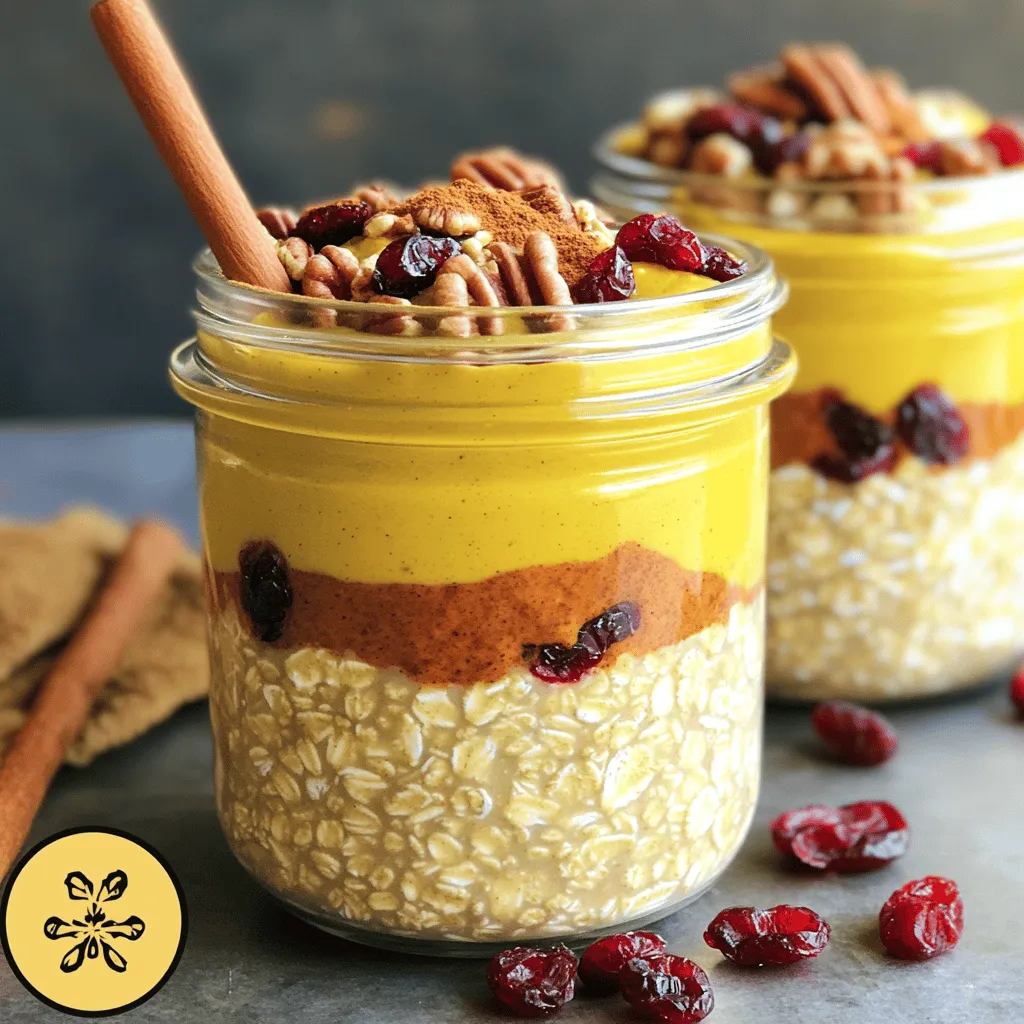
Pumpkin Spice Overnight Oats Simple and Tasty Recipe
Are you ready to dive into the cozy flavors of fall? Pumpkin Spice Overnight Oats are easy to make and Read Full Recipe -

Blueberry Lemon Yogurt Muffins Savory and Healthy Treat
If you’re looking for a tasty and healthy snack, you’ve come to the right place! My Blueberry Lemon Yogurt Muffins Read Full Recipe -

Chocolate Covered Strawberry Bark Delicious Treat Recipe
If you love sweet treats, this Chocolate Covered Strawberry Bark recipe is a must-try! I’ll guide you through the steps Read Full Recipe -

Mocha Oreo Icebox Cake Delicious and Easy Recipe
Are you ready to impress your friends with a dessert that’s both easy and delicious? This Mocha Oreo Icebox Cake Read Full Recipe -
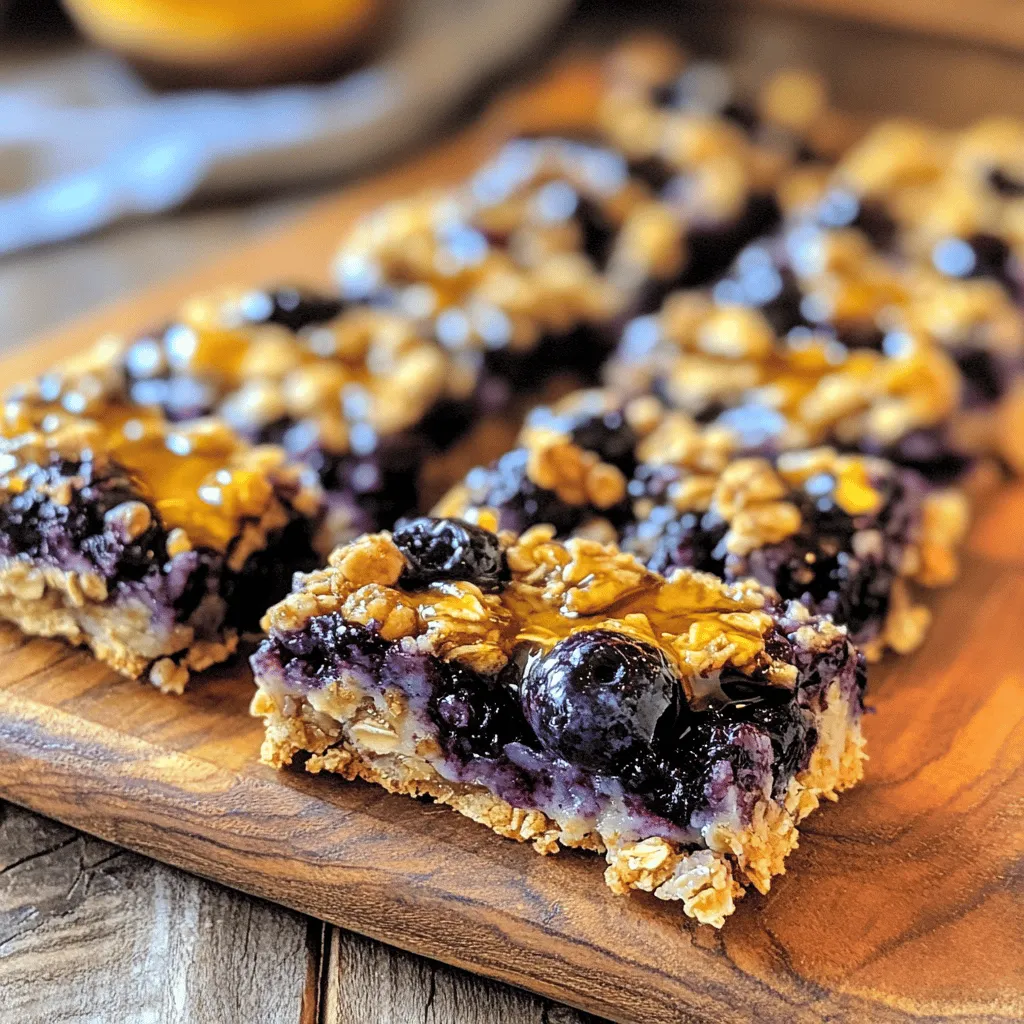
Blueberry Oatmeal Breakfast Bars Healthy and Tasty Snack
Looking for a healthy snack that’s both tasty and easy to make? Try my Blueberry Oatmeal Breakfast Bars! These bars Read Full Recipe
My Latest Recipes

hey,
i’m !
I’m so happy you’re here!
I’m not just sharing recipes I’m sharing a piece of my heart. I hope these dishes bring you comfort, joy, and maybe even a new favorite.
![- 8 large ripe tomatoes - 1 whole bulb of garlic - 1 medium onion - Fresh basil leaves for garnish - Olive oil - Vegetable broth - Dried basil - Sugar (optional) - Salt and pepper - ½ cup heavy cream To create the best Roasted Garlic Tomato Soup, start with fresh ingredients. Ripe tomatoes bring sweetness and depth. Use a full bulb of garlic for rich flavor. Don't skip the onion; it adds a nice base. Fresh basil leaves give a bright touch when serving. Next, gather your pantry items. Olive oil helps to roast the veggies until soft. Vegetable broth makes the soup hearty and tasty. Dried basil enhances the aroma, while sugar balances acidity. Finally, season with salt and pepper to taste. For a creamier soup, consider adding heavy cream. This optional ingredient elevates the dish, making it smooth and rich. If you want a simple yet tasty soup, you can skip the cream. You can find the full recipe for this delightful soup in the earlier section. First, preheat your oven to 400°F (200°C). This helps the tomatoes roast well. Next, take a large baking tray and lay out the halved tomatoes with the cut side facing up. Drizzle 2 tablespoons of olive oil over them. Sprinkle salt and pepper to taste. Now, take a whole bulb of garlic, slice off the top, and place it on the tray with the tomatoes. Put the tray in the oven and roast for 30-35 minutes. You want the tomatoes to caramelize and the garlic to become soft and golden. This roasting brings out the sweet flavors in the tomatoes and garlic. It makes your soup rich and tasty. While the tomatoes and garlic roast, heat 1 tablespoon of olive oil in a large pot over medium heat. Add the chopped onion and cook until it looks clear, which takes about 5-7 minutes. When the tomatoes and garlic are done, take them out of the oven. Add them to the pot with the onions. Pour in 2 cups of vegetable broth and add 1 teaspoon of dried basil. If you like, you can also add 1 teaspoon of sugar to balance the acidity of the tomatoes. Bring this mixture to a simmer and let it cook for 10 minutes. This time helps all the flavors blend. Now, carefully blend the soup until it is smooth. You can use an immersion blender or a regular blender, but be careful with hot liquids. If you want a creamier soup, stir in ½ cup of heavy cream and heat for another 2-3 minutes. Always taste and adjust with salt and pepper if needed. Serve the soup hot, garnished with fresh basil leaves. For a nice touch, you can drizzle some extra olive oil or cream on top. Enjoy this lovely soup with some crusty bread for a delightful meal. You can find the full recipe above. Using fresh herbs makes a big difference. Fresh basil adds brightness and depth. Dried herbs work too but lack that vivid taste. To make your soup shine, season it well. Taste as you go. Add salt and pepper in small amounts. This helps balance the natural sweetness of tomatoes. For a smooth soup, blend well. An immersion blender works great. If using a regular blender, be careful with hot soup. Blend in batches to avoid spills. If you want creaminess, add heavy cream slowly. You can skip it for a lighter soup. Serve your soup in rustic bowls. A drizzle of olive oil or cream looks nice on top. Fresh basil leaves add color and flavor. Crusty bread is a perfect match. The bread soaks up the soup and adds texture. Enjoy the flavors together for a delightful meal. For the full recipe, check the link. {{image_2}} You can spice up this soup with red pepper flakes. Just a pinch adds heat. If you want more depth, add other vegetables. Carrots, bell peppers, or even celery work well. Roast them with the garlic and tomatoes for a sweet flavor. To make it vegan-friendly, skip the heavy cream. The soup tastes great without it! You can add a splash of almond milk or coconut cream for a touch of richness. For gluten-free options, make sure your broth is gluten-free. Most vegetable broths are safe to use. You can serve this soup as a starter or a main dish. Pair it with a fresh salad or crusty bread for a full meal. If you have leftovers, transform them into a pasta sauce or a base for a stew. The options are endless! To store leftovers, let the soup cool to room temperature. Then, pour it into a clean container. I recommend using airtight glass or plastic containers. This keeps the soup fresh. Make sure to cover it well. You can store it in the fridge for up to five days. If you want to keep the soup longer, freezing is a great option. Use freezer-safe containers or freezer bags for storage. Be sure to leave space at the top, as the soup will expand when frozen. This soup freezes well for up to three months. When you're ready to eat, thaw it overnight in the fridge. To reheat, warm it on the stove or in the microwave. Stir it well to heat evenly. In the fridge, Roasted Garlic Tomato Soup lasts about five days. If you freeze it, it can stay good for around three months. Always check for any off smells or changes in color before eating. Enjoy this comforting soup at its best! If you do not have vegetable broth, you can use chicken broth. It adds great flavor. Another option is to use water with added herbs. This will give a nice base. Always taste as you go to check the flavor. Yes, you can make this soup ahead of time. Just cook, cool, and store it in the fridge. It will keep well for up to three days. Reheat it on the stove when you want to serve. You can also freeze it for longer storage. To add heat, try red pepper flakes or cayenne pepper. You can also add chopped jalapeños. Start with a little bit, then taste. Adjust the heat to your liking. Yes, you can use canned tomatoes. Just make sure to drain excess liquid. Use two cans of whole or diced tomatoes. The flavor will be a bit different, but still delicious. You may want to reduce the cooking time. This soup is wonderful with crusty bread. You could also add a drizzle of olive oil on top. A sprinkle of fresh basil will make it look nice. Serve with a side salad for a full meal. Check the [Full Recipe] for more serving ideas! This blog post covered how to make Roasted Garlic Tomato Soup. You learned about the fresh and pantry ingredients you need. I shared step-by-step instructions for preparation, roasting, and blending. Tips and variations offered ways to enhance flavor and texture. Remember, leftovers can be stored properly for later enjoyment. In summary, making this soup is easy and fun. Feel free to experiment and enjoy the different flavors. Cooking should be a joyful experience. Happy soup-making!](https://emmasdish.com/wp-content/uploads/2025/05/009f8a87-f482-4950-849e-7be89e836532-300x300.webp)
Vegan Creamy Roasted Red Pepper Pasta Delight
Are you ready to enjoy a simple yet delicious meal? My Vegan Creamy Roasted Red Pepper Pasta Delight is the perfect dish for everyone,…
![- 12 oz pasta (e.g., penne or fusilli) - 2 large red bell peppers - 1 tablespoon olive oil - 3 cloves garlic, minced - 1 cup raw cashews (soaked in water for at least 2 hours) - 1 cup vegetable broth - 1 tablespoon nutritional yeast - 1 tablespoon lemon juice - Salt and pepper to taste - Fresh basil leaves for garnish Gather these items before you start cooking. The pasta is your base, and the red peppers add a sweet and smoky flavor. Olive oil brings everything together, and garlic gives a nice kick. Soaked cashews create a creamy texture in the sauce. The vegetable broth adds depth, while nutritional yeast gives a cheesy taste without dairy. Lemon juice brightens the dish, and salt and pepper enhance all the flavors. Fresh basil leaves make it look pretty and add a fresh note. You can find the full recipe for this delightful dish later on. - Preheat your oven to 425°F (220°C). - Slice the red bell peppers in half and remove the seeds. - Place the peppers cut side down on a baking sheet. - Roast them for 20-25 minutes until the skins blister and char. - After roasting, let the peppers cool for a few minutes. - Peel off the skins carefully. - Chop the roasted peppers into smaller pieces. - In a large pot, bring salted water to a boil. - Add the pasta, cooking it until al dente, as per package instructions. - Reserve one cup of pasta water before draining the pasta. - Set the drained pasta aside for later use. - In a blender, combine roasted red peppers and soaked cashews. - Add minced garlic, vegetable broth, nutritional yeast, lemon juice, salt, and pepper. - Blend the mixture until it turns smooth and creamy. - In the same pot used for pasta, return the cooked pasta. - Pour the red pepper sauce over the pasta. - Toss well to coat the pasta evenly. - Add reserved pasta water a little at a time if the sauce is too thick. - Taste and adjust seasoning as needed. - Heat the mixture over low heat for a couple of minutes. - Serve right away, garnished with fresh basil leaves. This simple process creates a rich and creamy vegan dish. You can find the [Full Recipe] for more details. To get that perfect creamy texture, use soaked cashews. Soaking them for at least two hours makes them soft and easy to blend. This gives your sauce a rich, smooth feel. If your sauce turns out too thick, adjust it with reserved pasta water. Add a little at a time until it reaches your desired consistency. Spices can elevate your dish. Try adding red pepper flakes for a kick of heat. You can also mix in vegetables for extra nutrition. Spinach or peas work well and add color. This not only boosts flavor but also makes your meal healthier. Pair your pasta with a side salad or garlic bread for a complete meal. Both options add crunch and flavor. This dish is also great for meal prep. Pack it into lunchboxes for easy weekday meals. Just reheat and enjoy! {{image_2}} You can easily adjust this recipe for different diets. If you need a gluten-free option, try chickpea pasta or any gluten-free pasta. Both options work well and keep the dish tasty. For those avoiding nuts, use sunflower seeds or silken tofu instead of cashews. These swaps still give you a creamy sauce without the nuts. Want to mix up the flavors? You can add more veggies! Spinach, zucchini, or even mushrooms blend well into the sauce. They add nutrition and color. You can also try herbs like thyme or oregano. These herbs bring a new twist and make the dish even more fragrant. If you're short on time, consider a store-bought vegan cream. It saves time and still tastes great. You can also mix in other sauces, like marinara or pesto, for a unique flavor. Each alternative lets you create a new version of this creamy pasta. For the full recipe, check out the link provided. To keep your vegan creamy roasted red pepper pasta fresh, seal it in an airtight container. Place the container in the refrigerator. This dish stays good for about 3 to 5 days. The creamy sauce may thicken, but it will still taste great. You can freeze the creamy sauce for later use. First, let it cool completely. Transfer it to a freezer-safe container. When you freeze it, use it within 1 to 2 months for the best taste. If you see ice crystals, the sauce may lose some flavor. When you reheat the pasta, aim to keep its creamy texture. The stovetop is best for reheating. Add a splash of water or broth to help restore creaminess. If you use a microwave, heat it in short bursts. Stir often to avoid hot spots. Enjoy your creamy pasta just as you made it! Yes, you can use different types of pasta. Some suggestions include: - Whole wheat pasta for added fiber - Gluten-free pasta made from chickpeas or brown rice - Spaghetti for a classic look - Fusilli or rotini for more sauce coverage Using a pasta you enjoy makes the dish even better. Just cook it according to the package instructions. If you like heat, there are easy ways to spice up your pasta. Here are some options: - Add red pepper flakes to the sauce for a kick - Mix in diced jalapeños or serrano peppers - Use spicy garlic powder in the sauce - Drizzle a bit of hot sauce on top before serving These additions can enhance the flavor and make it exciting. This recipe is great for meal prep! Here are some tips to help: - Cook the pasta and sauce separately to keep the texture. - Store the sauce in an airtight container for up to 5 days. - Keep cooked pasta in a separate container, also for 5 days. - Reheat the sauce and pasta together on the stove or in the microwave. Meal prepping this dish saves time and makes for quick meals! In this blog post, we explored a delicious creamy pasta dish. We started with the main and additional ingredients you need. Then, we went through easy steps to prepare it. I shared tips for perfect texture and flavor. Plus, you learned about variations and storage options. This recipe is easy to customize, so have fun with it. Enjoy cooking and sharing this tasty dish with others!](https://emmasdish.com/wp-content/uploads/2025/07/982ba21e-a058-40ff-b3d3-28c410105247.webp)
