

Latest & Greatest
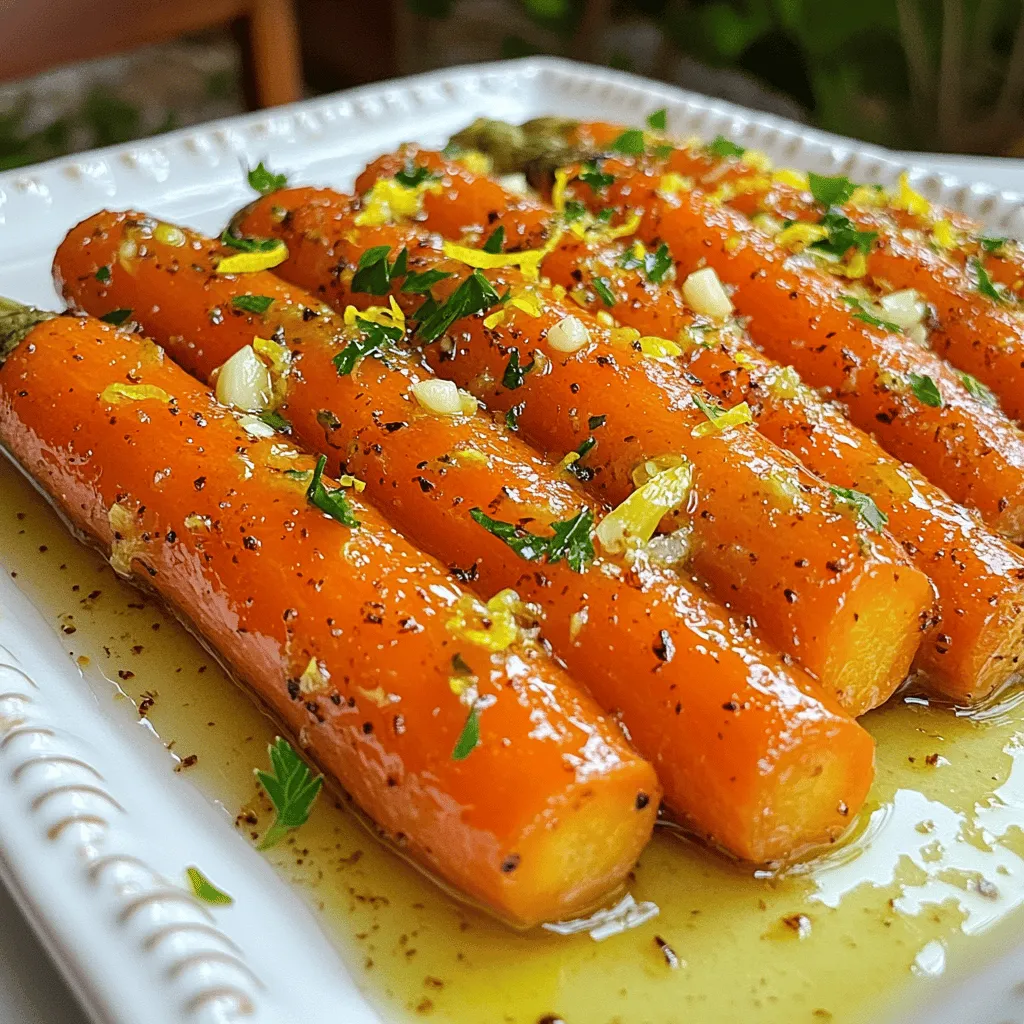
Tangy Lemon Garlic Roasted Carrots Flavorful Side Dish
Looking for a vibrant side dish that adds zest to your meals? Try my Tangy Lemon Garlic Roasted Carrots! With
Read more…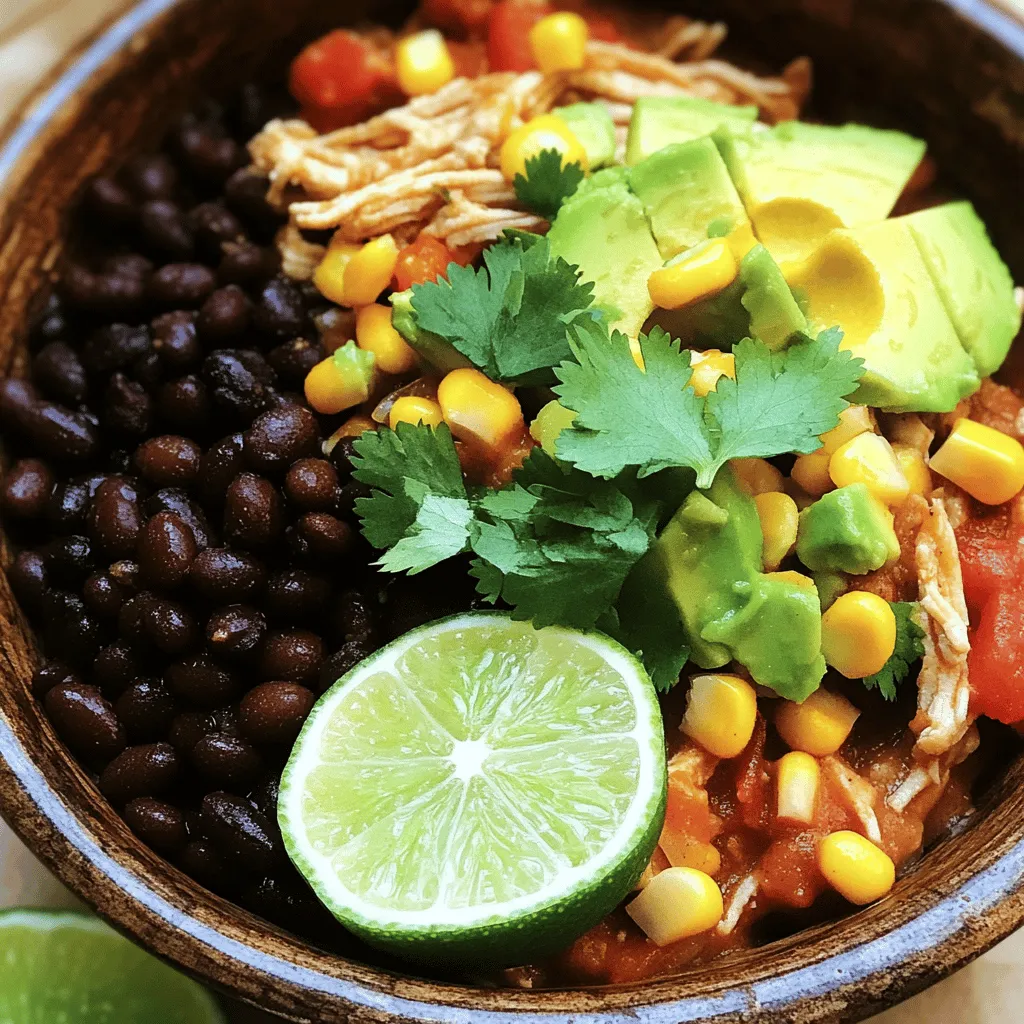
Crockpot Mexican Chicken Flavorful and Easy Meal
Are you in search of a simple yet delicious dinner idea? Look no further than my Crockpot Mexican Chicken! With
Read more…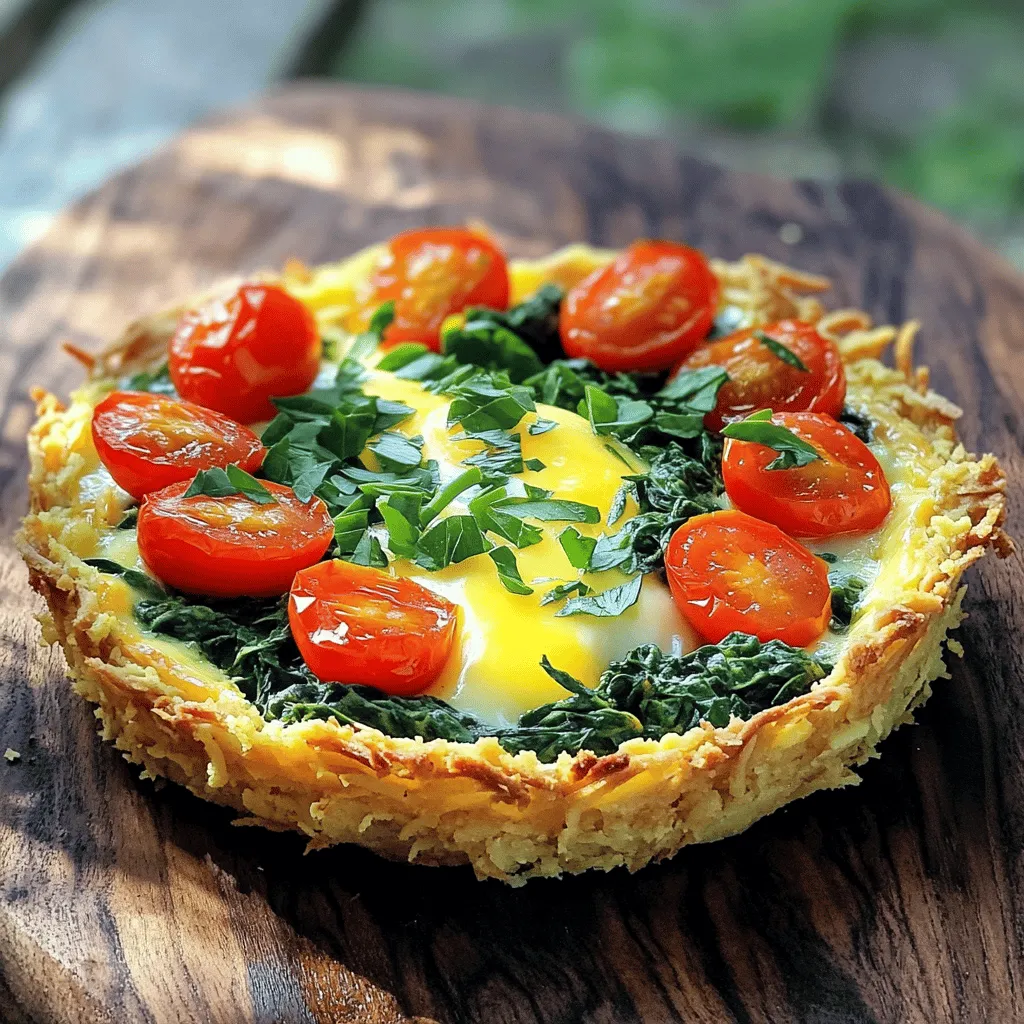
Spring Hash Brown Crust Quiche Flavorful Easy Recipe
Looking for a delicious and easy recipe to brighten your spring brunch? This Spring Hash Brown Crust Quiche is just
Read more…browse recipes


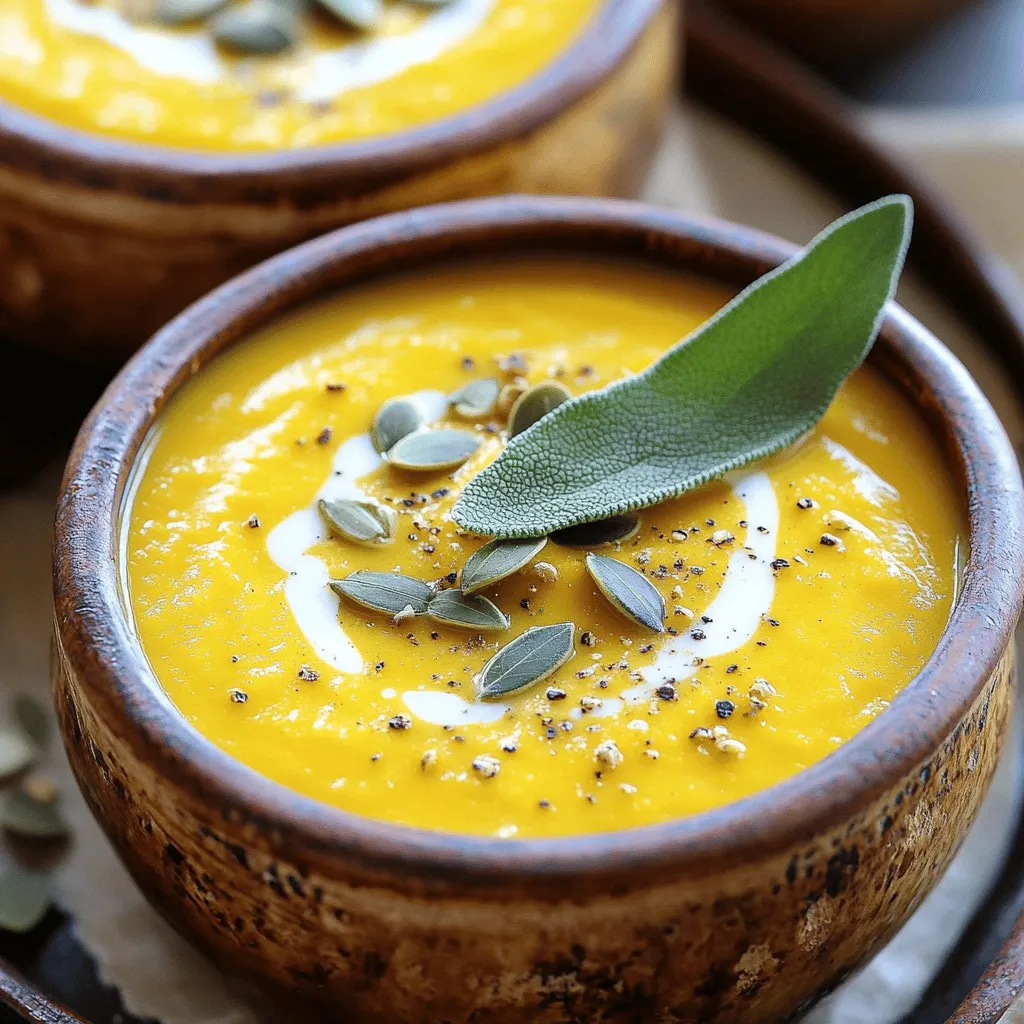
Simple Squash Soup Comforting and Easy Recipe
Looking for a cozy meal that’s easy to make? My Simple Squash Soup is the answer! With just a few fresh ingredients like butternut…
My Latest Desserts
-

Raspberry Chocolate Chip Scones Flaky and Tasty Treat
If you love delicious treats, Raspberry Chocolate Chip Scones are a must-try. These scones are flaky, tasty, and perfect for Read Full Recipe -

Stuffed French Toast Roll Ups Delicious Morning Treat
Wake up your taste buds with my amazing Stuffed French Toast Roll Ups! They’re easy to make and perfect for Read Full Recipe -

Cinnamon Roll French Toast Bake Irresistible Treat
If you love breakfast and sweet treats, you’re in for a real delight! Imagine waking up to the rich aroma Read Full Recipe -

Chocolate Covered Banana Bites Tasty and Easy Recipe
If you love sweet treats but want something simple, chocolate-covered banana bites are perfect for you. These tasty snacks combine Read Full Recipe -

Cinnamon Roll Mug Cake Quick and Tasty Treat
Craving something sweet but short on time? This Cinnamon Roll Mug Cake is your quick fix! In just minutes, you Read Full Recipe -

Raspberry Almond Thumbprint Cookies Simple Delight
Looking for a delightful treat that’s simple to make? Raspberry Almond Thumbprint Cookies are just the answer! These cookies combine Read Full Recipe -
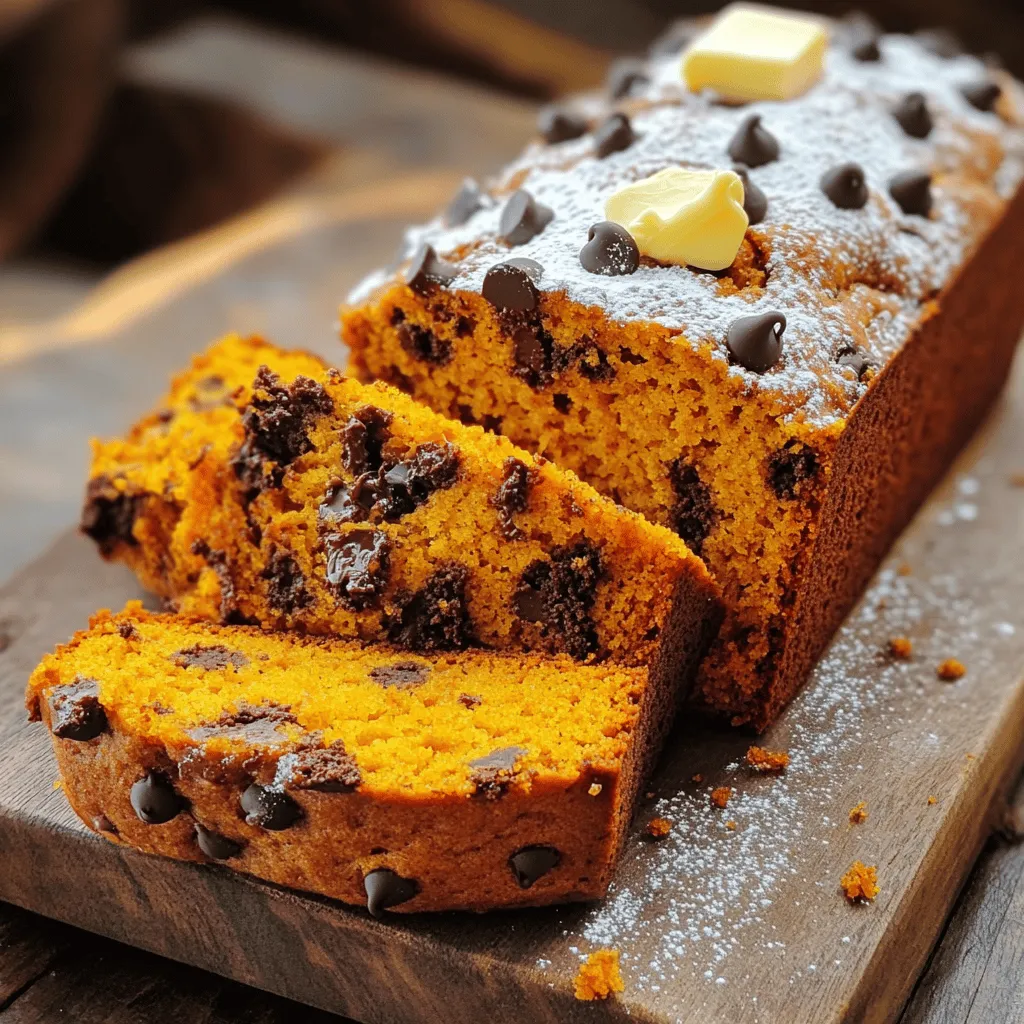
Chocolate Chip Pumpkin Bread Easy and Flavorful Treat
If you’re craving a sweet treat, let me introduce you to Chocolate Chip Pumpkin Bread! This easy recipe combines warm Read Full Recipe -

No Churn Oreo Ice Cream Simple and Delicious Treat
Craving a sweet, creamy treat but don’t own an ice cream maker? No worries! My No Churn Oreo Ice Cream Read Full Recipe -

Raspberry Almond Thumbprint Cookies Easy Treat Recipe
Are you ready to whip up a treat that’s as fun to make as it is delicious? Raspberry Almond Thumbprint Read Full Recipe -

Chocolate Lava Mug Cake Delicious and Simple Recipe
Craving a sweet treat but short on time? You’ve landed in the right place! This Chocolate Lava Mug Cake recipe Read Full Recipe
My Latest Recipes

hey,
i’m !
I’m so happy you’re here!
I’m not just sharing recipes I’m sharing a piece of my heart. I hope these dishes bring you comfort, joy, and maybe even a new favorite.

![To make Easy Creamy Garlic Sauce Baby Potatoes, gather these items: - 500g baby potatoes, washed and scrubbed - 4 cloves garlic, minced - 1 cup heavy cream - 2 tablespoons butter - 1 teaspoon dried thyme - 1 teaspoon dried parsley - Salt and black pepper to taste - Fresh chives, chopped (for garnish) Here’s a quick look at the measurements: - Baby Potatoes: 500 grams equals about 1.1 pounds. This amount serves about four people. - Garlic: Four cloves add a strong, rich flavor. - Heavy Cream: One cup gives the sauce its creamy texture. - Butter: Two tablespoons make the sauce rich and smooth. - Dried Thyme and Parsley: One teaspoon each adds earthy flavors. - Salt and Pepper: Use to taste for the perfect seasoning. - Chives: Fresh chives add a bright touch when serving. For the best results, follow these tips: - Potatoes: Choose firm, unblemished baby potatoes. They should be uniform in size to cook evenly. - Garlic: Fresh garlic will give the best flavor. Avoid pre-minced garlic. - Cream: Use high-quality heavy cream. It affects the sauce's richness. - Herbs: If possible, use fresh thyme and parsley for more vibrant flavors. Dried herbs are great too, especially when you don’t have fresh on hand. - Chives: Use fresh chives for garnish. They add color and a mild onion flavor. For a full list of instructions, check out the Full Recipe. To make Easy Creamy Garlic Sauce Baby Potatoes, follow these simple steps. First, start by boiling the baby potatoes. Place them in a large pot and cover them with water. Add a pinch of salt to the water to enhance flavor. Bring it to a boil over medium-high heat. Once boiling, cook for about 15-20 minutes. You want them tender but not mushy. Check if they are done by piercing them with a fork. If the fork goes in easily, they are ready. Next, let’s make the garlic sauce. In a large skillet, melt the butter over medium heat. Once it’s melted, add the minced garlic. Sauté it for about 1-2 minutes. You want it fragrant, but be careful not to let it burn. A burnt garlic can spoil the sauce. After that, reduce the heat to low. Pour in the heavy cream and mix it well with the garlic. This will create a rich and creamy base for our sauce. Now it’s time to add some herbs. Sprinkle in the dried thyme and dried parsley. Don’t forget to season with salt and black pepper to taste. Stir everything gently and let it simmer for about 3-4 minutes. This helps the sauce thicken slightly and allows the flavors to blend. Finally, add the boiled baby potatoes to the skillet. Toss them in the creamy garlic sauce until they are fully coated. Let them cook together for another 2-3 minutes. This step helps the potatoes soak up all that delicious flavor. The total cooking time for this dish is about 30 minutes. Here’s a breakdown: - Boiling Potatoes: 15-20 minutes - Making Sauce: 10 minutes - Combining and Coating: 2-3 minutes Using medium heat is key for both boiling and making the sauce. It ensures that the potatoes cook evenly and the garlic does not burn. You can easily tell when the potatoes are done. Use a fork to pierce one. If it slides in smoothly, they are tender. If you feel resistance, cook them a bit longer. Remember, overcooking can turn them mushy. It’s best to check them a few minutes before the time is up to avoid this. For the best results, stick to the recipe. You can find the full recipe above to guide you through these steps. Enjoy your creamy garlic sauce baby potatoes! To boost the flavor of your creamy garlic sauce baby potatoes, try these tips: - Use fresh garlic: Fresh garlic gives a stronger, better taste than jarred garlic. - Add cheese: Stir in grated Parmesan for a rich, savory flavor. - Introduce heat: Add a pinch of red pepper flakes for a spicy kick. - Experiment with herbs: Fresh herbs like basil or rosemary can add new notes to your dish. Here are a few mistakes to steer clear of: - Overcooking the potatoes: If you cook them too long, they can become mushy. Aim for tender but firm potatoes. - Burning the garlic: Garlic cooks fast. Keep an eye on it to avoid a bitter taste. - Skipping the seasoning: Don’t forget the salt and pepper! They help enhance all the flavors. - Not letting the sauce thicken: Allow your sauce to simmer a bit longer for that perfect creamy texture. Having the right tools makes cooking easier: - Large pot: For boiling the baby potatoes. - Skillet: A wide skillet works best for making the sauce. - Wooden spoon: Great for stirring without scratching your pan. - Potato masher: If you want a creamier texture, a masher can help blend the potatoes with the sauce. These tips will help you create the best creamy garlic sauce baby potatoes. Remember, cooking is all about experimenting and finding what you love! For the complete recipe, check out the [Full Recipe]. {{image_2}} You can easily change the recipe to fit what you have. If you don't have heavy cream, use half-and-half or whole milk. This will give you a lighter sauce. For a dairy-free option, try coconut milk or a plant-based cream. If you can't find baby potatoes, regular potatoes work too. Just chop them into smaller pieces. You can even use sweet potatoes for a sweet twist. Want to mix it up? Add different herbs for new flavors. For a spicy kick, toss in red pepper flakes. You can also use fresh herbs like basil or rosemary. These add freshness and depth. If you prefer a tangy taste, squeeze some lemon juice into the sauce. It brightens the dish and adds a zesty note. Try adding cheese for a richer flavor. Grated Parmesan or feta works great! These creamy garlic sauce baby potatoes shine on their own. But they also pair well with various dishes. Serve them alongside grilled chicken or fish for a complete meal. They also go well with roasted veggies. For a cozy night, serve them with a warm salad. Don’t forget to drizzle extra garlic sauce on top for added flavor. You can find the full recipe for these delightful potatoes linked above! To keep your creamy garlic sauce baby potatoes fresh, place them in an airtight container. You can store them in the fridge for up to 3 days. Make sure the potatoes are cool before sealing the container. This helps keep the sauce creamy and tasty. Reheating the potatoes is easy. You can use the microwave or the stovetop. For the microwave, place them in a safe dish. Heat in short bursts, stirring in between, until warm. If using the stovetop, add a splash of cream or water to the skillet. Heat over low until warmed through, stirring gently. You can freeze creamy garlic sauce baby potatoes, but the texture may change. To freeze, let them cool completely. Then, place them in a freezer-safe bag or container. They can last up to 2 months in the freezer. When ready to eat, thaw in the fridge overnight before reheating. For best results, use the full recipe soon after making it. Yes, you can use larger potatoes. Just cut them into smaller pieces. This helps them cook evenly. Make sure to adjust the cooking time. Larger chunks may take longer to soften. Aim for bite-sized pieces for the best texture. To make the sauce vegan, replace heavy cream with coconut cream or cashew cream. Use vegan butter instead of regular butter. Both options give a rich taste without dairy. You can still add garlic and herbs for flavor. The vegan sauce will be creamy and delicious. These baby potatoes pair well with many dishes. Try serving them with grilled chicken or fish. They also go great with roasted vegetables. For a full meal, add a fresh salad on the side. You can find more ideas in the Full Recipe. In this article, I covered how to make creamy garlic sauce baby potatoes. We explored the key ingredients and their measurements, highlighting tips for selecting quality items. I detailed step-by-step cooking instructions, including timing and signs of doneness. I shared helpful tips to enhance flavor and avoid common mistakes. I also offered variations, storage advice, and answered frequently asked questions. Overall, cooking these potatoes can be simple and fun. With the right ingredients and techniques, you can create a tasty dish that impresses anyone. Enjoy your cooking adventure!](https://emmasdish.com/wp-content/uploads/2025/05/8d9db788-2256-4464-8461-9d5b72b6ea0e-300x300.webp)
![- 4 boneless, skinless chicken breasts - 1 cup buttermilk - 1 teaspoon garlic powder - 1 teaspoon onion powder - 1 teaspoon smoked paprika - 1 teaspoon salt - ½ teaspoon black pepper The main ingredients make this dish special. The buttermilk helps the chicken stay moist. It adds a bit of tang too. Garlic and onion powders enhance the flavor. Smoked paprika gives a nice, smoky touch. Salt and black pepper round out the taste well. - ½ cup all-purpose flour - ¼ cup cornstarch - 1 teaspoon baking powder - ½ teaspoon dried thyme - ½ teaspoon cayenne pepper (optional for a kick) The coating ingredients create a crispy crust. All-purpose flour is the base. Cornstarch adds extra crunch. Baking powder helps the coating puff up. Dried thyme adds a nice herbal note. If you like heat, add cayenne pepper for a kick. - Fresh parsley for presentation Fresh parsley adds color and freshness. It makes your dish look beautiful. A little sprinkle of parsley can make a big difference. It’s a simple touch that elevates your meal. Follow the [Full Recipe] for the complete steps to create this tasty Melt In Your Mouth Chicken Breasts dish. To marinate the chicken, start by mixing the buttermilk, garlic powder, onion powder, smoked paprika, salt, and black pepper in a large bowl. Whisk it well until smooth. Then, add the chicken breasts, ensuring they are fully coated in the marinade. Cover the bowl and place it in the fridge. I recommend marinating for at least 2 hours. If you have time, letting it sit overnight will give you even better flavor and tenderness. For the coating, grab a separate shallow dish. In this dish, combine the all-purpose flour, cornstarch, baking powder, dried thyme, and cayenne pepper if you want some heat. Mix these dry ingredients thoroughly. An even coating is key to achieving that crispy texture. Make sure each piece of chicken is fully covered for the best results. Now, let’s cook that chicken! First, preheat your oven to 400°F (200°C). Line a baking sheet with parchment paper for easy cleanup. Heat a large skillet over medium-high heat and melt ¼ cup of butter. Once hot, add the coated chicken breasts to the skillet. Sear them for about 4-5 minutes on each side until they are golden brown. If your skillet is small, work in batches to avoid overcrowding. After searing, transfer the chicken to your baking sheet. Cut the remaining butter into small pieces and place them on top of the chicken. Now, bake in the oven for 20-25 minutes. Check that the chicken reaches an internal temperature of 165°F (75°C). This step ensures it's cooked through but still juicy. To make sure your chicken is tender, cook it at the right temperature. Aim for an internal temperature of 165°F (75°C). This ensures the chicken is safe to eat while keeping it juicy. Use a meat thermometer for accuracy. You can also keep the chicken moist by marinating it. Soaking it in buttermilk works wonders. The acid in the buttermilk helps break down protein, making it tender. Let it sit for at least 2 hours, or better yet, overnight. For more flavor, try different marinades. You can mix buttermilk with garlic powder, onion powder, and smoked paprika. This combination adds depth to the dish. If you like heat, add cayenne pepper to your spice mix. It gives the chicken a nice kick without overpowering the other flavors. Adjust the amount to your taste. When plating your chicken, arrange it neatly on a serving platter. Drizzle some melted butter on top for a shiny finish. This makes the dish look more appealing. Pair the chicken with sides like roasted vegetables or creamy mashed potatoes. These complement the flavors perfectly. Consider adding a sprinkle of fresh parsley for a pop of color. {{image_2}} You can change the taste of your melt in your mouth chicken breasts easily. Try different spice blends for fun. Here are some ideas: - Italian Blend: Use oregano, basil, and rosemary for an herbaceous kick. - Cajun Spice Mix: Add paprika, thyme, and cayenne for a spicy twist. - Lemon Zest: Grate fresh lemon peel for a bright, zesty flavor. - Garlic and Herb: Mix garlic powder with fresh parsley for a classic taste. Adding herbs or citrus lifts the dish. Fresh herbs like thyme or rosemary add flavor and aroma. Lemon juice or zest brightens up the chicken and makes it refreshing. This recipe can fit many dietary needs. For a gluten-free version, swap all-purpose flour with almond flour or coconut flour. Check labels to ensure they are gluten-free. To make it dairy-free, replace buttermilk with a plant-based milk. You can make your own buttermilk using almond milk and vinegar. Simply mix one cup of almond milk with a tablespoon of vinegar and let it sit for five minutes. Pair your chicken with healthy sides. Salads add freshness. Try a simple green salad with a light vinaigrette. You can also serve it with grains, like quinoa or rice. They soak up the juices well. For sauces, consider these options: - Garlic Butter Sauce: Drizzle melted garlic butter over the chicken. - Honey Mustard Dip: Mix honey and mustard for a sweet and tangy dip. - Creamy Avocado Sauce: Blend avocado with lime juice for a creamy touch. These ideas will make your meal even more delicious. For the full recipe, check out the instructions above. After enjoying your melt in your mouth chicken breasts, store any leftovers in an airtight container. Refrigerate them within two hours of cooking. This keeps the chicken fresh and safe to eat. It can last in the fridge for up to three days. If you notice any off smells or changes in color, it’s best to toss it. To reheat your chicken without drying it out, use the oven or stovetop. Preheat your oven to 350°F (175°C). Place the chicken on a baking sheet. Cover it with foil to retain moisture. Heat for about 15-20 minutes or until warm. On the stovetop, use a skillet over medium heat. Add a splash of chicken broth or water. This helps keep the chicken juicy while you reheat it. If you want to keep your chicken longer, freezing is a great option. First, let the chicken cool completely. Wrap each piece tightly in plastic wrap. Then, place them in a freezer-safe bag or container. This helps prevent freezer burn. You can freeze the chicken for up to three months. To reheat frozen chicken, thaw it in the fridge overnight. Then, follow the reheating methods mentioned above for the best results. Yes, you can make this recipe ahead of time. Marinating the chicken breasts is key. Mix the marinade in a bowl and add the chicken. Cover it and place it in the fridge. You can marinate it for at least two hours, but overnight works best. This helps the chicken soak up all the good flavors. You can also coat the chicken early. Just keep it in the fridge until you are ready to cook. This makes meal prep easy and saves time on busy nights. The best way to check chicken doneness is by using a meat thermometer. The chicken should reach a safe internal temperature of 165°F (75°C). Insert the thermometer into the thickest part of the chicken. Avoid touching the bone if using bone-in chicken. If you don't have a thermometer, cut into the chicken to check if the juices run clear. If they do, the chicken is done. To add more flavor, try using different spices or herbs. Garlic powder and onion powder are great starters. You can also add herbs like rosemary, thyme, or oregano. For a spicy kick, sprinkle in some cayenne pepper or chili powder. You can even mix in a splash of lemon juice or balsamic vinegar for brightness. Experiment with what you have in your kitchen to find your favorite combo. Yes, you can use bone-in chicken. However, cooking time may change. Bone-in chicken takes longer to cook than boneless pieces. Make sure to adjust the baking time to about 35-45 minutes. Always check the internal temperature to ensure it reaches 165°F (75°C). If you use bone-in chicken, sear it the same way and then bake it. The skin will get nice and crispy, adding great flavor. This blog post covered key steps to make the best tender chicken. You learned about essential ingredients, including spices and marinades. Proper marination and cooking techniques ensure flavor and moisture. I shared tips for variations and optimal storage methods. Don’t forget the presentation ideas, as they make your dish pop. Enjoy experimenting with flavors and impressing your friends and family with your tasty results. Following these steps will help you create a delicious meal every time.](https://emmasdish.com/wp-content/uploads/2025/04/b8c32008-2aea-48b7-975c-9e12fcb0fc54-300x300.webp)
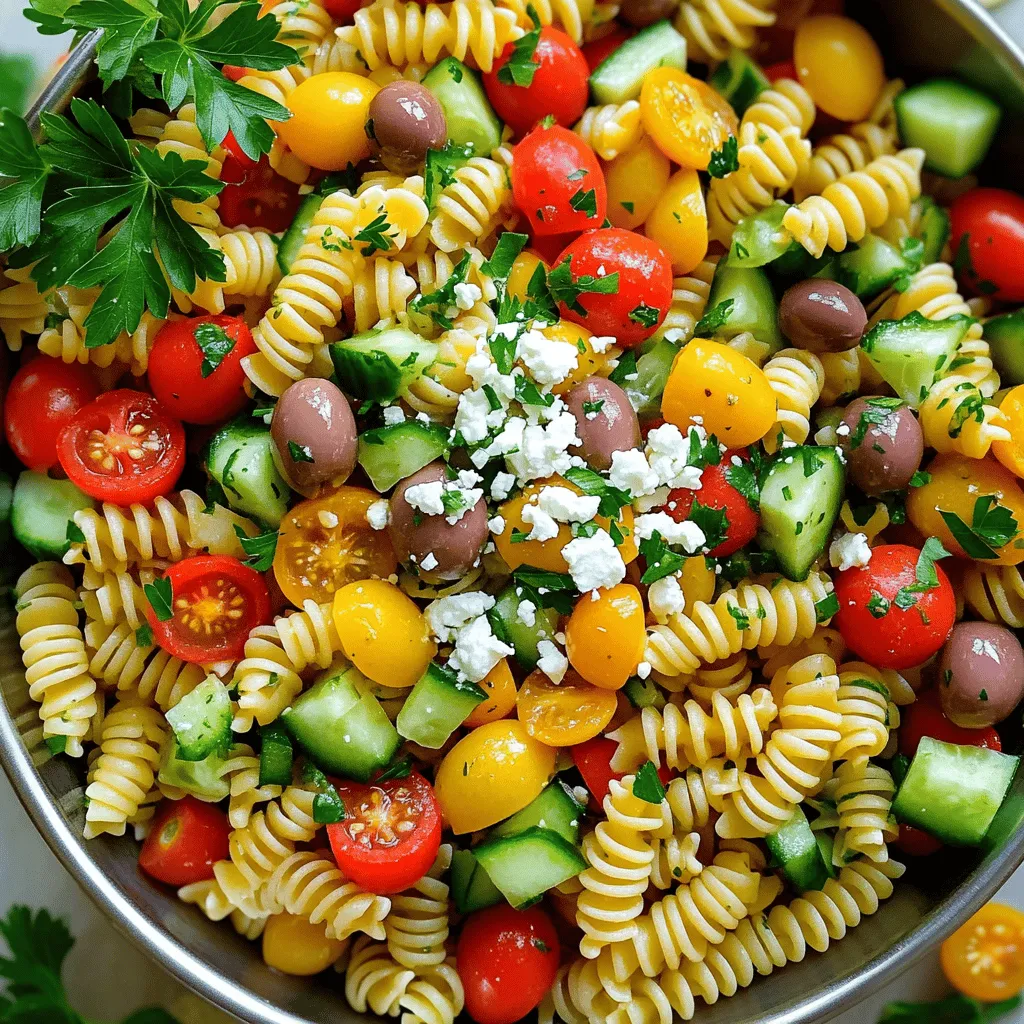
Healthy Greek Pasta Salad Fresh and Flavorful Dish
Looking for a fresh, tasty dish that’s both healthy and easy to make? You’ve found it! This Healthy Greek Pasta Salad packs vibrant veggies,…