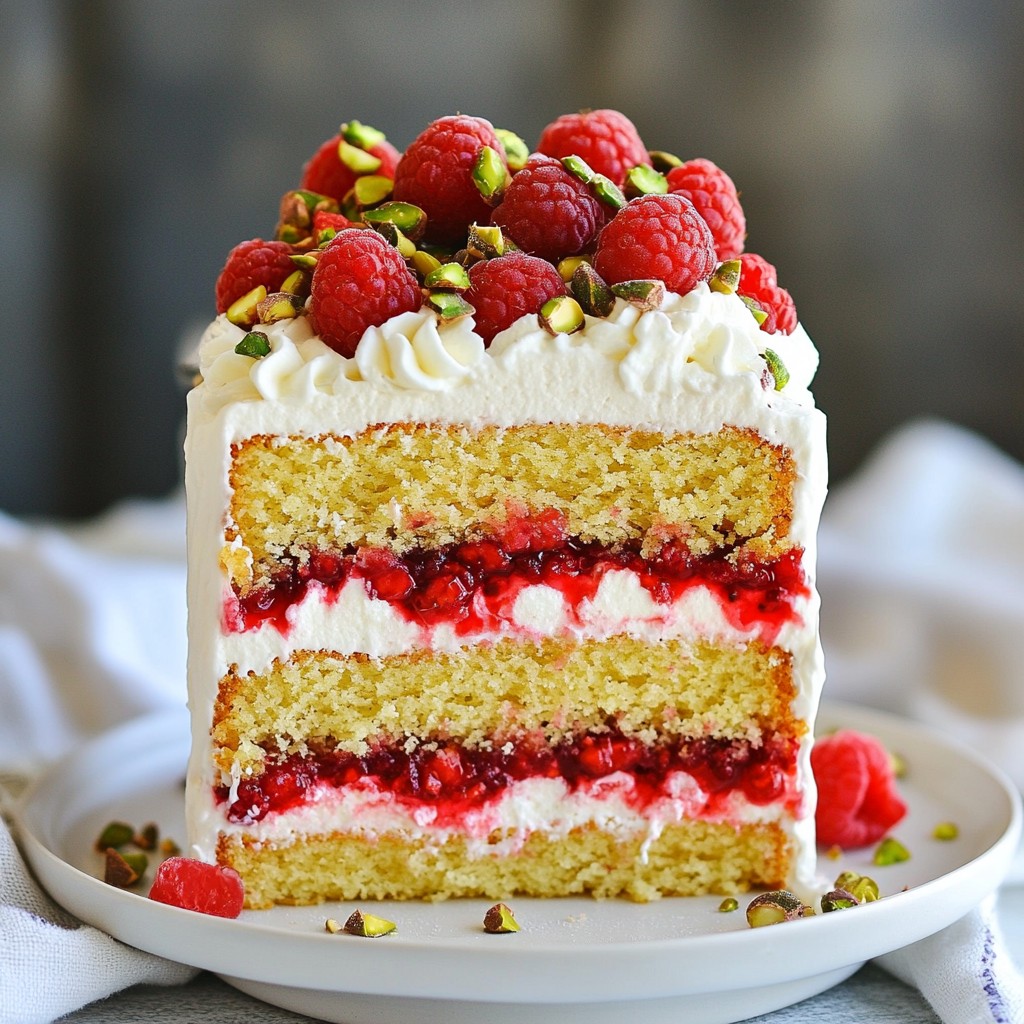
If you're looking for a cake that dazzles the eyes and delights the taste buds, you've come to the right place! This Pistachio Raspberry Layer Cake is a simple yet stunning treat you can whip up for any occasion. With layers of fluffy cake, fresh raspberries, and crunchy pistachios, it's a dessert that not only looks beautiful but also packs a flavorful punch. Let’s dive into the easy steps to create this delicious masterpiece!
Why I Love This Recipe
- Delicious Flavor Combination: The pairing of pistachios and raspberries creates a delightful balance of nutty and fruity flavors that is simply irresistible.
- Stunning Presentation: This cake not only tastes amazing but also looks beautiful, making it a perfect centerpiece for any celebration.
- Customizable Layers: You can easily modify the layers, adding more fruit or changing the cream, to make it your own.
- Perfect for Special Occasions: This cake is ideal for birthdays, anniversaries, or any event where you want to impress your guests.
Ingredients
List of Ingredients
- 2 cups all-purpose flour
- 1 cup unsalted butter, softened
- 1 ½ cups granulated sugar
- 4 large eggs
- 1 teaspoon vanilla extract
- 1 teaspoon almond extract
- 1 cup ground pistachios (unsalted)
- 1 tablespoon baking powder
- ½ teaspoon salt
- 1 cup buttermilk
- 1 cup fresh raspberries (plus extra for garnish)
- 2 cups heavy whipping cream
- 1 teaspoon powdered sugar (for whipped cream)
- Green food coloring (optional, for pistachio layer)
- Chopped pistachios (for decoration)
When choosing ingredients, always look for fresh and high-quality options. Use organic eggs and real butter for the best taste. For the raspberries, pick firm and bright ones. If you can't find fresh raspberries, you can use frozen. Just thaw them and drain excess water.
If you want a vegan version, swap the eggs with flax eggs and use plant-based butter. You can replace buttermilk with almond milk mixed with lemon juice for a great alternative. This will keep your cake moist and fluffy.
I recommend sourcing pistachios from a trusted brand. Freshly ground nuts have a great flavor. You can find them in bulk at local markets or online. High-quality ingredients make a big difference in flavor and texture.

Step-by-Step Instructions
Preparation Steps
First, we need to prepare the cake pans and oven. Preheat your oven to 350°F (175°C). This temperature is key for a perfectly baked cake. Grease and flour three 8-inch round cake pans. This helps the cakes come out easily.
Next, let's mix the dry and wet ingredients. In a large bowl, cream together the softened butter and granulated sugar. Mix until it looks light and fluffy. Add the eggs one at a time. Mix well after each addition. Then, stir in the vanilla and almond extracts for flavor.
In a separate bowl, combine the flour, ground pistachios, baking powder, and salt. This dry mix adds texture and taste. Gradually add this dry mix to the wet mixture, alternating with buttermilk. Start and finish with the flour mix. Mix just until everything is combined.
If you want to enhance the color, add a few drops of green food coloring. This gives the cake a fun pistachio hue.
Baking the Cake
Now we’re ready to bake the cake. Divide the batter equally among the prepared pans. Bake for 25 to 30 minutes. To check if they’re done, insert a toothpick in the center. If it comes out clean, your cakes are ready.
Assembling the Cake
Once the cakes are cool, it's time to assemble. Place one layer on a serving plate. Spread a thin layer of raspberry filling on top, followed by whipped cream. This gives a nice balance of flavors.
Add the second cake layer and repeat the filling process. Finally, top with the last cake layer. Frost the top and sides of the cake with the remaining whipped cream.
For the finishing touch, garnish with extra raspberries and a sprinkle of chopped pistachios. This makes your cake look beautiful and tasty!
Tips & Tricks
Achieving the Best Texture
To get a light and fluffy cake, start with soft butter. It should be easy to mix. Cream the butter and sugar together until it looks pale and fluffy. This step adds air to your batter. Mix the eggs in one at a time. Each egg needs to blend well before adding the next.
Room temperature ingredients matter. Make sure your eggs and buttermilk are not cold. This helps the batter mix well and rise better.
Decorating Ideas
For a beautiful finish, top your cake with fresh raspberries. Scatter them on the top and sides. Chopped pistachios also add a nice crunch and color. You can use edible flowers for a fancy touch. These flowers look great and add a pop of color.
Common Mistakes to Avoid
One big mistake is overmixing the batter. Once you add the dry mix to the wet mix, stir just until combined. Overmixing can make the cake dense.
Cooling layers properly is key. After baking, let the cakes sit in the pans for 10 minutes. Then, move them to a wire rack to cool completely. If you stack warm layers, they can slide or break apart.
Pro Tips
- Use Room Temperature Ingredients: Make sure your butter, eggs, and buttermilk are at room temperature before starting. This helps create a smoother batter and ensures better incorporation of ingredients.
- Don’t Overmix the Batter: Mix until just combined to keep the cake light and fluffy. Overmixing can result in a dense texture.
- Chill the Cakes: For easier assembly, chill the cooled cake layers in the refrigerator for about 30 minutes. This makes them firmer and easier to handle.
- Fresh Raspberries for Filling: Use fresh raspberries for the filling as they provide the best flavor and texture. If using frozen, make sure to thaw and drain them before use.
Variations
Flavor Variations
You can switch out the raspberry for other fruits. Strawberries or blueberries taste great too. They add a new twist to the cake. If you want to flavor the whipped cream, try adding lemon zest. This gives a bright note that balances the sweetness. You can also use orange zest for a fun change. Each option adds a unique taste to your cake.
Dietary Adaptations
To make a gluten-free cake, use almond flour instead of all-purpose flour. This keeps the cake moist and tasty. You can also lower the sugar by using less granulated sugar. Try using a sugar substitute that measures like sugar. These changes make the cake fit different diets without losing flavor.
Serving Suggestions
This cake pairs well with tea or coffee. The rich flavors blend nicely with these drinks. If you serve it at events, consider cutting smaller slices. This way, more guests can enjoy the cake. You can also add a scoop of vanilla ice cream on the side for extra delight. It creates a great mix of flavors!
Storage Information
Storing Leftovers
To keep your pistachio raspberry layer cake fresh, store it in the fridge. First, cover the cake with plastic wrap or place it in an airtight container. This helps prevent the cake from drying out. If you have leftover slices, wrap each slice in plastic wrap before putting them in the fridge.
If you want to save the cake for later, freezing works well. Wrap the whole cake tightly in plastic wrap, then place it in a freezer-safe bag. For slices, wrap each piece in plastic wrap, then store in a container or bag. This way, you can enjoy a slice anytime!
Shelf Life
Your cake stays fresh for about 3 to 5 days in the fridge. If frozen, it can last up to 3 months. Thaw it in the fridge before serving for the best taste.
Watch for signs of spoilage. If the cake smells off, has mold, or the texture feels strange, it’s best to throw it away. Always trust your senses when checking food freshness!
FAQs
How can I make this cake ahead of time?
You can bake the cake layers one day before you need them. Let them cool completely. Then, wrap each layer in plastic wrap. This helps to keep them fresh and moist. Store the wrapped layers in the fridge. You can even freeze the layers for up to a month. Just remember to thaw them before you assemble the cake.
Can I use frozen raspberries instead of fresh?
Yes, frozen raspberries work well for this cake. They may break down more when heated, but that’s fine for the filling. Just thaw and drain them to remove excess water. You can also add a little sugar to enhance their flavor. This way, you can enjoy the cake any time of the year.
What is the best way to serve this cake?
This cake is perfect for birthdays and special events. Cut it into even slices for serving. You can also add a dollop of whipped cream on the side for extra creaminess. Garnish each slice with fresh raspberries and chopped pistachios. This makes for a lovely presentation that guests will love.
To sum up, we explored the ingredients, preparation, baking, and decorating of a delicious cake. You learned how to source quality ingredients, avoid common mistakes, and create variations that suit your taste. Remember to follow the steps closely for the best results. With these tips, you'll impress your friends and family. Enjoy baking, and don't be afraid to get creative with flavors and decorations! You have all you need to make a fantastic cake now.