Skip to content
DisclaimerTerms Of UseGDPR PolicyCookie Policy

Emmas Dish

  • Home
  • Drinks
  • Appetizers
  • Dinner
  • Dessert
  • About
  • Contact
  • Privacy Policy
DisclaimerTerms Of UseGDPR PolicyCookie Policy

NO-ING-IMG

To make a Chicken Broccoli Pasta Bake, you will need the following ingredients: - 2 cups rotini pasta - 2 cups cooked chicken, shredded - 2 cups broccoli florets - 1 ½ cups ricotta cheese - 1 cup shredded mozzarella cheese - 1/2 cup grated Parmesan cheese - 1 teaspoon garlic powder - 1 teaspoon onion powder - 1 teaspoon Italian seasoning - Salt and pepper to taste - 1/2 cup chicken broth - 1 tablespoon olive oil - Fresh parsley, chopped (for garnish) These ingredients come together to create a dish that is filling and tasty. The rotini pasta serves as a great base, holding onto all the flavors. Shredded chicken brings protein, while broccoli adds color and nutrients. The blend of cheeses makes this bake extra creamy and cheesy. Garlic, onion, and Italian seasoning enhance the flavors, making every bite delicious. Don't forget the chicken broth! It keeps everything moist and flavorful. Finally, fresh parsley adds a bright note to the dish. {{ingredient_image_1}} First, boil water in a large pot. Add a pinch of salt to the water. Cook the rotini pasta according to the package instructions. Aim for al dente pasta, which means it should be firm to the bite. This will help keep the texture after baking. When it's done, drain the pasta and set it aside. Next, steam the broccoli florets. You can do this in a microwave-safe bowl. Add a tablespoon of water to the bowl and cover it with plastic wrap. Microwave the broccoli for about three minutes. Check to see if it is tender but still bright green. Drain it and set it aside with the pasta. Now, grab a large mixing bowl. Combine the cooked rotini, shredded chicken, and steamed broccoli in the bowl. Add the ricotta cheese, half of the mozzarella cheese, garlic powder, onion powder, and Italian seasoning. Season with salt and pepper to taste. Stir everything together until it's mixed well. Next, pour in the chicken broth and olive oil. This adds moisture and helps blend all the flavors. Mix until all the ingredients are combined. Take a greased 9x13-inch baking dish. Transfer the mixture from the bowl into the baking dish. Spread it out evenly. Top the mixture with the remaining mozzarella cheese and sprinkle grated Parmesan cheese on top. This will give the dish a rich and cheesy finish. Preheat your oven to 375°F (190°C). Bake the dish for 25-30 minutes. Keep an eye on it until the cheese is bubbly and golden brown. Once it's ready, remove it from the oven. Let it sit for five minutes before serving. Garnish with chopped fresh parsley for a nice touch. How to achieve al dente pasta? To cook rotini pasta perfectly, boil salted water. Once it bubbles, add the pasta. Cook it for about 8-10 minutes. Check it a minute or two before the time is up. The pasta should be firm but not hard. This gives a nice bite to your dish. Best way to steam broccoli for color and texture? I love steaming broccoli to keep it bright green. Use a microwave-safe bowl with a little water. Cover it with plastic wrap and steam for about 3 minutes. The broccoli will stay tender and crunchy, adding great texture to your bake. Choosing the right cheese for flavor? For this dish, I use a mix of ricotta, mozzarella, and Parmesan. Ricotta adds creaminess. Mozzarella gives a nice melt. Parmesan adds a salty kick. This combo makes each bite delicious and cheesy. How to get a golden cheese topping? To achieve a golden cheese layer, sprinkle the mozzarella and Parmesan on top. Bake it at 375°F for about 25-30 minutes. The cheese will bubble and turn golden, creating a perfect crust. Ahead of time prep for meal planning? You can prepare this dish ahead of time. Cook the pasta and steam the broccoli early. Mix everything and place it in the baking dish. Cover and refrigerate it for later. Just bake when you’re ready. How to make it a one-dish meal? This recipe is a one-dish meal. It combines protein, veggies, and carbs all in one. You don’t need any sides, but a fresh salad pairs nicely if you like. Enjoy your easy cleanup! Pro Tips Cook Pasta Al Dente: To prevent mushy pasta, cook it just until al dente, as it will continue to cook while baking. Use Fresh Broccoli: For the best flavor and texture, use fresh broccoli florets instead of frozen ones. Variations with Cheese: Feel free to mix in other types of cheese, like cheddar or gouda, for different flavor profiles. Let it Rest: Allow the pasta bake to sit for a few minutes after baking to help it set and make serving easier. {{image_2}} If you want to change up your Chicken Broccoli Pasta Bake, try these options: - Alternative proteins: Use turkey or tofu instead of chicken. Both add great flavor. - Dairy-free options: Substitute ricotta with cashew cream or a dairy-free cheese. This keeps it creamy without dairy. You can easily change the flavor of your bake. Here are some ideas: - Adding spices or herbs: Mix in red pepper flakes for heat or fresh basil for a fresh taste. - Incorporating additional vegetables: Try adding bell peppers, spinach, or carrots for extra nutrition and color. Pair your bake with these sides for a full meal: - Best sides: A simple green salad or garlic bread complements the flavors well. - Making it a full meal: Serve with roasted vegetables or a light soup for a hearty dinner. To keep your Chicken Broccoli Pasta Bake fresh, store leftovers in an airtight container. Make sure to let the dish cool down before sealing it. Properly stored, it lasts about 3-4 days in the fridge. Label the container with the date to keep track of freshness. You can freeze this dish before or after baking. If you freeze it before baking, wrap it tightly in plastic wrap and then foil. This protects it from freezer burn. For freezing after baking, let it cool completely first. Store it in a freezer-safe container. It will keep well for up to 2-3 months. When you are ready to enjoy it, thaw it overnight in the fridge. To keep your pasta bake moist, reheating in the oven works best. Preheat the oven to 350°F (175°C). Cover the dish with foil to prevent it from drying out. Heat for about 20-25 minutes until it's warm throughout. If you prefer using the microwave, place a portion in a microwave-safe bowl. Add a splash of chicken broth to keep it moist. Heat on medium power for 2-3 minutes, stirring halfway through. Both methods work well, but the oven gives a better texture. Yes, you can prepare Chicken Broccoli Pasta Bake ahead of time. To do this, follow the recipe up to the baking step. After mixing the ingredients, cover the dish tightly with plastic wrap or foil. You can store it in the fridge for up to two days. When ready to bake, just remove the cover and bake straight from the fridge. You may need to add a few extra minutes to the baking time to ensure it heats through. Baking Chicken Broccoli Pasta Bake takes about 25 to 30 minutes. Preheat your oven to 375°F (190°C) before placing the dish inside. Look for the cheese to be bubbly and golden brown. This visual cue means it is ready to serve. This dish pairs well with many sides. A fresh green salad adds a nice crunch. Garlic bread is another great choice, as it soaks up any extra cheese sauce. You can also serve it with steamed vegetables for a healthy touch. These options will round out your meal nicely. Absolutely! You can use any pasta shape you like. Rotini is great because it holds sauce well. Penne or fusilli can also work nicely. Just keep in mind that different shapes may change the texture slightly. Choose what you enjoy most! This guide provided how to make a Chicken Broccoli Pasta Bake. We covered each ingredient, from rotini to cheeses. You learned steps from prepping to mixing and baking. Tips and tricks helped improve your cooking. Variations offered ideas for swaps and flavors. Storage tips ensured your dish stays fresh. Enjoying this meal will impress your family and friends. Try out different flavors and substitutions. Happy cooking!

Chicken Broccoli Pasta Bake Simple and Satisfying Meal

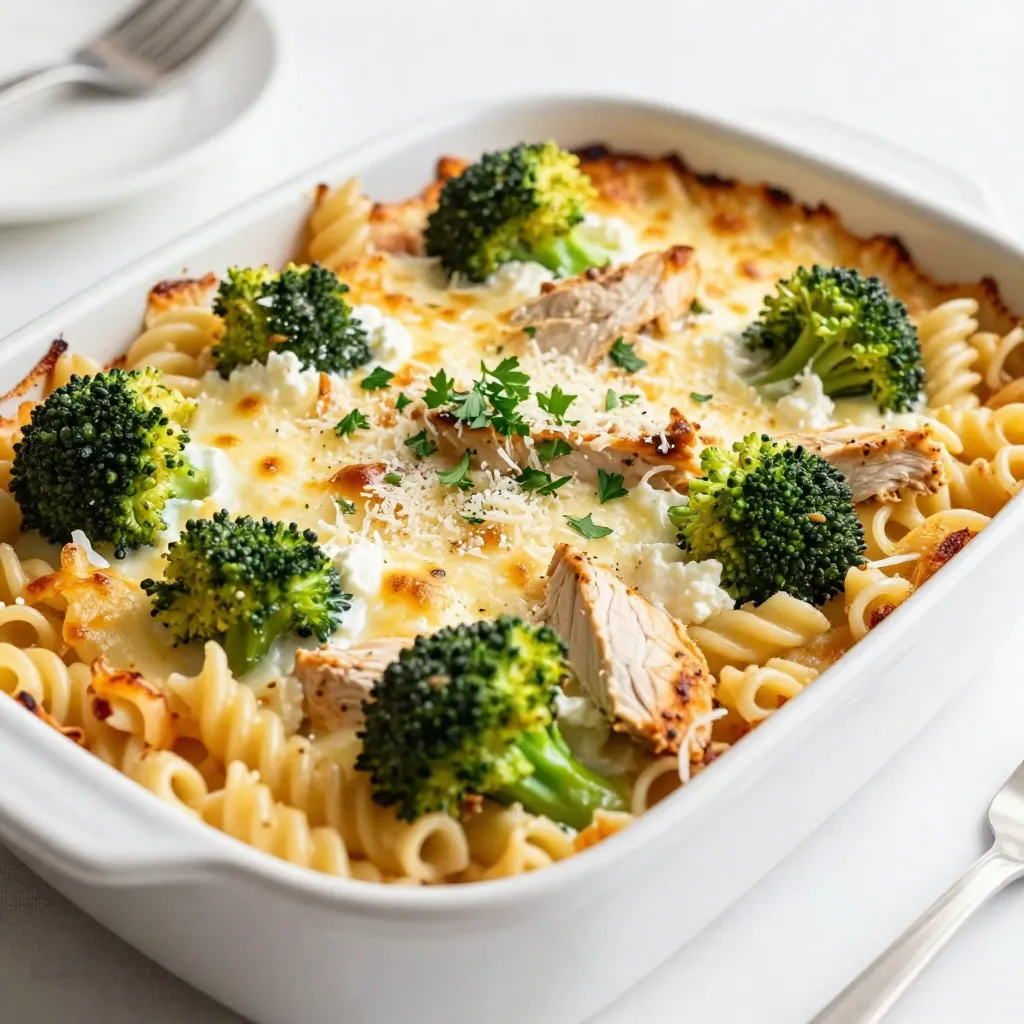
Looking for a simple and tasty meal? This Chicken Broccoli Pasta Bake is perfect for busy nights. With just a

- 200g pasta (penne or fusilli) - 200g block of feta cheese - 250g cherry tomatoes - 3 cloves garlic, minced - 1/4 cup olive oil - 1 teaspoon dried oregano - 1/2 teaspoon red pepper flakes (optional) - Salt and black pepper to taste - Fresh basil leaves, for garnish - Zest of 1 lemon For this dish, I recommend using penne or fusilli pasta. Both shapes hold the sauce well. The feta cheese is the star. A block of feta gives the best results. Cherry tomatoes add sweetness and color. Minced garlic brings depth to the flavor. Olive oil is key for richness. Dried oregano adds a nice herbal note. If you like heat, add red pepper flakes. Salt and black pepper enhance all the flavors. Fresh basil leaves offer a fragrant finish. Lemon zest brightens the dish, making it perfect for any meal. This combination of ingredients makes baked feta pasta creamy and delicious. Each bite bursts with flavor. You will love how easy it is to prepare! {{ingredient_image_1}} - Preheat the oven to 200°C (400°F). - In a large baking dish, add 250g of cherry tomatoes. Place a 200g block of feta cheese in the center. - Drizzle 1/4 cup of olive oil over the tomatoes and feta. - Sprinkle 3 minced garlic cloves, 1 teaspoon of dried oregano, 1/2 teaspoon of red pepper flakes, salt, and black pepper. - Bake for about 30 minutes. You want the tomatoes to blister and the feta to soften. - While the feta and tomatoes bake, cook 200g of pasta until al dente. Drain and set aside. - Once baked, remove the dish from the oven. Mash the feta and tomatoes with a fork. This creates a creamy sauce. - Toss the cooked pasta into the feta mixture until well combined. - Add the zest of 1 lemon and mix again for a bright flavor. - Adjust the seasoning if needed. Serve immediately, garnished with fresh basil leaves. To get the best texture for feta and tomatoes, you want to watch the bake time. Bake them until the tomatoes blister and the feta is soft. This usually takes about 30 minutes at 200°C (400°F). Every oven is different, so keep an eye on them. If your oven runs hot, check a few minutes early. If it’s cooler, you might need more time. Want to kick up the flavor? Try adding some olives or sun-dried tomatoes. You can also swap in fresh herbs like thyme or parsley. If you like a bit of heat, add more red pepper flakes. For a tangy kick, a splash of balsamic vinegar works well too. These add-ins can really make your dish pop. Serve your baked feta pasta with a simple side salad. A fresh green salad balances the creamy pasta. You can also sprinkle some extra basil on top for garnish. Another great option is to pair it with garlic bread. This adds a nice crunch to your meal. You can’t go wrong with a light, crisp white wine on the side, too! Pro Tips Use Quality Feta: Opt for a block of high-quality feta cheese for a creamier and more flavorful sauce. Add Veggies: Enhance the dish by adding other vegetables like spinach or bell peppers for extra nutrition and flavor. Customize the Spice: Adjust the amount of red pepper flakes according to your heat preference for a personalized kick. Perfect Pasta Timing: Ensure the pasta is cooked just right for the best texture; it should be al dente before mixing with the sauce. {{image_2}} You can use many pasta shapes for this dish. Penne and fusilli work great, but you can also try spaghetti. If you need gluten-free options, look for brown rice or chickpea pasta. These alternatives provide different textures. Each shape changes how the sauce clings to the pasta. While feta is creamy and tangy, you can switch it up. Try goat cheese for a different taste. Cream cheese also adds a rich texture. If you want a milder flavor, use ricotta. Each cheese brings a new twist to the dish. Want to boost nutrition? Add vegetables! Spinach or zucchini mix well with the pasta. You can toss in bell peppers or mushrooms too. These veggies add color and vitamins. They also make your meal even more filling. Just remember to adjust baking time based on the veggies you choose. To keep your baked feta pasta fresh, store leftovers in an airtight container. Make sure to let it cool before sealing. Place the container in the fridge. It will stay good for about 3 to 5 days. If you notice any moisture in the container, it’s best to eat it sooner. When it’s time to enjoy leftovers, reheating is key. The best way to reheat is in the oven. Preheat your oven to 180°C (350°F). Place the pasta in a baking dish and cover it with foil. Heat for about 15 to 20 minutes. This keeps the creaminess and prevents it from drying out. You can also use the microwave; just heat in short bursts. Stir in between to ensure even warming. Yes, you can freeze baked feta pasta! To do this, let it cool completely first. Then, place it in a freezer-safe container or bag. Make sure to squeeze out any air to avoid freezer burn. It will last for about 2 to 3 months in the freezer. When ready to eat, thaw it in the fridge overnight. Reheat it in the oven for the best taste and texture. Baked feta pasta is a simple dish that combines pasta, feta cheese, and tomatoes. It became popular on social media in 2020. The dish hails from Finland, where cooks baked a block of feta with tomatoes. The result is creamy and packed with flavor. You mix the melted feta and tomatoes with cooked pasta for a delightful meal. Yes, you can prepare baked feta pasta in advance. Cook the pasta and bake the feta and tomatoes. Once done, store them separately in the fridge. When ready to eat, combine them and heat gently. This method keeps the pasta from becoming mushy. You can store it for up to three days. Just remember to adjust the seasoning before serving. To make baked feta pasta vegan, swap feta with a plant-based cheese. You can use cashew cheese or tofu for a similar texture. Ensure the pasta is egg-free, as some may contain eggs. For added flavor, mix in nutritional yeast. This gives a cheesy flavor without dairy. You can also add more veggies for nutrition. Baked feta pasta pairs well with simple side dishes. A fresh green salad with lemon dressing complements it nicely. Garlic bread adds a crunchy texture and is great for dipping. You might also enjoy roasted vegetables on the side. These add color and flavor to your meal. For a drink, a light white wine or sparkling water works well. Baked feta pasta is simple and tasty, packed with fresh flavors. We covered the key ingredients like pasta, feta, and tomatoes. Then, I shared easy steps for baking and mixing. Also, I offered tips for perfecting your dish. You can even explore variations and storage tips. Remember, this dish is flexible. Enjoy your pasta with herbs, veggies, or different cheeses. Create your version to delight your taste buds.

Baked Feta Pasta Delight Easy and Flavorful Recipe

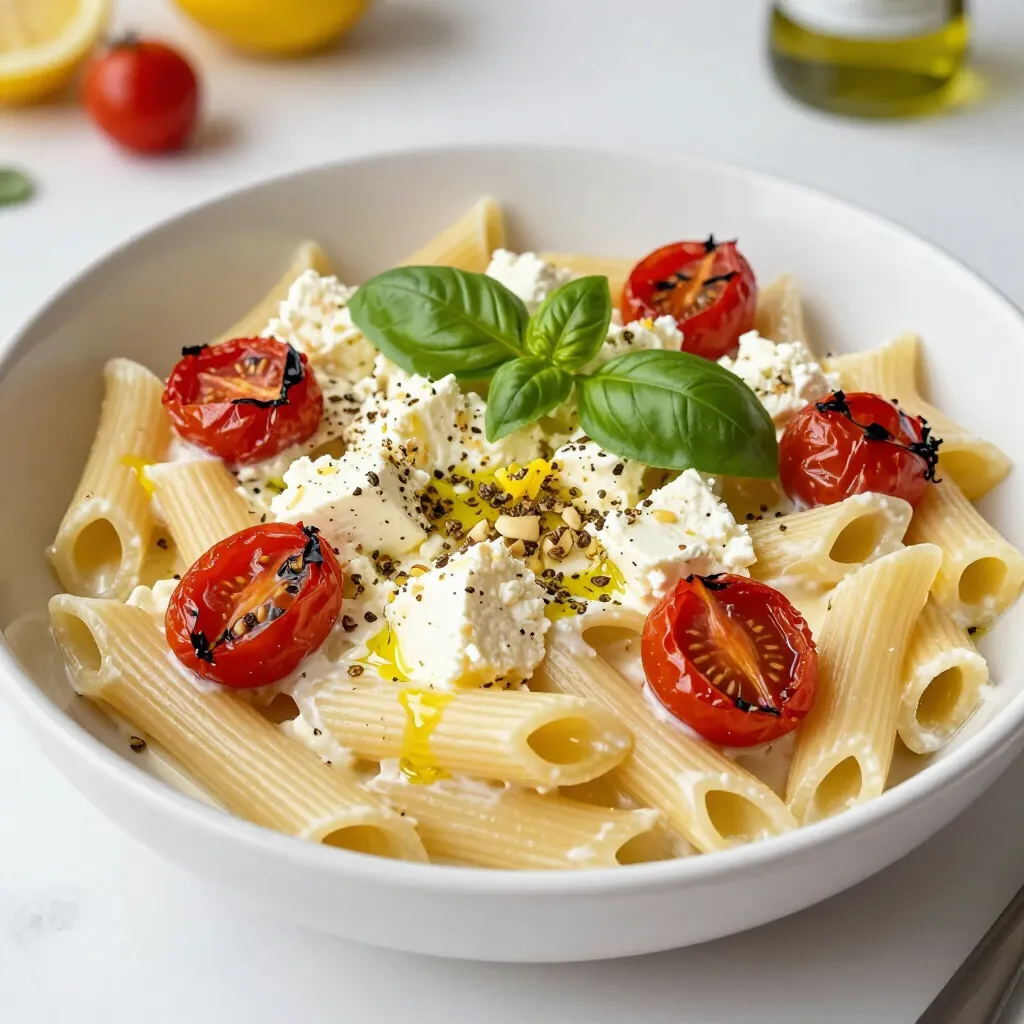
Are you ready to delight your taste buds with a simple yet flavorful dish? This Baked Feta Pasta is perfect

For this salad, we need a mix of fresh and crunchy veggies. Here’s what you’ll need: - 2 packs of ramen noodles (discard seasoning packets) - 1 cup shredded carrots - 1 cup red bell pepper, thinly sliced - 1 cup cucumber, julienned - 1 cup green onions, sliced - 1/2 cup edamame (shelled) - 1/4 cup sesame seeds, toasted - 1/4 cup fresh cilantro, chopped These ingredients bring bright colors and great flavors. The noodles form the base, while the veggies add crunch. Edamame gives a nice protein boost. The dressing is key to this salad. It ties everything together with bold flavors. You will need: - 3 tablespoons sesame oil - 2 tablespoons soy sauce (or tamari for gluten-free) - 1 tablespoon rice vinegar - 1 tablespoon fresh ginger, grated - 1 tablespoon honey or maple syrup - Salt and pepper to taste This dressing is simple yet packed with taste. The sesame oil gives depth, while the ginger adds freshness. You can mix things up! Here are some optional ingredients to customize your salad: - Sliced avocado for creaminess - Cherry tomatoes for extra sweetness - Spinach or mixed greens for more greens - Chili flakes for a spicy kick Feel free to add any of these extras. They can change the flavor and texture. Enjoy making this salad your own! {{ingredient_image_1}} To start, grab two packs of ramen noodles. You will not need the seasoning packets. Boil water in a pot and cook the ramen noodles as the package directs. This usually takes about three minutes. Once cooked, drain the noodles and rinse them with cold water. This step cools the noodles and stops the cooking process. Set the cooled noodles aside while you prepare the veggies. Next, take a large mixing bowl. Add one cup of shredded carrots, one cup of thinly sliced red bell pepper, one cup of julienned cucumber, one cup of sliced green onions, and half a cup of shelled edamame. Mix these vegetables gently to combine. This colorful mix adds crunch and freshness to your salad. In a small bowl, whisk together the dressing ingredients. You will need three tablespoons of sesame oil, two tablespoons of soy sauce, one tablespoon of rice vinegar, one tablespoon of grated ginger, and one tablespoon of honey or maple syrup. Add a pinch of salt and pepper. Whisk until the mixture is smooth and well combined. This dressing gives your salad a rich, nutty flavor. Now, add the cooled ramen noodles to your vegetable mix. Pour the dressing over the top. Gently toss everything together with your hands or two forks. Make sure the noodles and vegetables are coated evenly with the dressing. This step is key to flavoring every bite. Let the salad sit for at least ten minutes. This waiting time lets the flavors blend together. When ready to serve, you can present the salad in large bowls or on platters. For a beautiful touch, sprinkle toasted sesame seeds and chopped cilantro on top. If you like spice, add some chili flakes for a kick. Enjoy your fresh and tasty sesame ginger ramen noodle salad! To cook ramen noodles, start by boiling water in a pot. Once it’s boiling, add the noodles. Cook them for 3 to 4 minutes. Stir gently to prevent sticking. After cooking, drain the noodles. Rinse them under cold water to stop the cooking process. This keeps them firm and prevents mushiness. Letting the salad rest is key to great flavor. After mixing all the ingredients, let it sit for at least 10 minutes. This allows the noodles and veggies to soak up the dressing. If you have time, letting it rest for 30 minutes is even better. The flavors blend together nicely, making each bite tasty. You can easily swap ingredients in this salad. Here are some ideas: - Use whole wheat ramen for a healthier option. - Replace carrots with shredded cabbage for a different crunch. - Swap red bell pepper for yellow or orange for a sweet taste. - Use frozen peas instead of edamame if you can't find it. - For the dressing, tamari works well as a gluten-free soy sauce. These changes keep the salad fresh and fun! Pro Tips Chill the Noodles: After cooking the ramen, make sure to rinse them under cold water. This not only cools them down but also helps prevent them from sticking together. Mixing Colors: Feel free to add more colorful vegetables such as purple cabbage or yellow bell pepper for a vibrant look and additional nutrients. Flavor Infusion: Let the salad sit for at least 10 minutes before serving. This allows the flavors to meld beautifully and enhances the taste. Protein Boost: For added protein, consider mixing in grilled chicken, tofu, or shrimp, making it a more filling meal option. {{image_2}} You can easily add protein to your salad. Chicken is a great choice. Simply grill or poach it. Slice it thinly and mix it in. Tofu is another option. You can sauté or bake it for a tasty addition. Shrimp works well too. Just cook it until it turns pink and firm. Adding protein makes this dish heartier and more filling. For a vegan option, replace honey with maple syrup. You can also use tamari instead of soy sauce to keep it gluten-free. Choose gluten-free ramen noodles or use zucchini noodles for a fresh twist. These swaps keep the flavors bright while meeting dietary needs. While the sesame ginger dressing shines, feel free to mix it up. A peanut sauce can add a nutty flavor. Just whisk together peanut butter, soy sauce, lime juice, and a bit of water. A spicy chili sauce adds heat. You could also try a citrus vinaigrette with lime and orange juice. Each dressing gives a unique twist, so feel free to experiment! To keep your salad fresh, place it in an airtight container. This will prevent it from drying out. You can store the salad in the fridge for up to three days. If you added protein, it may only last two days. If you want to reheat your noodles, do it gently. Use a microwave or a pan on low heat. Add a splash of water to keep them moist. Stir often to heat them evenly. Do not overheat, as this can make them mushy. The salad tastes best when fresh. However, if stored correctly, it can last up to three days in the fridge. The longer it sits, the softer the veggies become. For the best crunch, eat it within 24 hours. Yes, you can make this salad ahead of time. It tastes great after it sits. Just prepare the salad and dressing separately. Mix them together right before serving. This keeps the noodles and veggies fresh and crisp. You can serve this salad with many dishes. It pairs well with grilled chicken or shrimp. For a light meal, serve it with miso soup. You can also enjoy it with spring rolls or dumplings for a fun Asian feast. To add spice, use chili flakes or sriracha in the dressing. You can also add sliced jalapeños or fresh chili peppers. Start with a small amount and taste as you go. Adjust it to your liking for a perfect kick. Yes, you can use different noodles. Rice noodles or soba noodles work nicely. Just cook them till tender and follow the same steps. Each noodle type brings a unique taste and texture to the salad. This salad is packed with nutrients. The veggies add vitamins and fiber. Edamame offers protein and healthy fats. The dressing uses sesame oil, which is good for heart health. Overall, it's a balanced meal that is also low in calories. This blog covers the delicious Sesame Ginger Ramen Noodle Salad. We explored the key ingredients, from the noodles to the dressing, and optional add-ins. I shared step-by-step instructions on how to prepare and serve it. Tips helped ensure perfect noodles and salad storage. Variations offered protein and dressing options. This easy dish is great for meal prep or a quick lunch. Enjoy experimenting with flavors and ingredients to make it your own!

Sesame Ginger Ramen Noodle Salad Simple and Fresh Recipe

If you’re looking for a bright, fresh dish to impress your family or friends, you’ve found it! This Sesame Ginger

- 1 lb large shrimp, peeled and deveined - 4 tablespoons olive oil - 4 cloves garlic, minced - Zest and juice of 2 lemons - 1 teaspoon smoked paprika - 1 teaspoon red pepper flakes (adjust for spice preference) - 1 cup cherry tomatoes, halved - 1 small red onion, sliced - 1 red bell pepper, sliced - Salt and black pepper to taste - Fresh parsley, chopped (for garnish) When I make this dish, I focus on fresh ingredients. The shrimp should be large and juicy. I prefer using peeled and deveined shrimp for a quick prep. The garlic gives a strong flavor, and lemon adds brightness. Smoked paprika adds a unique depth. The red pepper flakes can bring heat. Adjust these based on your taste. For veggies, I love cherry tomatoes for their sweetness. Red onions add a nice crunch, and red bell peppers bring color and flavor. Always season with salt and black pepper to enhance the taste. A sprinkle of fresh parsley at the end makes the dish look vibrant. This fresh touch makes the meal pop! Enjoy your cooking! {{ingredient_image_1}} - Preheat the oven to 400°F (200°C). - In a large bowl, mix together 4 tablespoons of olive oil, 4 minced garlic cloves, the juice and zest of 2 lemons, 1 teaspoon of smoked paprika, 1 teaspoon of red pepper flakes, 1 teaspoon of salt, and 1/2 teaspoon of black pepper. This mix is your marinade. - Add 1 lb of peeled and deveined large shrimp to the marinade. Toss well until each shrimp gets a coat. - Let the shrimp sit for about 10 minutes. This wait lets the flavors soak in. - On a large sheet pan, lay out 1 cup of halved cherry tomatoes, 1 small sliced red onion, and 1 sliced red bell pepper. - Drizzle a little olive oil over the veggies. Toss them with salt and pepper to bring out their taste. - Spread the marinated shrimp over the veggies on the sheet pan. Make sure they lay flat in one layer. - Bake in the hot oven for 10-12 minutes. Stir the mix halfway through to cook evenly. The shrimp should turn pink and opaque when ready. To cook shrimp just right, look for key signs. Cooked shrimp turn pink and opaque. They also curl into a C shape. Avoid shrimp that are gray or translucent. To prevent overcooking, keep an eye on the time. Shrimp usually need 10 to 12 minutes in the oven. If you overcook them, they become tough and rubbery. Want to amp up the taste? Try adding spices like cumin or coriander. Both spices bring warmth and depth. You can also use fresh herbs like basil or thyme. Just sprinkle them on before serving for a burst of flavor. Fresh herbs brighten the dish and add color. Serving this dish can be fun. Use a large platter to show off the shrimp and veggies. Arrange them in a colorful way to catch the eye. For garnishing, add a sprinkle of fresh parsley. This adds a nice touch of green. You can also serve it with lemon wedges for extra zest. Pro Tips Choose Fresh Shrimp: Always opt for the freshest shrimp available; check for a mild ocean smell and firm texture for the best flavor. Adjust Spice Levels: If you prefer a milder dish, reduce the amount of red pepper flakes, or omit them entirely for a family-friendly version. Don’t Overcook: Keep a close eye on the shrimp while baking; they cook quickly and should be removed as soon as they turn pink and opaque. Garnish for Flavor: Fresh parsley not only adds color but also brings a burst of freshness to the dish; consider adding lemon zest as an additional garnish for extra zing. {{image_2}} You can switch shrimp for chicken or tofu. Both options work well. For chicken, cut it into bite-sized pieces. Cook it for about 20-25 minutes. For tofu, use firm tofu, cut into cubes. Bake the tofu for 15-20 minutes. Adjust cooking times to ensure everything is perfectly done. Feel free to add more seasonal veggies. Think about zucchini, asparagus, or broccoli. These add color and flavor. You can also mix in grains like quinoa or pasta. This makes the meal more filling and satisfying. If you need gluten-free options, skip any soy sauce or gluten-rich ingredients. You can also use gluten-free grains. For a paleo-friendly meal, stick to fresh veggies and proteins. Avoid grains and legumes. Focus on whole foods for the best results. To keep your shrimp fresh, use an airtight container. Glass or plastic containers work well. Let the dish cool first before sealing it. Store leftovers in the fridge. They are best eaten within two days. If you leave them too long, they might lose taste and texture. You can reheat in the oven or microwave. For the oven, preheat it to 350°F (175°C). Place the shrimp on a baking sheet. Cover with foil to keep it moist. Bake for about 5-7 minutes. In the microwave, use a microwave-safe dish. Heat in short bursts, about 30 seconds. Check often to avoid overcooking. To freeze, let the dish cool completely. Place it in a freezer-safe container. Remove as much air as possible to prevent freezer burn. Label the container with the date. It can stay frozen for up to three months. To thaw, move it to the fridge overnight. For quicker thawing, place it in cold water for an hour. Shrimp cook quickly. They usually take about 10 to 12 minutes in the oven. Look for them to turn pink and opaque. Overcooking shrimp makes them tough, so keep an eye on them. Yes, you can use frozen shrimp! Just make sure to thaw them first. Place them in a bowl of cold water for about 15 minutes. Pat them dry before marinating. This way, they soak up the flavors well. I like to serve this dish hot from the oven. It pairs well with rice or crusty bread. You can also add a fresh salad on the side for a complete meal. Don't forget to sprinkle fresh parsley on top for a nice touch! You can prepare the shrimp and veggies ahead of time. Marinate the shrimp and chop the veggies. Store them in the fridge for up to 24 hours. When you're ready, just bake them. This makes dinner easy on busy nights. This blog post walks you through preparing a simple and delicious sheet pan lemon garlic shrimp. You learned about the key ingredients, easy steps to follow, and handy tips and tricks for perfect results. Remember, you can customize this dish by adding different proteins or veggies to match your taste. Enjoy this dish fresh or store leftovers for later. With this recipe, you’ll impress everyone and make a meal to remember! Happy cooking!

Savory Sheet Pan Lemon Garlic Shrimp Dinner Delight

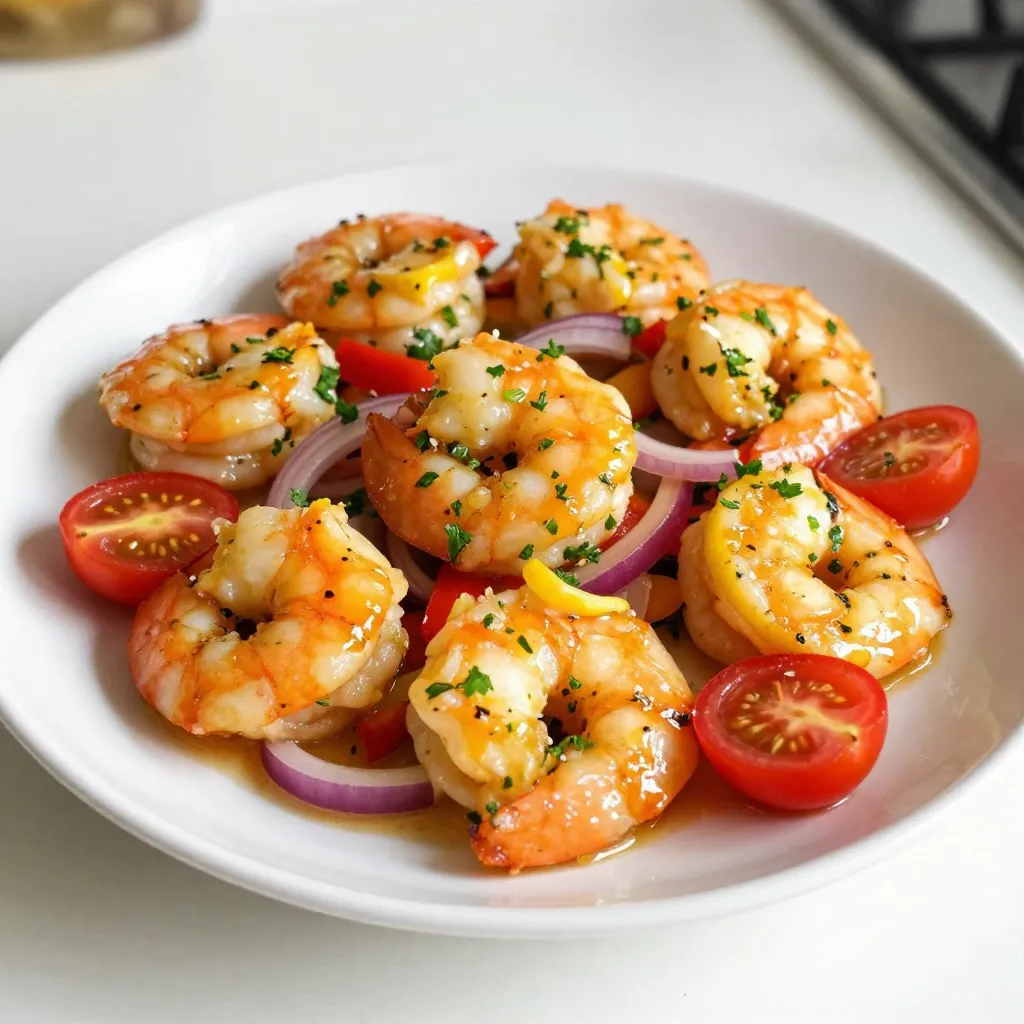
Looking for a quick and tasty dinner? Try my Savory Sheet Pan Lemon Garlic Shrimp! This dish bursts with fresh

To make a tasty cranberry pecan chicken salad, gather these items: - 2 cups cooked chicken breast, shredded or diced - 1/2 cup dried cranberries - 1/3 cup pecans, roughly chopped - 1/4 cup celery, finely diced - 1/4 cup red onion, finely chopped - 1/2 cup Greek yogurt (or mayonnaise for a richer flavor) - 1 tablespoon honey - 1 tablespoon Dijon mustard - Salt and pepper to taste - 1 tablespoon fresh parsley, chopped (optional, for garnish) These ingredients blend well. The chicken offers protein, while cranberries add sweetness. Pecans bring crunch, and celery plus onion give fresh flavors. You can swap some ingredients for different flavors or dietary needs: - Chicken: Use rotisserie chicken for a quick option. You can also try canned chicken. - Greek yogurt: Mayonnaise works well for a creamier taste. You can also use a vegan yogurt for a dairy-free option. - Honey: Maple syrup can replace honey for a vegan choice. - Nuts: Almonds or walnuts can work instead of pecans. - Celery and onion: Try bell peppers or cucumbers for a different crunch. These swaps keep the salad exciting and flexible for your taste. Understanding the nutrition helps you enjoy this dish more. Here’s a rough breakdown per serving: - Calories: Approximately 350-400 - Protein: About 30 grams - Fat: Roughly 20 grams - Carbohydrates: Around 15 grams - Fiber: About 3 grams - Sugar: Roughly 5 grams This salad packs protein and healthy fats. The fiber from the cranberries and celery adds a nice touch too. Enjoy it guilt-free as part of a balanced meal! {{ingredient_image_1}} Start by gathering all your ingredients. You will need: - 2 cups cooked chicken breast, shredded or diced - 1/2 cup dried cranberries - 1/3 cup pecans, roughly chopped - 1/4 cup celery, finely diced - 1/4 cup red onion, finely chopped - 1/2 cup Greek yogurt (or mayonnaise) - 1 tablespoon honey - 1 tablespoon Dijon mustard - Salt and pepper to taste - 1 tablespoon fresh parsley, chopped (optional) In a large bowl, mix the chicken, cranberries, pecans, celery, and red onion. Make sure to mix well, so all the flavors blend. Use a separate bowl for the dressing. Whisk together Greek yogurt, honey, and Dijon mustard until smooth. Pour this over the chicken mix. Gently fold it in. The goal is to coat everything without breaking the chicken pieces. This keeps the texture nice and chunky. Chill the salad for at least 30 minutes. This lets the flavors come alive. When serving, give the salad a gentle stir. You can serve it on a bed of greens, in a sandwich, or in a wrap. For a nice touch, garnish with fresh parsley. The colors and textures will make your dish pop. Enjoy this tasty meal! To make your chicken salad great, start with good chicken. Use boneless, skinless chicken breasts. You can grill, bake, or boil the chicken. Boiling is quick and keeps the meat juicy. Cook the chicken until it reaches 165°F. Let it cool before shredding or dicing. This keeps it easy to mix with other ingredients. To boost flavor, add herbs like thyme or basil. Try using different nuts, like walnuts or almonds, for a crunch. A pinch of cayenne can add heat if you like spice. You can also mix in some chopped apples for sweetness. Fresh lemon juice brightens the dish. Don't be afraid to experiment with these additions. One common mistake is overcooking the chicken. This makes it dry and tough. Another mistake is skipping the chill time. Chilling helps the flavors blend well. Don’t forget to taste and adjust the salt and pepper. Too little seasoning can make the dish bland. Lastly, avoid using too much dressing. This can make the salad soggy. Pro Tips Use Rotisserie Chicken: For a quicker option, shredded rotisserie chicken works perfectly and adds extra flavor. Toast the Pecans: Lightly toasting the pecans enhances their flavor and adds a delightful crunch to the salad. Chill Before Serving: Allowing the salad to chill for at least 30 minutes helps the flavors meld together beautifully. Experiment with Add-ins: Feel free to add other ingredients like grapes, apples, or feta cheese for a unique twist on the classic recipe. {{image_2}} You can change up the protein in your cranberry pecan chicken salad. If you want to try something new, consider using turkey or rotisserie chicken. These options bring a similar taste but with a twist. For a unique flavor, try adding shredded pork or even deli meats like ham. Each choice gives a tasty spin to the salad. If you prefer a vegan or vegetarian option, you can replace the chicken with chickpeas or tofu. Chickpeas add a nice texture and protein. Tofu can absorb flavors well, making it a great choice. Use firm tofu, diced small, and sauté it lightly for extra flavor. You can also add avocado for creaminess. This keeps the salad rich and satisfying. Seasonal ingredients can elevate your salad. In summer, try adding fresh berries like strawberries or blueberries. They add a burst of flavor and color. In the fall, swap dried cranberries for fresh cranberries or even diced apples for crunch. You can also use nuts like walnuts or almonds based on what is fresh. Each season offers unique flavors to explore in your salad. To keep your cranberry pecan chicken salad fresh, use an airtight container. This helps prevent any unwanted odors from your fridge. Always make sure the salad is cooled before placing it in the container. Label the container with the date to track freshness. Cranberry pecan chicken salad lasts about three to four days in the fridge. After that, the ingredients may not taste as fresh. Always check for any signs of spoilage before you enjoy it. If the salad smells off or looks different, it’s best to toss it. You can freeze the chicken salad, but some ingredients may not hold up well. The texture of the celery and cranberries could change. If you still want to freeze it, store it in a freezer-safe container. Use it within two months for the best taste. To reheat, let it thaw in the fridge overnight. Enjoy your salad cold, as reheating may not work well with the yogurt or mayonnaise. You can use mayonnaise as a substitute for Greek yogurt. It gives a rich taste. You might also try sour cream for a tangy flavor. If you want a lighter option, try plain yogurt. Each choice will change the salad’s taste a bit. To make this salad low-carb, swap out the dried cranberries with fresh ones. Fresh cranberries have fewer carbs. You can also reduce the honey or skip it for less sugar. Lastly, use a low-carb dressing instead of Greek yogurt or mayonnaise. These changes keep the taste while cutting carbs. Yes, you can make this salad in advance. It tastes even better after chilling for a while. Prepare it a day ahead and store it in the fridge. Just remember to stir it gently before serving. Enjoy your meal! This blog post covers all you need to create a great salad. We looked at key ingredients, how to prepare and present them, and tips for perfect flavor. You learned about ingredient swaps and storage tips. Lastly, we answered frequently asked questions to keep your salad fresh and delicious. Remember, a great salad can be fun and easy to make. Feel free to try new proteins and flavor choices. Enjoy experimenting and make each salad your own!

Cranberry Pecan Chicken Salad Simply Delicious Meal

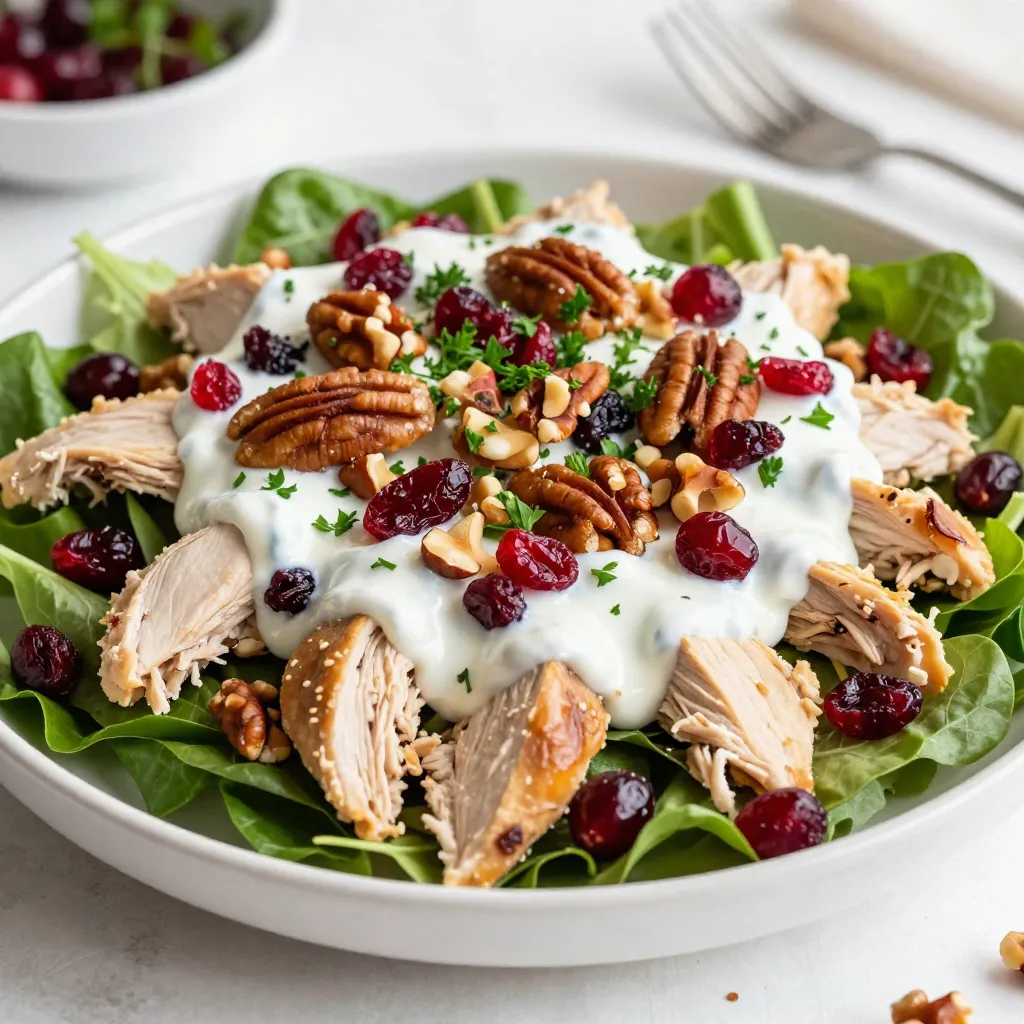
Are you ready to elevate your lunch game? This Cranberry Pecan Chicken Salad is a simple yet delicious meal that

- 1 ½ cups graham cracker crumbs - ½ cup unsalted butter, melted - 2 cups cream cheese, softened - 1 cup powdered sugar - 2 cups heavy whipping cream - 1 cup green food coloring (gel works best) - 1 tablespoon lime juice These main ingredients are key for making a tasty No-Bake Grinch Cheesecake. The graham cracker crumbs create a crunchy base. Melted unsalted butter helps bind the crust together. Softened cream cheese gives the cheesecake its creamy texture. Powdered sugar adds sweetness, helping balance the flavors. The heavy whipping cream makes the filling light and fluffy. Green food coloring brings that fun Grinch look, while lime juice adds a zesty kick. - Whipped cream for topping - Red and green sprinkles for decoration - Edible glitter or sugar The optional ingredients let you get creative! Whipped cream on top makes your cheesecake look extra special. Red and green sprinkles add festive cheer. You can sprinkle edible glitter or sugar for a fun sparkle. These toppings will surely impress your guests and make your dessert stand out on any holiday table. {{ingredient_image_1}} 1. In a medium bowl, combine 1 ½ cups of graham cracker crumbs and ½ cup of melted unsalted butter. Mix until it feels like wet sand. 2. Press the crumb mixture into the bottom of a 9-inch springform pan. Make sure it's even and compact. 3. Place the pan in the refrigerator for about 20 minutes to set while you prepare the filling. 1. In a large mixing bowl, beat 2 cups of softened cream cheese until smooth. 2. Slowly add 1 cup of powdered sugar, mixing until well combined. 3. Stir in 1 teaspoon of vanilla extract and 1 tablespoon of lime juice for flavor. 1. Gradually mix in 1 cup of green food coloring until you reach your desired shade of Grinch green. 2. In another bowl, whip 2 cups of heavy cream until stiff peaks form. 3. Gently fold the whipped cream into your cream cheese mixture. Be careful, so you don’t deflate the whipped cream. 4. Pour the green cheesecake filling over the prepared crust. Smooth the top with a spatula. 5. Cover the pan and refrigerate for at least 4 hours, or until the cheesecake is set. To make this cheesecake look festive, gel food coloring works best. Gel gives a vibrant color that stands out. You can adjust the amount of coloring to fit your taste. If you want a darker green, add more gel. For a lighter shade, use less. Mixing is key for a smooth cheesecake. First, beat the cream cheese until it is creamy and lump-free. This step is very important; lumps can ruin the texture. Next, when you add the whipped cream, fold it in gently. This keeps the whipped cream light and fluffy. Don’t stir too hard, or it will lose its airiness. This cheesecake pairs well with many holiday treats. You can serve it with cookies or chocolate. It also looks great on a dessert table. For festive gatherings, slice it into wedges. Add a dollop of whipped cream and sprinkle on red and green decorations. Your guests will love the fun and festive look! Pro Tips Use Gel Food Coloring: Gel food coloring provides a more vibrant color compared to liquid food coloring. This will ensure your cheesecake has the perfect Grinch green hue! Chill Ingredients: Make sure your cream cheese is at room temperature for easier mixing. Additionally, chilling your mixing bowl and beaters can help whip the cream more effectively. Whip Cream to Stiff Peaks: Be careful not to over-whip the cream. Whipping to stiff peaks will give your cheesecake a light and airy texture without being grainy. Decorate Just Before Serving: To maintain the freshness of the whipped cream and prevent it from wilting, add the toppings right before serving. This keeps your cheesecake looking beautiful! {{image_2}} You can easily change the taste of your No-Bake Grinch Cheesecake. One fun way is to add mint extract for a fresh twist. This small change can give your cheesecake a delightful minty flavor. Just one teaspoon is enough to make a difference. You might also want to use different food coloring. This lets you create alternate themes for any festive occasion. For instance, red and white can be perfect for Valentine's Day. Toppings can elevate your cheesecake's look and taste. A simple chocolate drizzle on top adds a rich layer of flavor. You can make this by melting chocolate and pouring it over the cheesecake. Another great idea is to use crushed candies for decoration. This adds a fun crunch and a pop of color. You can use peppermint candies or colorful sprinkles. They enhance the festive vibe and make the cheesecake even more appealing. Store your No-Bake Grinch Cheesecake in the refrigerator. This keeps it fresh and tasty. Always cover it with plastic wrap. This way, it won’t absorb any smells from the fridge. Make sure the wrap is tight to keep the cheesecake moist. You can freeze the cheesecake for later. Just remember to wrap it well in plastic wrap and then in foil. This will help keep it from getting freezer burn. When you want to enjoy it, thaw the cheesecake in the refrigerator. This ensures the texture stays creamy and smooth. Plan to let it sit overnight for best results. Yes, you can make this cheesecake ahead of time. I suggest preparing it at least one day before your event. The cheesecake needs 4 hours to set, but it tastes even better after sitting overnight. This way, all the flavors blend nicely. To ensure your cheesecake sets well, use softened cream cheese and beat it until smooth. Avoid lumps for a nice texture. When adding whipped cream, fold it in gently. This keeps it airy and fluffy. Lastly, refrigerate the cheesecake for at least 4 hours. Yes, you can make this cheesecake dairy-free. Use dairy-free cream cheese and coconut cream for the whipped cream. You can find these at most grocery stores. Make sure to adjust the other ingredients for taste, but the recipe will still be delicious! You learned how to make a delicious cheesecake with simple ingredients like graham crackers and cream cheese. Following the steps ensures a smooth filling and a solid crust. Don’t forget to play with colors and toppings to make it your own. Store your cheesecake properly to keep it fresh. This easy recipe is great for any celebration or gathering. Enjoy making and sharing this tasty treat!

No-Bake Grinch Cheesecake Festive Holiday Treat

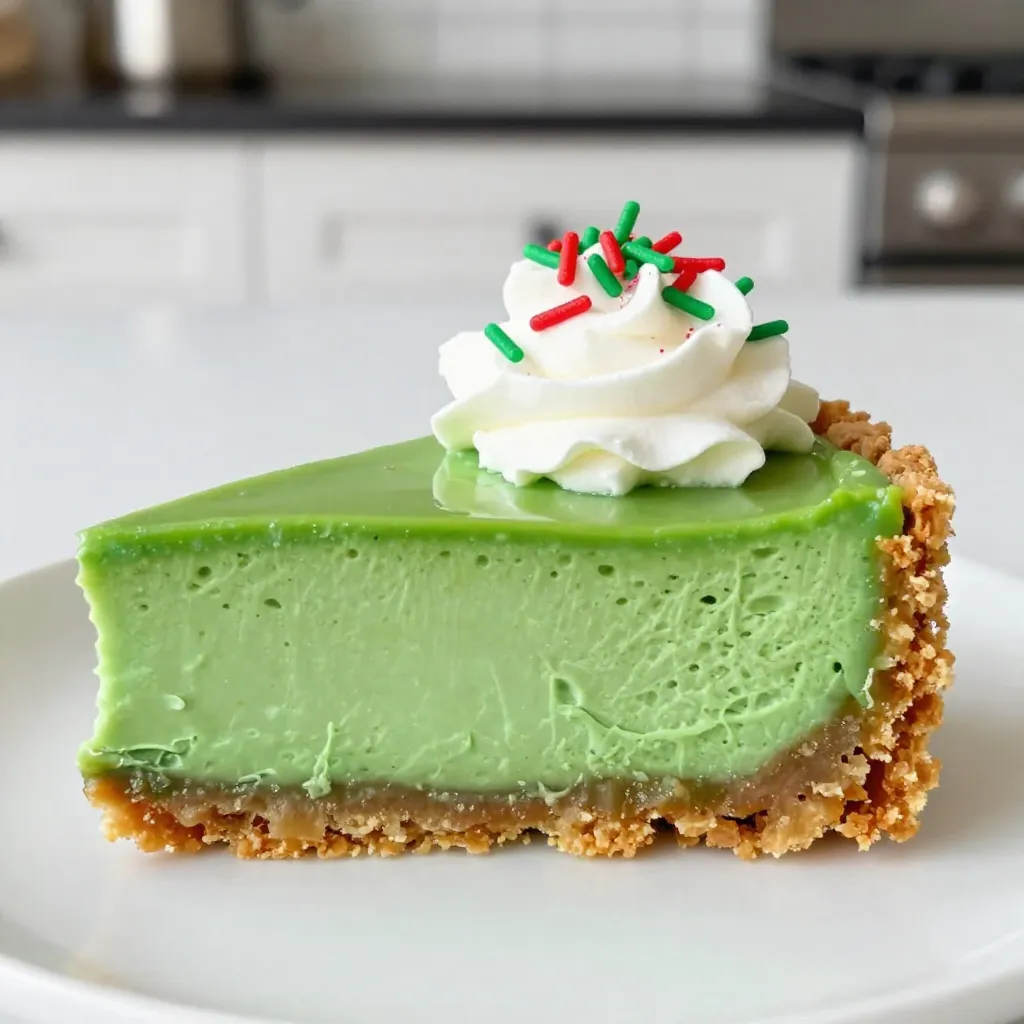
Looking for a fun dessert to brighten your holiday season? Try my No-Bake Grinch Cheesecake! This creamy, festive treat is

- 3 ripe bananas - 1 cup plain Greek yogurt - 1/2 cup brown sugar - 1/4 cup honey - 2 large eggs - 1 teaspoon vanilla extract - 1 teaspoon baking soda - 1/2 teaspoon baking powder - 1/2 teaspoon salt - 1 and 1/2 cups all-purpose flour - 1 teaspoon ground cinnamon - 1/2 cup chopped walnuts or pecans (optional) - 1/4 cup chocolate chips (optional) In this recipe, I use ripe bananas. They add natural sweetness and moisture. Greek yogurt makes the bread soft and rich. You can use plain yogurt if needed, but Greek yogurt gives it a nice tang. For sweetness, I add brown sugar and honey. Brown sugar adds depth, while honey brings a floral note. I use two large eggs to help bind the bread. Vanilla extract adds a lovely aroma. Baking soda and baking powder help the bread rise well. I mix in all-purpose flour and ground cinnamon for a warm flavor. You can add chopped walnuts or pecans for crunch. Chocolate chips are a fun touch, too! Each ingredient plays a key role. Choose quality ingredients for the best taste. {{ingredient_image_1}} - Preheat oven to 350°F (175°C). - Prepare a 9x5 inch loaf pan by greasing it or lining it with parchment paper. - In a large bowl, mash 3 ripe bananas. - Add 1 cup of plain Greek yogurt. - Stir in 1/2 cup of brown sugar and 1/4 cup of honey. - Crack in 2 large eggs and add 1 teaspoon of vanilla extract. - Mix until everything is smooth and well combined. - In another bowl, whisk together: - 1 teaspoon baking soda - 1/2 teaspoon baking powder - 1/2 teaspoon salt - 1 and 1/2 cups all-purpose flour - 1 teaspoon ground cinnamon - Gradually add the dry mix to the wet mix. - Gently fold them together until just combined. - Be careful not to over-mix; this keeps the bread light and fluffy. - If you like, fold in 1/2 cup of chopped walnuts or pecans. - You can also add 1/4 cup of chocolate chips for extra sweetness. - Pour the batter into the prepared loaf pan. - Use a spatula to smooth the top. - Bake in the preheated oven for 55-65 minutes. - Check with a toothpick; it should come out clean when done. Using Greek yogurt in baking adds moisture and protein. It makes your banana bread soft and fluffy. Greek yogurt also gives a slight tang that balances the sweetness. To get the best texture, mix the yogurt well with the wet ingredients. This ensures an even blend. Over-mixing is a common mistake. It can lead to dense banana bread. Mix just until the ingredients combine. This keeps the bread light and airy. Another tip is to check your oven temperature. If it’s too hot or cold, your bread may bake unevenly. Use an oven thermometer to be sure. To serve, slice the banana bread warm. A dollop of Greek yogurt on top adds creaminess. Sprinkle some nuts for a nice crunch. You can also drizzle honey over the slices. This extra touch makes each bite sweet and delightful. Pro Tips Ripe Bananas are Key: The riper the bananas, the sweeter and more flavorful your bread will be. Look for bananas with lots of brown spots for the best results. Don’t Overmix: To ensure a light and fluffy texture, mix the wet and dry ingredients until just combined. Overmixing can lead to a dense loaf. Cooling Time Matters: Allowing the bread to cool in the pan for a few minutes helps it set, making it easier to remove without breaking. Customization Options: Feel free to experiment with add-ins like dried fruits, seeds, or different nuts to personalize your banana bread to your taste. {{image_2}} You can make Greek yogurt banana bread even healthier. Start by swapping brown sugar. Try using coconut sugar or maple syrup instead. Both add sweetness and flavor. They also have less impact on blood sugar. Another simple change is to use whole wheat flour. This adds fiber and nutrients. Whole wheat flour makes the bread heartier. To boost the flavor, add spices like nutmeg or ginger. A little nutmeg gives warmth and depth. Ginger adds a nice zing. You can also mix in dried fruits or seeds. Raisins, cranberries, or sunflower seeds work well. They add texture and taste to your bread. Banana bread pairs well with spreads. Try almond butter, peanut butter, or cream cheese. These spreads take your bread to the next level. You can also create banana bread muffins. Just pour the batter into muffin tins. Bake for about 20-25 minutes. This way, you have easy, grab-and-go snacks. To keep your banana bread fresh, wrap it tightly in plastic wrap. You can also place it in an airtight container. This helps prevent it from drying out. If you want to store it longer, freeze it. Slice the bread before freezing for easy servings. Use freezer-safe bags or containers to keep it safe. Fresh banana bread lasts about 3 to 4 days in the fridge. If you freeze it, it can stay good for up to 3 months. Just remember to label your container with the date! To reheat your banana bread, use the oven or microwave. If you use the oven, preheat it to 350°F (175°C). Place the bread on a baking sheet and warm it for about 10 minutes. This will keep it moist and tasty. If you prefer the microwave, heat a slice for about 15 to 20 seconds. Check to make sure it doesn’t get too hot, as that can dry it out. Enjoy your warm banana bread with a bit of Greek yogurt or honey on top! Yes, you can use other ingredients. Sour cream works well in place of Greek yogurt. You can also try using applesauce for a lower-fat option. These substitutes keep the bread moist and tasty. To check for doneness, insert a toothpick into the center. If it comes out clean, the bread is done. You can also gently press the top. It should spring back when it's ready. This recipe is not gluten-free as it includes all-purpose flour. To make it gluten-free, use a gluten-free flour blend. This change helps achieve the right texture without gluten. You can make this recipe vegan by substituting eggs. Use flax eggs or applesauce instead. Additionally, choose a plant-based yogurt for a fully vegan option. This way, you keep it delicious and plant-based. Greek yogurt adds protein, which supports muscle health. It also provides probiotics for gut health. Additionally, it lowers fat compared to butter or oil. This makes your banana bread lighter and healthier. This blog post outlined a simple way to make Greek yogurt banana bread. You learned about essential ingredients and step-by-step instructions to achieve great results. Tips helped you avoid common baking mistakes, while variations offered creative options. Remember, using Greek yogurt gives your bread moisture and richness. Now, grab your ingredients and enjoy the process. You will create a delicious treat that everyone will love! Happy baking!

Greek Yogurt Banana Bread Simple and Healthy Recipe

Are you ready to bake something delicious and healthy? Greek Yogurt Banana Bread is the perfect treat! This easy recipe

To make No-Churn Strawberry Cheesecake Ice Cream, gather these simple ingredients: - 2 cups fresh strawberries, hulled and sliced - 1/2 cup granulated sugar (divided) - 1 cup cream cheese, softened - 1 cup heavy cream - 1 teaspoon vanilla extract - 1/2 cup graham cracker crumbs - A pinch of salt These ingredients come together to create a creamy, fruity, and crunchy dessert. Fresh strawberries give a sweet and tangy flavor, while cream cheese adds richness. Heavy cream brings a smooth texture, and graham cracker crumbs offer a nice crunch. The sugar helps balance the flavors, while vanilla and salt enhance the overall taste. You can find most of these ingredients at your local grocery store. Using fresh strawberries is key, as they provide the best flavor. If you want, you can adjust the sugar to make it sweeter or less sweet, based on your taste. Feel free to get creative! You can swap the strawberries for other fruits like blueberries or peaches for a fun twist. Each change will make your ice cream unique. Now that you have the ingredients, let’s move on to making this delightful treat! {{ingredient_image_1}} - First, take 2 cups of fresh strawberries and hull them. Slice them into small pieces. - In a medium bowl, combine the strawberries with 1/4 cup of granulated sugar. Mix them well. - Let the strawberries sit for about 15-20 minutes. This process is called macerating. It helps them release their juices and enhances their flavor. - After they have macerated, blend them until smooth using a blender or immersion blender. Set this strawberry puree aside for later. - In a large mixing bowl, take 1 cup of softened cream cheese. Beat it with an electric mixer until it is creamy and smooth. - Gradually add the remaining 1/4 cup of granulated sugar. Also, add 1 teaspoon of vanilla extract and a pinch of salt. Continue mixing until everything is well combined. - In another bowl, whip 1 cup of heavy cream until soft peaks form. Then, gently fold this whipped cream into the cream cheese mixture. This step adds lightness to your cheesecake base. - Take about 1 cup of the strawberry puree and gently fold it into the cheesecake base. Leave some streaks for a marbled look. - In a suitable container, layer half of the cheesecake mixture at the bottom. - Sprinkle half of the graham cracker crumbs on top. - Next, add half of the remaining strawberry puree. - Layer the second half of the cheesecake mixture over this. - Finish by sprinkling the rest of the graham cracker crumbs and drizzling the remaining strawberry puree on top. - Cover the container and freeze for at least 6 hours or until fully set. Enjoy your no-churn strawberry cheesecake ice cream! To get the best texture in your ice cream, you need to whip the cream properly. Whipping heavy cream adds air, making the ice cream light and fluffy. Beat it until soft peaks form, then fold it gently into the cream cheese mixture. This keeps the ice cream creamy and smooth. For marbling, use a gentle folding technique. Take about a cup of strawberry puree and fold it into the cheesecake base. Leave some streaks. This creates a beautiful swirl and enhances the flavor. To avoid ice crystals, ensure your mixture is smooth before freezing. An even freeze helps keep the texture creamy. Use a shallow container for freezing. This helps it freeze faster and more evenly. When serving your ice cream, use fun bowls or cones. This adds a playful touch. Top each scoop with fresh strawberries for color and flavor. A sprinkle of graham cracker crumbs adds a nice crunch. Consider using clear glass dishes. This lets the beautiful pink color shine through. You can also layer the ice cream in a tall glass. This makes a stunning dessert for guests. Pro Tips Choose Ripe Strawberries: Select fresh, ripe strawberries for the best flavor and sweetness in your ice cream. Chill Your Ingredients: Ensure your cream cheese and heavy cream are well chilled before mixing to achieve a smoother consistency. Don't Overmix: When folding in the whipped cream, be gentle to maintain the light and airy texture of the ice cream. Layering Technique: For a beautiful presentation, alternate the cheesecake mixture and strawberry puree in layers to create a striking marbled effect. {{image_2}} You can change the fruit in this recipe. Try using ripe peaches or blueberries. Each fruit gives a new taste. Blend them the same way as strawberries. You can also add chocolate. Swirl in some melted dark chocolate for a rich touch. Or, mix in a fudge ribbon to add a chocolate layer. These small tweaks can make this ice cream even more fun. If you want a dairy-free option, use coconut cream instead of heavy cream. Use dairy-free cream cheese too. This keeps the creamy texture while being friendly to those who avoid dairy. You can also reduce the sugar by using a sugar substitute. Choose options like stevia or erythritol. This way, you can enjoy a tasty treat with less sugar. To keep your no-churn strawberry cheesecake ice cream fresh, use the right containers. I recommend airtight containers. Glass or plastic containers work well. They help prevent ice crystals from forming. You can also use a loaf pan covered tightly with plastic wrap. Make sure it fits your ice cream snugly to minimize air exposure. You can store this ice cream for about 1 to 2 weeks. It stays tasty and creamy during this time. After that, it may lose its best flavor and texture. When you want to serve the ice cream, take it out of the freezer. Let it sit for about 5 to 10 minutes. This helps it soften slightly. This step makes it easier to scoop. If it's too hard, you may end up with a mess. If you have leftovers, you can re-freeze the ice cream. Just make sure to seal it tightly again. This will help keep the texture nice. Remember, each time you thaw and refreeze, it may lose some creaminess. So, try to enjoy it fresh when you can! Yes, you can use frozen strawberries. Just thaw them first. Drain excess liquid after thawing to avoid watery ice cream. This gives you a nice strawberry flavor. No graham crackers? No problem! You can use vanilla wafers or crushed cookies. They add a sweet crunch to your ice cream. You can also use oats for a healthy twist! Making this ice cream takes about 20 minutes of prep time. Afterward, it needs at least 6 hours in the freezer to set. Plan for a total of around 6 hours and 20 minutes to enjoy your treat. Yes, you can make this recipe without an electric mixer. Just use a sturdy whisk to mix the cream cheese. It takes more effort, but you can still achieve a smooth texture. For whipping cream, use a hand whisk or a jar to shake it up. This recipe for strawberry cheesecake ice cream combines fresh flavors for a perfect treat. You learned how to prepare strawberries, make a creamy base, and layer the ingredients. Plus, you now have tips for texture and presentation. Experiment with flavors and variations to suit your taste. Store your ice cream correctly for the best results. Use these steps to impress friends and family with your homemade treat! Enjoy every scoop of your delicious creation.

No-Churn Strawberry Cheesecake Ice Cream Delight

Are you ready to enjoy a creamy, delicious treat without the hassle of an ice cream maker? In No-Churn Strawberry

- 1 cup brown sugar - 1/2 cup unsalted butter - 1/2 cup heavy cream - 1 teaspoon vanilla extract - 1/2 teaspoon sea salt - 4 medium-sized apples (such as Granny Smith or Honeycrisp), sliced - 1/2 cup cream cheese, softened - 1 tablespoon powdered sugar For this recipe, you will need precise measurements for the best results. You will use: - 1 cup of brown sugar for sweetness and depth. - 1/2 cup of unsalted butter to create a rich caramel flavor. - 1/2 cup of heavy cream for creaminess. - 1 teaspoon of vanilla extract for warmth. - 1/2 teaspoon of sea salt to enhance the taste. - 4 medium-sized apples, ideally Granny Smith or Honeycrisp, for a perfect crunch. - 1/2 cup of softened cream cheese for a smooth dip. - 1 tablespoon of powdered sugar to slightly sweeten the cream cheese. When choosing apples, I recommend using Granny Smith for a tart kick or Honeycrisp for sweetness. These apples hold up well when dipped and add a great balance to the rich caramel flavor. {{ingredient_image_1}} 1. Start by taking a medium saucepan. Add 1 cup of brown sugar and 1/2 cup of unsalted butter. 2. Heat this mixture over medium heat. Stir it all the time until it bubbles. This should take about 3 to 5 minutes. 3. Now, carefully add 1/2 cup of heavy cream to the pan. Keep stirring until it is mixed well. 4. Let it boil for 2 to 3 minutes without stirring. You want it to thicken a bit. 5. Once thickened, remove the pan from heat. Stir in 1 teaspoon of vanilla extract and 1/2 teaspoon of sea salt. Set it aside to cool a little. 1. In a mixing bowl, add 1/2 cup of softened cream cheese and 1 tablespoon of powdered sugar. 2. Use a hand mixer to beat the mix until it is smooth and creamy. 3. Take your cooled caramel sauce and drizzle some over the cream cheese mix. 4. Gently fold it to create a marbled look. Be careful not to mix it too much. 1. Spoon the caramel cream cheese dip into a nice serving bowl. 2. Pour the rest of the salted caramel on top. Drizzle it generously for a pretty look. 3. Serve this dip with sliced apples. I love using Granny Smith or Honeycrisp apples for their crispness. 4. Arrange the apple slices around the bowl. It makes for a great presentation. To make great caramel, you need the right consistency. Start by cooking the brown sugar and butter together. Stir them for about three to five minutes until the sugar melts. You'll see bubbles form. This step is key! After that, add the heavy cream. Keep stirring as you do this. Let it boil for two to three minutes without stirring. This helps it thicken. You want it to coat the back of a spoon. Adding spices makes your dip more special. Try a pinch of cinnamon or nutmeg for warmth. It adds depth to the flavor. For a smooth dip base, make sure your cream cheese is soft. Let it sit at room temperature for at least 30 minutes. Mix it well with powdered sugar until it's creamy. This will help create the perfect texture. Don’t skip the cooling time! Let the caramel cool for about ten minutes before mixing. This prevents the cream cheese from melting. Also, be careful not to overcook the caramel. If you let it cook too long, it becomes hard. You want a nice, pourable consistency. Keep an eye on it to get it just right! Pro Tips Choose the Right Apples: For the best flavor combination, use a mix of tart and sweet apples like Granny Smith and Honeycrisp. Control the Caramel Texture: Boil the caramel for longer if you prefer a thicker consistency, but keep an eye on it to prevent burning. Cool Before Mixing: Let the caramel cool slightly before drizzling it into the cream cheese to maintain its structure and prevent separation. Presentation Matters: For a beautiful presentation, drizzle extra caramel on top and garnish with a sprinkle of sea salt or crushed nuts. {{image_2}} You can change the cheese and sweetener in the dip. For a creamier texture, try mascarpone cheese instead of cream cheese. If you want it sweeter, use maple syrup or honey. Toppings can also add fun! Try mixing in crushed nuts like pecans or walnuts to add crunch. You can also drizzle melted chocolate over the top. Seasonal flavors can make this dip special. In fall, add pumpkin spice for a warm, cozy taste. For summer, a hint of lemon zest can brighten the dip. You can also add other dippables besides apples. Try sliced pears or fresh strawberries. These fruits pair well with the sweet and salty mix. If you need gluten-free options, this dip is naturally safe. All the ingredients are gluten-free. For a vegan version, swap the cream cheese for a nut-based cheese. Use coconut cream instead of heavy cream for a rich, creamy taste. You can also use agave nectar in place of brown sugar. To store leftovers, place the dip in an airtight container. Cover it well to keep moisture out. You want the dip to stay fresh and tasty. Use containers made from glass or plastic. Glass is better for flavor, but plastic works too. Make sure to chill it right away. This helps keep it from spoiling. You can freeze the dip, but it may change texture. If you want to freeze it, use a freezer-safe container. Leave some space at the top for expansion. To thaw, move it to the fridge overnight. This helps keep the taste and texture. Avoid microwaving it, as it can separate. In the fridge, the dip stays fresh for about a week. Look for signs of spoilage, like a sour smell or change in color. If you see any mold, throw it away right away. Always trust your senses! If it doesn’t smell or look right, it’s better to be safe. To make the caramel less sticky, cook it a bit longer. The longer you boil it, the thicker it gets. Just be careful not to burn it. Stir often while it's cooking. This will help keep the sugar from getting too sticky. You can also add a bit more cream to help. Yes, you can use store-bought caramel sauce. It saves time and is easy to find. Just warm it up a little before serving. This will make it smoother for dipping. However, homemade caramel has a richer taste. If you have time, I recommend making it from scratch. Besides apples, you can serve pears, bananas, or strawberries. These fruits pair well with the caramel dip. You can even try grapes or pineapple for a fun twist. The sweet and salty dip works great with many fruits. You can keep the dip in the fridge for about three days. Make sure to store it in an airtight container. If you notice any change in color or smell, it's best to throw it away. Enjoy it fresh for the best taste! This blog post covered the key ingredients, preparation steps, serving tips, and storage for the salted caramel apple dip. You learned how to create a tasty treat using simple items like brown sugar, apples, and cream cheese. Remember, each step matters in making the dip rich and flavorful. Whether you try variations or stick to the basics, enjoy the fun of dipping. I hope you create delicious moments with this recipe. Your next gathering will shine with this dip at the center.

Salted Caramel Apple Dip Delightful and Easy Recipe

Are you ready to indulge in a sweet and savory treat? This Salted Caramel Apple Dip is simple to whip

- 1 (4-5 pounds) boneless turkey breast, skin-on - 4 tablespoons olive oil - 2 tablespoons fresh rosemary, chopped - 2 tablespoons fresh thyme, chopped - 1 tablespoon fresh sage, chopped - 4 cloves garlic, minced - Zest of 1 lemon - Juice of 1 lemon - Salt and pepper to taste - 1 cup low-sodium chicken broth To make a tasty herb roasted turkey breast, you need a few key ingredients. Start with a boneless turkey breast. This cut is perfect for roasting. The skin keeps the meat juicy. You also need olive oil, which adds flavor and helps the herbs stick. Fresh herbs like rosemary, thyme, and sage bring a bright taste. Minced garlic adds depth. Lemon zest and juice brighten the dish. Don’t forget salt and pepper to enhance all the flavors. Finally, chicken broth keeps the meat moist as it cooks. Fresh herbs make a big difference in flavor. I love using rosemary, thyme, and sage. Each herb has its own unique taste. - Rosemary: This herb has a strong, pine-like flavor. It pairs well with turkey. - Thyme: This herb is earthy and slightly sweet. It adds warmth to the dish. - Sage: This herb has a savory taste. It complements the turkey perfectly. When you chop these herbs, their aroma fills the kitchen. It makes your mouth water! Using fresh herbs is key for the best taste. You can add a few optional ingredients to take your turkey to the next level. - Onion: Add sliced onion to the roasting pan for extra flavor. - Carrots and Celery: These veggies add sweetness and texture. - Wine: A splash of white wine in the broth adds richness. These ingredients are not required, but they can enhance the flavor of your turkey. You can experiment with them based on your taste. Enjoy the process of creating your own special dish! {{ingredient_image_1}} Start by preheating your oven to 375°F (190°C). This step gets your oven ready for cooking. Take your turkey breast and place it on a clean cutting board. Pat it dry using paper towels. This helps the skin crisp up. Next, you need to loosen the skin from the meat. Use your fingers to create a pocket. Be careful not to tear the skin. This pocket is where we will add the herb mixture. In a small bowl, mix together the olive oil, chopped rosemary, thyme, sage, minced garlic, lemon zest, lemon juice, salt, and pepper. This fragrant herb mixture will give your turkey a wonderful flavor. Make sure all the ingredients blend well. When you have it ready, take half of this mixture and rub it under the skin of the turkey. Spread it evenly to cover the meat. Use the remaining mixture to rub all over the outside of the turkey breast. This adds flavor to every bite. Now, grab a roasting pan and pour in the chicken broth. This will keep the turkey moist while it cooks. Place a rack on top of the pan. Set the turkey breast on the rack, skin side up. This helps the heat circulate evenly. Put the turkey in the preheated oven. Roast it for about 1.5 to 2 hours. You want the internal temperature to reach 165°F (74°C). Halfway through, baste the turkey with the pan juices. This step adds even more flavor and keeps the turkey juicy. Once it's done, take the turkey out and cover it with aluminum foil. Let it rest for about 15-20 minutes. This resting time helps the juices settle before slicing. To cook a turkey breast just right, aim for an internal temperature of 165°F. Use a meat thermometer to check this. Insert it into the thickest part of the breast, away from the bone. This ensures even cooking. If you don’t have a thermometer, check the juices. They should run clear, not pink. Basting adds flavor and keeps the turkey moist. Halfway through cooking, open the oven and use a spoon to pour the pan juices over the turkey. This helps create a nice crust on the skin. Repeat this every 30 minutes for best results. If the skin gets too brown, cover it lightly with foil. Leftover turkey is great for many meals! Slice it for sandwiches or salads. You can also shred it for soups and casseroles. For a quick meal, mix it with some pasta and pesto. Freeze any leftovers in airtight bags for later use. This keeps your meals fresh and tasty! Pro Tips Resting Time: Allowing the turkey to rest after roasting helps the juices redistribute throughout the meat, ensuring a moist and flavorful turkey. Use a Meat Thermometer: To ensure perfect doneness, use a meat thermometer to check that the internal temperature reaches 165°F (74°C) in the thickest part of the turkey. Herb Variations: Feel free to experiment with different herbs like oregano or basil for a unique flavor profile that suits your taste. Homemade Gravy: Use the pan drippings to make a delicious homemade gravy by whisking in some flour and chicken broth for a rich sauce to accompany your turkey. {{image_2}} To add a bright twist, try using citrus. You can mix orange or lime juice with the herb mixture. The zest from these fruits adds a vibrant flavor. Just like with lemon, this will keep your turkey juicy and fresh. The sweet notes from orange or the tang from lime will enhance the herbs. Want a kick? Add some heat to your herb mix. You can include crushed red pepper flakes or cayenne pepper. Start with a small amount, as you can always add more. This spicy touch will create a bold flavor. It’s a great way to surprise your guests. If you want to change it up, try different herbs. You can use parsley, oregano, or basil. Each herb brings its own unique flavor. Mixing herbs like dill or tarragon can also create a lovely profile. Just remember to balance the flavors. The key is to find a blend that suits your taste. After your meal, let the turkey cool. Wrap it in plastic wrap or foil. Place it in an airtight container. Store it in the fridge for up to four days. This keeps the meat fresh and tasty. To freeze leftover turkey, first slice it. Place the slices in freezer bags. Remove as much air as possible before sealing. Label the bags with the date. You can freeze it for up to three months. This way, you can enjoy it later without losing flavor. To reheat turkey, use the oven for best results. Preheat it to 325°F (163°C). Place the turkey in a baking dish. Add a splash of chicken broth to keep it moist. Cover with foil to prevent drying out. Heat for about 20-30 minutes or until warm. Enjoy the juicy flavors! The best cooking temperature for turkey breast is 165°F (74°C). This temperature keeps the meat juicy and safe to eat. Use a meat thermometer to check the temperature in the thickest part. Let your turkey rest for 15-20 minutes before slicing. This step allows the juices to settle. If you cut too soon, the juices will run out. Resting ensures each slice is full of flavor. Yes, you can use dried herbs instead of fresh herbs. Use about one-third the amount of dried herbs. Dried herbs are stronger in flavor, so adjust to your taste. Fresh herbs add brightness, but dried herbs work well in a pinch. Herb roasted turkey breast pairs well with several sides. Here are some ideas: - Mashed potatoes - Green beans - Roasted carrots - Stuffing - Cranberry sauce These sides complement the turkey’s rich flavors and add color to your plate. You learned how to make a tasty herb roasted turkey breast. We covered key ingredients, steps, and helpful tips. I shared ways to add flavor and store leftovers too. Cooking turkey can be easy and fun with the right advice. Keep trying new flavors and techniques. Enjoy your meals and impress your guests with this simple, delicious dish. Happy cooking!

Herb Roasted Turkey Breast Flavorful and Juicy Delight

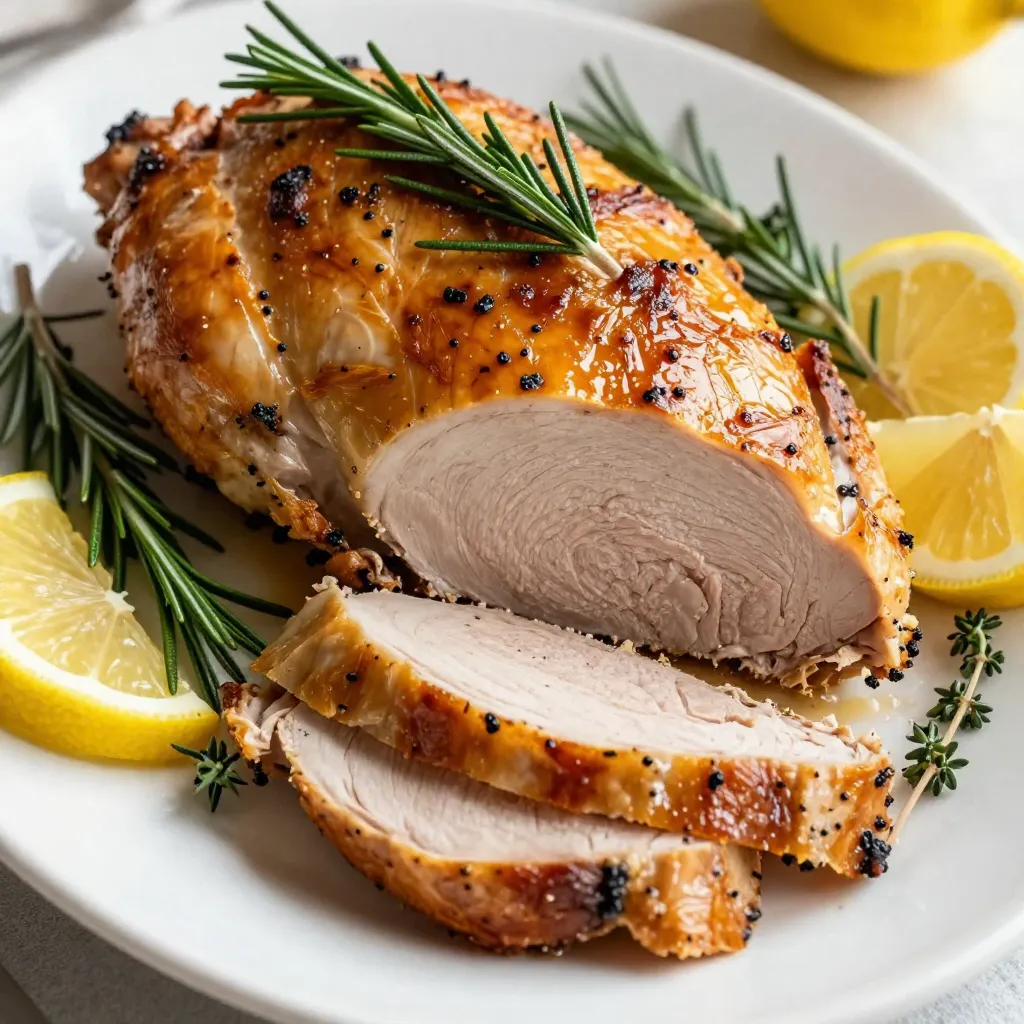
Are you ready to impress your family with a mouthwatering Herb Roasted Turkey Breast? This recipe brings juicy flavors and

Older posts
Page1 Page2 … Page86 Next →

dsad

© 2026 Emmas Dish • Built with GeneratePress

Our Policies

  • Copyright Policy
  • Cookie Policy
  • GDPR Policy
  • Privacy Policy
  • Disclaimer
  • Terms Of Use

More Information

  • Home
  • About
  • Contact
  • Appetizers
  • Dessert
  • Dinner
  • Drinks
©2026, Emmas Dish About Back To Top