Skip to content
DisclaimerTerms Of UseGDPR PolicyCookie Policy

Emmas Dish

  • Home
  • Drinks
  • Appetizers
  • Dinner
  • Dessert
  • About
  • Contact
  • Privacy Policy
DisclaimerTerms Of UseGDPR PolicyCookie Policy

NO-ING-IMG

To make Strawberry Lemonade Cupcakes, you need simple and fresh ingredients. Here’s the list: - 1 ½ cups all-purpose flour - 1 teaspoon baking powder - ½ teaspoon baking soda - ¼ teaspoon salt - ½ cup unsalted butter, softened - 1 cup granulated sugar - 2 large eggs - 2 tablespoons lemon zest - 1 tablespoon lemon juice - ½ cup buttermilk - 1 cup fresh strawberries, diced - 1 cup powdered sugar (for frosting) - 2 tablespoons lemon juice (for frosting) - 1 tablespoon milk (for frosting) - Fresh strawberries, for garnish Each ingredient plays a key role. The flour gives structure. Baking powder and baking soda help the cupcakes rise. Salt enhances the flavor. Butter and sugar make the cupcakes moist and sweet. Eggs bind everything together. Lemon zest and juice add that bright, tangy flavor. Buttermilk keeps the cupcakes tender. Diced strawberries provide bursts of sweet fruit in each bite. The frosting is a simple mix of powdered sugar, lemon juice, and milk, creating a creamy topping. Finally, fresh strawberries on top make these cupcakes look beautiful and inviting. Using fresh ingredients makes a big difference in taste. Fresh strawberries add vibrant flavor. The lemon zest brings a natural aroma. When you gather these ingredients, you step closer to making delightful cupcakes that shine at any gathering. {{ingredient_image_1}} First, preheat your oven to 350°F (175°C). This helps your cupcakes bake evenly. Next, grab a cupcake pan and line it with paper liners. This keeps your cupcakes nice and neat. In a medium bowl, mix the dry ingredients. Combine 1 ½ cups of all-purpose flour, 1 teaspoon of baking powder, ½ teaspoon of baking soda, and ¼ teaspoon of salt. Whisk them well to make sure they blend together. Set this bowl aside for later. In a large bowl, cream together ½ cup of softened unsalted butter and 1 cup of granulated sugar. You want to beat these together until the mixture looks light and fluffy. This step should take about 3-4 minutes. The air you mix in makes the cupcakes soft and airy. Once the butter and sugar are ready, add 2 large eggs, one at a time. Mix well after each addition. Then stir in 2 tablespoons of lemon zest and 1 tablespoon of lemon juice. This will give your cupcakes a bright flavor. Now, it's time to mix the wet and dry ingredients. Gradually add the dry mix to the butter mixture. Alternate this with ½ cup of buttermilk. Start and end with the dry ingredients. Mix until everything is just combined; don’t overmix. Next, gently fold in 1 cup of diced fresh strawberries. Be careful not to break the strawberries too much. This adds a nice fruity burst to each bite. Now, divide the batter evenly among the cupcake liners. Fill each about two-thirds full. This helps them rise without overflowing. Bake in your preheated oven for 18-20 minutes. To check if they're done, insert a toothpick. If it comes out clean, they're ready! Let the cupcakes cool in the pan for about 5 minutes. After that, transfer them to a wire rack to cool completely. This step is key for the best texture! Using room temperature ingredients is key. It helps the butter mix well with sugar. This gives your cupcakes a light and airy texture. Take your eggs and butter out early. Let them sit for about 30 minutes before you start baking. Check for doneness with a toothpick. Insert it into the center of a cupcake. If it comes out clean, your cupcakes are done. If not, bake for a few more minutes. Keep an eye on them to avoid overbaking. For the frosting, you want a smooth and creamy texture. Mix the powdered sugar, lemon juice, and milk well. If it’s too thick, add a little more milk. If it’s too thin, add more powdered sugar. Use a piping bag for a nice finish. You can also use a knife if you prefer. Spread the frosting evenly across the top of each cupcake. This makes them look beautiful. Fresh strawberries make a great garnish. Slice them in half or leave them whole. Place one on top of each cupcake for a pop of color. You can also add a sprinkle of lemon zest for extra flair. This not only looks nice but adds a lovely flavor too. Pro Tips Use Fresh Ingredients: The fresher your strawberries and lemons, the more vibrant the flavor of your cupcakes will be. Always opt for in-season produce for the best taste. Don’t Overmix the Batter: Gently fold in the diced strawberries to avoid tough cupcakes. Overmixing can lead to a dense texture, so mix just until combined. Cool Completely Before Frosting: Make sure your cupcakes are completely cooled before adding the frosting. This prevents the frosting from melting and losing its shape. Experiment with Flavors: Feel free to add a splash of vanilla extract to the batter for an extra layer of flavor. You can also try different fruits depending on your preference. {{image_2}} You can change the flavor of your cupcakes easily. Try adding other fruits like blueberries or raspberries. These fruits blend well with the lemon and add a fun twist. You may also use flavored extracts. Almond or vanilla extracts can give a sweet touch to your cupcakes. Just use a teaspoon or two for the best results. For gluten-free cupcakes, swap all-purpose flour with a gluten-free mix. This will keep the texture light and fluffy. If you want vegan cupcakes, replace the butter with coconut oil or vegan butter. Use flaxseed meal mixed with water instead of eggs. This allows your cupcakes to rise and stay moist. The frosting can be just as creative as the cupcakes. You can use cream cheese for a tangy twist. Simply mix it with powdered sugar and lemon juice. Whipped cream is another great option. It adds a light and airy feel. You can also add zest from a lime or orange for extra flavor! To keep your strawberry lemonade cupcakes fresh, store them in an airtight container. This helps prevent them from drying out. If it's hot or humid, place them in the fridge. You can store the cupcakes for up to three days at room temperature. If you have leftover frosting, keep it in a separate container in the fridge. This keeps the frosting nice and creamy. If you want to save cupcakes for later, freezing is a great option. First, let the cupcakes cool completely. Then, wrap each cupcake in plastic wrap tightly. Place them in a freezer-safe bag or container. They will stay fresh for up to three months. To thaw, take them out of the freezer and leave them at room temperature for a few hours. If you froze them with frosting, just let them sit for a while and enjoy! These delicious cupcakes can last for about three days at room temperature. They stay fresh longer in the fridge, lasting up to a week. Just remember to keep them in an airtight container. If you notice any changes in smell or texture, it’s best to toss them. Always prioritize food safety! Can I use frozen strawberries? Yes, you can use frozen strawberries. Just thaw them first. Drain any excess liquid. This keeps your batter from getting too wet. Frozen strawberries work well in cupcakes. What can I substitute for buttermilk? If you don't have buttermilk, mix regular milk with vinegar or lemon juice. Use one tablespoon of vinegar or lemon juice per cup of milk. Let it sit for five minutes. This makes a great buttermilk substitute. How do you prevent cupcakes from sinking? To avoid sinking, mix your batter gently. Overmixing can add too much air. Make sure your oven is preheated. Baking at the right temperature helps too. You can also check that your leavening agents are fresh. Can you make the frosting in advance? Yes, you can make the frosting ahead of time. Store it in the fridge in an airtight container. Just let it sit at room temperature before using. This keeps it smooth and easy to spread. What drinks pair well with strawberry lemonade cupcakes? Lemonade is an obvious choice. I also love iced tea with a splash of lemon. Sparkling water with lemon can be refreshing too. These drinks enhance the bright flavors of the cupcakes. How to serve at parties or special occasions? Serve these cupcakes on a pretty platter. Add fresh strawberries on top for a cute look. You can also sprinkle some lemon zest for extra color. Arrange them nicely for a stunning display. In this post, we covered how to make Strawberry Lemonade Cupcakes from scratch. We discussed the ingredients, from flour to strawberries, and shared step-by-step instructions. I offered tips for baking and frosting to ensure great results. We even explored variations and storage options. These cupcakes are not just tasty; they are fun to make. Enjoy experimenting with flavors and sharing them at your next party. Happy baking, and may your cupcakes always rise to the occasion!

Strawberry Lemonade Cupcakes Delightful and Bright Treat

Get ready to brighten your day with strawberry lemonade cupcakes! These moist, fruity treats blend sweet strawberries with zesty lemon

To make a Peach Cobbler Dump Cake, you will need just a few simple ingredients. This recipe is quick and easy. Here’s what you need: - 2 (15-ounce) cans peaches in syrup, undrained - 1 box yellow cake mix - 1 teaspoon cinnamon - 1/2 cup unsalted butter, melted - 1 cup chopped pecans (optional) - Vanilla ice cream (for serving) Each ingredient plays a key role in the final dish. The peaches provide sweetness and moisture. The yellow cake mix gives the cake its base and texture. The cinnamon adds a warm spice that pairs well with the peaches. Melted butter helps to create a crispy topping. If you choose to use pecans, they will add a nice crunch. Finally, serving with vanilla ice cream makes it truly special. When I cook, I always choose high-quality ingredients. This helps the flavors shine through. If you use fresh peaches, make sure they are ripe and sweet. You can also use frozen peaches if that’s what you have. Just thaw them before using. Enjoy your cooking! {{ingredient_image_1}} First, preheat your oven to 350°F (175°C). This step is key for even baking. Next, grab a 9x13 inch baking dish. Make sure it’s clean and dry. No need to grease it; the peaches will provide moisture. Now, let’s add the peaches. Pour both cans of peaches, syrup included, into the baking dish. Spread them evenly across the bottom. Next, take your box of yellow cake mix. Sprinkle it evenly over the peaches. Make sure every peach gets covered. In a small bowl, mix one teaspoon of cinnamon into half a cup of melted butter. Drizzle this mixture over the cake mix. Try to cover as much of the mix as you can. This will add a nice flavor. If you want to, add chopped pecans on top of the cake mix. They give a nice crunch. Now, place the dish in the oven. Bake for 45 to 50 minutes. You’ll know it's done when the top is golden brown and the edges bubble. Check it carefully. Let it cool for a few minutes before serving. To make a great dump cake, start with even layers. Pour the peaches evenly in the dish. Then, sprinkle the cake mix so it covers all the peaches. This step helps the cake cook evenly. For a golden top, drizzle the cinnamon butter mixture carefully. This mix adds flavor and color. Bake until you see a nice brown crust. The edges should bubble, which means it’s almost ready. The best way to enjoy your dump cake is warm. Serve it with a scoop of vanilla ice cream. The ice cream melts into the warm cake, creating a tasty mix. You can also drizzle some peach syrup on top for extra sweetness. I recommend serving it right out of the oven. This way, you get the best texture and flavor. If you want a twist, try different fruits. You can use cherries, blueberries, or even apples. Each fruit gives a new flavor to the cake. You can also change the cake mix flavor. A spice or chocolate cake mix adds a fun twist. Get creative and use what you have on hand! Pro Tips Use Fresh Peaches: If in season, substitute canned peaches with fresh ones for an even more vibrant flavor. Just peel, slice, and toss them in a bit of sugar before using. Experiment with Flavors: Add a splash of almond extract or vanilla extract to the melted butter for an extra layer of flavor that complements the peaches beautifully. Crunchy Topping Twist: For added texture, mix in some oats or crushed graham crackers with the pecans before sprinkling them on top of the cake mix. Serve with Style: Consider garnishing your serving with a sprig of mint or a dusting of powdered sugar for a beautiful presentation. {{image_2}} You can change the fruit in this dump cake to mix things up. Try using cherries, blueberries, or apricots. These fruits pair well with cake mix and add a nice twist. Seasonal fruits like apples or pears work great in fall. In summer, use berries for a burst of color and flavor. The sky is the limit when it comes to fruit choices! If you need a gluten-free option, look for a gluten-free cake mix. Many brands offer this choice now. Just swap the regular cake mix for the gluten-free one in the recipe. You can also make this cake dairy-free. Use a dairy-free butter substitute and skip the ice cream or opt for a dairy-free brand. You can still enjoy the same delicious taste without the dairy! To make your dump cake even more special, add spices or extracts. A dash of nutmeg or vanilla extract can elevate the flavor. You can even try using flavored cake mixes like lemon or coconut. These flavors blend well with the peaches and add a new layer of taste. Experiment and find what you love best! After enjoying your peach cobbler dump cake, store leftovers in the fridge. Place the cake in an airtight container. It will keep well for about 3 to 5 days. If you want to store it for longer, freezing is a great option. Cut the cake into squares and wrap them tightly in plastic wrap. Then, place the wrapped pieces in a freezer-safe bag. This way, it can last for up to 3 months in the freezer. When it's time to enjoy your leftovers, reheating is key. The best method is to use the oven. Preheat it to 350°F (175°C). Place a piece of the cake in a baking dish. Cover it with foil to keep moisture in. Heat for about 15 to 20 minutes, or until warm. If you want a quick method, you can use the microwave. Heat a slice for about 30 seconds. Be careful not to overheat, as this can make it dry. Enjoy your warm peach cobbler dump cake with that perfect texture! Can I use fresh peaches instead of canned? Yes, you can use fresh peaches. Just slice them and add them to your dish. Use about six to eight medium peaches. Make sure to remove the pits. Fresh peaches add great flavor. How do I know when the dump cake is done? You can check the dump cake at 45 minutes. Look for a golden brown top and bubbly edges. A toothpick inserted in the center should come out clean. If it needs more time, bake for another five minutes. Can I make this dessert ahead of time? Yes, you can prepare the dump cake a day ahead. Just cover it and store it in the fridge. When ready to serve, bake it fresh for about 10-15 minutes. This helps keep the top crisp. What can I substitute for pecans? If you don’t have pecans, you can use walnuts or almonds. You can also skip the nuts altogether if you prefer. The cake will still taste great without them. This blog post covered everything you need to make a peach cobbler dump cake. I shared the main ingredients and simple steps to prepare and bake it. I also offered tips for perfect layers and serving ideas. Variations let you explore different fruits and dietary needs. Lastly, I provided storage and reheating advice. You now have the tools to create a tasty dessert. Enjoy this easy recipe and let your creativity shine!

Peach Cobbler Dump Cake Delightfully Simple Recipe

Are you ready for a dessert that’s as easy as pie but tastes even better? This Peach Cobbler Dump Cake

To make this soup, gather these simple ingredients: - 1 pound fresh mushrooms, sliced (shiitake or cremini recommended) - 1 medium onion, finely chopped - 3 cloves garlic, minced - 4 cups vegetable broth - 1 cup milk (or plant-based milk) - 2 tablespoons olive oil - 2 tablespoons flour - 2 teaspoons paprika (preferably Hungarian sweet paprika) - 1 teaspoon dried thyme - Salt and pepper to taste - Fresh parsley, chopped (for garnish) - 1 tablespoon lemon juice You can swap some ingredients to suit your taste or diet: - Use any type of mushrooms you like. Button mushrooms work well too. - If you want a dairy-free option, any plant-based milk will do. - For a richer flavor, try coconut milk instead of regular milk. - Instead of flour, you can use cornstarch for thickening. - If you don’t have paprika, smoked paprika adds a nice twist. This soup is more than just tasty; it's also nutritious! Here’s a rough breakdown per serving: - Calories: About 200 - Protein: 5 grams - Carbohydrates: 30 grams - Fiber: 3 grams - Fat: 8 grams This soup is packed with vitamins from mushrooms and is low in calories. Enjoy a bowl that warms your heart and nourishes your body! {{ingredient_image_1}} First, gather all your ingredients. You will need: - 1 pound fresh mushrooms, sliced (shiitake or cremini recommended) - 1 medium onion, finely chopped - 3 cloves garlic, minced - 4 cups vegetable broth - 1 cup milk (or plant-based milk) - 2 tablespoons olive oil - 2 tablespoons flour - 2 teaspoons paprika (preferably Hungarian sweet paprika) - 1 teaspoon dried thyme - Salt and pepper to taste - Fresh parsley, chopped (for garnish) - 1 tablespoon lemon juice Make sure to chop the onion and mince the garlic before you start cooking. This saves time. Slice the mushrooms thinly. This helps them cook faster and adds flavor. Now, heat the olive oil in a large pot over medium heat. Add the chopped onion and cook for about five minutes. You want the onion to become soft and clear. Next, stir in the minced garlic and let it cook for one more minute. This will fill your kitchen with a great smell. Add the sliced mushrooms to the pot. Cook them for about eight minutes. The mushrooms will release moisture and start to brown. This step is key for flavor. After that, sprinkle the flour over the mixture. Stir it well and cook for one to two minutes. This creates a roux that thickens your soup. Gradually pour in the vegetable broth while stirring. Keep stirring to avoid lumps. Bring the mixture to a gentle simmer. Then, add the paprika, thyme, salt, and pepper. Let the soup simmer for ten minutes. This allows the flavors to mix and grow. Lower the heat and stir in the milk. Cook for an additional five to seven minutes. This makes the soup creamy and warm. Lastly, stir in the lemon juice. It adds a bright touch to your soup. To make the best Hungarian mushroom soup, use fresh ingredients. Fresh mushrooms have more flavor. Always taste and adjust seasoning. You can add more salt or pepper based on your preference. If you want a thicker soup, let it simmer longer. For a lighter version, reduce the milk or use plant-based milk. Garnish with fresh parsley before serving. This adds a nice color and fresh taste. Enjoy your cooking journey! To boost flavor in Hungarian mushroom soup, use fresh herbs. Adding a few sprigs of thyme or parsley can uplift the taste. You can also choose different mushroom types. Shiitake and cremini add rich flavors. For a deeper taste, add a splash of soy sauce or tamari. This will create umami notes that make the soup shine. A common mistake is overcooking the mushrooms. Cook them just until they brown. This keeps their texture and flavor intact. Another error is not letting the soup simmer long enough. Simmering helps the flavors mix well. Taste and adjust seasonings as you go. Too much salt at once can ruin the soup. For this soup, use a large pot for cooking. A wooden spoon helps stir the ingredients. A sharp knife is great for chopping onions and mushrooms finely. A measuring cup is useful for liquids like broth and milk. Lastly, grab a ladle for serving the soup. These tools will make cooking easier and more fun. Pro Tips Choosing the Right Mushrooms: Opt for shiitake or cremini mushrooms for a deeper flavor profile compared to white button mushrooms. Adjusting Creaminess: For a creamier soup, use full-fat milk or a rich plant-based alternative like coconut milk. Enhancing Flavor: Consider adding a splash of soy sauce or tamari for an umami boost that complements the mushrooms. Garnishing Tips: Fresh herbs like dill or chives can add a unique twist to the garnishing, enhancing both flavor and presentation. {{image_2}} You can easily make this soup vegan. Just swap the milk for plant-based milk. Almond, soy, or oat milk works great. This keeps the soup creamy without using dairy. Use vegetable broth for a full vegan option. Add new flavors by using different herbs. Fresh dill or rosemary adds a unique taste. If you want a kick, sprinkle in some red pepper flakes. This gives the soup a nice heat. Try adding bay leaves for depth. They enhance the overall flavor profile. You can change the mushrooms for a different taste. Try portobello or button mushrooms. Each type has its own flavor and texture. For broth, you can use homemade stock. It adds a personal touch to the soup. This makes it even more special. Store leftover Hungarian mushroom soup in an airtight container. Let it cool first. Place it in the fridge for up to three days. If you need more time, freezing is a great option. To freeze the soup, allow it to cool completely. Use freezer-safe containers or bags. Leave some space for expansion. It can stay frozen for up to three months. When you are ready to eat, just thaw it in the fridge overnight. Reheat the soup on the stove over medium heat. Stir occasionally to avoid sticking. You can also microwave it in a bowl. Heat in short bursts, stirring in between. Add a splash of milk if it seems too thick. Enjoy it warm for the best taste! For Hungarian Mushroom Soup, I love using shiitake or cremini mushrooms. These types add great depth and flavor. Shiitake mushrooms have a rich, earthy taste. Cremini mushrooms are slightly sweet and meaty. You can also mix in other mushrooms for fun. Just make sure they are fresh for the best taste. Yes, you can make this soup in advance. It tastes even better after sitting in the fridge. Just cool it down and store it in an airtight container. It should last up to three days. When you’re ready to eat, simply reheat it on the stove. You may want to add a splash of milk to freshen it up. You can make Hungarian Mushroom Soup gluten-free! Just swap out the regular flour for a gluten-free flour blend. This change keeps the soup thick and creamy. Always check your broth and other ingredients for gluten. Many brands offer gluten-free options, making it easy to enjoy this dish. This blog post covered everything you need to know about making Hungarian Mushroom Soup. We explored the key ingredients, including substitutions and their nutritional info. You learned step-by-step instructions and helpful tips to enhance the flavor. We shared easy variations, like vegan options, and provided storage advice for leftovers. Remember, cooking is about trial and fun. Use this guide to create a great soup that suits your taste! Enjoy your cooking journey!

Hungarian Mushroom Soup Creamy and Flavorful Dish

If you’re craving a warm and cozy meal, look no further than Hungarian Mushroom Soup. This creamy and flavorful dish

To make Lemon Garlic Orzo with Shrimp, you'll need: - 1 cup orzo pasta - 1 pound large shrimp, peeled and deveined - 3 tablespoons olive oil, divided - 4 cloves garlic, minced - Zest of 1 lemon - 1/4 cup freshly squeezed lemon juice - 1 cup cherry tomatoes, halved - 1 cup fresh spinach leaves - Salt and pepper to taste - 1/4 cup fresh parsley, chopped - 1/4 teaspoon red pepper flakes (optional) Using fresh ingredients makes a big difference. Fresh shrimp brings a sweet taste. Fresh garlic adds a strong aroma. Fresh lemon juice gives a bright zing. When you use fresh herbs like parsley or spinach, they add color and flavor. They help the dish come alive. You will taste the difference. Fresh ingredients make your meal not just good, but great. You can change some ingredients if you want. Here are a few options: - Instead of orzo, use quinoa or rice for a gluten-free option. - Frozen shrimp works well, just thaw it first. - If you don’t have cherry tomatoes, any diced tomato will do. - Spinach can be swapped for kale or arugula. - You can leave out the red pepper flakes for a milder dish. These swaps can still give you a tasty meal. Don't be afraid to get creative! {{ingredient_image_1}} To start, you need a large pot. Fill it with water and add salt. Bring it to a boil. When the water boils, add 1 cup of orzo pasta. Cook it according to the package instructions. Usually, it takes around 8 to 10 minutes. You want it to be al dente, which means it should be firm but not hard. Once cooked, drain the orzo and set it aside. Next, let’s cook the shrimp. Take a large skillet and heat 2 tablespoons of olive oil over medium heat. Once the oil is hot, add 4 cloves of minced garlic. Sauté the garlic for about 1 minute. It should smell great, but don’t let it burn. Now, add 1 pound of peeled and deveined shrimp to the skillet. Season them with salt, pepper, and red pepper flakes if you like spice. Cook the shrimp for 2 to 3 minutes on each side. They should turn pink and opaque when done. Remove them from the skillet and set them aside. Now it’s time to mix everything. In the same skillet, add the drained orzo. Then, add the zest of 1 lemon, 1/4 cup of lemon juice, and 1 cup of halved cherry tomatoes. Stir all of this together and let it cook for 2 to 3 minutes. The tomatoes should soften but not fall apart. After that, add 1 cup of fresh spinach leaves and the cooked shrimp back into the skillet. Toss everything together and cook for another 2 minutes. The spinach should wilt nicely. Finally, remove the skillet from heat and stir in 1/4 cup of chopped parsley. Taste and add more salt or pepper if needed. Enjoy your meal! To boost the lemon flavor, use fresh lemon juice and zest. The zest carries a strong, bright taste. You can also add more lemon juice if you like it tangy. Toss in a bit of lemon zest just before serving for a fresh burst. Another trick is to let the dish sit for a few minutes. This helps the flavors blend well together. Using the right tools can make cooking easier and more fun. Here are a few I recommend: - A large pot for boiling orzo. - A large skillet to cook shrimp and mix the ingredients. - A zester or grater for the lemon zest. - A good cutting board for chopping garlic and parsley. - A sharp knife for easy slicing. These tools help you work fast and keep your kitchen tidy. Even simple recipes can have pitfalls. Here are some mistakes to watch out for: - Overcooking the shrimp. They should be pink and opaque in just a few minutes. - Not salting the pasta water. This adds flavor to the orzo. - Skipping the fresh ingredients. Fresh garlic, tomatoes, and spinach are key to flavor. - Forgetting to taste as you go. Adjust salt and pepper to your liking. Keep these tips in mind, and your dish will shine! Pro Tips Fresh Ingredients: Always use fresh shrimp and vegetables for the best flavor and texture in your dish. Perfectly Cooked Shrimp: Cook shrimp just until they turn pink and opaque to avoid overcooking, which can make them rubbery. Lemon Zest Balance: Be generous with lemon zest; it enhances the dish's brightness and adds a fragrant aroma. One-Pan Wonder: For easy cleanup, try cooking everything in one skillet, allowing flavors to meld beautifully. {{image_2}} You can easily make this dish vegetarian. Just swap the shrimp for chickpeas. Use one can, drained and rinsed. Chickpeas add protein and a nice texture. They soak up the lemon and garlic flavors well. This option keeps the meal hearty and satisfying. Plus, it makes the dish friendly for vegetarians. If you need a gluten-free meal, try using quinoa or rice. Quinoa cooks quickly and has a nutty flavor. Use 1 cup of quinoa, rinsed. Cook it in two cups of water for about 15 minutes. If you prefer rice, use jasmine or basmati for a fragrant touch. Both options will blend well with the lemon and garlic. Feel free to get creative with flavors! You can add fresh herbs like basil or dill for a twist. A pinch of cumin or smoked paprika brings a warm depth. Fresh herbs brighten the dish, while spices add warmth. Adjust to your taste and enjoy a new spin on this classic dish! To store leftover Lemon Garlic Orzo with Shrimp, let it cool first. Place it in an airtight container. This helps keep the flavors fresh. Use a container that fits the amount you have. Avoid overfilling to prevent spilling when you close it. When reheating, use a skillet for best results. Add a splash of olive oil or water. Heat over medium-low heat. Stir often to warm evenly. You can also use the microwave. Cover the dish with a damp paper towel. This keeps the orzo moist and tasty. In the fridge, Lemon Garlic Orzo with Shrimp lasts about 3 days. Make sure to keep it sealed tight. If you freeze it, it can last up to 2 months. Just remember to thaw it in the fridge before reheating. This helps maintain its flavor and texture. Yes, you can use frozen shrimp! Just thaw them first. Place the shrimp in a bowl of cold water for about 15-20 minutes. This method helps them thaw quickly without cooking. After thawing, peel and devein them if needed. Then, follow the recipe as normal. Using frozen shrimp can be a great time-saver. Several side dishes go well with Lemon Garlic Orzo with Shrimp. Here are a few tasty options: - Garlic bread: It adds a nice crunch and flavor. - Steamed broccoli: This brings a healthy green element to your meal. - Mixed green salad: A simple salad with vinaigrette adds freshness. - Roasted asparagus: This side is light and complements the shrimp well. These sides enhance the meal and make it more filling. To add spice to your dish, consider these options: - Increase red pepper flakes: Use more than 1/4 teaspoon for a bolder kick. - Add jalapeños: You can chop fresh jalapeños and sauté them with garlic. - Use hot sauce: A dash of your favorite hot sauce can add heat. These simple tweaks can turn up the heat without changing the dish too much. Enjoy experimenting! Lemon Garlic Orzo with Shrimp is a tasty dish made with fresh ingredients. We explored each ingredient's role and how to cook everything perfectly. You learned tips to boost the lemon flavor and avoid common mistakes. Variations allow you to customize the dish, making it vegetarian or gluten-free. Proper storage keeps leftovers tasty for days. Overall, this recipe is simple and rewarding. Enjoy making it your own!

Lemon Garlic Orzo with Shrimp Flavorful and Simple Meal

If you’re craving a meal that’s both tasty and easy to make, you’re in the right place! Today’s recipe for

To make Salted Caramel Pretzel Bark, gather these items: - 2 cups pretzel sticks - 1 cup semi-sweet chocolate chips - 1 cup caramel sauce (store-bought or homemade) - 1/2 teaspoon sea salt - 1 tablespoon unsalted butter - Optional: 1/2 cup chopped nuts (pecans or almonds) You can swap some ingredients if needed: - Use milk chocolate chips for a sweeter taste. - Try dark chocolate for a richer flavor. - If you don’t have pretzel sticks, use pretzel squares. - For a nut-free option, skip the nuts. - Use dairy-free butter to make it vegan. When buying ingredients, look for these tips: - Choose pretzels that are fresh and crunchy. - Buy high-quality chocolate chips for the best flavor. - Use a thick caramel sauce that will hold up well. - Opt for sea salt for a more complex taste. - If using nuts, pick fresh ones to avoid bitterness. By using good ingredients, your Salted Caramel Pretzel Bark will taste amazing! {{ingredient_image_1}} First, preheat your oven to 350°F (175°C). This helps the bark bake evenly. Next, grab your baking sheet and line it with parchment paper. Leave some paper hanging over the edges. This makes it easy to pull out the bark later. Now, take your pretzel sticks. Spread them evenly across the baking sheet. Make sure they are close together, but don't let them overlap. A good layer of pretzels gives your bark a nice crunch. In a small saucepan, add one tablespoon of unsalted butter. Turn the heat to low and let it melt. Once it’s melted, pour in one cup of caramel sauce. You can use store-bought or homemade, whichever you prefer. Stir the butter and caramel together until they blend smoothly. This mix will be the sweet glue for your pretzels. Make sure it’s well combined. If you want, you can add chopped nuts at this stage for extra flavor. Now, take your caramel mixture and pour it over the pretzel sticks. Use a spatula to spread it out evenly. It should cover all the pretzels. Bake the sheet in the oven for 10 to 12 minutes. Watch it closely as it cooks. You want it bubbly and golden, not burnt! When it’s done, take it out and sprinkle one cup of semi-sweet chocolate chips on top. Let them sit for about 5 minutes to soften. After that, use your spatula to spread the melted chocolate over the caramel and pretzels. Finally, sprinkle half a teaspoon of sea salt on top. You can adjust the salt to your taste. If you added nuts, now is the time to sprinkle them, too. Allow the bark to cool for 30 minutes at room temperature. Then, place it in the fridge for another 30 minutes to set completely. Once it's firm, lift the bark out using the parchment paper and break it into pieces. Enjoy your sweet and salty treat! To get the best texture for your bark, follow a few key steps. First, spread the pretzel sticks close, but not overlapping. This helps keep the bark firm. Bake it just until bubbly and golden. This usually takes about 10 to 12 minutes. Keep an eye on it so it does not burn. If you bake too long, the bark will get hard and lose its chewy goodness. Salt is key in this recipe. It brings out the sweet flavor of the caramel and chocolate. Use sea salt for the best taste. Start with 1/2 teaspoon, then taste and adjust. If you want more saltiness, sprinkle a bit more on top. Just remember, a little goes a long way. You want the salt to enhance, not overpower. Presentation can make your bark even more appealing. After breaking the bark into pieces, arrange them on a nice platter. Drizzle extra caramel sauce over the top for a fancy touch. You can also add some chopped nuts for color and crunch. This makes your snack look great and taste even better. Enjoy sharing this treat! Pro Tips Use Fresh Ingredients: Ensure your chocolate chips and caramel sauce are fresh for the best flavor and texture in your bark. Watch the Baking Time: Keep a close eye on the bark while it bakes to prevent burning; every oven is different, so check for a bubbly and golden appearance. Customize Your Nuts: Feel free to experiment with different types of nuts or even add crushed pretzels on top for extra crunch and flavor. Storing Your Bark: Store the pretzel bark in an airtight container at room temperature for up to a week to maintain its crunchiness. {{image_2}} You can mix in nuts for extra crunch. Pecans and almonds work well. You can also try walnuts or cashews. Simply chop them and sprinkle on top of the chocolate layer. This adds a nice flavor contrast. If you're nut-free, leave them out. The bark still tastes great without them. You can switch up the chocolate. Dark chocolate gives a rich taste. Milk chocolate is sweeter and creamier. White chocolate adds a unique touch. Try mixing different chocolates for fun flavors. Just remember, the type of chocolate changes the overall taste. Pick what you love most! Adding flavors can take your bark to the next level. A dash of vanilla adds warmth. Espresso powder gives a nice coffee kick. You can also add a touch of cinnamon for warmth. Don’t be shy to experiment! Just a small amount can change everything. Try different flavors to find your favorite combo. To keep your salted caramel pretzel bark fresh, store it in an airtight container. This helps maintain its crunch. You can layer parchment paper between pieces. This prevents them from sticking together. Avoid leaving it in a warm place, as heat can melt the chocolate. When stored properly, your bark lasts about one week at room temperature. If you place it in the fridge, it can last up to two weeks. Just remember that cold storage may change the texture slightly. You can freeze the bark for longer storage. Cut it into pieces and wrap each piece in plastic wrap. Then, place them in a freezer-safe bag or container. The bark can stay fresh for about three months in the freezer. To enjoy, thaw it in the fridge overnight before serving. Yes, you can use homemade caramel sauce for this recipe. Making your own caramel adds a personal touch. Use a simple recipe with sugar, butter, and cream. Stir until smooth. This will give your bark a rich taste. Remember to let the caramel cool slightly before pouring it over the pretzels. You can get creative with toppings! Here are some ideas: - Chopped nuts like pecans or almonds - Crushed pretzels for extra crunch - Drizzled white chocolate for added sweetness - Sprinkles for a fun, colorful look Experimenting with toppings can make your bark unique. To keep pretzels crunchy, bake them first. Lay them out on your baking sheet and bake for 5 minutes at 350°F (175°C). This step helps them stay crispy. Pour the warm caramel over them quickly to avoid sogginess. Yes, you can make a vegan version! Replace the butter with coconut oil. Use dairy-free chocolate chips and a plant-based caramel sauce. Many stores sell vegan caramel options. This way, everyone can enjoy the sweet and salty treat! In this post, I shared how to make delicious bark with simple steps and quality ingredients. You learned about ingredient choices, substitutions, and tips for perfect texture. I also offered creative variations and storage tips. Remember, the key is to experiment and find what you love. Use this guide to create your own tasty bark. Enjoy making it as much as you will eating it!

Salted Caramel Pretzel Bark Tasty Sweet Snack Recipe

Are you craving a sweet snack that hits all the right notes? Look no further! This Salted Caramel Pretzel Bark

- 300g fettuccine or your favorite pasta - 250g button mushrooms, sliced - 4 cloves garlic, minced In this dish, the fettuccine serves as the base. I love how it holds the sauce perfectly. The button mushrooms bring great texture and a rich flavor. Garlic is the star that adds warmth and aroma to the meal. - 1 cup heavy cream - 1 tablespoon olive oil - 1 tablespoon unsalted butter - 1/2 cup grated Parmesan cheese Heavy cream makes the sauce rich and smooth. Olive oil and butter work together to sauté the mushrooms, enhancing their taste. Parmesan cheese adds a savory depth that makes the sauce irresistible. - Salt and pepper to taste - Fresh parsley, chopped (for garnish) - Zest of 1 lemon (for added freshness) Salt and pepper boost the dish's flavors. Fresh parsley brings a pop of color and freshness. Lemon zest adds a bright note, cutting through the creaminess. Each ingredient plays a big role in making creamy garlic mushroom pasta a favorite for many. The combination creates a rich and flavorful dish that is both comforting and satisfying. To start, fill a large pot with salted water. Bring it to a boil over high heat. Once boiling, add 300 grams of fettuccine. Cook it according to the package instructions. You want the pasta to be al dente, which means it should be firm to the bite. After cooking, reserve one cup of pasta water. This water helps the sauce stick. Drain the fettuccine and set it aside. Next, grab a large skillet. Heat one tablespoon of olive oil and one tablespoon of unsalted butter over medium heat. When the butter melts, add 250 grams of sliced button mushrooms. Sauté them for about 5-7 minutes. You want them to be golden brown and juicy. Stir occasionally to ensure even cooking. Now it's time for the garlic. Stir in four minced garlic cloves. Cook for 1-2 minutes until it smells amazing. Be careful not to let it burn. Lower the heat and pour in one cup of heavy cream. Mix well with the mushrooms and garlic. Let this simmer gently for 3-5 minutes. This helps the sauce thicken a bit. Then, add half a cup of grated Parmesan cheese. Stir until the cheese melts. If the sauce seems too thick, add some reserved pasta water. Do this a little at a time until you reach the right consistency. Finally, add the cooked fettuccine to the skillet. Toss it well to coat all the pasta in the creamy mushroom sauce. Season with salt, pepper, and the zest of one lemon. Toss again to mix everything. This adds a nice pop of flavor. Your creamy garlic mushroom pasta is ready to serve! To get the cream sauce just right, balance the thickness with pasta water. After cooking the fettuccine, save some of the water before draining. If your sauce is too thick, add a bit of this water. This helps you find the perfect texture. The cheese you use is very important. I recommend using fresh, high-quality Parmesan cheese. The flavor will be richer and creamier. Grate it fresh for the best results. This small step makes a big difference in taste. You can add more flavor to your dish by using extra seasonings. Consider adding a pinch of nutmeg or a dash of red pepper flakes. These will give your pasta a nice kick. Fresh herbs make a lovely garnish. I suggest using parsley, but you can also try basil or thyme. Chop them finely and sprinkle on top before serving. This adds color and freshness to your dish. When serving creamy garlic mushroom pasta, use wide, shallow bowls. This creates a nice look and allows the sauce to shine. You can add extra Parmesan on the side for those who want more. For garnish, drizzle a tiny bit of olive oil on top. It adds a shiny finish and enhances the flavor. You can also place a lemon wedge on the plate. This gives your guests a way to brighten up their dish. {{image_2}} You can switch fettuccine for many pasta types. Try penne, rigatoni, or spaghetti. Each type brings its own charm to the dish. If you need gluten-free options, look for rice or chickpea pasta. They cook well and taste great with the sauce. Button mushrooms are tasty, but don't stop there! You can use cremini or shiitake mushrooms. They add a deeper flavor and nice texture. Mix in some spinach or bell peppers for color and taste. This adds nutrients and makes your meal more exciting. Want to add protein? Chicken or shrimp works well. Cook them in the skillet before adding mushrooms. For a vegetarian twist, consider beans or lentils. These options give you a hearty meal without meat. You can enjoy a creamy garlic mushroom pasta that fits your needs perfectly! Store any leftover creamy garlic mushroom pasta in air-tight containers. This keeps the dish fresh and prevents odors from other foods. You can safely refrigerate the pasta for up to three days. Remember to let it cool down before sealing the container to avoid steam buildup. Reheat pasta on the stove for the best results. Add a splash of water or cream to the pan. This keeps the sauce creamy and prevents sticking. Heat on low and stir gently. Avoid high heat to stop the pasta from cooking further. If you prefer the microwave, use a microwave-safe bowl. Cover it loosely and heat in short bursts, stirring in between. For freezing, allow the dish to cool completely. Portion the pasta into freezer-safe bags or containers. Squeeze out any extra air before sealing. Creamy dishes freeze well, but the sauce may change. To thaw, move the pasta to the fridge overnight. When ready to eat, reheat on the stove or microwave. Add a bit of cream for the best texture. You can use coconut cream instead of heavy cream. It gives a nice richness. For cheese, try nutritional yeast or a vegan cheese substitute. These options keep the creamy texture without dairy. Yes, you can use dried herbs. They are handy and last longer. Use about one-third of the amount. Dried herbs pack a strong flavor. They can give your dish a nice taste, but fresh herbs add brightness. This pasta pairs well with a simple green salad. A side of garlic bread adds crunch. You can also serve steamed vegetables for a colorful plate. These sides balance the rich pasta and add freshness. To add heat, try red pepper flakes. A pinch gives a nice kick. You can also add a dash of hot sauce. For more flavor, add diced jalapeños or spicy sausage. Adjust the heat to your taste! This blog post explored making creamy garlic mushroom pasta. We covered ingredients like fettuccine, mushrooms, and garlic. You learned to cook pasta, sauté ingredients, and make a rich cream sauce. Tips helped you perfect the dish’s flavor and presentation. Variations offer new twists, like different pastas and proteins. Proper storage and reheating keep leftovers fresh. Enjoy your creamy pasta creation! Experiment and make it your own!

Creamy Garlic Mushroom Pasta Rich and Flavorful Dish

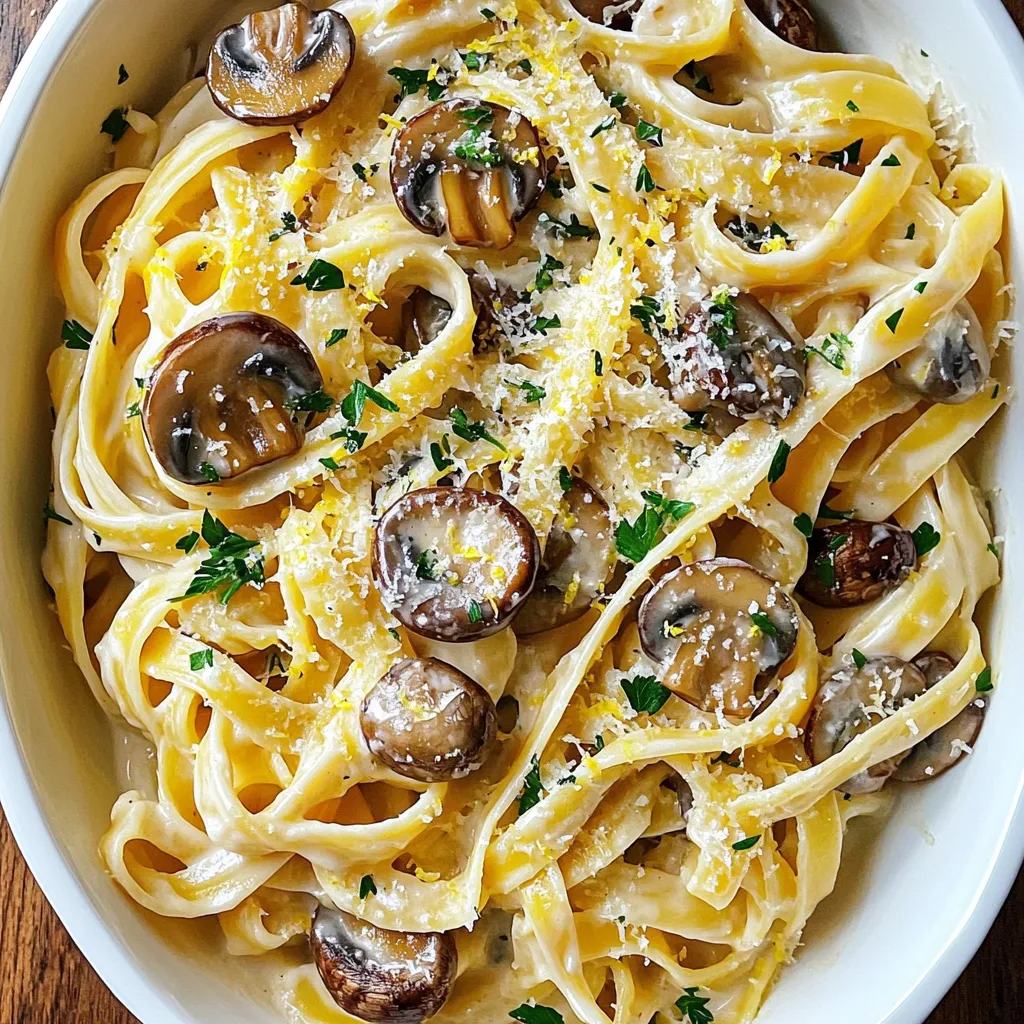
Are you ready to dive into a plate of pure comfort? My Creamy Garlic Mushroom Pasta is a rich and

- 2 boneless, skinless chicken breasts - 1/2 cup teriyaki sauce - 2 cups cooked jasmine rice (day-old rice works best) - 1/4 cup cornstarch - 3 tablespoons vegetable oil - 2 cups mixed salad greens (such as spinach, arugula, and romaine) - 1 red bell pepper, diced - 1 cup shredded carrots - 1/4 cup green onions, sliced - Salt and pepper to taste To create this dish, you need fresh and quality ingredients. The chicken, marinated in teriyaki sauce, brings a sweet and savory flavor. The jasmine rice adds a soft and fluffy base. Mixing in cornstarch gives the rice a crispy texture when cooked. The salad greens and veggies make the dish fresh and colorful. - Sesame seeds - Additional herbs or toppings Garnishes like sesame seeds add a nice crunch. They also enhance the dish's look. Feel free to add herbs for extra flavor. You can use cilantro, mint, or even sliced avocado. These extras make the meal feel special. Marinating the chicken adds great flavor. Start by putting the boneless chicken breasts in a bowl. Pour in 1/4 cup of teriyaki sauce. Make sure the chicken is well-coated. Let it sit for at least 30 minutes. For even more flavor, marinate for up to 2 hours. This will help the chicken soak up the sauce. To cook the chicken, heat your grill or grill pan over medium-high heat. Remove the chicken from the marinade. Let the extra sauce drip off. Grill the chicken for 6-7 minutes on each side. Use a meat thermometer to check the internal temperature. It should reach 165°F (75°C). Once done, let the chicken rest for a few minutes. Then slice it into bite-sized pieces. For the crispy rice, mix the cooked jasmine rice with cornstarch in a large bowl. Make sure every grain is coated. Heat vegetable oil in a non-stick pan over medium heat. When the oil is hot, add the rice mixture in a flat layer. Cook it for about 4-5 minutes on each side. You want it to be golden brown and crispy. Once crispy, take it off the heat and break it into pieces. In a large bowl, combine the mixed salad greens, diced bell pepper, shredded carrots, and sliced green onions. Drizzle the remaining teriyaki sauce and rice vinegar over the salad. Toss everything together gently. Make sure all the ingredients are well coated for the best taste. To serve, plate the salad mixture first. Then, add the sliced teriyaki chicken on top. Finally, sprinkle the crispy rice pieces over the chicken. Don't forget to add sesame seeds for a nice touch. This makes for a colorful and tasty presentation. To make your teriyaki chicken crispy rice salad even tastier, use fresh ingredients. Fresh herbs like cilantro or basil can add a nice touch. You can also add a bit of ginger or garlic to the teriyaki sauce. This will give your dish a nice kick. If you want more sweetness, try adding a touch of honey. It blends well with the teriyaki sauce and adds depth. Choosing the right rice is key. I recommend using jasmine rice for this dish. It has a lovely fragrance and a soft texture. If you have day-old rice, that works best. It helps the rice get crispy. Rinse the rice before cooking to remove excess starch. This will keep the rice from getting too sticky. If you don’t have a grill, you can pan-fry the chicken. Heat some oil in a skillet over medium-high heat. Cook the chicken for about 6-7 minutes on each side. Make sure it reaches 165°F (75°C) for safety. For the crispy rice, you can also bake it. Spread the rice on a baking sheet and bake at 400°F (200°C) until golden, about 15-20 minutes. This method is great if you want to use less oil. {{image_2}} You can switch out the chicken for other proteins. Here are some great options: - Tofu: Firm tofu works well. Press and cube it for grilling. - Shrimp: Use peeled and deveined shrimp. Grill them for about 2-3 minutes per side. - Beef: Thinly slice flank steak. Marinate in teriyaki sauce and grill quickly. - Pork: Boneless pork chops are another tasty choice. Grill until cooked through. Each protein brings a unique flavor and texture to the salad. Feel free to get creative! If you want a plant-based dish, there are easy swaps to make: - Tofu or Tempeh: Both are great chicken substitutes. Use the same marinating and cooking method. - Seitan: This wheat-based protein mimics meat very well. Slice and grill it like chicken. - Chickpeas: For a hearty option, roast chickpeas and toss them in. These swaps keep your salad fresh and full of flavor while meeting dietary needs. You can try various dressings to change up the salad's taste. Here are some ideas: - Peanut Sauce: A creamy peanut sauce adds a rich flavor. Mix with a bit of water to thin. - Miso Dressing: This adds umami. Blend miso, rice vinegar, and a touch of honey. - Ginger Soy Dressing: Combine soy sauce, grated ginger, and sesame oil for zest. - Spicy Mayo: Mix mayo with sriracha for a kick. These dressings can elevate your salad and keep it exciting every time you make it! To keep your Teriyaki Chicken Crispy Rice Salad fresh, store it well. Place leftovers in an airtight container. This helps maintain the flavor and texture of your dish. You can refrigerate it for up to three days. If you want to keep it longer, freeze the chicken and crispy rice separately. This way, they won’t get soggy. When you are ready to eat your leftovers, reheating is key. Use the oven to keep the crispy texture. Preheat your oven to 350°F (175°C). Place the chicken and crispy rice on a baking sheet. Heat for about 10-15 minutes. This method helps maintain their crunch. You can also use a skillet on low heat. Stir gently to warm through without losing crispness. The shelf life of your Teriyaki Chicken Crispy Rice Salad varies. In the fridge, it lasts about three days. If you freeze it, expect it to stay good for about one month. After that, the taste may fade. Always check for any signs of spoilage before eating. Enjoy your meal without worry! To make Teriyaki Chicken Crispy Rice Salad gluten-free, you need to change a few ingredients. Use gluten-free teriyaki sauce instead of regular sauce. Check the label for wheat-free options. You can also choose a gluten-free soy sauce alternative. This way, you keep all the great flavors without the gluten. Yes, you can use brown rice instead of jasmine rice. Brown rice has a nuttier taste and a chewier texture. It is more nutritious too, with extra fiber. Just remember that brown rice takes longer to cook. Plan for extra time if you choose brown rice. This salad goes well with many side dishes. You can serve it with steamed broccoli or sautéed snap peas. These veggies add color and crunch. For a light touch, try a miso soup or a simple cucumber salad. These sides will make your meal even more satisfying! This blog post covers how to make Teriyaki Chicken Crispy Rice Salad. First, we discussed key ingredients like chicken, rice, and salad vegetables. Next, I shared step-by-step cooking instructions for marinating and grilling the chicken. We explored tips to enhance flavors, perfect rice textures, and different variations for protein and dressings. Finally, I provided storage advice for leftovers to keep your meal fresh. Try this recipe for a tasty dish that’s easy to make and customize. Enjoy your cooking journey!

Teriyaki Chicken Crispy Rice Salad Easy and Fresh Meal

Looking for a quick and tasty meal? My Teriyaki Chicken Crispy Rice Salad is just what you need! It’s fresh,

For the fresh taste, you need: - 1 cup strawberries, hulled and diced - 1 tablespoon sugar - 1 teaspoon lemon juice These ingredients add flavor and brightness to your eggrolls. The strawberries bring sweetness, while the sugar and lemon juice help enhance their natural taste. For the creamy filling, gather: - 8 oz cream cheese, softened - 1/3 cup powdered sugar - 1 teaspoon vanilla extract These dairy items create a rich and sweet cream cheese filling. The cream cheese gives a smooth texture, while the powdered sugar adds sweetness. Vanilla extract adds a lovely aroma. You will also need: - 1 package eggroll wrappers - Oil for frying - 1/2 cup crushed graham crackers (for coating) - Whipped cream (for serving) Eggroll wrappers create a crisp shell around the filling. Frying oil is key for that golden color. The crushed graham crackers give a nice crunch. Whipped cream is perfect for dipping! Start by hulling and dicing 1 cup of fresh strawberries. Place them in a bowl. Add 1 tablespoon of sugar and 1 teaspoon of lemon juice. Mix it well and let it sit for about 10 minutes. This helps the strawberries become juicy and sweet. In another bowl, take 8 oz of softened cream cheese. Add 1/3 cup of powdered sugar and 1 teaspoon of vanilla extract. Mix it until smooth and creamy. This will be the rich base for your filling. Grab an eggroll wrapper and place it on a clean surface. Point one corner towards you. Spoon about 2 tablespoons of the strawberry cream cheese mixture in the center. Fold the bottom corner over the filling. Then fold in the sides and roll it up tightly. Seal the top corner with a bit of water. Repeat this with the rest of the wrappers and filling. Heat oil in a deep frying pan over medium heat. Once hot, gently place the eggrolls in the oil. Fry them in batches for about 3-4 minutes on each side. They should turn golden brown and crispy. After frying, remove them and place on a paper towel-lined plate to drain excess oil. While warm, roll each eggroll in crushed graham crackers for added crunch. Serve them with whipped cream on the side for dipping. This adds a sweet touch that pairs perfectly with the strawberry cheesecake flavors. Enjoy your tasty treat! To get a crispy outside, use a good amount of oil for frying. Heat the oil to medium. If it's too hot, the eggrolls may burn. If it's too cool, they will soak up too much oil. Fry in small batches to keep the oil temperature steady. This helps the eggrolls cook evenly and stay crisp. For the best filling, let the strawberries sit with sugar and lemon juice. This makes them juicy and sweet. When mixing with cream cheese, ensure it's very soft. A smooth mixture makes it easier to scoop into wrappers. Be gentle when combining the strawberries with the cream cheese. This keeps the chunks intact for great flavor. You can bake these eggrolls if you prefer a healthier option. Preheat the oven to 400°F (200°C). Place the eggrolls on a baking sheet lined with parchment paper. Spray them lightly with cooking spray for a golden finish. Bake for about 15-20 minutes, flipping halfway through. They will not be as crispy as fried, but still tasty! {{image_2}} You can change the fruit in these eggrolls. Blueberries, raspberries, or peaches work well. Just swap the strawberries for your choice. You’ll still get that sweet and creamy taste. Each fruit adds its unique flavor. For example, raspberries give a tart kick. Peaches add a soft sweetness. Experiment and find your favorite! If you want a dairy-free version, use dairy-free cream cheese. Many brands offer great options. You can also use coconut yogurt for a lighter filling. This keeps the taste creamy while fitting your diet. Just follow the same steps in the recipe. You can bake eggrolls if you prefer a healthier option. Preheat your oven to 400°F. Place the eggrolls on a baking sheet and spray them with cooking oil. Bake for about 15-20 minutes, flipping halfway through. They won't be as crispy as fried, but they are still tasty. Try both methods to see which one you like better! To keep your strawberry cheesecake eggrolls fresh, store them in the fridge. Place them in an airtight container. They will stay good for about 2 to 3 days. If you want to keep them longer, consider freezing instead. Freezing eggrolls is a great option! First, let them cool completely. Then, place them on a baking sheet in a single layer. Freeze them until solid, about 1-2 hours. Once frozen, transfer them to a freezer bag. They can last up to 2 months in the freezer. When you're ready to enjoy your eggrolls again, reheat them for the best taste. For a crispy texture, bake them in the oven at 350°F (175°C) for about 10-15 minutes. You can also fry them again for a few minutes until hot. If you prefer, you can microwave them too, but they may lose their crispness. Enjoy! Yes, you can use other types of cream cheese. You might try flavored cream cheese, like strawberry or vanilla. These add a fun twist to your eggrolls. Just ensure it is soft, so it mixes well. You can serve these eggrolls with whipped cream for dipping. A drizzle of chocolate sauce also works great. Fresh strawberries on the side add a nice touch. You could pair them with a scoop of vanilla ice cream too. The eggrolls are done frying when they turn golden brown. This usually takes about 3-4 minutes per side. Make sure to check for crispiness. A nice, crunchy texture means they are ready to enjoy! Yes, you can make these ahead of time. Prepare the filling and wrap the eggrolls. Store them in the fridge for up to 24 hours. Fry them just before serving for the best crispiness. You can also freeze them for later use! You learned how to make delicious Strawberry Cheesecake Eggrolls. We covered fresh and dairy ingredients, and discussed wrappers and coatings. Then, I shared step-by-step instructions and helpful tips for the best results. You discovered fun variations, storage info, and answers to key questions. Now, it’s time to create your tasty treats. Enjoy experimenting and sharing your eggrolls with family and friends! Your culinary adventure starts here.

Strawberry Cheesecake Eggrolls Tasty and Easy Recipe

Get ready to make a quick and easy treat that will wow your friends! Strawberry Cheesecake Eggrolls are a fun

- 1 lb ground turkey - 1 medium zucchini, diced - 1 bell pepper, chopped - 1 cup cherry tomatoes, halved - 1 cup fresh spinach - 2 cloves garlic, minced - 1 medium onion, chopped - 1 teaspoon dried oregano - 1 teaspoon smoked paprika - Salt and pepper to taste - 2 tablespoons olive oil - 1/4 cup low-sodium chicken broth In this recipe, ground turkey serves as a lean protein base. It cooks quickly and absorbs flavors well. Fresh vegetables like zucchini, bell pepper, cherry tomatoes, and spinach add color, texture, and nutrients. The garlic and onion bring depth to the dish, while oregano and smoked paprika enhance the flavor. Olive oil keeps everything moist and adds healthy fats. Chicken broth adds a savory note, making the dish even more delicious. - Crumbled feta cheese - Broth variations You can sprinkle crumbled feta cheese on top for a tangy twist. It adds creaminess and pairs well with the other flavors. If you want to switch things up, you can use vegetable broth instead of chicken broth for a vegetarian option. This keeps the dish light while adding a rich taste. - Skillet - Cooking utensils A large skillet is essential for this recipe. It allows you to cook everything evenly and keep the flavors locked in. Basic cooking utensils like a chopping knife and a spatula will help you prepare and mix the ingredients with ease. With the right equipment, you can whip up this tasty Turkey Veggie Skillet in no time! - Heating the oil: Start by pouring 2 tablespoons of olive oil into a large skillet. Heat it over medium heat until warm. - Sautéing onion and garlic: Next, add 1 medium onion, chopped, and 2 cloves of minced garlic. Stir them for 2-3 minutes. You want them soft and fragrant. - Adding ground turkey: Now, increase the heat to medium-high. Add 1 pound of ground turkey to the skillet. Use a spoon to break it apart as it cooks. - Mixing in seasonings: Season the turkey with 1 teaspoon of dried oregano, 1 teaspoon of smoked paprika, salt, and pepper. Stir well to mix the spices into the turkey. - Cooking zucchini and bell pepper: Toss in 1 medium zucchini, diced, and 1 bell pepper, chopped. Cook them for about 5-7 minutes. Stir occasionally until they soften. - Adding tomatoes and spinach: Finally, add 1 cup of halved cherry tomatoes and 1 cup of fresh spinach. Pour in 1/4 cup of low-sodium chicken broth. Stir gently, cover the skillet, and let it simmer for 3-4 minutes. This will let the spinach wilt and the tomatoes soften. To ensure the turkey is cooked through, use a meat thermometer. Aim for 165°F. This keeps the meat safe to eat. Always break the turkey into small pieces while cooking. This helps it cook evenly. For sautéing vegetables, start with the onions and garlic. Sauté them until soft and fragrant. This builds a great base flavor. Then, add heartier veggies first, like zucchini and bell pepper. They need a bit more time to cook. Finish with softer vegetables, like spinach and tomatoes. They will wilt quickly and add freshness. For a great presentation, serve the Turkey Veggie Skillet in shallow bowls. This makes the dish look inviting. Garnish with fresh parsley or extra feta cheese. It adds color and flavor. When pairing sides, consider crusty bread. It’s perfect for soaking up the juices. You could also serve a light salad on the side. This adds a refreshing crunch to the meal. To boost flavor, try adding spices like cumin or chili powder. These add warmth and depth. You can also use fresh herbs. Basil or cilantro can brighten the dish. Just add them at the end for the best taste. {{image_2}} You can switch up the meat in this dish. Lean ground beef makes a tasty option. It gives a rich flavor while keeping it healthy. Ground chicken is another great choice. Both options cook in a similar way to turkey. For those who prefer plant-based meals, try using a meat substitute. Crumbled tempeh or lentils can replace the turkey. Both options add protein and fiber. They also soak up the flavors of the spices well. The veggies in this skillet are versatile. You can swap zucchini for yellow squash. Both have a similar texture and taste. Broccoli or cauliflower also work well. They add crunch and nutrition. When it's summer, use fresh corn or green beans. In fall, try adding butternut squash or sweet potatoes. Seasonal produce brings great flavors and nutrients. If you want a low-carb meal, skip the starchy vegetables. Focus on leafy greens and bell peppers. They are low in carbs and high in vitamins. For gluten-free options, check the chicken broth. Make sure it’s gluten-free. You can also skip the feta cheese on top if you want. This meal remains delicious without it. After cooking, let the Turkey Veggie Skillet cool down. Store any leftovers in the fridge. Use airtight containers to keep the dish fresh. Glass or plastic containers work great. Make sure to seal them tightly to prevent odors from other foods. Leftovers can stay in the fridge for about 3 to 4 days. If you want to save some for later, freezing is a smart choice. Allow the skillet to cool completely before freezing. Divide it into portions and place them in freezer-safe bags or containers. Squeeze out as much air as you can to prevent freezer burn. When you're ready to eat, thaw it in the fridge overnight. Reheat on the stove or in the microwave until hot. Leftovers from the Turkey Veggie Skillet last about 3 to 4 days in the fridge. If frozen, they can last up to 3 months. Check for signs of spoilage before eating. Look for off smells, changes in color, or a slimy texture. It's best to discard any leftovers that look or smell strange to avoid foodborne illness. Yes, you can use other meats. Ground chicken or lean beef works well. If you want a plant-based option, try using lentils or crumbled tofu. These substitutes offer great protein and keep the dish hearty. You can prep the Turkey Veggie Skillet easily. Chop the vegetables and store them in the fridge. Cook the turkey ahead and keep it in an airtight container. When you're ready to eat, just heat everything in the skillet. This saves time and makes dinner quick. This dish pairs well with many sides. Consider serving it with crusty bread to soak up the juices. A fresh salad adds a nice crunch and balance. You can also enjoy it over rice or quinoa for a filling meal. This blog post explored how to create a delicious Turkey Veggie Skillet. We covered essential ingredients like ground turkey and fresh veggies. The step-by-step instructions will guide you in cooking the dish perfectly. Remember the tips for flavor and presentation to impress at the table. Feel free to customize using different proteins or veggies based on your taste. With proper storage, you can enjoy this meal later. Now, you have all the tools to make a flavorful Turkey Veggie Skillet that fits your needs. Happy cooking!

Turkey Veggie Skillet Flavorful Healthy Dinner Option

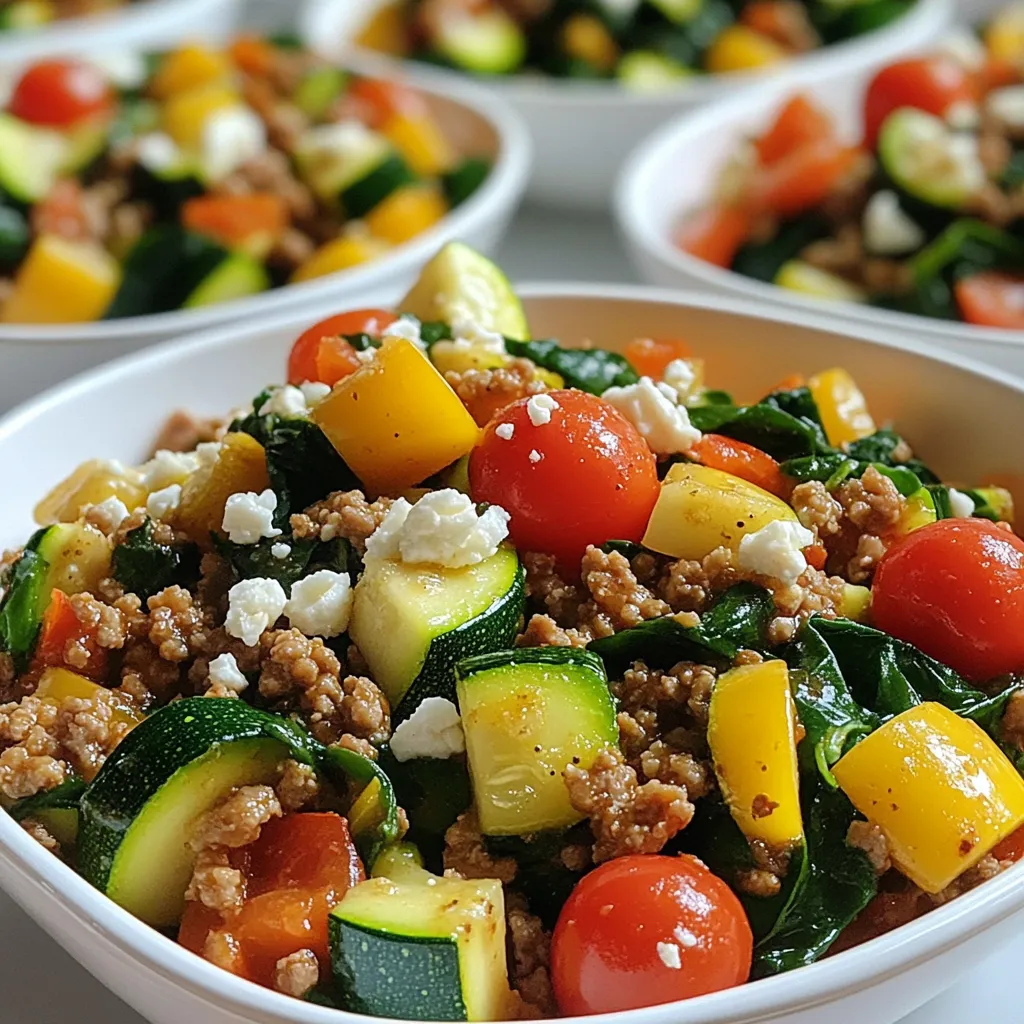
Looking for a quick, tasty, and healthy dinner? The Turkey Veggie Skillet is your answer. This one-pan meal combines ground

- 1 pound ground beef - 1 cup ricotta cheese - 1/2 cup grated Parmesan cheese - 1 tablespoon chopped fresh basil - 1 tablespoon chopped fresh parsley - 2 cloves garlic, minced - 1/4 teaspoon red pepper flakes - 1 jar (24 oz) marinara sauce For these ricotta meatballs, we want fresh flavors and good texture. The ground beef gives a nice base. I love using ricotta cheese for its creamy taste. It makes the meatballs moist and soft. A sprinkle of grated Parmesan adds a salty kick, making them even more tasty. Next, we add fresh herbs like basil and parsley. They brighten the dish. The garlic brings a strong, savory flavor. For a bit of heat, you can toss in red pepper flakes. This is optional, but I think it adds a nice touch. Finally, marinara sauce is great for serving. It adds moisture and flavor, making the meatballs even better. All these ingredients come together to create a warm, comforting meal your family will love. Mixing ingredients Start by taking a large mixing bowl. Add 1 pound of ground beef. Then, mix in 1 cup of ricotta cheese. Next, add 1/2 cup of grated Parmesan cheese and 1/2 cup of breadcrumbs. Crack in 1 large egg, then toss in 2 cloves of minced garlic. Add 1 tablespoon of chopped fresh basil and 1 tablespoon of chopped fresh parsley for flavor. Season with 1 teaspoon of salt, 1/2 teaspoon of black pepper, and 1/4 teaspoon of red pepper flakes if you like a bit of heat. Mix everything well, but do not over-mix. This helps keep the meatballs tender. Forming meatballs Once your mixture is ready, scoop out portions to form meatballs. Aim for about 1 to 1.5 inches in diameter. You should get around 20 meatballs from this mix. Place them on a plate as you go. Browning meatballs Now, heat a large skillet over medium heat. Add a few tablespoons of olive oil. When the oil is hot, carefully add the meatballs. Do not overcrowd the pan. Brown the meatballs on all sides for about 5 minutes. This step adds depth to the flavor. Baking meatballs After browning, transfer the meatballs to a baking dish. Pour 1 jar of marinara sauce over them, making sure they are well coated. Cover the dish with aluminum foil. Bake in your preheated oven at 375°F (190°C) for 20-25 minutes. Check that the internal temperature reaches 160°F (71°C). After that, remove the foil and bake for another 5-10 minutes. This caramelizes the sauce just right. Garnishing options Once done, serve the meatballs hot. You can garnish them with freshly chopped herbs and extra Parmesan cheese for a nice touch. Pairing with sides These meatballs go great with spaghetti or a fresh salad. You can also serve them in a sub roll for a delicious meatball sandwich. Enjoy your flavorsome meal! To make sure your meatballs are tender, avoid over-mixing the ingredients. Mix just until combined. This keeps them light and fluffy. Also, use the right meatball size. Aim for 1 to 1.5 inches. This size cooks evenly and stays juicy. For frying, olive oil is the best choice. It adds flavor and helps brown the meatballs nicely. Heat the oil over medium heat. This helps to prevent burning. If you prefer baking, preheat your oven to 375°F. Bake for 20-25 minutes, covered with foil, then remove it to caramelize the sauce. You can boost the flavor with extra herbs and spices. Try adding oregano or thyme for a new twist. Using homemade marinara can also elevate the dish. It brings freshness and richness that jarred sauces may lack. This makes your meal even more special. {{image_2}} You can easily change the meat for your meatballs. Ground turkey works well as a lean option. It has less fat but still gives great taste. Just follow the same steps in the recipe. If you want a plant-based choice, try using lentils or chickpeas. Mash them up, and mix with the other ingredients. This makes a tasty and healthy meal. Ricotta makes these meatballs special, but you can switch it out. Cottage cheese is a great substitute. It adds creaminess and protein, too. Just blend it well with the other ingredients. Another option is feta cheese. It brings a nice tangy flavor. Crumble it into the mix for a fun twist. Adding vegetables is a smart way to boost flavor and nutrition. Chopped spinach or diced bell peppers can make a big difference. Just mix them into the meatball mixture. You can also try different sauces. Instead of marinara, use pesto or a creamy alfredo. This can give your meatballs a whole new taste. Experiment and find your favorite! To store leftovers, place your ricotta meatballs in an airtight container. Make sure to cover them with marinara sauce to keep them moist. You can also use plastic wrap if you don’t have a container. The shelf life in the fridge is about three to four days. Always label the container with the date to know when to eat them. You can freeze both uncooked and cooked meatballs. For uncooked meatballs, freeze them on a baking sheet first, then transfer them to a freezer bag. This keeps them from sticking together. For cooked meatballs, let them cool down before freezing. Thawing instructions are easy: place the meatballs in the fridge overnight. If you need them fast, you can thaw them in the microwave for a few minutes on low. The best methods for reheating your meatballs are in the oven or on the stovetop. If using the oven, preheat it to 350°F (175°C) and bake for about 15-20 minutes. On the stovetop, simmer them in marinara sauce for about 10 minutes. To prevent dryness, always add a little extra sauce when reheating. This keeps them juicy and flavorful. Yes, you can use other meats with ricotta. Ground turkey is a popular choice. It makes a lighter meatball. You can also try ground chicken for a different taste. If you prefer beef, mix in pork for more flavor. Each meat brings its own unique taste. Feel free to experiment! To check if the meatballs are done, use a meat thermometer. The safe internal temperature is 160°F (71°C). Insert it into the center of a meatball. If it reads 160°F, they are ready. Another way is to slice one open. The meat should be brown and no pink should show. Ricotta meatballs go well with many sides. You can serve them over pasta or with crusty bread. A fresh salad adds a nice crunch. If you want comfort food, pair them with mashed potatoes. For a lighter option, serve with steamed veggies or a side of roasted zucchini. Enjoy the meal! In this guide, we explored making delicious ricotta meatballs. We covered the main ingredients like ground beef, ricotta, and Parmesan. You learned how to mix and cook the meatballs for perfect flavor and texture. I shared tips for tender meatballs and fun variations with different proteins and cheeses. Remember to store leftovers properly to keep them fresh. Experiment with sides and sauces for tasty meals. Enjoy creating this dish that brings people together around the table. You can make it your own with different flavors. Happy cooking!

Ricotta Meatballs Flavorsome and Easy Family Meal

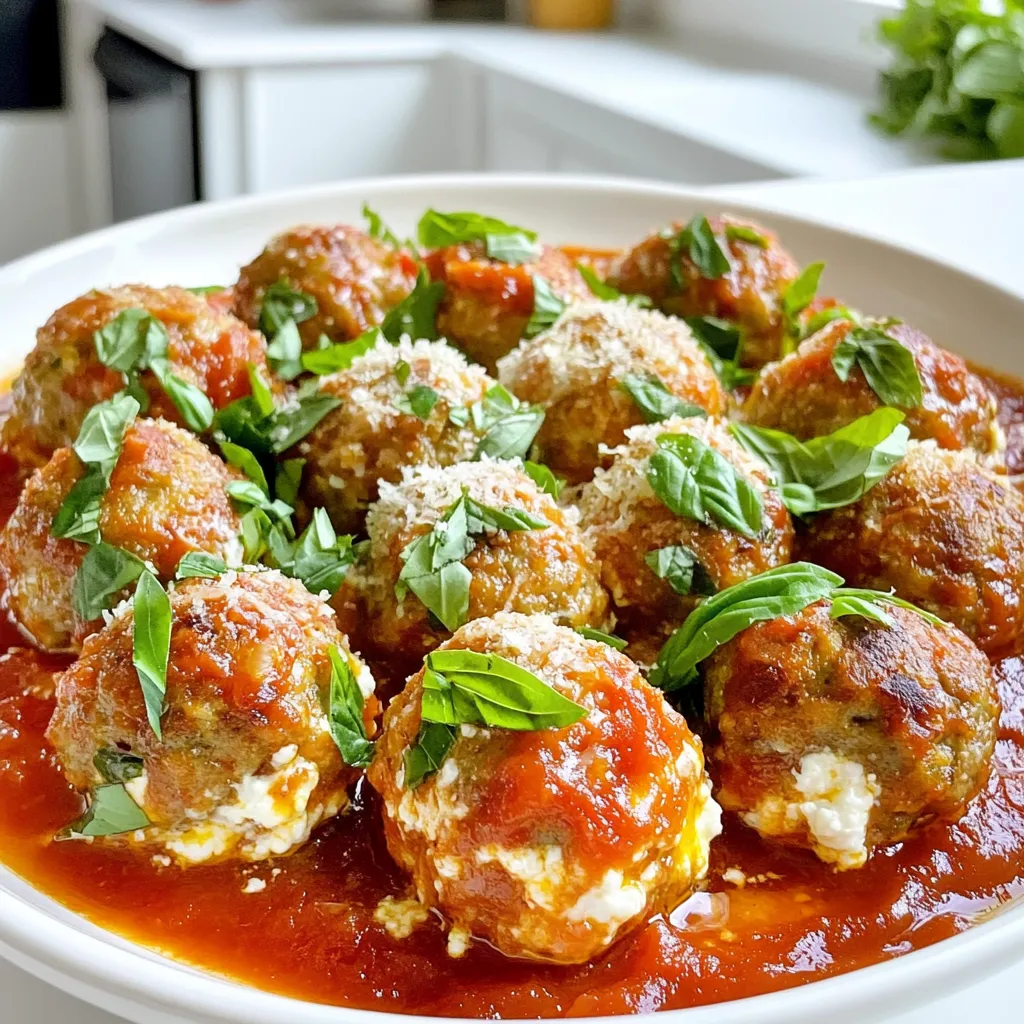
Looking for an easy, tasty family meal? Try my ricotta meatballs! Packed with ground beef, creamy ricotta, and fresh herbs,

Older posts
Newer posts
← Previous Page1 Page2 Page3 … Page86 Next →

dsad

© 2026 Emmas Dish • Built with GeneratePress

Our Policies

  • Copyright Policy
  • Cookie Policy
  • GDPR Policy
  • Privacy Policy
  • Disclaimer
  • Terms Of Use

More Information

  • Home
  • About
  • Contact
  • Appetizers
  • Dessert
  • Dinner
  • Drinks
©2026, Emmas Dish About Back To Top