Skip to content
DisclaimerTerms Of UseGDPR PolicyCookie Policy

Emmas Dish

  • Home
  • Drinks
  • Appetizers
  • Dinner
  • Dessert
  • About
  • Contact
  • Privacy Policy
DisclaimerTerms Of UseGDPR PolicyCookie Policy

NO-ING-IMG

- 1 tablespoon olive oil - 1 pound Italian sausage, casing removed - 1 medium onion, chopped - 2 cloves garlic, minced - 4 cups chicken or vegetable broth - 1 teaspoon dried thyme - 1 teaspoon red pepper flakes (adjust for spice preference) - 2 cups kale, chopped and stems removed - 1 pound gnocchi (store-bought or homemade) - 1/2 cup heavy cream - Salt and pepper to taste - Grated Parmesan cheese for garnish The main ingredients set the stage for a rich and hearty soup. The olive oil adds a nice base, while the Italian sausage brings warmth and flavor. Onions and garlic add depth, and the broth is the heart of the soup. The additional ingredients enhance the flavor and texture. Dried thyme gives an earthy note, and red pepper flakes let you control the spice. Kale offers a boost of nutrients, while gnocchi makes the soup filling. The heavy cream adds a silky finish that ties everything together. For seasoning, salt and pepper are essential. They help balance the flavors. Lastly, grated Parmesan cheese on top is the cherry on the cake. It adds a savory touch and visual appeal. Start by heating 1 tablespoon of olive oil in a large pot over medium heat. Add 1 pound of Italian sausage, breaking it apart with a wooden spoon. Cook until the sausage is browned and cooked through, about 5 to 7 minutes. This step builds a rich flavor base for your soup. Next, add 1 medium chopped onion to the pot. Cook for 3 to 4 minutes until the onion looks translucent. Then, stir in 2 cloves of minced garlic. Cook it for 1 more minute until it smells great. These aromatics enhance the soup's flavor. Pour in 4 cups of chicken or vegetable broth. Add 1 teaspoon of dried thyme and 1 teaspoon of red pepper flakes for some heat. Bring the mixture to a gentle boil. Once boiling, add 2 cups of chopped kale and 1 pound of gnocchi. Cook until the gnocchi are tender and float to the surface, about 2 to 4 minutes. Lower the heat and stir in 1/2 cup of heavy cream. Let it simmer for another 2 minutes. Season with salt and pepper to taste. This creates a creamy, hearty soup that is sure to satisfy. To get the right kick, adjust the red pepper flakes. Start with a teaspoon. If you love heat, add more! The flakes bring warmth and depth. They balance the creamy soup. Remember, spice can change with each batch. You can use store-bought or homemade gnocchi. Store-bought saves time and works well. Homemade gnocchi has a unique taste and texture. If you choose homemade, make sure it’s fresh. Cook gnocchi until they float in the soup. This shows they are ready! Serve the soup in rustic bowls. It feels cozy and inviting. Garnish with freshly grated Parmesan cheese. This adds a rich, salty flavor. A sprinkle of black pepper also enhances the look. These touches make your soup shine! {{image_2}} You can switch the Italian sausage for other meats if you want. Ground turkey or chicken works well. You can also try spicy chorizo for a kick. If you prefer a milder taste, use sweet Italian sausage. Just remember that the flavor will change based on your choice. For a plant-based soup, skip the sausage and use mushrooms instead. They add great texture and flavor. Replace the heavy cream with coconut milk or cashew cream for richness. You can also use vegetable broth for a fully vegan base. This way, you can enjoy a delicious soup without animal products. Kale is tasty, but you can use other greens if you prefer. Spinach or Swiss chard can work well in this soup. For the broth, feel free to use homemade stock or any low-sodium option. These swaps help you tailor the soup to your taste and what you have on hand. To store leftover soup, let it cool down first. Pour it into an airtight container. Make sure to seal it well. Place the container in the fridge. This soup keeps well for up to three days. When you're ready to eat, just reheat it on the stove. If you want to freeze the soup, follow these steps. First, cool the soup completely. Then, pour it into freezer-safe bags or containers. Leave some space at the top for expansion. Seal tightly to avoid freezer burn. When it's time to eat, thaw it overnight in the fridge. Reheat it gently on the stove. When stored correctly, the soup can last up to three months in the freezer. In the fridge, it stays fresh for about three days. Always check for any off smells or changes in color before eating. If it looks or smells bad, it's best to toss it. Yes, you can use frozen gnocchi in this soup. Cooking with frozen gnocchi is easy. Just add them directly to the boiling soup. They will cook in about 2-4 minutes. You do not need to thaw them first. This saves time and keeps things simple. To add more heat, try these tips: - Increase the red pepper flakes. Start with an extra half teaspoon. - Add fresh chopped jalapeños for a fresh kick. - Stir in a dash of hot sauce to taste. - Experiment with spicy sausage instead of mild Italian sausage. If you want alternatives to kale, consider these leafy greens: - Spinach is a great choice. It wilts nicely and cooks fast. - Swiss chard adds color and flavor. Chop it into bite-sized pieces. - Collard greens can work too. They need a bit longer to cook. - Arugula adds a peppery taste. You can stir it in at the end. This blog post guides you through a hearty soup recipe bursting with flavor. We covered key ingredients like olive oil, Italian sausage, and kale. You learned step-by-step how to cook and add your ingredients for the best taste. We shared tips for perfecting flavors and variations for different diets. Finally, you received storage advice to keep your soup fresh. Enjoy making this delicious dish! It’s a simple way to create warmth in your kitchen.

Satisfying Sausage Kale Gnocchi Soup Recipe

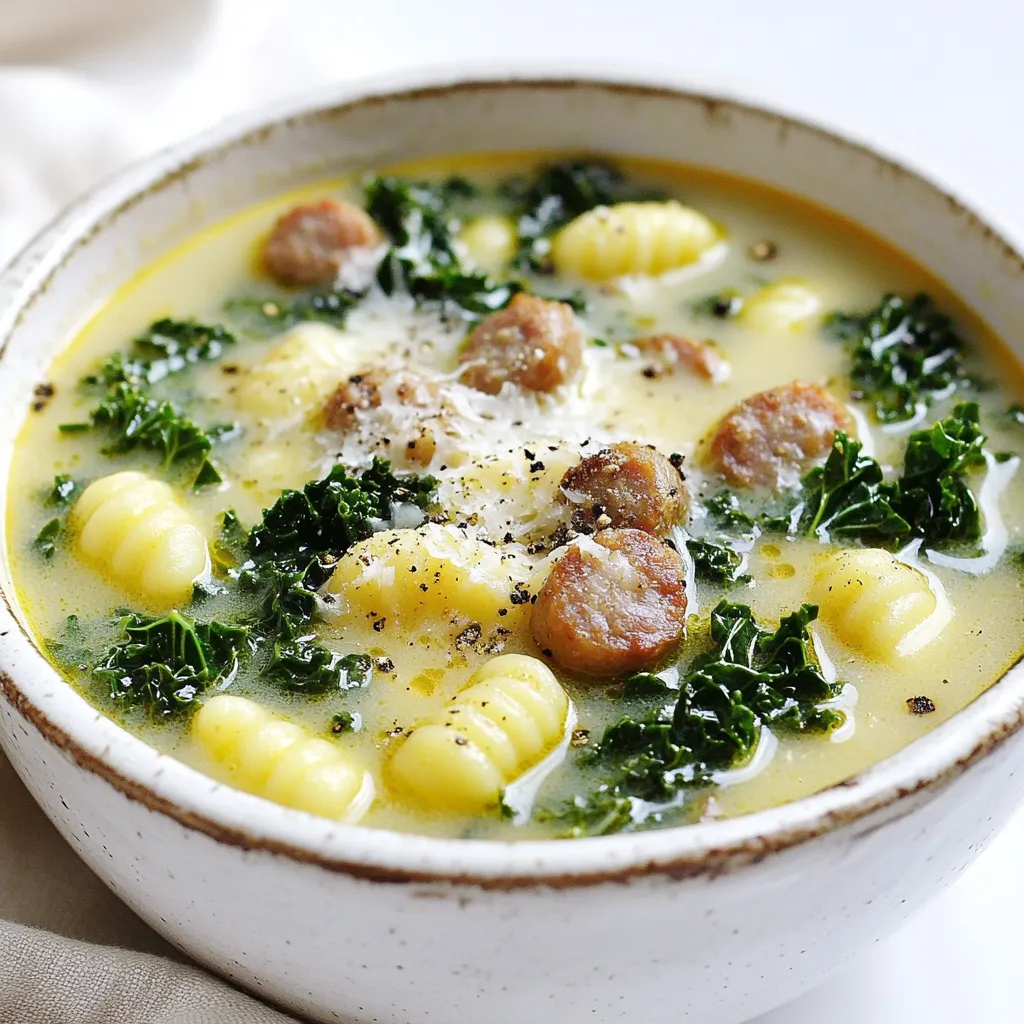
Warm, hearty, and full of flavor, my Satisfying Sausage Kale Gnocchi Soup is the perfect dish for chilly days. Whether

- 1 pound large shrimp, peeled and deveined - 4 cloves garlic, minced - 2 tablespoons fresh ginger, minced - 1 red bell pepper, sliced - 1 cup snap peas - 2 tablespoons soy sauce - 2 tablespoons chili garlic sauce - 1 tablespoon sesame oil - 1 tablespoon vegetable oil - 2 green onions, sliced (for garnish) - Sesame seeds (for garnish) - Cooked jasmine rice (for serving) In this dish, shrimp is the star. I love using large shrimp because they cook quickly and stay juicy. The garlic and ginger add great flavor and warmth. Fresh vegetables like red bell pepper and snap peas bring color and crunch. The soy sauce gives a salty touch, while chili garlic sauce adds heat. Sesame oil rounds out the flavors with its nutty scent. Don't forget the jasmine rice; it makes the perfect base for this meal. Each ingredient plays a key role, creating a lively and quick meal that you will enjoy making and eating! To start, you need to marinate the shrimp. In a medium bowl, combine one pound of shrimp with two tablespoons of soy sauce and two cloves of minced garlic. This adds flavor. Let the shrimp marinate for about 10 minutes. This short time works well for shrimp. Next, heat a large skillet over medium-high heat. Add one tablespoon of vegetable oil. When the oil is hot, add the rest of the minced garlic and two tablespoons of minced ginger. Stir them quickly for about 30 seconds. You want the kitchen to smell great! Add the marinated shrimp to the hot skillet. Cook them for about 2-3 minutes. Stir occasionally. The shrimp will start turning pink. This color change means they are cooking well. Now it's time to add vegetables. Toss in one sliced red bell pepper and one cup of snap peas. Stir-fry for an additional 2-3 minutes. Aim for tender-crisp veggies. They should stay bright and colorful. Pour in two tablespoons of chili garlic sauce and the remaining soy sauce. Mix everything well to coat the shrimp and veggies. Let it cook together for another minute. This step enhances the flavor! Serve your stir fry over a bed of cooked jasmine rice. For a finishing touch, garnish with two sliced green onions and a sprinkle of sesame seeds. This adds a nice crunch and bright color to your dish. Enjoy! To get the best shrimp, avoid overcooking. Shrimp cooks fast. When they turn pink and curl, they are done. Overcooked shrimp can be tough. The best size shrimp for this dish is large. They have a nice bite and hold up well in the stir fry. Add spices and herbs to boost flavor. Try a pinch of red pepper flakes for extra heat. Fresh ingredients are key in this dish. Use fresh garlic and ginger for the best taste. They bring a vibrant taste that dried spices can’t match. For stir-frying, a large skillet or wok works best. A wok heats evenly and gives you space to toss ingredients. I recommend using a wooden spatula. It’s gentle on your cookware and helps you mix well without scratching the surface. {{image_2}} You can change up the veggies in this stir fry. Broccoli, carrots, and zucchini work great. If you want more color, add seasonal vegetables, like asparagus in spring or squash in fall. Mixing different vegetables keeps the dish fresh and exciting. Use what you have on hand to make it your own. Do you prefer your dish mild or spicy? You can make it milder by using less chili garlic sauce. For more heat, add extra sauce or some red pepper flakes. If you want a different flavor, try using teriyaki or hoisin sauce instead. This gives the dish a fun twist while keeping it tasty. Want to switch up the protein? You can easily use chicken or tofu instead of shrimp. If you choose chicken, cut it into bite-sized pieces and cook it a bit longer. Tofu needs a little pressing first, then cook it until it's golden. Adjust the cooking time based on the protein you choose, and enjoy the flavors! To keep your Garlic Chili Shrimp Stir Fry fresh, store it in an airtight container. This method helps prevent air from spoiling the dish. In the fridge, it stays good for about 3 days. Always let it cool to room temperature before sealing. If you want to save some for later, freezing is a great option. Place the stir fry in a freezer-safe container. Make sure to leave some space at the top, as it may expand when frozen. It can last up to 2 months in the freezer. When you're ready to eat, thaw it overnight in the fridge. For reheating, use a skillet over low heat for best results. For meal prep, divide the stir fry into single servings. This way, it’s easy to grab when you're busy. You can also add it to salads or wraps for a quick lunch. The flavors blend well with rice or noodles, making it a versatile option for different meals. Yes, you can use frozen shrimp. Just remember to thaw them first. To thaw shrimp, place them in the fridge overnight. If you're short on time, you can submerge them in cold water for about 20-30 minutes. Avoid using hot water, as it can cook the shrimp unevenly. After thawing, pat them dry before marinating. This dish pairs well with many sides. Here are a few options: - Cooked jasmine rice: It absorbs the sauce well. - Quinoa: A healthy grain with a nutty flavor. - Steamed broccoli: It adds color and nutrition. - Noodles: Try rice noodles or soba for a twist. Feel free to mix and match based on your taste! You can easily make this dish gluten-free. Just swap regular soy sauce for gluten-free soy sauce or tamari. These options give you the same rich flavor without gluten. Always check labels to ensure the products are certified gluten-free. Consider using coconut aminos as a soy-free alternative. In this post, we explored how to make a delicious Garlic Chili Shrimp Stir Fry. We covered main ingredients like shrimp and fresh vegetables. I shared steps for marinating shrimp, cooking aromatics, and mixing sauces. We also discussed tips for perfecting your dish and easy variations. Remember, fresh ingredients and proper cooking times make all the difference. Enjoy your cooking journey and don’t hesitate to experiment with flavors. Happy cooking!

Garlic Chili Shrimp Stir Fry Lively and Quick Meal

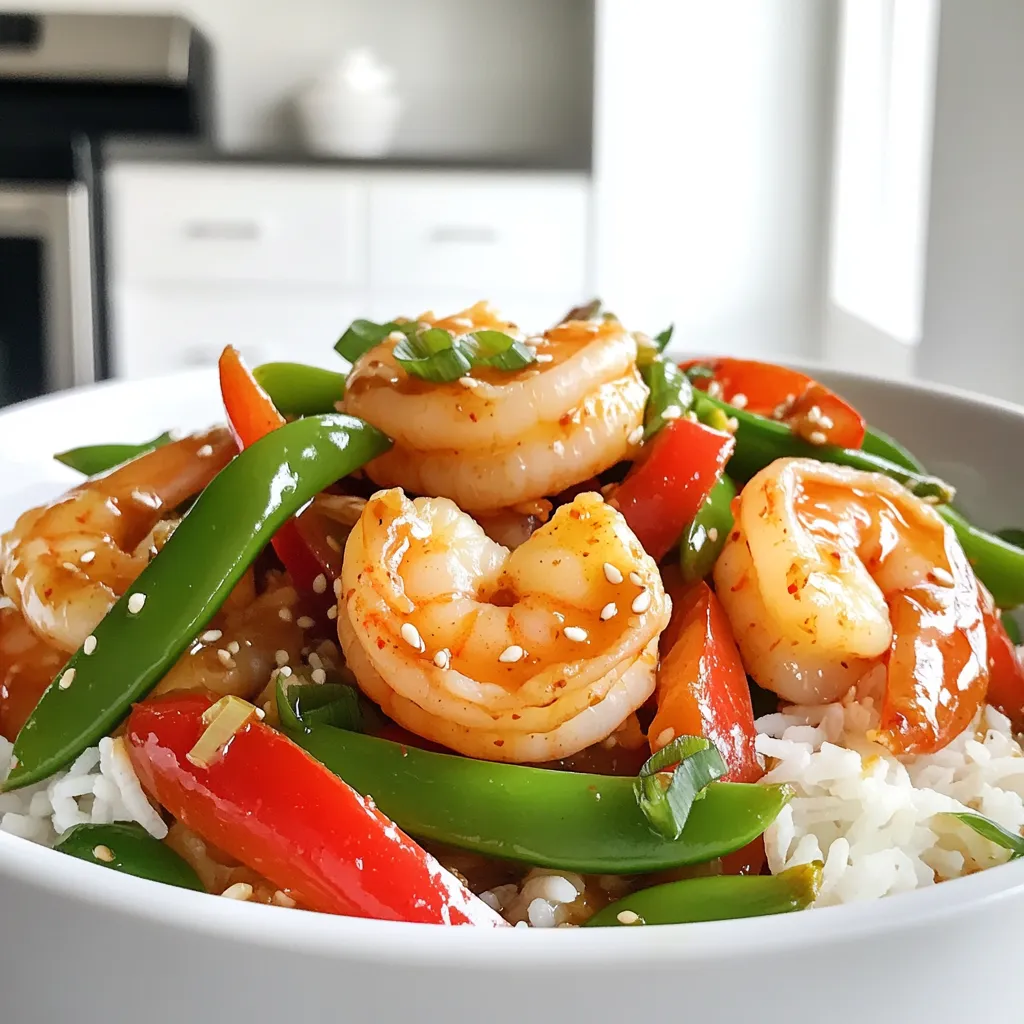
Looking for a vibrant dish that’s both quick and satisfying? Garlic chili shrimp stir fry is your answer! This meal

- Grahams and More: Key Components - 1 cup graham cracker crumbs - 4 tablespoons unsalted butter, melted - 2 tablespoons granulated sugar The base of this dessert is made from graham cracker crumbs. The melted butter helps bind them together. The granulated sugar adds just the right amount of sweetness. - Sweeteners and Creaminess - 16 oz cream cheese, softened - ½ cup powdered sugar - 1 teaspoon vanilla extract - 1 cup heavy whipping cream Cream cheese gives the filling a rich texture. Powdered sugar sweetens it without grittiness. Vanilla extract adds a lovely aroma. Whipping cream makes the cheesecake light and fluffy. - Toppings and Garnishes - 1 cup mini marshmallows - ½ cup chocolate chips - Additional mini marshmallows and chocolate shavings for topping Mini marshmallows and chocolate chips mix into the filling for fun bites. You can top with toasted marshmallows and chocolate shavings for a beautiful finish. This adds extra flavor and makes the dessert look fancy. Mixing the Base Ingredients Start by mixing the graham cracker crumbs, melted butter, and granulated sugar in a bowl. Stir until the mix looks like wet sand. This mixture gives your crust a nice flavor and texture. Creating the Crust Layer Next, divide the crumb mixture into six cups. Press the crumbs down firmly to form a solid base. Make sure each cup has an even layer. Chilling the Crust Put the cups in the fridge for about 15 minutes. This helps the crust firm up before adding the filling. Beating the Cream Cheese In a separate bowl, beat the softened cream cheese until it’s smooth. This step is key for a creamy filling. Folding in Whipped Cream Next, whip the heavy cream in another bowl until stiff peaks form. Gently fold this whipped cream into the cream cheese mixture. This makes the filling light and airy. Adding Mini Marshmallows and Chocolate Chips Now, fold in the mini marshmallows and chocolate chips. These add fun bites of sweetness and flavor to your cheesecake. Layering the Cheesecake Mixture After the crust has chilled, spoon the cheesecake mixture into each cup. Make sure each cup gets the same amount. Ensuring Consistency and Smoothness Use a spatula to smooth the top of each cup. This makes them look nice and ready to chill. Chilling for Setting Finally, place the cups back in the fridge. Let them set for at least 2 hours. This helps the flavors blend, making every bite delicious. - Cream Cheese Temperature: To get a smooth filling, your cream cheese should be at room temperature. This helps it mix well without lumps. If it’s cold, it won’t blend nicely. - Whipping Cream Tips: When whipping the cream, use a cold bowl and beaters. This helps create stiff peaks quickly. Don't overmix; stop when it looks fluffy and thick. - Garnishing Ideas: Top your cheesecake cups with toasted mini marshmallows and chocolate shavings. You can even drizzle some chocolate syrup for a fun look. - Pairing with Beverages: These cups go well with milk, hot cocoa, or even a light coffee. The flavors mix really well with warm drinks. - Crust Too Crumbly: If your crust is too crumbly, add a bit more melted butter. This helps it hold together better. - Overmixing the Filling: Overmixing can make your filling too airy. Mix just until combined to keep it dense and creamy. {{image_2}} You can mix up the flavors of your No-Bake S’mores Cheesecake Cups for fun. Here are two ideas: - Dark Chocolate S’mores: Use dark chocolate chips instead of regular ones. This gives a rich, bold taste. You can also add a layer of dark chocolate ganache on top for extra depth. - Berry Swirl Cheesecake Cups: Add a berry puree, like raspberry or strawberry, to the cheesecake filling. Swirl it in gently for a beautiful look and a fruity twist. If you have dietary needs, you can still enjoy these cups. Here are some swaps: - Gluten-Free Version: Use gluten-free graham cracker crumbs. This keeps the same great taste without the gluten. - Vegan Alternatives: Substitute cream cheese with vegan cream cheese and use coconut whipped cream. You can also replace the butter with coconut oil. You can change the recipe to fit the seasons. Here are two fun ideas: - Pumpkin Spice S’mores Cups: Add pumpkin puree and pumpkin spice to the cheesecake filling. This gives it a warm, cozy flavor for fall. - Peppermint Cheesecake Cups: In winter, use peppermint extract in the filling. Top with crushed candy canes for a festive touch. To keep your no-bake s'mores cheesecake cups fresh, store them in the fridge. Use an airtight container to prevent them from absorbing other odors. Make sure to keep them covered. If you want to freeze them, wrap each cup tightly in plastic wrap, then place them in a freezer-safe bag. This will help avoid freezer burn. In the fridge, these cheesecake cups will last for about 3 to 5 days. If you freeze them, they can stay good for up to a month. To check for spoilage, look for any changes in texture or smell. If they start to smell sour or have a watery layer, it’s best to toss them. Always trust your senses when it comes to food safety. Yes, you can make these cheesecake cups ahead of time. They stay fresh for up to three days in the fridge. Just prepare the cups and let them chill. This saves time when you want to serve them. It also helps the flavors meld together nicely. Absolutely! You can use any cookie you like. Some tasty options include Oreo cookies, gingersnaps, or even vanilla wafers. Each type will give a different flavor. Just crush them like you would graham crackers. Mix them with butter and sugar, and you’re good to go! Toasting marshmallows is not necessary, but it adds a nice touch. The toasted flavor gives a great campfire vibe. If you want that classic s'mores taste, I recommend toasting them. You can use a kitchen torch or place them under a broiler for a minute. Just keep an eye on them so they don’t burn! This blog post shared how to make delicious cheesecake cups. We discussed key ingredients, like graham crackers and sweeteners, to create a tasty crust. I guided you through step-by-step instructions for preparing the filling and assembling the cups. You also learned tips to achieve the perfect texture and common mistakes to avoid. Don’t forget the fun variations that add seasonal flair! Try out these cheesecake cups for your next gathering or treat. Enjoy the sweet flavors and easy steps as you create your own tasty masterpiece.

No-Bake S’mores Cheesecake Cups Easy and Delicious Treat

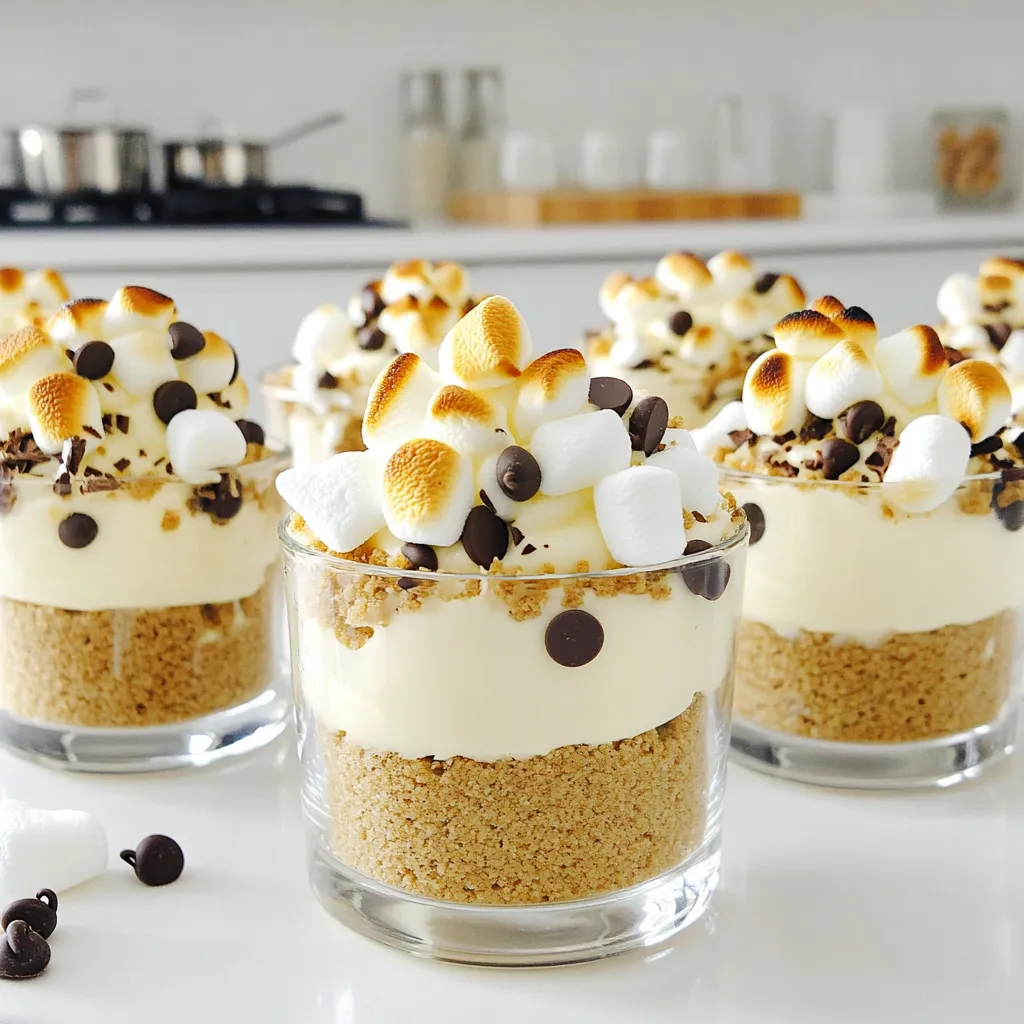
Get ready to indulge in a sweet treat with my No-Bake S’mores Cheesecake Cups! These easy, creamy, and delicious cups

To make the best apple butter coffee cake, you need simple ingredients. Each one plays an important role in flavor and texture. Here’s a list of what you'll need: - 2 cups all-purpose flour - 1 cup sugar - 1/2 teaspoon salt - 1 tablespoon baking powder - 1/2 teaspoon baking soda - 1/2 cup unsalted butter, softened - 2 large eggs - 1/2 cup sour cream - 1/2 cup apple butter - 1 teaspoon vanilla extract - 1 teaspoon cinnamon - 1/2 cup chopped walnuts (optional) - 1/4 cup brown sugar (for topping) Each ingredient has a purpose. The flour gives the cake structure. Sugar adds sweetness, while salt brings out the flavors. Baking powder and baking soda help the cake rise. The butter keeps it moist. Eggs add richness, and sour cream gives it a nice tang. Apple butter is the star here, giving the cake its unique flavor. Vanilla extract adds warmth. Cinnamon makes it cozy and inviting. You can add walnuts for crunch, but it’s not a must. Brown sugar on top creates a sweet crust. Gather these items, and you're ready to bake a delicious treat! Start by preheating your oven to 350°F (175°C). This step warms the oven for even baking. Next, take a 9x13 inch baking dish and grease it well. You can use butter or cooking spray. This keeps the cake from sticking. In a large bowl, combine the dry ingredients. Use 2 cups of all-purpose flour, 1 cup of sugar, 1/2 teaspoon of salt, 1 tablespoon of baking powder, and 1/2 teaspoon of baking soda. Whisk them together until they blend smoothly. This helps the cake rise nicely. In another bowl, beat 2 large eggs. Then, add 1/2 cup of sour cream, 1/2 cup of apple butter, and 1 teaspoon of vanilla extract. Mix these until they are smooth. This mixture adds moisture and flavor to your cake. Pour the wet mixture into the dry ingredients. Gently mix until just combined. Be careful not to overmix; some lumps are okay. If you like, fold in 1/2 cup of chopped walnuts for added crunch. Next, pour the batter into your greased dish and spread it evenly. In a small bowl, mix 1/4 cup of brown sugar with 1 teaspoon of cinnamon. Sprinkle this topping evenly over the batter. Now, bake your coffee cake for 30-35 minutes. To check if it’s done, insert a toothpick in the center. If it comes out clean, your cake is ready. Let it cool for 10-15 minutes before cutting. Serve warm, and enjoy with coffee or tea! To make your coffee cake soft, use room temperature butter. This helps it mix well. You want a smooth batter, so don’t overmix. Mix just until you see no dry flour. This keeps the cake light and fluffy. Start with dry ingredients first. Whisk together flour, sugar, baking powder, and salt. This gets the leavening agents mixed well. When adding wet ingredients, mix them in a separate bowl. This helps them blend better. You can add chopped walnuts for crunch. This gives your cake a nice texture. If you want more spice, try adding nutmeg or more cinnamon. You could also mix in some raisins or diced apples for extra flavor. {{image_2}} You can make this cake gluten-free. Use a gluten-free flour blend instead of all-purpose flour. Many blends work well in baking. Look for one that includes xanthan gum. This helps your cake rise and hold shape. If you want a vegan version, swap eggs with flax eggs. Mix 1 tablespoon of flaxseed meal with 2.5 tablespoons of water. Let it sit for five minutes. For butter, use coconut oil or vegan butter. Replace sour cream with unsweetened applesauce or non-dairy yogurt. These swaps keep the cake moist and tasty. You can add fun flavors to your cake. Try mixing in spices like nutmeg or ginger. They add warmth and depth. You can also toss in fruits like chopped apples or pears. Dried fruits like raisins or cranberries work too. Each option gives a new twist to the classic recipe. To keep your apple butter coffee cake fresh, store it in an airtight container. This helps to keep moisture in and prevents it from drying out. You can leave it at room temperature for up to three days. If you want to keep it longer, refrigerate it. It will last for about a week in the fridge. You can freeze the coffee cake to enjoy later. First, let it cool completely. Then, wrap it tightly in plastic wrap. After that, place it in a freezer bag or an airtight container. This will keep it fresh for up to three months. When you are ready to eat it, just thaw it in the fridge overnight. To reheat the coffee cake, slice it into pieces. You can use the microwave for quick reheating. Heat a slice for about 20-30 seconds. If you prefer a warm, crispy top, use the oven. Preheat it to 350°F (175°C) and bake for about 10 minutes. Enjoy it warm, paired with your favorite coffee or tea! You can use mashed apples or applesauce. Both options give a similar sweet taste. If you want a unique twist, try pumpkin puree. It adds a nice flavor and keeps the cake moist. Yes, you can use whole wheat flour for a heartier texture. Just keep in mind it might change the cake's flavor. Gluten-free flour is also an option. Make sure it has a 1:1 ratio for best results. Check for doneness with a toothpick. Insert it into the center of the cake. If it comes out clean, the cake is ready. You can also gently press the top; it should spring back. Absolutely! You can mix the batter and store it in the fridge overnight. Just bake it fresh in the morning. If the cake cools, you can keep it covered for a day or two. Serve it warm with coffee or tea for the best experience. You can also add whipped cream or a scoop of ice cream. A sprinkle of powdered sugar enhances the look and taste. This article covers how to make a delicious apple butter coffee cake. We explored key ingredients, step-by-step baking instructions, helpful tips for the best texture, and fun variations. You also learned how to store and reheat your cake to keep it fresh. Baking is an art that brings joy. Creating this cake lets you enjoy that joy. Follow these tips to make your cake tasty and unique every time. Enjoy the process and share your creations with others!

Apple Butter Coffee Cake Delightful Weekend Recipe

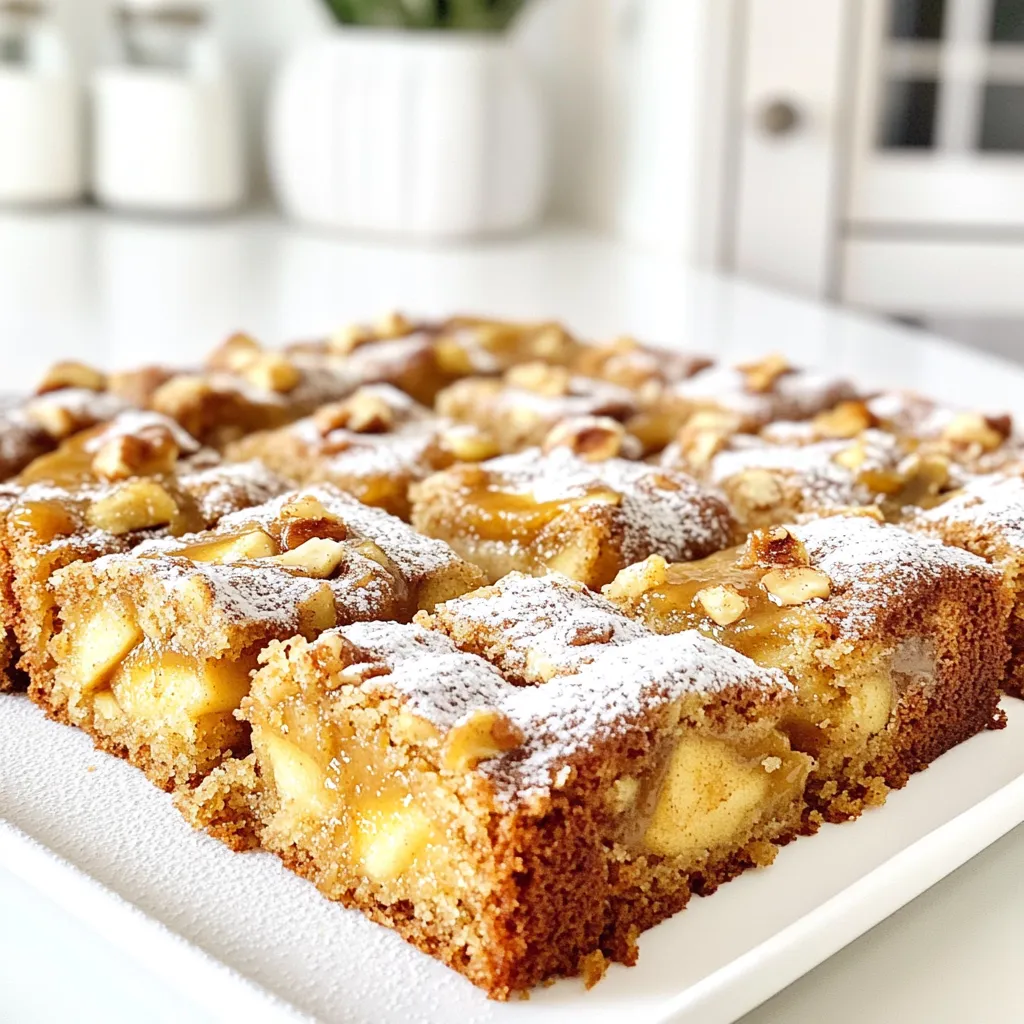
Are you ready to make your weekends sweeter? This Apple Butter Coffee Cake is a cozy treat that’s perfect for

- 1 pound beef chuck - 1 cup pearl barley - 8 ounces cremini mushrooms - 2 tablespoons olive oil - 1 large onion, chopped - 2 carrots, diced - 2 celery stalks, diced - 4 cloves garlic, minced - 1 teaspoon dried thyme - 1 teaspoon dried rosemary - Salt and pepper to taste - 2 tablespoons soy sauce - Fresh parsley, chopped - Crusty bread When I make Slow Cooker Beef Barley Mushroom Soup, I start with high-quality beef chuck. The beef adds rich flavor and a hearty texture. Cut it into small cubes, about one inch. This size helps the meat cook evenly and tenderly. Next, I add pearl barley. It cooks well and gives a nice chew to the soup. Rinse it before using to remove any dust. Cremini mushrooms are my favorite for this recipe. Their earthy flavor enhances the broth. For the base, I use a large onion, two carrots, and two celery stalks. I chop them finely. This mix gives the soup a sweet and savory depth. I also include garlic, thyme, and rosemary to layer in more flavor. Lastly, I season with salt, pepper, and soy sauce. The soy sauce adds a touch of umami, making the soup even more satisfying. For garnishing, I always have fresh parsley on hand. It brightens the dish and adds a pop of color. I love to serve this soup with crusty bread on the side. Dipping the bread into the warm soup is a treat! To start, heat two tablespoons of olive oil in a large skillet over medium-high heat. Add one pound of beef chuck cut into 1-inch cubes. Brown the beef on all sides for about 5-7 minutes. This step builds flavor and gives the beef a nice crust. Once browned, transfer the beef to the slow cooker. Next, in the same skillet, add one chopped large onion, two diced carrots, and two diced celery stalks. Also, add 8 ounces of sliced cremini mushrooms. Sauté these veggies for about 5 minutes. You want them to soften but not fully cook. After that, stir in four minced garlic cloves and cook for one more minute. Then, transfer this veggie mix to the slow cooker. Now it's time to bring everything together. Add one cup of rinsed pearl barley to the slow cooker along with 6 cups of beef broth. Pour in two tablespoons of soy sauce, and sprinkle in one teaspoon of dried thyme and one teaspoon of dried rosemary. Season with salt and pepper to taste. Mix all the ingredients well. Finally, cover the slow cooker and set it to cook on low for 6-8 hours or on high for 3-4 hours. The goal is to have tender beef and perfectly cooked barley. To get the best flavor, taste your soup as it cooks. You can adjust the seasonings easily. If it needs more salt, add a pinch. If you like a richer taste, add a bit more soy sauce. Cooking time matters, too. For tender beef, cook it on low for 6-8 hours. If you’re in a hurry, high for 3-4 hours works well. The beef should be fork-tender when done. You can prep ingredients the night before. Store the chopped veggies in the fridge. Keep the beef and broth separate until you’re ready to cook. This helps save time on busy days. For quick meal prep, rinse the barley and measure out your spices ahead. This way, you can toss everything into the slow cooker without fuss. Serve your soup in big, rustic bowls. It looks great and feels cozy. Pair it with crusty bread for dipping. A fresh salad can also balance the meal. For a nice touch, sprinkle parsley on top before serving. This adds color and a fresh taste. Enjoy your soup with family or friends for a warm, inviting meal! {{image_2}} You can change the meat in this soup. Try using chicken or turkey. Both give nice flavors. If you want a vegetarian option, use vegetable broth instead of beef broth. This keeps the taste rich without meat. Want to make your soup even better? Add more vegetables! Spinach or peas work great. They add color and nutrients. You can also boost the flavor with red wine or Worcestershire sauce. Just a little can make a big difference! Garnishing adds a nice touch to your soup. Try cheese or crunchy croutons on top. They give a fun texture. You can also serve it with crusty bread. It’s perfect for dipping and makes the meal heartier! To store your soup in the fridge, let it cool first. Place it in an airtight container. It will stay fresh for about three to four days. If you want to enjoy it later, refrigerate it right after cooling. This keeps the flavors intact and safe to eat. Freezing the soup is a great option. Use freezer-safe containers or bags. Make sure to leave some space for expansion. Your soup can last up to three months in the freezer. When you're ready to enjoy it, thaw it overnight in the fridge. For reheating, pour the soup into a pot and heat until warm. You can also use the microwave, stirring every few minutes. Leftover soup is so versatile. You can use it in many ways. Try adding it to pasta for a hearty dish. Mix it with rice for a filling meal. You can even use it as a base for a stew. The options are endless! Get creative and enjoy your leftovers in new ways. Yes, you can make this soup in an Instant Pot. Here’s how: 1. Use the “Sauté” function to brown the beef cubes in olive oil. 2. Add the chopped onion, carrots, celery, and mushrooms. Sauté for 5 minutes. 3. Stir in the minced garlic and cook for another minute. 4. Add the rinsed pearl barley, beef broth, soy sauce, dried thyme, and rosemary. 5. Season with salt and pepper. 6. Close the lid and set the valve to sealing. Cook on “Manual” for 35 minutes. 7. Let it release naturally for 10 minutes, then quick release any remaining pressure. This method gives you tender beef and perfectly cooked barley. To thicken the soup, you have a few options: - Cornstarch Slurry: Mix 1 tablespoon of cornstarch with 2 tablespoons of water. Stir it into the soup and cook on high for 15 minutes. - Puree Some Soup: Take a cup of soup, blend it until smooth, then stir it back in. - Add More Barley: Stir in a bit more barley during the last hour of cooking. It will absorb liquid and thicken the soup. These methods enhance the texture and make the soup heartier. This recipe is not gluten-free due to the pearl barley. However, you can make it gluten-free. Here are some suggestions: - Use Quinoa: Substitute pearl barley with quinoa for a gluten-free grain. - Use Rice: Brown or white rice can also work well. Just adjust the cooking time. - Gluten-Free Barley: Look for gluten-free barley options available in stores. These swaps keep the soup tasty while catering to gluten-free diets. This blog covered a rich soup recipe with beef, barley, and fresh veggies. You learned step-by-step how to make it in a slow cooker. I shared tips for perfecting flavor and efficient meal prep. Plus, we explored variations like using chicken or a vegetarian broth. This soup can be stored or frozen for later meals. Enjoy experimenting with garnishes and serving styles. I hope you find joy in making and sharing this dish.

Savory Slow Cooker Beef Barley Mushroom Soup Recipe

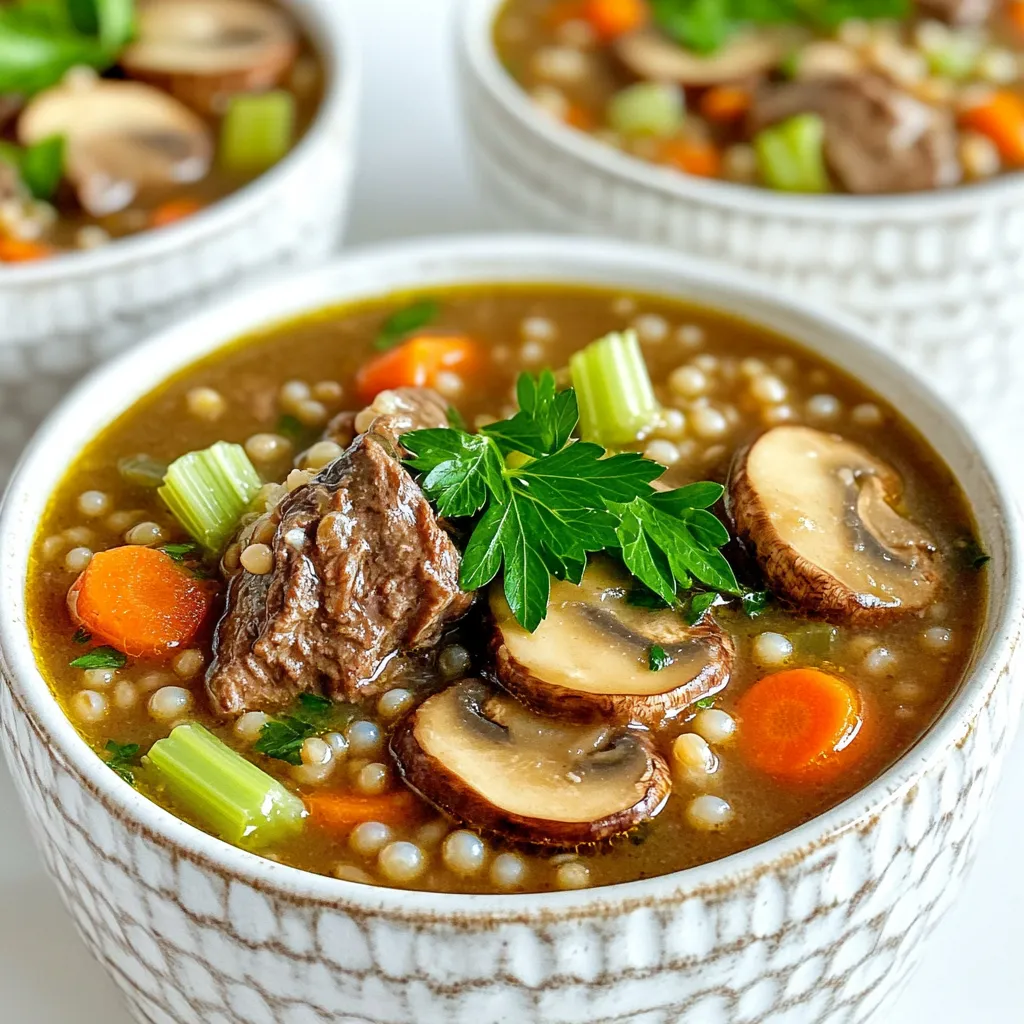
Are you ready to warm up your kitchen with a delicious meal? This Savory Slow Cooker Beef Barley Mushroom Soup

- 1 pound chicken tenderloins - 1 cup buttermilk (or milk with 1 tablespoon lemon juice added) - 1 cup all-purpose flour - 1 teaspoon garlic powder - 1 teaspoon onion powder - 1 teaspoon smoked paprika - 1/2 teaspoon cayenne pepper (adjust for spice level) - Salt and pepper to taste - 1/2 cup buffalo sauce (plus extra for tossing after cooking) - 2 tablespoons olive oil - Fresh parsley, chopped (for garnish) You can swap buttermilk with regular milk mixed with lemon juice for a similar taste. If you want a gluten-free option, use almond flour or a gluten-free flour blend. For spice lovers, try adding more cayenne. If you need a milder flavor, reduce the cayenne or skip it altogether. When buying chicken tenderloins, look for ones that are plump and pale pink. Avoid any that appear gray or have a strong smell. Always check the expiration date. Fresh chicken should feel firm to the touch, and the skin should be smooth and free of blemishes. If possible, buy organic or free-range chicken for better flavor and quality. First, take 1 pound of chicken tenderloins. Place them in a large bowl. Pour 1 cup of buttermilk over the chicken. This helps make the chicken tender and tasty. Cover the bowl and put it in the fridge for at least 30 minutes. You can marinate it for up to 2 hours if you want more flavor. While the chicken marinates, get another bowl. In this bowl, mix together 1 cup of all-purpose flour, 1 teaspoon of garlic powder, 1 teaspoon of onion powder, 1 teaspoon of smoked paprika, and 1/2 teaspoon of cayenne pepper. Add salt and pepper to taste. Stir this well. This coating gives the chicken a nice crunch and flavor. When your chicken is ready, take it out of the fridge. Let the extra buttermilk drip off. Dredge each chicken tender in the flour mix. Make sure they are well-coated, then shake off the excess flour. Preheat your air fryer to 400°F (200°C) for about 5 minutes. Lightly spray the air fryer basket with cooking spray or brush it with olive oil. Arrange the chicken tenders in a single layer. Do not overcrowd them. Lightly spray the tops with olive oil for extra crispiness. Cook for 10-12 minutes, flipping halfway. The chicken should be golden brown and reach 165°F (74°C) inside. I recommend cooking the buffalo chicken tenders at 400°F (200°C). This high heat ensures they cook quickly and get crispy outside while staying juicy inside. Preheating your air fryer for about 5 minutes helps it reach the right temperature. The cooking time is between 10 and 12 minutes. I suggest flipping the tenders halfway through. This helps them cook evenly and brown nicely. If you want a crunchier texture, you can air fry them for the full 12 minutes. To check if the tenders are done, use a meat thermometer. The internal temperature should reach 165°F (74°C). If you don’t have a thermometer, cut one tender in the thickest part. The meat should be white and juices should run clear. This ensures they are safe to eat. {{image_2}} To get that perfect crunch, follow these tips: - Marinate well: Soak your chicken in buttermilk. This helps the meat stay moist and tasty. - Use flour blend: Mix all-purpose flour with spices. It adds flavor and crunch. - Spray lightly: After coating, spray the tops with olive oil. This makes them crisp in the air fryer. - Avoid overcrowding: Place tenders in a single layer. Give them space to cook evenly. Be careful with these common errors: - Skipping the marinade: Don’t rush. Marinate the chicken for at least 30 minutes. This step adds flavor and tenderness. - Too much flour: Coat the chicken but shake off extra flour. Excess can lead to a soggy texture. - Not preheating: Always preheat your air fryer. This makes a big difference in cooking time and texture. - Neglecting to flip: Flip the tenders halfway through cooking. This ensures they brown evenly on both sides. Serve your Buffalo chicken tenders with style: - Dipping sauces: Pair with ranch or blue cheese dressing. The cool dip balances the spice. - Fresh veggies: Add crunchy celery sticks on the side. They make a great contrast to the tenders. - Garnish: Sprinkle chopped parsley on top. It adds color and freshness. - Presentation: Arrange on a wooden board or in small bowls. This adds a fun, casual vibe for gatherings. You can easily change the taste of your buffalo chicken tenders by using different sauces. Try a honey buffalo sauce for a sweet kick. If you love heat, a ghost pepper sauce will make your tenders fiery. For a milder option, use a garlic buffalo sauce. Mixing sauces can also create unique flavors. Just remember, the base is always buffalo sauce. If you want a lighter meal, consider baking instead of air frying. You can also use whole wheat flour or almond flour for the coating. For a lower calorie option, skip the breading entirely and marinate the chicken in buffalo sauce. You can even grill the chicken for a smoky flavor. These choices keep the taste while reducing calories and carbs. Buffalo chicken tenders pair well with classic sides. Serve them with celery sticks and carrots for crunch. A creamy ranch or blue cheese dressing adds rich flavor. For a heartier meal, serve the tenders with a side salad or sweet potato fries. You can even make a buffalo chicken wrap with lettuce and your favorite toppings. Each pairing amplifies the flavor and makes the meal more fun. Yes, you can use frozen chicken tenders. However, I recommend thawing them first. This helps the coating stick better. If you choose to air fry them frozen, add a few extra minutes to the cooking time. This way, they will cook through and stay crispy. To store leftovers, let the tenders cool down. Place them in an airtight container. Store them in the fridge for up to three days. When you want to eat them again, reheat in the air fryer for extra crispiness. Avoid using the microwave, as it can make them soggy. Yes, you can bake these chicken tenders. Preheat your oven to 425°F (220°C). Place the coated tenders on a baking tray lined with parchment paper. Bake for about 20-25 minutes, flipping halfway through. This method will yield good results, but they may not be as crispy as air-fried ones. This post covered how to make great buffalo chicken tenders. We talked about key ingredients, cooking steps, and tips for the best results. Remember to marinate your chicken and use quality ingredients for flavor. Don’t skip the tips for crispiness and checking doneness to avoid mistakes. Explore various flavors and healthier options for a fun twist. Whether you air fry or bake, these tenders can suit your taste. Enjoy making this easy dish and impress your friends and family!

Buffalo Chicken Tenders Air Fryer Delicious Recipe

Are you ready to spice up your dinner? These Buffalo Chicken Tenders made in an air fryer are a game

- 4 large russet potatoes, peeled and diced - 1 medium onion, chopped - 3 cloves garlic, minced - 4 cups vegetable broth - 1 cup heavy cream or coconut cream - 1 cup shredded cheddar cheese, plus extra for topping - 1/2 cup sour cream or Greek yogurt - 1 teaspoon smoked paprika - Salt and pepper to taste - Optional toppings: 6 slices cooked turkey bacon, crumbled, green onions, fresh parsley To make this loaded baked potato soup, gather these fresh ingredients. Start with russet potatoes. They add a nice texture. Chop a medium onion and mince three cloves of garlic. These will give the soup a great base flavor. Next, pour in four cups of vegetable broth. This adds depth to your soup. For creaminess, use one cup of either heavy cream or coconut cream. If you want a lighter option, go for Greek yogurt instead of sour cream. You need one cup of shredded cheddar cheese for that cheesy goodness. Add some smoked paprika for a smoky hint. Don’t forget to season with salt and pepper. Finally, for optional toppings, crumbled turkey bacon, sliced green onions, and fresh parsley can elevate your soup. These add flavor and a nice look to your dish. Enjoy the process of gathering these ingredients. They will come together to create a warm and comforting meal. - First, peel and dice 4 large russet potatoes. - Next, chop 1 medium onion and mince 3 cloves of garlic. - In your slow cooker, combine the diced potatoes, onion, garlic, and 4 cups of vegetable broth. - Stir well to mix all the ingredients evenly. - Set your slow cooker to low for 6 to 8 hours. - If you're short on time, set it to high for 4 hours. - The goal is to cook until the potatoes are tender and easy to mash. - Once cooked, use a potato masher or an immersion blender. - Mash the potatoes slightly for a creamy texture. - Leave some chunks for extra bite if you like. - Mix in 1 cup of heavy cream or coconut cream, 1 cup of shredded cheddar cheese, and 1 teaspoon of smoked paprika. - Add salt and pepper to taste. - Stir until the cheese is melted and well blended. - Let the soup simmer on low for an extra 30 minutes to meld all the flavors together. To make your Loaded Baked Potato Soup even tastier, add some spices. I love using smoked paprika; it gives a nice depth. You can also try garlic powder or onion powder for more flavor. When it comes to cheese, cheddar is a classic choice. But you can mix it up! Try using pepper jack for a kick or gouda for a smoky taste. Mashing the potatoes is key to getting the right texture. Use a potato masher for a chunky feel. If you like it creamier, an immersion blender works great, too. Just blend a bit, and leave some chunks for fun. If your soup needs more creaminess, add extra broth or cream. A splash of broth can lighten it up, while more cream will make it richer. Garnishing makes your soup look special. Top it with a dollop of sour cream or Greek yogurt. Extra cheese and crumbled turkey bacon add a great touch too. For serving, consider using bowls that keep the soup warm. Add some fresh parsley or sliced green onions on top for color. A sprinkle of these makes the soup pop on the table! {{image_2}} You can make this soup dairy-free without losing creaminess. For heavy cream, use coconut cream. It adds a rich flavor. For sour cream, try using cashew cream or Greek yogurt. Both give a great taste and texture. If cheese is a must, look for vegan cheese. It melts well and keeps the dish nice and cheesy. Want to add some protein? You can mix in cooked chicken or chopped ham. Both make the soup heartier. If you prefer a plant-based option, try adding lentils or beans. They add protein and fiber. You can easily boost the nutrition without losing flavor. If you love heat, add jalapeños or chili powder. Both bring a nice kick to the soup. You can also try adding hot sauce to your serving. For more depth, consider smoked paprika. It adds warmth without too much spice. Adjust the heat to your taste, and enjoy a spicy twist! To keep your Loaded Baked Potato Soup fresh, follow these tips: - Refrigeration: Cool the soup first. Place it in an airtight container. It can last for up to 3 days in the fridge. - Freezing: For longer storage, freeze the soup. Use a freezer-safe container or a heavy-duty freezer bag. Leave some space at the top, as soup expands when frozen. You can freeze it for up to 3 months. When it’s time to enjoy your leftovers, here’s how to reheat without losing flavor: - Microwave: Pour a bowl of soup. Heat in short bursts, stirring in between. This helps it heat evenly. - Stovetop: Pour the soup into a pot. Heat on low, stirring often. This method keeps the soup creamy. - Avoiding Changes: If you find the soup too thick, add a splash of broth or water. Stir well to bring back its creamy texture. Yes, you can make this soup ahead of time. Just cook it fully, let it cool, then store it in the fridge. It stays fresh for about three days. To reheat, warm it on the stove or in the microwave. Stir well to keep the texture right. The flavors may deepen overnight. This makes it even tastier! This soup pairs well with various side dishes. Here are some tasty options: - A crisp green salad adds freshness. - Garlic bread or cheesy breadsticks bring a nice crunch. - Steamed broccoli or roasted veggies make a great side. - Grilled cheese sandwiches are a classic combo. These sides enhance the meal and add variety. If your soup needs thickening, there are simple ways to do it. Here are some methods: - Mash more potatoes during cooking for added thickness. - Stir in a slurry of cornstarch and water. - Add extra cheese to boost creaminess. - Mix in some instant potato flakes for quick results. These techniques help you achieve the perfect soup texture. This loaded baked potato soup is both comforting and easy to make. We explored the key ingredients, from russet potatoes to smoked paprika. The step-by-step instructions guide you through cooking it perfectly in a slow cooker. You can also add your favorite spices and toppings for extra flavor. With simple variations and storage tips, this soup remains a winner. You can enjoy it fresh or as leftovers. Remember, cooking should bring joy, so get creative with this delicious recipe. It’s a comforting dish that warms both body and soul.

Loaded Baked Potato Soup Slow Cooker Creamy Delight

If you’re craving comfort food, Loaded Baked Potato Soup is the perfect choice! It’s creamy, warm, and full of delicious

To make garlic herb flatbread, you need: - 2 cups all-purpose flour - 1 teaspoon instant yeast - 1 teaspoon salt - 1 tablespoon olive oil - 3/4 cup warm water (110°F) - 4 cloves garlic, minced - 1 tablespoon fresh rosemary, chopped - 1 tablespoon fresh thyme, chopped - 1 tablespoon fresh parsley, chopped - Extra olive oil for brushing - Sea salt for sprinkling For the best results, stick to the measurements above. You can change the flour. Use whole wheat flour for a nutty flavor. If you lack instant yeast, use active dry yeast. Just make sure to activate it first in warm water. If you don’t have fresh herbs, use dried ones. Use about one teaspoon of each dried herb to replace fresh ones. Fresh herbs make a big difference in flavor. Rosemary brings a warm, earthy taste. Thyme adds a hint of freshness. Parsley gives a nice, bright finish. If you can't find these fresh herbs, grow your own. They are easy to care for and add great taste to many dishes. You can also explore other herbs like basil or oregano for different flavors. These small changes can make your flatbread feel like a new dish each time! To start, grab a mixing bowl. Add 2 cups of all-purpose flour, 1 teaspoon of instant yeast, and 1 teaspoon of salt. Stir these dry ingredients well. Next, make a small well in the center. Pour in 1 tablespoon of olive oil and 3/4 cup of warm water. The water should be about 110°F. Mix until a rough dough forms. Now, turn the dough out onto a floured surface. Knead it for 5 to 7 minutes. You want it to be smooth and elastic. This step is key for good texture. Once your dough is ready, place it in a lightly oiled bowl. Cover the bowl with a cloth. Now, let it rise in a warm spot for about 1 hour. You want the dough to double in size. This makes the flatbread light and fluffy. After the dough has risen, preheat your oven to 475°F (245°C). Next, punch down the dough gently. Divide it into 4 equal pieces. Roll each piece into a ball. On a floured surface, roll out each ball. Make it into a rectangle or oval shape, about 1/4 inch thick. In a small bowl, mix 4 cloves of minced garlic with 1 tablespoon each of chopped rosemary, thyme, and parsley. Spread this herb mixture evenly over each flatbread. Brush each flatbread lightly with olive oil and sprinkle some sea salt on top. Place them on a baking sheet lined with parchment paper. Bake for 8 to 10 minutes, until they are golden brown. When they’re done, remove the flatbreads from the oven. Let them cool slightly before serving. Enjoy them warm with dips or as a side! To make great flatbread, follow these tips: - Use fresh herbs for strong flavor. - Measure flour accurately using a spoon and level. - Knead the dough until smooth; this helps the rise. - Keep your oven hot at 475°F for a good bake. - Use parchment paper to prevent sticking. Avoid these common errors: - Don’t skip the rising time; it makes the bread light. - Don’t use cold water; warm water helps the yeast. - Avoid overworking the dough; it can become tough. - Don’t crowd the flatbreads on the baking sheet; give them space. To get the best texture: - Roll out the dough evenly to about 1/4 inch thick. - Aim for a soft and slightly chewy flatbread. - Brush with olive oil before baking for a crispy crust. - Bake until just golden; too long will dry them out. {{image_2}} You can make garlic herb flatbread even better. Adding cheese is a great idea. Try mozzarella for a gooey texture or feta for a tangy twist. You can also sprinkle some red pepper flakes for heat. Mixing in spices like cumin or smoked paprika adds depth. Each change can make the flatbread unique. This flatbread pairs well with many dips. Hummus is a classic choice. It’s creamy and rich. You can also try tzatziki, which brings a cool touch. For something warm, serve it with spinach artichoke dip. These dips enhance the garlic flavor and add fun to your meal. You can switch herbs based on the season. In spring, use fresh basil or mint for a bright taste. In summer, try adding dill or cilantro for a fresh vibe. Fall is perfect for sage or oregano. Each herb brings its own flavor profile to the flatbread. Get creative and mix what you love! To keep your leftover flatbreads fresh, place them in an airtight container. You can also wrap them in plastic wrap or aluminum foil. Store them at room temperature for up to two days. If you want them to last longer, refrigerate them. Just make sure to wrap them well to prevent drying out. If you have extra flatbreads, freezing them is a great option. First, let them cool completely. Then, stack the flatbreads with parchment paper between each one. Wrap the stack tightly in plastic wrap, then place it in a freezer bag. They can last up to three months in the freezer. When you’re ready to enjoy them, just take them out and let them thaw in the fridge. Reheating flatbreads can bring back their fresh taste. For best results, preheat your oven to 350°F (175°C). Place the flatbreads on a baking sheet and cover them loosely with foil. Heat for about 5-7 minutes. This method keeps them soft and warm. You can also reheat them in a skillet over medium heat for a few minutes on each side. This gives them a nice crisp texture. Enjoy your flatbreads warm! Yes, you can use whole wheat flour. It adds a nutty flavor and more fiber. Start with 1 cup of whole wheat flour and 1 cup of all-purpose flour. This mix keeps the flatbread light but adds health benefits. You can use dried herbs if you don’t have fresh ones. Use about one teaspoon of dried herbs for each tablespoon of fresh herbs. Dried parsley, thyme, or oregano work well. Just remember that dried herbs taste stronger, so adjust to your liking. Homemade flatbread lasts about three days at room temperature. Store it in a sealed bag to keep it fresh. You can also freeze it for up to three months. Just wrap it well in plastic wrap before freezing. This blog post walks you through making perfect flatbreads. You learned about key ingredients, measurements, and special herbs. The step-by-step guide detailed how to prepare, rise, and bake the dough. Tips shared best practices and common mistakes to avoid. You can also explore tasty variations and great dips. Finally, I provided storage tips for leftovers and answers to common questions. Enjoy making your flatbreads and experiment with flavors. You’ll love the results!

Garlic Herb Flatbread Flavorful and Easy Recipe

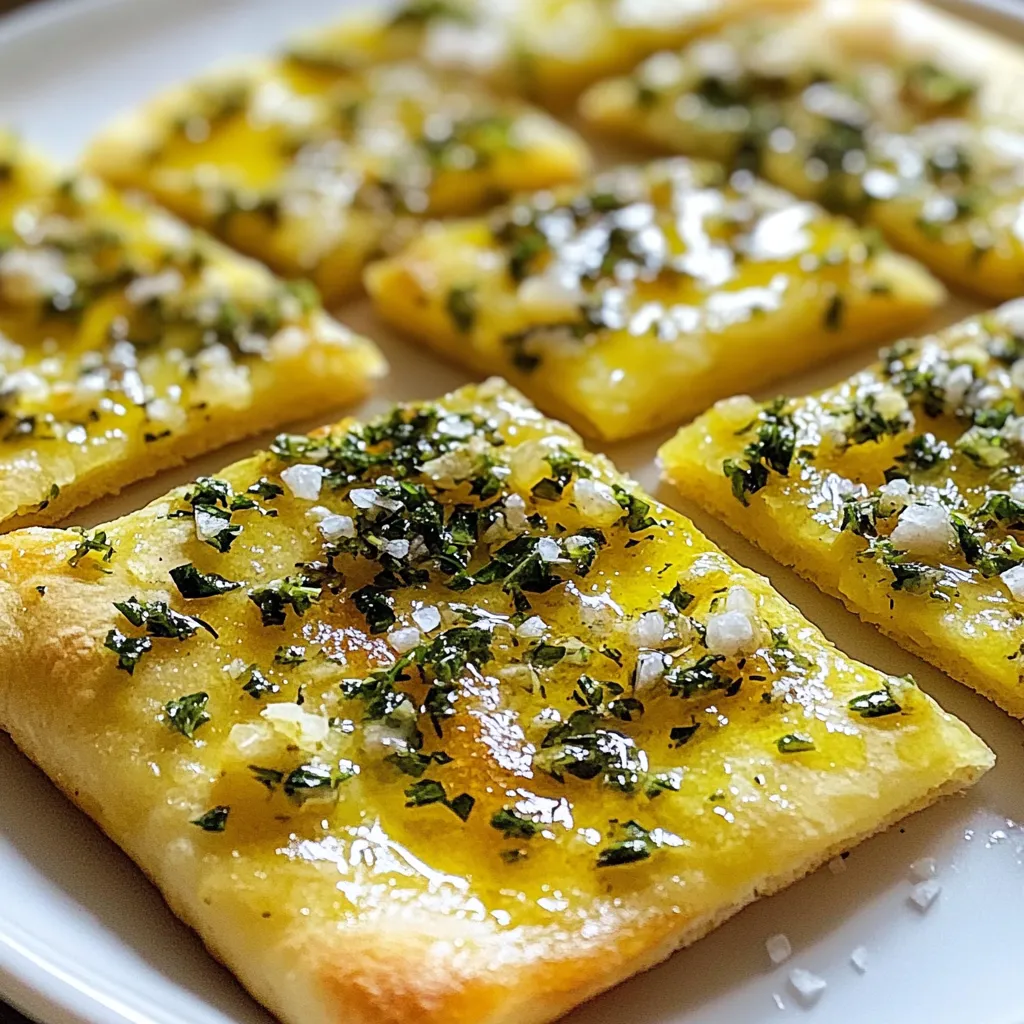
Are you ready to impress your friends and family with a delicious Garlic Herb Flatbread? This easy recipe brings the

To make pumpkin chocolate chip blondies, gather these key ingredients: - 1 cup pumpkin puree - 1/2 cup unsalted butter, melted - 1 cup brown sugar - 1/2 cup granulated sugar - 2 large eggs - 1 teaspoon vanilla extract - 1 1/2 cups all-purpose flour - 1 teaspoon baking powder - 1/2 teaspoon baking soda - 1/2 teaspoon salt - 1 teaspoon ground cinnamon - 1/2 teaspoon ground nutmeg - 1 cup semi-sweet chocolate chips These ingredients blend together to create a rich, moist treat. If you have dietary needs, these swaps work well: - Butter: Use coconut oil or dairy-free butter for a vegan version. - Eggs: Replace each egg with 1/4 cup of applesauce or a flax egg. - Flour: Choose gluten-free flour for a gluten-free option. - Sugars: Use coconut sugar or a sugar substitute for a healthier option. These substitutions keep the flavor strong while meeting dietary needs. Selecting fresh and high-quality ingredients makes a big difference. Here are some tips: - Pumpkin Puree: Use canned puree without additives. Check for organic options. - Butter: Choose unsalted butter for better control of salt levels. - Chocolate Chips: Go for high-quality semi-sweet chips for the best taste. - Spices: Fresh spices enhance flavor. Check expiration dates for best results. Quality ingredients lead to better tasting blondies. Enjoy your baking! Start by preheating your oven to 350°F (175°C). This step is key for even baking. Next, take a 9x13-inch baking pan. You can grease it with butter or use parchment paper. Parchment makes it easy to lift out the blondies. In a large bowl, add the melted butter, pumpkin puree, brown sugar, and granulated sugar. Mix them well until fully combined. This blend creates a rich base for your blondies. Then, crack in two large eggs and add the vanilla extract. Stir until the mixture is smooth and creamy. This is the heart of your blondies! Grab another bowl and whisk together the flour, baking powder, baking soda, salt, cinnamon, and nutmeg. This step is important for even flavor and texture. Make sure there are no lumps in the dry mixture. Once done, you will have a fragrant blend that brings warmth to your blondies. Now, gradually mix the dry ingredients into the wet mixture. Use a spatula to fold gently. Be careful not to overmix; this keeps your blondies soft. After that, it’s time to add the semi-sweet chocolate chips. Fold them in until they are evenly distributed. You want every bite to have chocolate! Pour the batter into your prepared baking pan. Spread it out evenly for uniform baking. Place it in the preheated oven and bake for 25-30 minutes. To test for doneness, insert a toothpick into the center. It should come out clean, with just a few moist crumbs. Once baked, let the blondies cool in the pan for about 10 minutes. This makes cutting easier. Then, transfer them to a wire rack to cool completely. Enjoy your tasty treat! To get the best texture in your blondies, mix the wet and dry ingredients well. Do not overmix the batter. This keeps your blondies soft and chewy. The right balance of pumpkin puree and butter adds to the moistness. Make sure your butter is melted, but not too hot. This helps blend the sugars smoothly. To keep your blondies fresh, store them in an airtight container. This will prevent them from drying out. You can keep them at room temperature for up to three days. If you want to save them longer, put them in the fridge. Just remember to let them cool completely before storing. These blondies are great on their own, but you can make them even better. Serve them warm with a scoop of vanilla ice cream. The cold ice cream melts slightly on the warm blondies, creating a perfect treat. You can also add a drizzle of caramel sauce or a sprinkle of sea salt for an extra burst of flavor. Enjoy them with a warm cup of coffee or a fall-inspired chai tea to complete your cozy experience. {{image_2}} You can make these blondies even more fun by adding nuts or seeds. I love adding chopped walnuts or pecans. They add a nice crunch and flavor. You can also use sunflower seeds or pumpkin seeds for a twist. Just mix in about half a cup with the chocolate chips. You will enjoy the extra texture in every bite. If you want a spicy kick, try adding ground ginger or cloves. Both spices pair well with pumpkin. Just add one teaspoon of ground ginger or half a teaspoon of ground cloves to the dry mix. This change will give your blondies a warm and cozy taste. They will be perfect for chilly fall days. You can easily make these blondies gluten-free. Use a gluten-free flour blend instead of all-purpose flour. Look for blends that work well in baking. You may need to adjust the amount of baking powder slightly. Adding one teaspoon of xanthan gum can also help with the texture. This way, everyone can enjoy your delicious pumpkin chocolate chip blondies! You can store your pumpkin chocolate chip blondies at room temperature. Place them in an airtight container. This keeps them fresh for about three days. If you like them warm, just pop them in the microwave for a few seconds before serving. If you want them to last longer, refrigerate the blondies. Wrap them tightly in plastic wrap or foil. Place them in an airtight container to avoid drying out. They stay good in the fridge for up to a week. Chilling also enhances the flavors, making them even tastier! Freezing is a great option for long-term storage. Cut the blondies into squares. Wrap each piece in plastic wrap, then place them in a freezer bag. Squeeze out the air to prevent freezer burn. They can last up to three months in the freezer. When ready to eat, thaw them in the fridge or microwave for a quick treat. Yes, you can use fresh pumpkin. Just cook the pumpkin until soft. Then, mash it well. You need 1 cup of pumpkin puree. This will give your blondies a fresh taste. Just make sure to remove any excess water. Check the blondies at 25 minutes. Insert a toothpick in the center. If it comes out clean or with a few crumbs, they are done. If there’s wet batter, bake a bit longer. Keep an eye on them. Overbaking can make them dry. You can use applesauce as an egg substitute. Use 1/4 cup of unsweetened applesauce for each egg. This keeps the blondies moist. You can also use flaxseed meal. Mix 1 tablespoon of flaxseed with 2.5 tablespoons of water. Let it sit for a few minutes until it thickens. This blog post covered everything you need to make delicious blondies. We began with essential ingredients, exploring options for dietary needs. I shared tips on choosing quality items and detailed step-by-step baking instructions. You learned variations to try, smart storage tips, and answers to common questions. In short, baking blondies can be fun and easy. Experiment with flavors and enjoy your creation! Trust your skills and get baking today!

Pumpkin Chocolate Chip Blondies Delightful Fall Treat

Fall is here, and what better way to celebrate than with Pumpkin Chocolate Chip Blondies? These treats combine soft pumpkin

- 1 lb chicken breast, sliced into strips - 2 tablespoons Cajun seasoning - 2 tablespoons olive oil - 3 cups chicken broth - 8 oz fettuccine pasta - 1 cup heavy cream - 1 cup grated Parmesan cheese - 1 cup cherry tomatoes, halved - 2 cups fresh spinach - 2 cloves garlic, minced - Salt and pepper - Fresh parsley You need to gather your main ingredients first. Start with 1 pound of chicken breast. Slice it into strips for even cooking. Cajun seasoning brings the heat, so grab 2 tablespoons of that too. You will also need 2 tablespoons of olive oil for cooking. Next, get 3 cups of chicken broth. This broth is key for flavor and helps cook the pasta. You will need 8 ounces of fettuccine pasta for that classic Alfredo texture. For creaminess, have 1 cup of heavy cream and 1 cup of grated Parmesan cheese ready. The cheese adds a rich taste. Don’t forget 1 cup of cherry tomatoes, halved, for some sweetness. You will also need 2 cups of fresh spinach for color and nutrition. Lastly, grab 2 cloves of garlic, minced, for that delicious aroma. For seasoning, have salt and pepper to taste. Chop fresh parsley for a nice garnish. With all these ingredients, you are ready to create a Cajun Chicken Alfredo One Pot delight! - In a bowl, take the chicken strips. - Sprinkle Cajun seasoning over them. - Mix well to coat every piece. - Heat olive oil in a large pot. - Add the chicken strips to the pot. - Cook until they are browned, about 5-7 minutes. - Make sure they are cooked through. - Remove the chicken from the pot and set aside. - In the same pot, add minced garlic. - Sauté for about 1 minute until it smells good. - Pour in 3 cups of chicken broth and bring to a boil. - Add 8 oz of fettuccine pasta to the pot. - Cook the pasta according to package directions. - Stir occasionally until the pasta is al dente. - Lower the heat after the pasta cooks. - Stir in 1 cup of heavy cream. - Add 1 cup of grated Parmesan cheese. - Mix until it turns creamy and smooth. - Add the cooked chicken back to the pot. - Toss in 1 cup of halved cherry tomatoes. - Add 2 cups of fresh spinach. - Stir until the spinach wilts down, about 2-3 minutes. - Taste and add salt and pepper as needed. - Turn off the heat and let it sit for a few minutes. - To ensure chicken is cooked through, use a meat thermometer. Aim for 165°F. Cut into a piece to check for no pink inside. - For perfect pasta, cook the fettuccine until it is al dente. Stir often to prevent sticking. Follow the package instructions closely for timing. - Serve the dish in deep bowls for a nice look. Add fresh parsley on top for color. A sprinkle of extra Parmesan cheese makes it even better. - Pair this meal with a crisp green salad. A side of garlic bread also goes well. These options balance the rich flavors of the dish. {{image_2}} You can change up the protein in this dish. Try shrimp instead of chicken. Shrimp cooks quickly and adds a nice touch. If you want a vegetarian option, use tofu. Just make sure to press the tofu first. You can also swap out some vegetables. Instead of spinach, try kale or broccoli. They add great color and nutrients. You can even use bell peppers for a sweet crunch. Cherry tomatoes can be replaced with zucchini or mushrooms. These swaps keep the dish fresh and fun. Want to boost the flavor? Add more spices. A pinch of cayenne pepper can add heat. You can also mix in some Italian herbs like basil or thyme. This can give your dish a new twist. If you want creaminess, adjust the heavy cream. Add more for a richer sauce. For a lighter option, use half-and-half instead. You can even try a splash of lemon juice for brightness. Mixing in this tangy flavor can make your meal pop. After you enjoy your Cajun Chicken Alfredo, you will want to store any leftovers. For best results, place the dish in an airtight container. This keeps it fresh and tasty. Make sure to let it cool first before sealing it up. Store the container in the fridge. It will stay good for about 3 to 4 days. If you want to save some for later, you can freeze portions. Use freezer-safe bags or containers. Divide the dish into single servings. This makes it easy to grab a meal later. It can last in the freezer for about 2 to 3 months. Just remember to label the bags with the date. When it's time to enjoy your leftovers, you want them hot and tasty. For best results, reheat on the stove. Place the leftovers in a pan over low heat. Stir often to warm it evenly. If it looks dry, add a splash of chicken broth or cream. You can also use the microwave. Place the meal in a microwave-safe bowl. Cover it with a lid or a microwave-safe plate. Heat it in short bursts of 1 minute, checking in between. Stir after each minute to make sure it heats well. Following these tips will keep your Cajun Chicken Alfredo delicious, whether fresh or reheated! Yes, you can make this recipe gluten-free. Just swap the fettuccine pasta for gluten-free pasta. Many brands offer tasty options made from rice or corn. Check the package for cooking times, as they may differ from regular pasta. You can still enjoy all the creamy goodness and Cajun flavor. To spice it up, consider adding more Cajun seasoning. A pinch of cayenne pepper brings heat without overpowering the dish. You can also add diced jalapeños or red pepper flakes for extra spice. For a smoky touch, try some smoked paprika. Adjust based on your heat preference. Cajun Chicken Alfredo pairs well with a fresh side salad. A mix of greens, cherry tomatoes, and a light vinaigrette complements the dish. Garlic bread is another great choice; it soaks up the creamy sauce. If you want, serve it with steamed vegetables like broccoli or green beans for added nutrition. In this blog post, we explored a delicious Cajun Chicken Alfredo recipe. We covered key ingredients like chicken breast, Cajun seasoning, and fettuccine pasta. I shared step-by-step instructions for preparation, cooking, and assembly. You learned valuable tips for cooking and serving. We also discussed variations to fit your taste and storage methods for leftovers. Enjoy making this dish and impressing others with your cooking skills. Remember, cooking is fun and it's okay to experiment!

Cajun Chicken Alfredo One Pot Delight Tonight

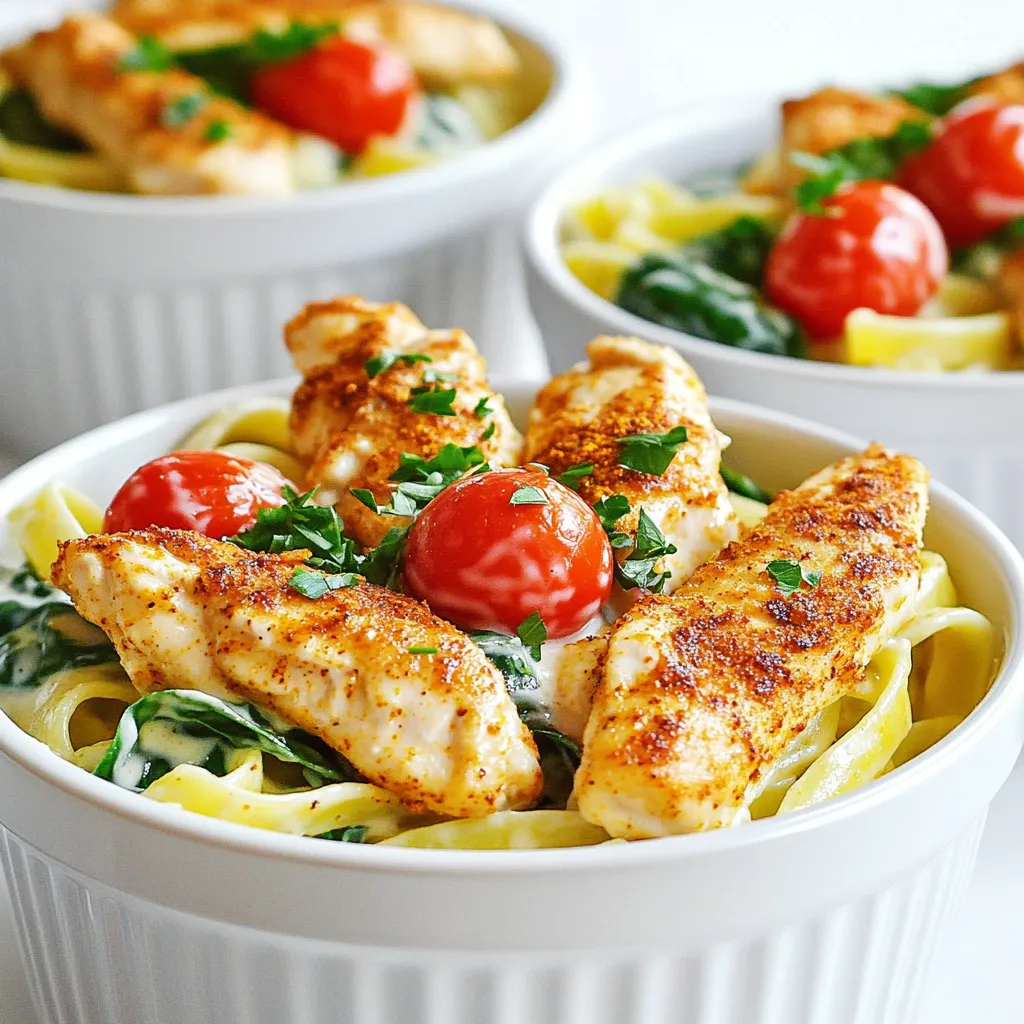
Are you ready for a creamy, spicy delight? This Cajun Chicken Alfredo One Pot recipe is perfect for dinner tonight!

Older posts
Newer posts
← Previous Page1 … Page4 Page5 Page6 … Page86 Next →

dsad

© 2026 Emmas Dish • Built with GeneratePress

Our Policies

  • Copyright Policy
  • Cookie Policy
  • GDPR Policy
  • Privacy Policy
  • Disclaimer
  • Terms Of Use

More Information

  • Home
  • About
  • Contact
  • Appetizers
  • Dessert
  • Dinner
  • Drinks
©2026, Emmas Dish About Back To Top