Skip to content
DisclaimerTerms Of UseGDPR PolicyCookie Policy

Emmas Dish

  • Home
  • Drinks
  • Appetizers
  • Dinner
  • Dessert
  • About
  • Contact
  • Privacy Policy
DisclaimerTerms Of UseGDPR PolicyCookie Policy

NO-ING-IMG

To make mulled apple cider with orange, gather these items: - 4 cups apple cider - 1 orange, zested and juiced - 4 whole cloves - 2 cinnamon sticks - 1 star anise - 1 tablespoon brown sugar (optional) - 1 teaspoon vanilla extract - 2 cups water - Fresh apple slices and orange wedges for garnish These ingredients create a warm, cozy drink perfect for cold days. You can add unique flavors to make this drink your own. Consider these options: - Fresh ginger slices for spice - A dash of nutmeg for warmth - Maple syrup instead of brown sugar for sweetness - Cranberry juice for a tart twist Feel free to mix and match based on what you like. If you need to adjust your recipe, here are some quick conversions: - Cups to Ounces: 1 cup = 8 ounces - Tablespoons to Teaspoons: 1 tablespoon = 3 teaspoons For substitutions, if you don't have specific spices, try these: - Use ground cinnamon instead of sticks (1 stick = 1/2 teaspoon ground) - Swap star anise for a pinch of anise seeds This way, you can still enjoy your mulled cider! To start, gather your ingredients. You will need apple cider and water. I use four cups of apple cider and two cups of water. 1. Take a medium saucepan and pour in the apple cider and water. 2. Place the saucepan on the stove over medium heat. 3. Stir the mixture gently to combine the liquids. This base is the heart of your drink. The water helps to balance the sweetness of the cider. Now it’s time to add the fun stuff! These spices bring warmth and flavor to your cider. 1. Zest and juice one orange. Add both to the saucepan. 2. Toss in four whole cloves, two cinnamon sticks, and one star anise. 3. If you like sweetness, add one tablespoon of brown sugar. 4. Don’t forget one teaspoon of vanilla extract for extra flavor. Stir the mix gently to help the sugar dissolve. These spices will create a cozy aroma in your kitchen. After your cider has simmered, it’s time to serve. 1. Let the cider simmer for about 20 minutes on low heat. This allows the flavors to blend well. 2. Taste your cider. If you want, add more brown sugar to adjust the sweetness. 3. Remove the saucepan from the heat and strain the cider to remove the spices. Now, pour the warm cider into mugs. For a pretty touch, garnish with fresh apple slices and orange wedges. This drink looks as good as it tastes! To make your mulled apple cider shine, focus on the spices. Fresh spices make a big difference. Use whole cloves and fresh cinnamon sticks for a richer taste. You can also add a pinch of nutmeg for depth. If you want more citrus, add lemon zest along with the orange. This gives a bright contrast to the sweetness. For sweetness, adjust the brown sugar to your taste. One common mistake is boiling the cider. Boiling can ruin the flavors and make it bitter. Always bring it to a simmer instead. Another mistake is not straining the spices before serving. Leaving them in can make the drink too strong. Make sure to taste the cider as it cooks. This helps you catch any flavors that need adjustment. Serve your mulled cider warm in cute mugs. Garnish with fresh apple slices and orange wedges for a fun touch. This not only looks great but adds extra flavor. You can even add a cinnamon stick to each mug for style. If you want to keep it warm, use a slow cooker on low heat. This way, your guests can enjoy refills throughout the night. {{image_2}} You can make mulled apple cider with or without alcohol. For a fun twist, add your favorite spirit. Bourbon or rum works well in the warm cider. Just stir in about a cup when the cider is done simmering. If you want a family-friendly drink, skip the alcohol. The spices and orange give it great flavor on their own. Feel free to customize your mulled cider with other fruits. Cranberries add a tart kick. Pears bring a sweet touch. You can also add spices like ginger or nutmeg for more warmth. Seasonal flavors make this drink even more special. Experiment with what you like best! If you want to change the sweetness, try different options. Maple syrup adds a unique taste. Honey gives a floral flavor, while agave syrup is a lighter choice. Adjust the sweetness to fit your taste. Always start with a little and add more as needed. This way, you make the cider just right for you! To store leftover cider, let it cool first. Use a clean glass jar or a bottle. Pour the cider into the jar, leaving some space at the top. Seal it tightly with a lid. Place the jar in the fridge. This keeps the cider fresh for later use. When you want to enjoy your cider again, take it out of the fridge. Pour the cider into a saucepan. Heat it slowly on low to medium heat. Stir it gently until it warms up. Avoid boiling; you want it hot, not bubbling. This keeps the flavors just right. The cider lasts about a week in the fridge. If you want to keep it longer, you can freeze it. Pour the cider into freezer-safe containers. Leave some space at the top, as liquids expand when frozen. It can last up to three months in the freezer. When ready to drink, thaw it in the fridge overnight. Then, reheat it gently as before. Enjoy the cozy flavors anytime! Yes, you can make mulled cider in a slow cooker. Just combine all your ingredients in the slow cooker. Set it to low heat for about two to three hours. This method gives the flavors time to mix well. It also fills your home with a cozy scent. You can keep mulled apple cider for about three to five days. Store it in an airtight container in the fridge. If you want to keep it longer, freeze it in a safe container. Just make sure to leave some space as it will expand when frozen. Mulled apple cider with orange is not just tasty; it has health benefits too. Apples are rich in fiber and vitamin C. They help boost your immune system. Oranges also add vitamin C and antioxidants. Spices like cinnamon can help regulate blood sugar levels. This drink can warm you up and soothe your throat during cold days. This blog post covers ingredients, preparation, and storage of mulled cider. You can personalize your drink and avoid common mistakes. Try different variations for a unique flavor. Remember, store leftovers wisely and follow the reheating tips. I hope this guide makes your cider-making journey easier. Enjoy creating and sharing this warm drink with friends and family. Making mulled cider can bring joy to any gathering. So, go ahead and experiment with flavors. Happy brewing!

Mulled Apple Cider with Orange Festive Flavor Drink

As the chill of fall settles in, nothing warms the soul like a cup of mulled apple cider. This festive

To make Caramel Apple Overnight Oats, gather these items: - 1 cup rolled oats - 1 ½ cups almond milk (or any milk of choice) - 1 medium apple, diced (try Fuji or Honeycrisp) - 2 tablespoons caramel sauce (plus extra for drizzling) - 1 tablespoon chia seeds - 1 teaspoon ground cinnamon - 1 tablespoon maple syrup (add for extra sweetness) - Pinch of salt - Chopped nuts (like pecans or walnuts) for topping You can swap or add these for fun: - Use coconut milk for a tropical twist. - Try different fruits like bananas or berries. - Add a scoop of protein powder for extra energy. Finish it off with these tasty toppings: - Extra caramel drizzle for sweetness. - A sprinkle of cinnamon for warmth. - Fresh apple slices for crunch. - A handful of granola for added texture. These ingredients and options make your breakfast not only easy but also delicious and fun! Start by gathering your ingredients. You will need rolled oats, almond milk, and chia seeds. In a large bowl, mix 1 cup of rolled oats, 1 ½ cups of almond milk, and 1 tablespoon of chia seeds. Stir well to combine. Let it sit for about 5 minutes. This will help the chia seeds swell and thicken the mix. Next, add in your diced apple. Choose a sweet apple like Fuji or Honeycrisp for the best taste. Then, pour in 2 tablespoons of caramel sauce and 1 teaspoon of ground cinnamon. If you want extra sweetness, add 1 tablespoon of maple syrup. Don't forget a pinch of salt! Stir everything together until well mixed. Now, divide the oat mix into jars or containers. Make sure each has a good amount of apple pieces. Seal the jars and place them in the fridge. Let them chill overnight or for at least 4 hours. This allows the oats to soak up all the tasty flavors. In the morning, take out your jars and give the oats a good stir. Top with a drizzle of caramel sauce for extra sweetness. Add a sprinkle of chopped nuts like pecans or walnuts for crunch. For a nice touch, serve your oats in clear jars. This way, you can show off the beautiful layers and colors. You can even add extra apple slices on top for a lovely look! To get the best texture, use rolled oats. They absorb liquid well and stay chewy. Mix in chia seeds for extra thickness. Let the mixture sit for five minutes before adding the apples and caramel. This helps the chia seeds swell. The oats will become creamy and delicious. Meal prep makes mornings easy. Prepare your oats in jars or containers. This keeps them fresh and ready to go. Make a batch for the week. Store jars in the fridge for up to five days. Just grab one each morning for a quick breakfast. Add more flavor with spices and toppings. Try a pinch of nutmeg or ginger for warmth. You can use different nuts like almonds or hazelnuts for crunch. Fresh fruit like bananas or berries can brighten the dish. A dollop of yogurt adds creaminess and tang. Experiment to find your favorite mix! {{image_2}} You can switch up the milk in this recipe. I often use almond milk, but you can try oat, soy, or coconut milk. Each milk adds its own flavor and texture. Oat milk is creamy and perfect for oats. Coconut milk gives a tropical twist. Use what you love! The caramel sauce adds a nice touch of sweetness. You may want to explore other sweeteners too. Honey, agave syrup, or stevia can work well. If you prefer less sugar, skip the extra maple syrup. The diced apples will still shine with their natural sweetness. Feel free to change the fruit based on the season. In fall, use pears instead of apples. In summer, berries like strawberries or blueberries can add a fresh flavor. Each fruit brings its unique taste and can make your oats exciting all year round. You should store your caramel apple overnight oats in airtight containers. Glass jars work well because they keep the oats fresh. Make sure the lids fit tightly. This helps to keep out air and moisture. If you plan to enjoy the oats over a few days, separate them into individual servings. When stored correctly, overnight oats last about five days in the fridge. They taste best within the first three days. After this time, the texture may change. You might notice the oats become too soft or mushy. If you see any signs of mold or strange smells, it’s best to toss them. If you prefer warm oats, you can easily reheat them. First, transfer the oats to a microwave-safe bowl. Heat in the microwave for about 30 seconds. Stir the oats and check the temperature. Heat in additional 15-second bursts if needed. You can also add a splash of almond milk to help loosen the mixture. Enjoy your warm, tasty breakfast! You can use quick oats. They will make your oats softer. Quick oats absorb liquid faster than rolled oats. This change may alter the texture slightly. If you like a creamy feel, quick oats work well. Overnight oats last about 3 to 5 days in the fridge. Store them in airtight containers. This keeps them fresh and tasty. Over time, the oats may get softer. For the best taste, eat them within the first few days. Yes, you can easily make this recipe vegan. Use almond milk or any plant-based milk. Make sure the caramel sauce is vegan too. You can find vegan caramel at many stores. This way, you enjoy the same great flavor without animal products. Overnight oats offer many health benefits. They are high in fiber, which aids digestion. Oats can help you feel full longer. This can help with weight management. They also provide essential nutrients, like vitamins and minerals. Adding fruits and nuts boosts these benefits even more. In this post, we explored overnight oats. We covered ingredients, step-by-step instructions, and key tips. You learned how to mix oats and customize flavors. I shared storage tips to keep your oats fresh. By using alternate milks and sweeteners, you can create tasty variations. Remember, overnight oats are not just easy; they’re also healthy. Enjoy making them your own!

Caramel Apple Overnight Oats Tasty Breakfast Idea

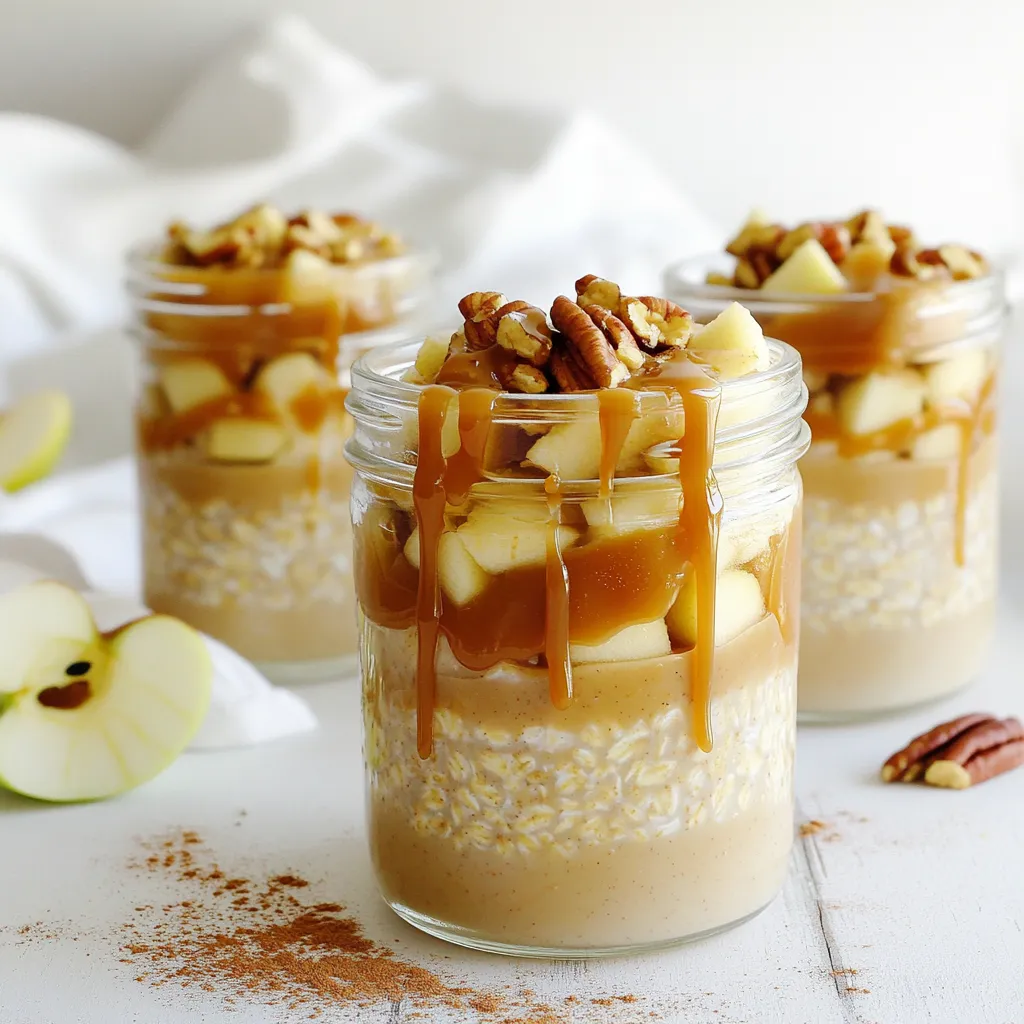
Looking for a fun breakfast that’s both tasty and easy? You’ll love Caramel Apple Overnight Oats! This recipe blends sweet

- 2 cups all-purpose flour - 1 teaspoon baking powder - 1 teaspoon ground cinnamon - 1/2 teaspoon salt - 3/4 cup unsalted butter, softened - 1 cup granulated sugar - 1 large egg - 1 teaspoon vanilla extract - 16 oz cream cheese, softened - 1 cup pumpkin puree - 1 cup powdered sugar - 2 large eggs - 1 teaspoon vanilla extract - 1 teaspoon ground cinnamon - 1/2 teaspoon ground nutmeg - 1/2 teaspoon ground ginger - 2 tablespoons granulated sugar - 1 teaspoon ground cinnamon Gathering the right ingredients is key to making these Pumpkin Snickerdoodle Cheesecake Bars. You start with the snickerdoodle crust. Use flour, baking powder, cinnamon, salt, butter, sugar, an egg, and vanilla extract. Each item adds a special touch. Next, prepare for the cheesecake filling. You’ll need cream cheese, pumpkin puree, powdered sugar, eggs, vanilla extract, and spices like cinnamon, nutmeg, and ginger. These flavors mix to create a rich filling that shines. For the topping, grab some granulated sugar and cinnamon. This mix will add that final sweet touch on top of your bars. All these ingredients come together to create a dessert that is both tasty and fun to make! 1. Preheat your oven to 350°F (175°C). This step warms up your kitchen. 2. In a medium bowl, whisk together the flour, baking powder, cinnamon, and salt. This helps mix the dry items well. 3. In a large bowl, beat the softened butter and granulated sugar until light and fluffy. This takes about 2-3 minutes. 4. Add the egg and vanilla extract to the butter mixture. Mix until combined. 5. Gradually add the dry ingredients to the wet mixture. Stop mixing as soon as it's combined. 6. Press the dough evenly into the bottom of a 9x13 inch baking pan. Make sure it covers the bottom well. 7. Bake for 15 minutes. The crust should be lightly golden. Once done, take it out and let it cool. 1. In a large bowl, beat the softened cream cheese until smooth. This is key for a creamy filling. 2. Add the pumpkin puree, powdered sugar, eggs, vanilla, cinnamon, nutmeg, and ginger. Mix until everything is smooth and creamy. 3. Carefully pour the cheesecake filling over the cooled snickerdoodle crust. Spread it evenly to cover the crust. 1. In a small bowl, mix the granulated sugar and cinnamon for the topping. This adds flavor and a nice finish. 2. Sprinkle this mixture evenly over the cheesecake layer. This gives a sweet touch on top. 3. Bake in the preheated oven for 25-30 minutes. The edges should be set, and the center should jiggle slightly. 4. Let the bars cool at room temperature for about 30 minutes. Then, refrigerate them for at least 2 hours to set before slicing into bars. To make the best snickerdoodle crust, start with room temperature ingredients. This helps the butter mix well with the sugar. If the butter is too cold, it won’t blend properly. Next, don’t overmix the crust. Just mix until it all comes together. This keeps the crust light and fluffy. For a smooth cheesecake filling, make sure your cream cheese is fully softened. Cold cream cheese can lead to lumps. Blend all the ingredients until smooth. This includes pumpkin puree, eggs, and spices. A creamy filling makes the bars taste rich and delicious. I love to garnish these bars with whipped cream on top. It adds a nice touch of sweetness. You can serve them chilled or at room temperature. Both ways, they taste great! For a fun twist, try dusting them with powdered sugar before serving. {{image_2}} You can easily make these bars even more fun. Try adding chocolate chips for a sweet surprise. The rich chocolate pairs well with the pumpkin. You can also drizzle caramel on top for a gooey finish. This adds a nice contrast to the spiced cheesecake. If you want a twist, use a graham cracker crust instead. It gives a nice crunch and a sweet flavor. For those who need gluten-free options, use gluten-free flour for the crust. It works well and keeps the bars delicious. Change things up with seasonal ingredients. Swap out the pumpkin for sweet potato for a unique taste. You can also toss in cranberries for a tart kick. This adds a bright flavor and makes the bars even more festive. To keep your bars fresh, place them in the fridge. Use an airtight container to protect them from drying out. You can also cover the pan tightly with plastic wrap. This keeps the flavors intact. I recommend eating them within five days for the best taste. If you want to save some for later, you can freeze them. First, cut the bars into squares. Wrap each piece in plastic wrap. Then, place them in a freezer bag. This keeps them fresh for up to three months. To enjoy, thaw them in the fridge overnight. This keeps the texture nice and creamy. Pumpkin Snickerdoodle Cheesecake Bars taste best when eaten fresh. I suggest you enjoy them within five days when stored in the fridge. If they start to smell off or look dry, it’s time to toss them. Always trust your senses when it comes to food safety. Yes, you can make these bars ahead of time. I recommend preparing them a day before. Let the bars cool at room temperature, then refrigerate. This allows the flavors to blend well. Serve them chilled or at room temperature. If you don’t have pumpkin puree, you can use sweet potato puree. You may also use butternut squash puree. The ratio is the same, one cup for each. These options give a similar taste and texture. To check for doneness, look for slight jiggles in the center. The edges should be set while the middle is a bit wobbly. It will firm up as it cools. Keep an eye on it to avoid overbaking. Yes, you can swap flavors easily! Try using chocolate or vanilla instead of pumpkin. You can also add fruit purees like raspberry or strawberry for a fruity twist. Adjust spices accordingly to match the new flavor. The Pumpkin Snickerdoodle Cheesecake Bars blend sweet and spicy flavors in a fun way. We covered ingredients for the snickerdoodle crust, creamy cheesecake filling, and tasty toppings. I shared step-by-step baking tips, fun variations, and storage info. Remember, using room temperature ingredients ensures the best texture. Enjoy these bars chilled or warm, and feel free to swap flavors! Baking should be fun, so experiment with different tastes and textures. Try this recipe, and make it your own!

Pumpkin Snickerdoodle Cheesecake Bars Irresistible Treat

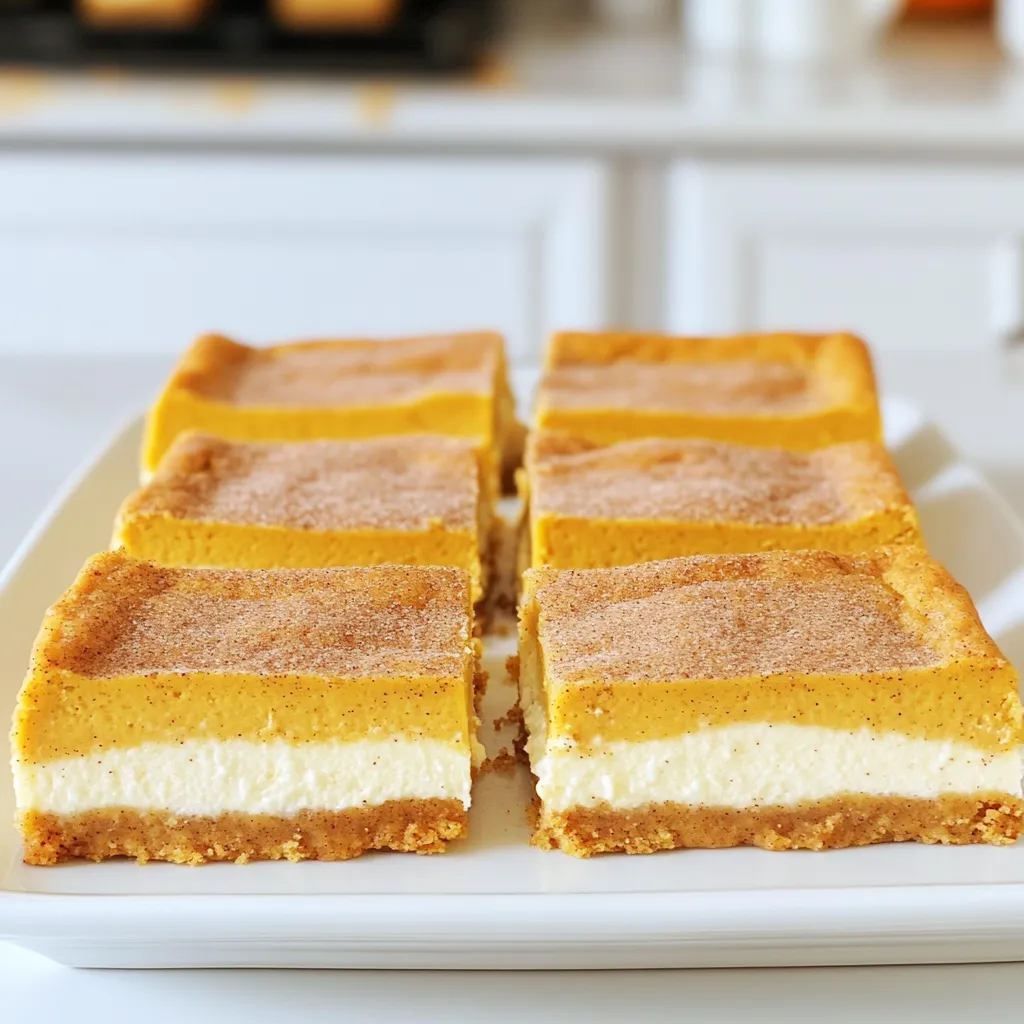
Fall brings the perfect blend of spices and sweetness, and these Pumpkin Snickerdoodle Cheesecake Bars are a must-try! In just

For this recipe, you need 500g of fresh button mushrooms. Make sure they are clean and the stems are trimmed. These mushrooms are mild in flavor, which makes them perfect for soaking up the garlic and spices. You will also need: - 4 tablespoons olive oil - 4 cloves garlic, minced - 1 teaspoon dried thyme - 1 teaspoon smoked paprika - Salt and pepper to taste The olive oil helps the mushrooms cook well, while garlic adds a strong flavor. Thyme gives a nice herb taste, and smoked paprika adds a hint of smokiness. Adjust salt and pepper to your liking. To finish your dish, you can use fresh parsley, chopped. This adds a pop of color and freshness. You can sprinkle it on top just before serving. It makes the mushrooms look appealing and adds extra flavor. First, gather all your ingredients. You need 500g of fresh button mushrooms. Clean them well under cold water. Make sure to trim the stems so they cook evenly. In a large bowl, add the mushrooms. Pour in 4 tablespoons of olive oil. Then, add 4 cloves of minced garlic. Sprinkle in 1 teaspoon of dried thyme and 1 teaspoon of smoked paprika. Season with salt and pepper to taste. Toss the mushrooms well. Ensure they are coated fully with the oil and spices. Next, preheat your air fryer to 180°C (356°F). This step takes about 3 minutes. Preheating helps the mushrooms cook evenly. It also gives them a nice golden color. While the air fryer heats, you can prepare the mushrooms. This makes the process faster and smoother. Now it’s time to cook! Place the seasoned mushrooms in the air fryer basket. Make sure they are in a single layer. Do not overcrowd them. This allows hot air to circulate well. Air fry the mushrooms for 12 to 15 minutes. Halfway through, shake the basket gently. This helps them cook evenly. Watch for a golden brown color and a tender texture. Once done, remove the basket. Transfer your mushrooms to a serving dish. Garnish with freshly chopped parsley before serving. Enjoy your tasty snack! To get the best results, spread the mushrooms in a single layer. If they overlap, they won't cook well. The hot air needs space to flow around each mushroom. This makes them brown and tender. Shake the basket halfway through cooking. This helps them cook evenly and adds a nice texture. You can boost the taste with some tricks. Try adding fresh herbs like basil or oregano. A splash of lemon juice can brighten the dish too. For a kick, add a pinch of red pepper flakes. These small changes can change the whole dish. Play with flavors to find your favorite mix. Serve these mushrooms as a snack or side dish. They pair well with grilled meats and salads. You can also put them on toast for a quick bruschetta. Top with cheese or nuts for extra flavor. They are also great on a charcuterie board. Enjoy them hot or at room temperature for a tasty bite. {{image_2}} You can use many kinds of mushrooms in this recipe. While button mushrooms are great, try cremini or portobello for deeper flavors. Shiitake mushrooms add a nice umami touch. Just keep in mind that cooking times may vary slightly based on the type. If you use larger mushrooms, cut them into smaller pieces for even cooking. Feel free to switch up the spices and herbs. Instead of thyme, use rosemary or oregano for a fresh twist. For a zesty kick, add a bit of lemon zest. You can also try using chili powder or Italian seasoning. Each change brings a new flavor to your mushrooms. Experiment and find your favorite mix! If you love heat, add some spice to your mushrooms. You can mix in red pepper flakes or cayenne pepper with the olive oil. For a smoky flavor, try adding chipotle powder. You can also serve the mushrooms with a spicy dipping sauce. This simple addition makes the snack even more exciting. To store leftover mushrooms, let them cool first. Place them in an airtight container. They stay fresh in the fridge for up to three days. Avoid stacking them too high. This keeps them from getting squished. Reheating mushrooms is easy. You can use your air fryer again. Preheat it to 160°C (320°F). Place the mushrooms in the basket. Heat them for about 5-7 minutes. This brings back their crispiness. You can also use a microwave. Heat them in short bursts of 30 seconds. Stir in between to avoid sogginess. Freezing mushrooms is a good option, too. First, cook them fully before freezing. Let them cool and spread them on a baking sheet. Freeze them for a few hours. Once frozen, transfer them to a freezer bag. They will last for up to three months. When ready to eat, cook them from frozen. Yes, you can use frozen mushrooms. However, they may not get as crispy. Thaw them first and pat them dry. This helps remove excess moisture. Moisture can make mushrooms soggy in the air fryer. Fresh mushrooms do work best for this recipe. You can mix in many flavors! Try adding onion powder for a savory kick. You might also enjoy some chili flakes for heat. Italian seasoning or rosemary can also enhance the taste. Feel free to experiment with what you like best! Check the mushrooms after 12 minutes. They should be golden brown and tender. If they look too soft or mushy, they may be overcooked. You can also taste a mushroom to ensure it is cooked through. The texture should be firm but not hard. This blog post detailed a simple air fryer mushroom recipe. We covered fresh mushrooms, aromatics, and garnishes. You learned step-by-step instructions, tips for even cooking, and ways to enhance flavors. Variations using different mushrooms and spices are possible. We also shared how to store and reheat leftovers. Air frying mushrooms is easy and fun. Experiment with flavors and enjoy your dish. With these tips, you can create tasty meals every time!

Air Fryer Garlic Mushrooms Flavorful Quick Snack

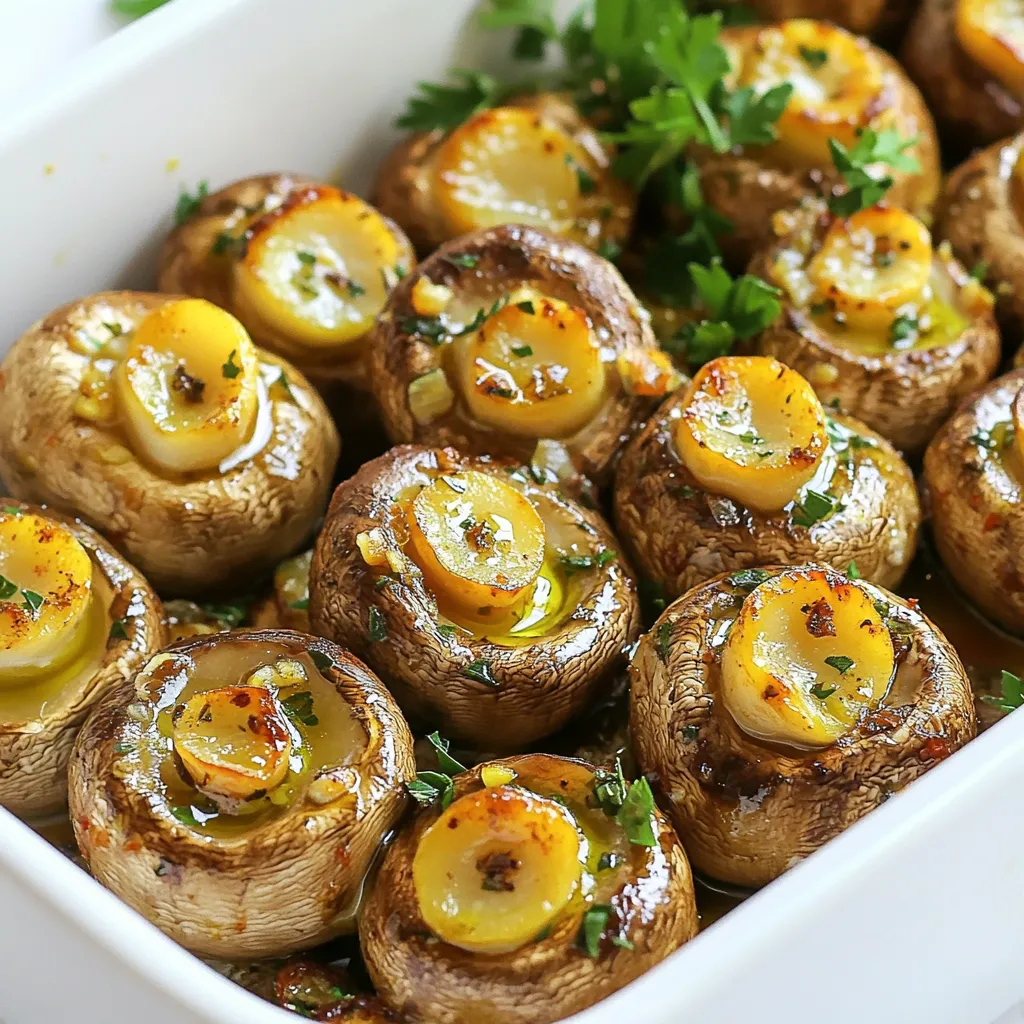
If you’re looking for a quick and tasty snack, you’ll love these Air Fryer Garlic Mushrooms! They are easy to

- 2 cups all-purpose flour - 1 teaspoon baking powder - 1/2 teaspoon baking soda - 1 teaspoon ground cinnamon - 1/4 teaspoon nutmeg - 1/2 teaspoon salt - 1/2 cup unsalted butter, softened - 1 cup brown sugar, packed - 2 large eggs - 1 teaspoon vanilla extract - 1/2 cup buttermilk (or milk with a splash of lemon juice) - 2 cups diced apples (Granny Smith or Honeycrisp work well) - 1/2 cup chopped walnuts or pecans (optional) - Additional cinnamon sugar for topping: 2 tablespoons sugar mixed with 1 teaspoon cinnamon You can add nuts for crunch. Walnuts or pecans work great. You can also add raisins for extra sweetness. If you want, try a dash of ginger for a warm spice kick. If you don’t have buttermilk, mix regular milk with a splash of lemon juice. You can swap all-purpose flour for whole wheat flour for more fiber. If you don’t like nuts, just leave them out. For a dairy-free option, use coconut oil instead of butter. Start by preheating your oven to 350°F (175°C). This step warms the oven for even baking. Next, grab a 9x5 inch loaf pan. Grease it well with butter or oil. Then, sprinkle a little flour inside. This helps the bread come out easily after baking. In a medium bowl, mix the dry ingredients. Combine 2 cups of all-purpose flour, 1 teaspoon of baking powder, and 1/2 teaspoon of baking soda. Add in 1 teaspoon of ground cinnamon, 1/4 teaspoon of nutmeg, and 1/2 teaspoon of salt. Use a whisk to blend these together well. This step is key for even flavor in your bread. Now, take a large mixing bowl. Add 1/2 cup of softened unsalted butter and 1 cup of brown sugar. Beat them together with a mixer until creamy. This should take about 2 to 3 minutes. The mix should look light and fluffy. It’s important to get this right for a soft bread. Next, add 2 large eggs one at a time. Mix well after each egg. Then, add 1 teaspoon of vanilla extract. Now it’s time to mix the dry and wet ingredients. Gradually add the flour mix to the butter mix. Alternate this with 1/2 cup of buttermilk. Start and end with the dry mix. Stir until just combined. Don’t overmix! Now, fold in 2 cups of diced apples. Use Granny Smith or Honeycrisp for the best flavor. If you like, add 1/2 cup of chopped walnuts or pecans. Gently mix until the apples and nuts are spread throughout the batter. This adds great texture and taste to the bread. Pour the batter into your prepared loaf pan. Use a spatula to smooth the top. Sprinkle the cinnamon sugar mixture on top. Bake in the oven for 55 to 60 minutes. Check with a toothpick; it should come out clean when done. After baking, let it cool in the pan for 10 minutes. Then move it to a wire rack to cool completely. Enjoy the warm, sweet smell as it fills your kitchen! To make your bread soft, use fresh flour. Old flour can weigh down the loaf. Make sure your butter is soft but not melted. This helps the sugar blend well. Mix the batter gently to keep air in. This will give you a light and fluffy bread. Don’t overmix after adding the apples. This keeps the pieces intact and adds texture. For more flavor, you can add a splash of lemon juice to the apples. This brightens up their taste. If you like nuts, walnuts or pecans add crunch. You can also use different spices. Try adding a bit of ginger or cardamom for a twist. A small amount of vanilla extract will boost the sweetness too. Lastly, a sprinkle of cinnamon sugar on top adds a sweet finish. Cooling is key to good bread. After baking, let the loaf sit in the pan for 10 minutes. This helps it firm up. Then, move it to a wire rack. This allows air to flow around it. If you cool it in the pan too long, it can get soggy. Let it cool completely before slicing to keep the bread from crumbling. Enjoy each slice fresh for the best taste! {{image_2}} You can swap out apples for other fruits. Pears add a juicy twist. Bananas bring a soft texture. Berries like blueberries or raspberries add a tart flavor. Each fruit changes the taste and keeps it fun. Mix it up and see what you like best! To make this bread gluten-free, use a gluten-free flour blend. Check that your baking powder is gluten-free too. This swap makes it safe for those with gluten issues. The texture might be different but still tasty. Enjoy your gluten-free treat without worry! For a vegan version, replace eggs with flaxseeds. Mix 1 tablespoon of flaxseed with 3 tablespoons of water. Let it sit to thicken. Use plant-based butter instead of regular butter. Swap buttermilk for almond or soy milk with a splash of vinegar. These changes keep the bread soft and flavorful. To keep your apple cinnamon bread fresh, wrap it well. Use plastic wrap or aluminum foil. Store it at room temperature for up to three days. If you want to keep it longer, place it in the fridge. This can extend its life for about a week. However, the bread may dry out in the fridge. So, use wrapping to help retain moisture. If you want to freeze the bread, let it cool completely first. Wrap the loaf tightly in plastic wrap. Then, place it in a freezer bag. This method helps prevent freezer burn. You can freeze the bread for up to three months. When you're ready to enjoy it, thaw it in the fridge overnight or at room temperature for a few hours. To reheat your apple cinnamon bread, preheat your oven to 350°F (175°C). Remove the wrapping and place the bread on a baking sheet. Heat it for about 10-15 minutes. This warms it up and restores some of its freshness. You can also slice the bread and toast it in a toaster. This adds a nice crispness to each slice. Enjoy it warm with butter or cream cheese! To keep your bread moist, use room temperature ingredients. This includes butter and eggs. Buttermilk adds moisture, so don’t skip it. You can also avoid overmixing the batter, as this can dry it out. Let it cool in the pan for a bit before moving it to a wire rack. This helps keep the moisture in. Yes, you can use regular milk. Just add a splash of lemon juice to mimic buttermilk. This simple swap keeps your bread tender. It works well and still gives a nice flavor. Granny Smith and Honeycrisp apples are fantastic choices. Granny Smith gives a tart flavor, while Honeycrisp adds sweetness. You can mix both for a more complex taste. Always choose firm apples for the best texture. You can keep the bread fresh for about 3 to 4 days at room temperature. Wrap it tightly in plastic wrap. If you want it to last longer, freeze it. It can stay good in the freezer for up to 3 months. You can find bakery-style apple cinnamon bread in local bakeries, especially during fall. Some grocery stores also carry it. If you want a unique flavor, try making it at home. It’s fun, and you can control the ingredients! This article covered everything you need for perfect apple cinnamon bread. We discussed the key ingredients, easy steps, and helpful tips. You learned how to store and freeze your loaf. Plus, we explored variations for everyone to enjoy. Baking this bread can bring warmth to your kitchen and smiles to your table. Use what you learned and share your yummy results! Happy baking!

Apple Cinnamon Bread Bakery-Style Simple and Tasty

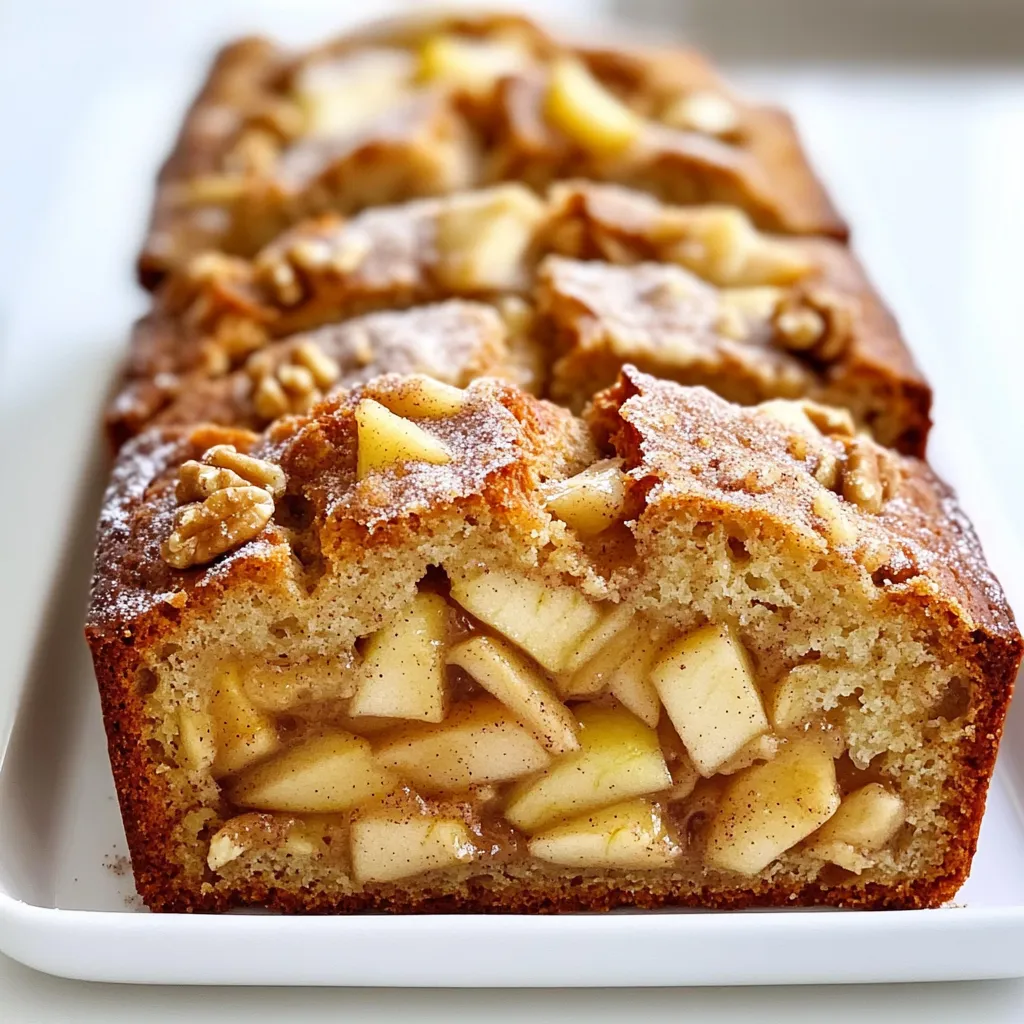
If you crave warm, bakery-style apple cinnamon bread, you’re in the right place! This simple recipe brings together sweet apples

To make Pumpkin Spice Biscotti with White Chocolate, gather these simple ingredients: - 2 cups all-purpose flour - 1 teaspoon baking powder - 1/2 teaspoon baking soda - 1 teaspoon ground cinnamon - 1/2 teaspoon ground nutmeg - 1/2 teaspoon ground ginger - 1/4 teaspoon ground cloves - 1/2 teaspoon salt - 1/2 cup granulated sugar - 1/4 cup brown sugar, packed - 2 large eggs - 1/2 cup pure pumpkin puree - 1 teaspoon vanilla extract - 1/2 cup chopped walnuts or pecans (optional) - 1 cup white chocolate chips These ingredients create a perfect balance of flavors. The spices bring warmth, while the pumpkin adds moisture. The sugars give a nice sweetness and the white chocolate chips create a rich finish. If you love nuts, try adding walnuts or pecans for extra texture. Make sure to use pure pumpkin puree, not pumpkin pie filling. This keeps your biscotti from getting too sweet. Each ingredient plays a key role in the final taste. So, use fresh spices for the best flavor. Enjoy the process of gathering and preparing these ingredients. First, set your oven to 350°F (175°C). This step is key for even baking. Next, grab a baking sheet and line it with parchment paper. This helps prevent sticking and makes cleanup easier. In a medium bowl, whisk together the dry ingredients. Combine 2 cups of flour, 1 teaspoon of baking powder, and 1/2 teaspoon of baking soda. Then, add 1 teaspoon of ground cinnamon, 1/2 teaspoon each of nutmeg, ginger, and cloves. Finish with 1/2 teaspoon of salt. Mix well and set aside. This blend creates a lovely spice flavor. In a large bowl, mix together your sugars and eggs. Use 1/2 cup of granulated sugar and 1/4 cup of packed brown sugar. Beat these with an electric mixer on medium speed for about 2-3 minutes. You want a smooth, pale mix. Next, add 1/2 cup of pure pumpkin puree and 1 teaspoon of vanilla extract. Stir until everything is well combined. The pumpkin adds moisture and flavor. Take your dry mix and gradually add it to the wet mix. Stir gently until just combined. If you want, fold in 1/2 cup of chopped nuts and 1 cup of white chocolate chips. Divide the dough in half. Shape each half into a log, about 12 inches long and 3 inches wide. Place these logs on your prepared baking sheet. Bake for 25-30 minutes. They should feel firm and look lightly golden. After baking, let the logs cool for about 10 minutes. Then, transfer them to a cutting board. Use a serrated knife to slice the logs diagonally into 1/2-inch thick slices. Place the slices back on the baking sheet, cut side up. Bake for another 10-15 minutes to make them crisp and golden brown. Keep an eye on them to prevent burning. For a special touch, melt some extra white chocolate in a microwave-safe bowl. Once your biscotti cool completely, drizzle the melted chocolate over them. This adds a sweet finish that complements the spices. Enjoy your delicious pumpkin spice biscotti! To make sure your biscotti stays crisp, follow these steps: - Make sure you bake them twice. The first bake firms them up. - During the second bake, leave them in the oven until golden brown. - Keep an eye on them. You want a nice crunch without burning. - For extra crispiness, slice them thinner. This also helps with even baking. Storing your biscotti right keeps them fresh and tasty. Here are some tips: - Use an airtight container. This keeps air out and moisture in. - Store at room temperature for up to two weeks. - If you want to keep them longer, freeze them. They freeze well for up to three months. - Thaw at room temperature before enjoying. This way, they stay crisp. You can enhance your biscotti with fun flavors. Here are some ideas: - Add orange zest for a citrus twist. - Swap in dark chocolate chips instead of white chocolate for richness. - Try different nuts like almonds or hazelnuts for added crunch. - Experiment with spices like cardamom or allspice for a unique taste. These customizations make your biscotti special and tailored to your taste! {{image_2}} You can switch up the flavors in your pumpkin spice biscotti. Instead of using pumpkin, try chocolate or almond. For chocolate, add 1/2 cup of cocoa powder to the dry mix. This creates a rich, deep flavor. If you want almond, use almond extract instead of vanilla. You can also add sliced almonds for a nice crunch. Nuts and chips can change the taste and texture of your biscotti. Use chopped pecans or hazelnuts to add a different nutty flavor. If you love chocolate, consider adding dark chocolate chips or even butterscotch chips. Each nut or chip brings its own charm to the biscotti. Feel free to mix and match for your favorite combo! Seasonal flavors make biscotti special. For the holidays, add peppermint extract for a festive touch. You can also use dried cranberries or orange zest. These ingredients give a fresh burst of flavor. For a warm winter treat, try adding a pinch of cardamom or cloves. These small changes can make your biscotti perfect for any season! To keep your pumpkin spice biscotti fresh, store them in an airtight container. Use a container that fits them snugly. This helps maintain their crunch and flavor. You can store them at room temperature for up to two weeks. Avoid placing them in a humid area, as moisture can make them soft. If you want to keep them longer, consider freezing. Freezing biscotti is a simple way to extend their life. First, let the biscotti cool completely. Then, place them in a single layer on a baking sheet. Freeze them for about an hour. After they are firm, transfer them to a freezer-safe bag. Remove as much air as possible before sealing. You can freeze them for up to three months. When you’re ready to enjoy them, thaw at room temperature for about 30 minutes. Homemade pumpkin spice biscotti can last up to two weeks when stored properly. If you freeze them, they can stay good for up to three months. Always check for any signs of spoilage before eating. If they smell off or feel too soft, it’s best to toss them. Enjoy your biscotti at their best! Yes, you can use canned pumpkin puree. It saves time and still gives great flavor. Look for 100% pure pumpkin, not pumpkin pie filling. This ensures you get the right taste and texture for your biscotti. You'll know the biscotti are done when they feel firm and slightly golden. The logs should not be soft. After the first bake, let them cool before slicing. The second bake should make them crisp. You can use dark chocolate, milk chocolate, or even butterscotch chips. Each option gives a unique taste. If you want a healthier choice, try dried fruit or nuts for added flavor. Yes, you can make gluten-free biscotti. Just swap the all-purpose flour for a gluten-free blend. Make sure the blend has a good structure to hold the biscotti together. This way, you can enjoy the same great taste without gluten. You now have a complete guide to making delicious pumpkin biscotti. We covered the key ingredients, step-by-step instructions, and helpful tips for the best results. You can customize your biscotti with different flavors and store them properly for lasting freshness. Remember, simple swaps can elevate the taste. Making biscotti at home is fun and rewarding. Enjoy every bite and share with friends for a cozy treat. Follow these steps, and you will bake a perfect batch every time. Happy baking!

Pumpkin Spice Biscotti with White Chocolate Delight

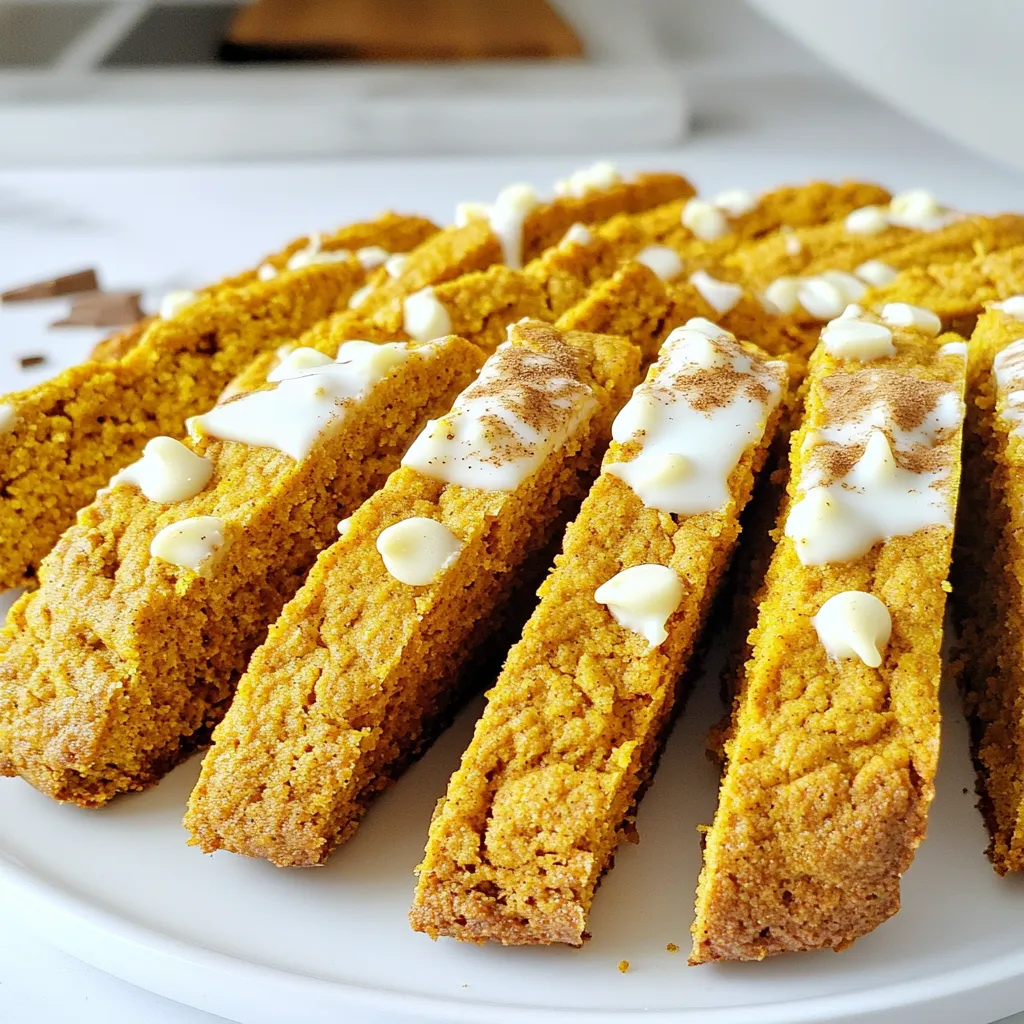
Are you ready to blend fall flavors into a simple treat? My Pumpkin Spice Biscotti with White Chocolate is a

To whip up your chocolate peanut butter protein smoothie, gather these items: - 1 large ripe banana, frozen - 2 tablespoons natural peanut butter - 1 scoop chocolate protein powder - 1 tablespoon unsweetened cocoa powder - 1 cup almond milk (or any milk of choice) - A pinch of sea salt - Ice cubes (optional, for a thicker smoothie) These ingredients blend together to create a rich and creamy treat. The frozen banana gives it a nice sweetness and smooth texture. The peanut butter adds a nutty flavor that pairs perfectly with the chocolate protein powder. If you like your smoothie a bit sweeter, consider adding: - 1 tablespoon honey (optional, for sweetness) Honey brings a natural sweetness. You can add more honey based on your taste. Just blend again after adding it for the best flavor. This smoothie is not just tasty; it's also good for you. Here’s a quick look at the nutrition: - High in protein from the protein powder and peanut butter - Contains healthy fats from the peanut butter - Rich in vitamins and minerals from the banana and almond milk Each ingredient adds something special. The banana gives you energy, while the protein helps with muscle repair. This smoothie is perfect for a post-workout snack or a quick breakfast! To start, gather your ingredients. You will need: - 1 large ripe banana, frozen - 2 tablespoons natural peanut butter - 1 scoop chocolate protein powder - 1 tablespoon unsweetened cocoa powder - 1 cup almond milk (or any milk of choice) - 1 tablespoon honey (optional, for sweetness) - A pinch of sea salt - Ice cubes (optional, for a thicker smoothie) Next, take your frozen banana and break it into smaller pieces. This helps the blender mix everything well. Add the banana to your blender. Then, scoop in the peanut butter. I love using natural peanut butter because it adds great flavor. Now, add the chocolate protein powder and cocoa powder. These give your smoothie that rich chocolate taste. Pour in the almond milk. If you want extra sweetness, add honey and a pinch of sea salt. Put the lid on your blender. Blend the mixture on high until it is smooth and creamy. If you like a thicker smoothie, toss in a few ice cubes. Blend again until everything is well mixed. After blending, taste your smoothie. If it needs more sweetness, add some honey and blend again. This step ensures your smoothie is just right for you. Once your smoothie is ready, pour it into a tall glass. You can enjoy it right away. For an extra touch, top it with a few chocolate shavings or a sprinkle of cocoa powder. This makes it look fancy and fun! Now you have a delicious chocolate peanut butter protein smoothie. It's perfect for breakfast or a quick snack. Enjoy! To get the perfect texture for your smoothie, start with a frozen banana. This adds creaminess and chill. Blend all the ingredients well. If it feels too thin, add ice cubes. Ice makes it thicker. Blend again until you see a smooth mix. You want it to be thick but drinkable. If you have allergies or need alternatives, don’t worry! You can swap peanut butter for almond or sunflower seed butter. For a nut-free option, choose sunflower seed butter. If you want a vegan version, use plant-based protein powder. You can also use oat milk instead of almond milk. These swaps keep it tasty. You can add fun flavors too! Try a scoop of chia seeds for extra fiber. A dash of cinnamon adds warmth and spice. For more chocolate taste, add a bit of chocolate syrup. Want a fruit twist? Toss in a handful of spinach or kale. It won’t change the taste much but adds nutrients. {{image_2}} To make a vegan version, swap out the honey for maple syrup. Use a plant-based protein powder, like pea or hemp. Almond milk works great, but you can also use oat or soy milk. These small swaps keep the taste rich while making it vegan-friendly. Want more nutrients? Add a handful of spinach or kale. They blend well and you won’t taste them. This is a smart way to get more vitamins. Plus, greens add fiber to help with digestion. Your smoothie stays tasty and healthy! You can try many kinds of protein powder. Vanilla or even unflavored protein can work well. If you want plant-based options, look for pea or rice protein. Each type changes the taste slightly, so choose what you like best. Experimenting with different flavors can make your smoothie even more fun! If you have leftover smoothie, don’t worry! You can freeze it. Pour the smoothie into an ice cube tray. Once frozen, pop the cubes into a freezer bag. This makes it easy to blend later. Just toss a few cubes into your blender with some almond milk. Blend until smooth for a quick treat. Store your ingredients the right way to keep them fresh. Here are some tips: - Bananas: Keep them at room temperature. Once ripe, freeze them if you want them for smoothies. - Peanut Butter: Store it in a cool place. If you use natural peanut butter, stir well before each use. - Protein Powder: Keep it in a dry place. Seal it tightly after each use to avoid moisture. - Cocoa Powder: Store in a dark, dry spot. Use a tight lid to keep it fresh. A freshly made smoothie tastes best right away. If you store it in the fridge, drink it within 24 hours for the best taste. It may separate over time but just shake or stir it before drinking. If you freeze it, it can last up to 3 months. Enjoy your smoothie with no waste! To lower the calories in your smoothie, you can make simple changes. First, use less peanut butter. One tablespoon instead of two cuts calories. You can also skip the honey. Unsweetened cocoa powder adds a rich taste without calories. Finally, choose unsweetened almond milk. It has fewer calories than regular milk. These swaps keep the flavor great and reduce calorie counts. Yes, you can use different nut butters. Almond butter works well and has a nice taste. Cashew butter is another good choice. It adds creaminess without overpowering the flavor. If you are allergic to nuts, try sunflower seed butter. It gives a unique twist and is nut-free. Each nut butter changes the taste a bit, but they all taste great! Yes, this smoothie is great for meal prep. You can make it ahead of time. Just blend your ingredients and pour them into jars. Seal them and keep them in the fridge for up to two days. When ready to drink, shake or stir well. If you want, you can freeze it in ice cube trays. When you want to enjoy it, blend the frozen cubes with milk. This gives you a fresh smoothie anytime! In this post, we covered the key ingredients for a great smoothie, plus optional ones for added sweetness. I shared step-by-step instructions to help you blend perfectly. You learned tips on texture and flavor enhancements, along with various smoothie ideas and storage tips. Remember, making smoothies can be simple and fun. You can try new ingredients and adjust flavors to your taste. Enjoy creating your own smoothie masterpiece, and let your imagination guide you!

Chocolate Peanut Butter Protein Smoothie Delightful Treat

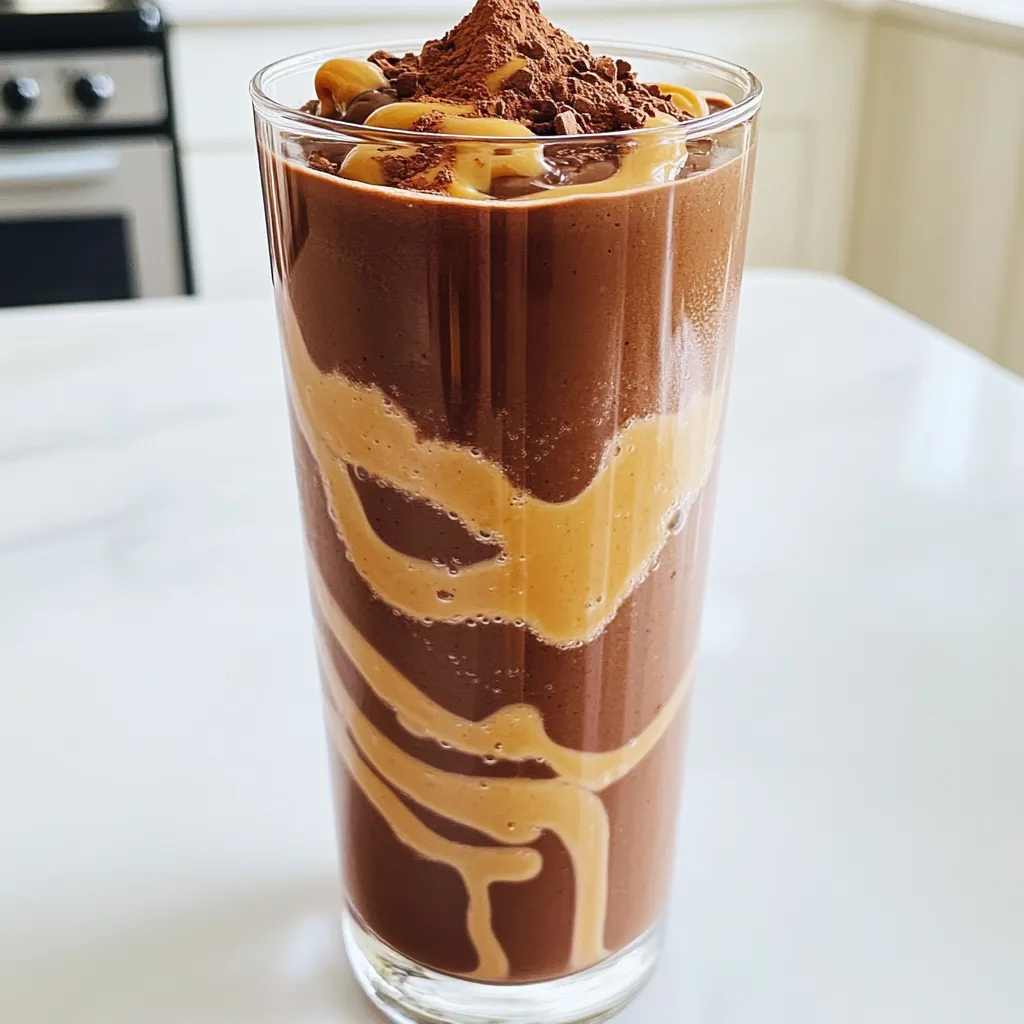
If you’re craving a tasty and healthy treat, look no further! My Chocolate Peanut Butter Protein Smoothie is packed with

- 1 lb shrimp, peeled and deveined - 1 red bell pepper, sliced - 1 yellow bell pepper, sliced - 1 red onion, sliced - 3 tablespoons olive oil - 2 tablespoons chili powder - 1 tablespoon cumin - 1 teaspoon garlic powder - Zest and juice of 2 limes - Salt and pepper to taste - Corn tortillas for serving You need fresh shrimp for this dish. They add a nice texture and flavor. The bell peppers and onions bring color and sweetness. Olive oil helps in cooking and adds richness. The spices, like chili powder and cumin, give the shrimp a bold taste. Lime zest and juice brighten the dish and balance the spices. - Fresh cilantro, chopped, for garnish - Lime wedges - Optional toppings: salsa and guacamole After cooking, you can add fresh cilantro. It gives a nice herb flavor. Lime wedges are great for squeezing on top. You can also serve salsa or guacamole. They add creaminess and flavor, making the meal more fun. - Sheet pan - Mixing bowls - Whisk You will need a sheet pan to bake everything together. Mixing bowls help combine the shrimp and veggies. A whisk is handy for mixing the marinade. With these tools, you can make this meal easy and quick. 1. First, heat your oven to 400°F (200°C). This step ensures even cooking. 2. Next, grab a large mixing bowl. Add 1 pound of peeled and deveined shrimp. 3. Slice one red bell pepper, one yellow bell pepper, and one red onion. Toss them into the bowl with the shrimp. 1. In a small bowl, mix three tablespoons of olive oil. 2. Add two tablespoons of chili powder and one tablespoon of cumin. 3. Then, stir in one teaspoon of garlic powder. Zest and juice two limes into the mix. 4. Season with salt and pepper. Whisk until everything combines well. 1. Pour the marinade over the shrimp and veggies in the large bowl. Toss to coat all pieces evenly. 2. Spread the mixture on a large sheet pan. Make sure it’s in a single layer. 3. Bake in the oven for about 15 to 20 minutes. Check that the shrimp is pink and opaque. The veggies should be tender and slightly charred. 4. Once done, remove the pan from the oven. Let it cool for a few minutes before serving. - Alternative spices or herbs to use: Try using smoked paprika for a deeper flavor. You can also add oregano or thyme for a fresh twist. If you like heat, consider adding cayenne pepper or crushed red pepper flakes. - Marinating shrimp: how long and why: Marinate the shrimp for about 15 to 30 minutes. This time allows the shrimp to soak up the lime juice and spices. The acid from the lime tenderizes the shrimp and enhances the taste. - Best sides to accompany fajitas: Serve your fajitas with Mexican rice or black beans. A fresh corn salad or avocado slices also pair well. These sides add color and flavor to your meal. - How to serve for gatherings: Set up a fajita bar for easy serving. Place warm tortillas, shrimp, and veggies in separate bowls. Add toppings like salsa, guacamole, and sour cream. Guests can build their own fajitas. - Stovetop or grilling options: You can cook the shrimp on a stovetop in a skillet. Heat olive oil and sauté the shrimp and veggies until tender. Grilling gives a nice char. Just place them on a hot grill for a smoky flavor. {{image_2}} You can swap shrimp for chicken or tofu. Chicken is a great choice. It cooks well and absorbs flavors nicely. Use bite-sized pieces of chicken breast. For a plant-based option, try tofu. Press it to remove excess water. Then, cut it into cubes and follow the same steps. Both options give you tasty fajitas. Feel free to add more veggies for better nutrition. Try zucchini, mushrooms, or corn. These veggies add color and texture. Slice them thinly, just like the bell peppers. Mix them in with the shrimp and spices. This adds flavor and makes the dish more filling. The more veggies, the better! You can control the spice level to suit your taste. For milder fajitas, reduce the chili powder. You can also add a touch of sugar to balance flavors. If you love heat, add more chili powder or some diced jalapeños. Try chipotle powder for a smoky kick. Adjusting spice makes your fajitas unique! To store your chili lime shrimp fajitas, let them cool first. Place the leftovers in an airtight container. This helps keep them fresh. You can store them in the fridge for up to three days. Make sure to separate the shrimp from the tortillas. This prevents sogginess. To reheat, use the oven for best results. Preheat the oven to 350°F (175°C). Place the fajitas on a baking sheet. Heat for about 10 minutes, or until warm. This method keeps the shrimp tender and the veggies crisp. If you’re in a hurry, the microwave works too. Just heat in short bursts to avoid overcooking. If you want to freeze your fajitas, start by cooling them completely. Pack the shrimp and veggies in freezer-safe bags. Remove as much air as possible. This helps prevent freezer burn. You can freeze them for up to three months. To thaw, place them in the fridge overnight. Reheat in the oven or pan before serving. Bake shrimp fajitas for 15 to 20 minutes at 400°F (200°C). This time ensures the shrimp cook through and the veggies soften. They should look vibrant and slightly charred. Keep an eye on them to avoid overcooking. Yes, you can use frozen shrimp. Thaw them first in cold water. This makes them easier to peel and devein if needed. Fresh shrimp cook faster, so adjust your baking time by a couple of minutes. Toppings can really enhance your fajitas. Here are some ideas: - Fresh cilantro for a burst of flavor - Lime wedges for squeezing - Salsa for a spicy kick - Guacamole for creaminess - Sliced jalapeños for heat - Shredded cheese for richness Feel free to mix and match! You’ve learned about the key ingredients for tasty shrimp fajitas, like shrimp, peppers, and olive oil. Mixing them with the right spices makes a big difference. I shared tips on preparing and cooking, plus options for storing leftovers. Remember, you can swap proteins or add veggies to fit your taste. Getting creative with toppings can make your dish pop. Now, grab your sheet pan and start cooking! Enjoy the journey and delicious results.

Chili Lime Shrimp Fajitas Sheet-Pan Delight

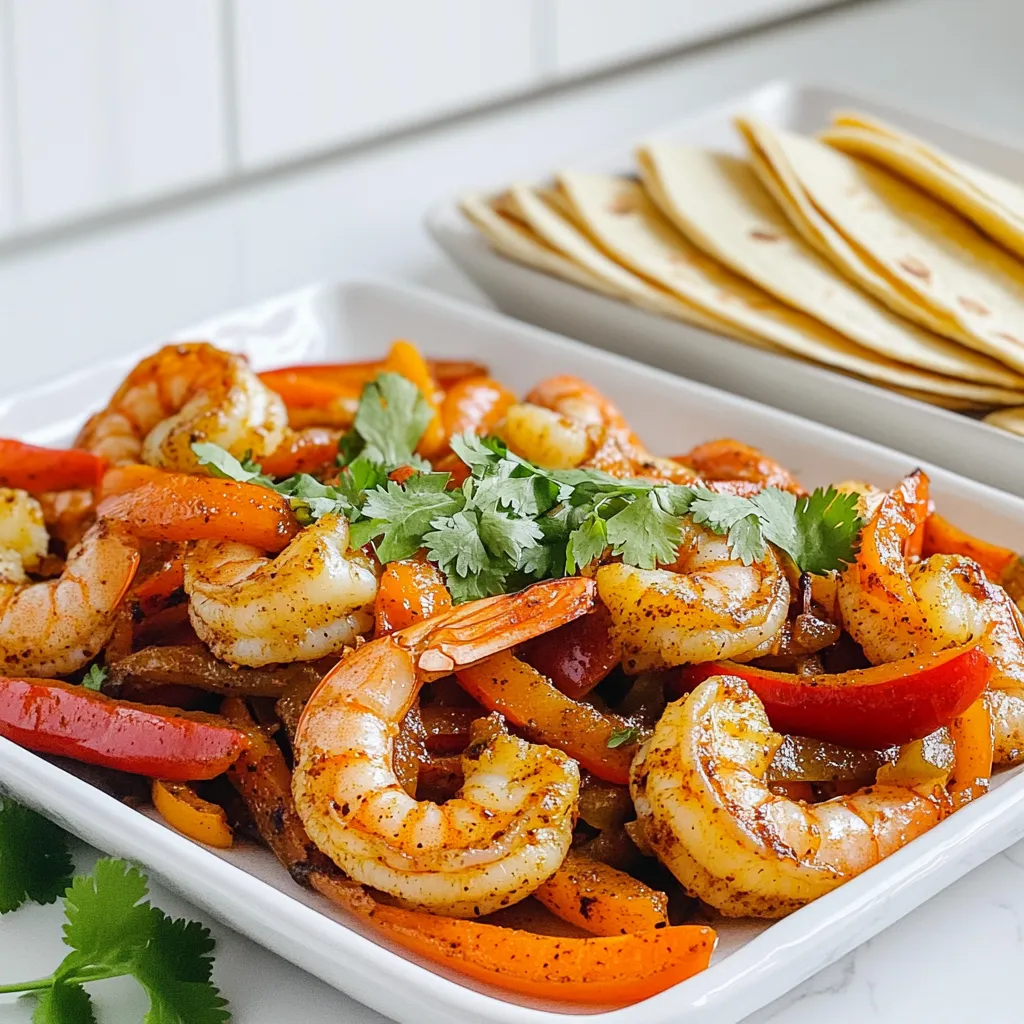
Get ready for a flavor-packed meal that’s easy and fun to make! In this blog post, I’m sharing my favorite

For these tacos, you will need a few key ingredients that bring flavor and texture. Here’s what you’ll need: - 1 medium head cauliflower, cut into florets - 1 cup all-purpose flour - 1 teaspoon garlic powder - 1 teaspoon onion powder - 1 teaspoon smoked paprika - 1 teaspoon cayenne pepper (adjust for spice preference) - 1/2 cup water - 1 cup buffalo sauce - 8 small corn tortillas These ingredients work together to create a crunchy and spicy filling. Toppings can elevate your tacos. I suggest the following for a tasty finish: - 1 cup shredded lettuce - 1 ripe avocado, sliced - 1/2 cup crumbled blue cheese (optional) - Fresh cilantro, for garnish - Lime wedges, for serving These toppings add freshness and creaminess to balance the heat. You can customize your tacos to make them your own. Here are some ideas: - Extra spices like cumin or chili powder for more flavor - Different sauces like ranch or sriracha for variety - Other veggies like diced tomatoes or radishes for crunch Feel free to mix and match based on your taste! First, wash the cauliflower well. Cut it into bite-sized florets. Make sure they are even in size. This helps them cook at the same time. Pat the florets dry with a paper towel. Removing moisture is key for crispiness. In a mixing bowl, add 1 cup of all-purpose flour. Then, mix in 1 teaspoon of garlic powder, 1 teaspoon of onion powder, 1 teaspoon of smoked paprika, and 1 teaspoon of cayenne pepper. Stir everything together. Gradually add 1/2 cup of water while mixing. You want a thick batter that coats the florets nicely. Preheat your air fryer to 400°F (200°C). Dip each cauliflower floret in the batter. Make sure each piece is fully coated. Shake off any extra batter. Place the coated florets in a single layer in the air fryer basket. You may need to cook in batches. Air fry for 10-12 minutes. Shake the basket halfway through cooking. The florets should be golden and crispy. Once the cauliflower is done, transfer it to a large bowl. Pour 1 cup of buffalo sauce over the florets. Toss them gently until they are all coated in sauce. The florets should be fiery red and full of flavor. While the cauliflower cools slightly, warm your tortillas. Heat a skillet over medium heat. Place each tortilla in the skillet for about 30 seconds on each side. You want them pliable but not too crispy. Now it's time to build your tacos! Take a warm tortilla and add a generous amount of buffalo cauliflower. Top it with shredded lettuce and avocado slices. If you like, sprinkle crumbled blue cheese on top. Finish with fresh cilantro. Serve with lime wedges on the side to squeeze over your tacos. To make your cauliflower extra crispy, start by drying the florets well. Moisture can make them soggy. After coating with batter, shake off any excess. This helps the batter stick better. Air fry at a high heat, around 400°F. This creates a nice crunch. You can also use a light spray of oil on the cauliflower before frying for more crispiness. If you want a gluten-free version, swap all-purpose flour with gluten-free flour. Almond flour works well too. Just make sure to check the labels for any hidden gluten. You can also use chickpea flour for a nutty flavor. The batter will still coat the cauliflower nicely and keep that crunchy texture. If you have leftovers, store them in an airtight container. Keep the cauliflower and tortillas separate to prevent sogginess. They last up to three days in the fridge. To reheat, air fry them for a few minutes to regain the crispiness. Avoid the microwave, as it can make them soft. Enjoy your tasty tacos again! {{image_2}} You can change the heat in these tacos. Add more cayenne pepper if you want extra spice. You can also mix in some hot sauce with the buffalo sauce. Try using different hot sauces, like sriracha or chipotle. Each sauce will give a unique twist to your dish. If you want a protein boost, try adding chickpeas or black beans. Both add flavor and texture. You can also use shredded chicken or tempeh for a heartier meal. These options keep the tacos filling and fun. Just air fry the chickpeas or tempeh for a crispy touch. Buffalo sauce is fantastic, but don't stop there! You can drizzle ranch or cilantro-lime dressing over the tacos. A creamy avocado sauce also pairs well. For a tangy kick, try a drizzle of yogurt sauce or tahini. Each sauce creates a new flavor adventure for your tacos. These tacos shine when paired with simple sides. Try serving them with: - Mexican Street Corn: Roasted corn topped with mayo, cheese, and chili powder. - Guacamole: Creamy avocado dip adds a nice balance to spicy flavors. - Black Bean Salad: A fresh mix of black beans, corn, and lime juice for a zesty kick. - Rice: Cilantro lime rice works well for a filling meal. Make your tacos look as good as they taste. Here are some fun ideas: - Use Colorful Plates: Bright plates make the food pop. - Garnish with Cilantro: Fresh cilantro adds a lovely touch. - Add Lime Wedges: Place lime wedges next to the tacos for zest. - Layer Ingredients Neatly: Stack the toppings high for a fun, messy look. A good drink can enhance your meal. Here are some great options: - Margaritas: A classic choice that complements the heat. - Lemonade: The sweetness of lemonade pairs well with spicy flavors. - Iced Tea: A refreshing option that balances the meal. - Light Beer: A crisp beer can help cool down the spice. These serving suggestions will elevate your crispy air fryer buffalo cauliflower tacos. Enjoy experimenting! Yes, you can use frozen cauliflower. Just thaw it first. Pat it dry to remove moisture. This helps the batter stick better. Frozen cauliflower may not be as crispy, but it still tastes great. To make these tacos vegan, skip the blue cheese. Use a dairy-free ranch or avocado crema instead. You can also use a plant-based batter mix if you want. These options keep the flavors bold and tasty. If you want to skip blue cheese, try these options: - Dairy-free cheese - Avocado slices - Fresh salsa - A drizzle of tahini sauce These alternatives add flavor without cheese. Store leftovers in an airtight container in the fridge. They will last for 2-3 days. To reheat, use the air fryer at 350°F for 5-7 minutes for crispiness. You can also use a skillet on low heat if needed. In this blog post, we explored how to make crispy air fryer buffalo cauliflower tacos. We covered the main ingredients, preparation steps, and tips for extra crispiness. You can customize with different toppings and sauces to fit your taste. Remember, these tacos can serve as a tasty, healthier option for any meal. Enjoy them with your favorite sides and drinks for the best experience. Dive in and get creative with your ingredients; there are endless ways to enjoy these tacos!

Crispy Air Fryer Buffalo Cauliflower Tacos Delight

If you’re craving a tasty meal that’s both fun and easy to make, you’re in luck! Crispy Air Fryer Buffalo

- 4 cups all-purpose flour - 1 packet instant yeast - ½ cup granulated sugar - 1 teaspoon salt - 1 teaspoon ground cinnamon - ½ cup warmed milk - ¼ cup melted unsalted butter - 2 large eggs - ½ cup packed brown sugar - 2 tablespoons ground cinnamon - ¼ cup softened unsalted butter - 1 cup chopped pecans - ½ cup packed brown sugar - ¼ cup unsalted butter - ¼ cup heavy cream - 1 teaspoon vanilla extract To make these rolls, you need simple but key ingredients. The dough forms the base. Flour, sugar, yeast, salt, and cinnamon create a great flavor. The warmed milk, melted butter, and eggs help bind everything together. The filling is where the magic happens. Brown sugar and cinnamon add sweetness and spice. Softened butter helps mix it all up, while chopped pecans give a nice crunch. Lastly, the caramel sauce brings it all together. Brown sugar and butter melt with cream for a rich flavor. A touch of vanilla adds depth to the sauce. Each ingredient plays a part in making these rolls special. - Combine 4 cups of flour, 2 ¼ teaspoons of instant yeast, ½ cup of sugar, 1 teaspoon of salt, and 1 teaspoon of cinnamon in a mixing bowl. This mix gives your rolls a great base. - In a separate bowl, whisk together ½ cup of warmed milk, ¼ cup of melted butter, and 2 eggs. Pour this mix into the dry ingredients. Stir until a dough starts to form. - Knead the dough on a floured surface for about 5-7 minutes. You want it smooth and elastic. Place the dough in a greased bowl. Cover it with a towel. Let it rise in a warm spot for 1 hour, or until it doubles in size. - While the dough rises, mix together ½ cup of packed brown sugar, 2 tablespoons of ground cinnamon, and ¼ cup of softened butter in a bowl. This filling will add a sweet touch. - Set this mixture aside. It will wait for the dough to rise. - Once the dough has risen, punch it down. Roll it out on a floured surface into a rectangle about 16x12 inches. - Spread the cinnamon filling evenly over the dough, leaving a small border. Sprinkle 1 cup of chopped pecans on top of the filling. - Starting from the long edge, roll the dough tightly into a log. Slice the log into 12 equal pieces. - In a small saucepan, combine ½ cup of packed brown sugar, ¼ cup of butter, and ¼ cup of heavy cream. Cook over medium heat, stirring until the mixture is smooth and bubbly. - Remove from heat and stir in 1 teaspoon of vanilla extract. This sauce will make your rolls extra special. - Pour the caramel sauce evenly into a greased 9x13 inch baking dish. Arrange the sliced rolls on top, cut side up. - Cover the rolls with a towel. Let them rise again for about 30 minutes until puffy. - Preheat your oven to 350°F (175°C). Bake the rolls for 25-30 minutes until golden brown. Enjoy the sweet aroma filling your kitchen! To get your dough to rise well, keep it warm. The ideal temperature is about 80°F. You can place the dough in a cozy spot, like near a warm oven. Cover it with a clean towel to keep the heat in. Kneading is key. Press down and fold the dough with your hands for about 5 to 7 minutes. This helps develop gluten, making the dough smooth and elastic. For a great texture, roll the dough to about ½ inch thick. This thickness gives your rolls a nice fluffy bite. Use fresh ingredients, too. Fresh flour and yeast make a big difference in taste and rise. Always check the expiration dates on your yeast and flour for the best results. Drizzling extra caramel sauce on top makes your rolls look stunning. It also adds more sweetness. Use a spoon or a squeeze bottle to create a lovely pattern. For a final touch, add whole pecans on top. They look pretty and give a nice crunch. Presenting your rolls this way will impress everyone! {{image_2}} You can still enjoy these rolls without nuts. Simply leave out the pecans. For added texture, try using sunflower seeds or pumpkin seeds. Both options give a nice crunch and flavor without the nuts. Want to mix it up a bit? You can add different spices to the filling. Try nutmeg or cardamom for a warm twist. If you're a chocolate lover, sprinkle in some chocolate chips. For a fruity touch, chopped apples or raisins work well too. Switch up the glaze for a fun twist. A simple vanilla icing is a great choice. Just mix powdered sugar with milk until smooth. You can also make a cream cheese frosting. Blend cream cheese, powdered sugar, and a bit of vanilla. This frosting adds a nice tangy flavor to the rolls. To keep your caramel pecan cinnamon rolls fresh, store them in an airtight container at room temperature. This method works well for up to three days. For longer storage, refrigerate them. Wrap each roll tightly in plastic wrap before placing them in a container. This helps prevent them from drying out. You can also freeze the rolls for up to three months. Place them in a freezer-safe bag or container. Make sure to label them with the date for easy reference. When reheating your rolls, you want to keep them moist and soft. The best way to do this is by using the oven or microwave. For the oven, preheat it to 350°F (175°C). Place the rolls on a baking sheet, cover them with foil, and heat for about 10-15 minutes. This helps keep the moisture in. If you use the microwave, place a roll on a microwave-safe plate. Cover it with a damp paper towel and heat for about 15-20 seconds. Check to see if it’s warm enough, and add more time if needed. Yes, you can make the dough ahead of time. Just prepare it as usual, then let it rise. After that, cover it and place it in the fridge. You can keep it there for up to 24 hours. This helps the flavors develop. When you're ready, let the dough come to room temperature before rolling it out. If you have a nut allergy, there are good options. You can use sunflower seeds or pumpkin seeds. These seeds give a nice crunch. You can also skip the nuts altogether and add more cinnamon filling. Dried fruits like raisins or cranberries also work well for sweetness. To check if your rolls are done, look for a golden brown color. They should also be puffy. Gently press on a roll; it should spring back. If it leaves an indent, they need more time. You want a soft and airy texture, not hard. Yes, you can use store-bought caramel sauce. It saves time and works well. However, homemade caramel adds a richer taste. If you choose store-bought, look for one with simple ingredients. This will help keep the flavors fresh and tasty. In this post, we covered how to bake delicious cinnamon rolls from scratch. You learned about the key ingredients and step-by-step instructions for making the dough, filling, and caramel sauce. We also explored tips for the perfect rise, how to adjust flavors, and ways to store your rolls. With these easy steps, you can enjoy fresh, homemade cinnamon rolls anytime. Don't hesitate to experiment with flavors or presentation. Happy baking!

Bakery-Style Caramel Pecan Cinnamon Rolls Delight

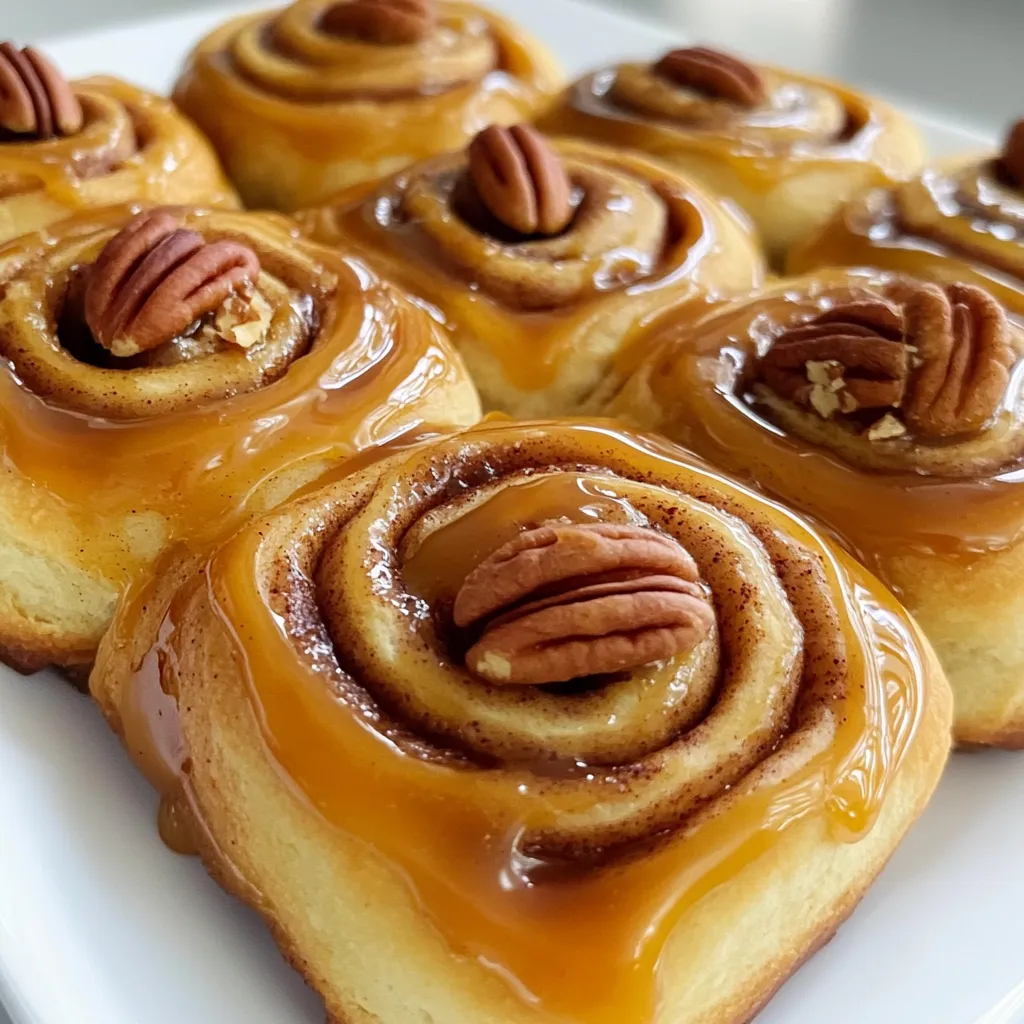
Get ready to bake the ultimate treat: Bakery-Style Caramel Pecan Cinnamon Rolls! These rolls are soft, sweet, and packed with

Older posts
Newer posts
← Previous Page1 … Page5 Page6 Page7 … Page86 Next →

dsad

© 2026 Emmas Dish • Built with GeneratePress

Our Policies

  • Copyright Policy
  • Cookie Policy
  • GDPR Policy
  • Privacy Policy
  • Disclaimer
  • Terms Of Use

More Information

  • Home
  • About
  • Contact
  • Appetizers
  • Dessert
  • Dinner
  • Drinks
©2026, Emmas Dish About Back To Top