Skip to content
DisclaimerTerms Of UseGDPR PolicyCookie Policy

Emmas Dish

  • Home
  • Drinks
  • Appetizers
  • Dinner
  • Dessert
  • About
  • Contact
  • Privacy Policy
DisclaimerTerms Of UseGDPR PolicyCookie Policy

NO-ING-IMG

- 2 ripe avocados, halved and pitted - 12 oz spaghetti or your choice of pasta - 2 cloves garlic, minced - 1 tablespoon lemon juice The main ingredients make the dish creamy and fresh. Ripe avocados are key, as they bring a rich texture. Choose spaghetti or any pasta you like. Garlic adds a nice kick, while lemon juice brightens everything up. - 1/4 cup grated Parmesan cheese - Cherry tomatoes, halved (for garnish) - Red pepper flakes (optional, for heat) Adding Parmesan cheese gives the dish a savory depth. Cherry tomatoes add color and sweetness. If you enjoy heat, red pepper flakes are a great choice. - Food processor - Large pot for boiling pasta A food processor helps blend the sauce into a creamy mix. Use a large pot to boil the pasta. These tools make the cooking process quick and easy. For the full recipe, check the [Full Recipe]. Enjoy making a delicious dish with these simple ingredients! Start by boiling a large pot of salted water. The salt adds flavor to the pasta. Once the water is boiling, add 12 oz of spaghetti or your choice of pasta. Cook until it is al dente, which means it should still have a bit of firmness. This usually takes about 8 to 10 minutes. After cooking, drain the pasta, but remember to save about 1/2 cup of the pasta water. This water will help make your sauce creamy. While your pasta cooks, let’s make the sauce. Take 2 ripe avocados and cut them in half. Scoop out the flesh and put it in a food processor. Add 2 cloves of minced garlic, 1 tablespoon of lemon juice, 1/4 cup of fresh basil leaves, and 1/4 cup of extra virgin olive oil. Blend everything until it is smooth and creamy. If the sauce is too thick, add a little of the reserved pasta water. Mix until you reach a nice, creamy consistency. Once your pasta is ready and drained, put it back in the pot. Pour the creamy avocado sauce over the pasta. Toss gently until every strand is well coated. Now, season your dish with salt and pepper to taste. If you like, add 1/4 cup of grated Parmesan cheese for extra flavor. Serve the pasta in bowls and garnish it with halved cherry tomatoes and a sprinkle of red pepper flakes if you want some heat. Enjoy this fresh and tasty meal! For the full recipe, check the details above. To make the best creamy avocado sauce, start with ripe avocados. Look for ones that are firm but yield slightly when you press gently. If they feel hard, they are not ready. If they feel mushy, they are overripe. For a smooth sauce, blend the avocado with garlic, lemon juice, basil, and olive oil. If it’s too thick, add some reserved pasta water. This helps achieve the perfect creamy texture. To boost flavor, think about adding herbs like parsley or dill. You can also sprinkle in some crushed red pepper flakes for a little heat. For garnishing, halved cherry tomatoes add color and freshness. A sprinkle of grated Parmesan cheese elevates the dish even more. Cook pasta until it's al dente, which means it should still have a slight bite. This adds texture to the dish. Always reserve some pasta water before draining. This water is starchy and can help adjust the sauce's thickness. It’s a simple trick that makes a big difference! {{image_2}} You can add protein to your creamy avocado pasta for a heartier meal. Grilled chicken or shrimp gives great flavor and texture. They cook quickly and pair well with the creamy sauce. For a vegetarian option, try tofu or chickpeas. Both add protein and blend nicely with the dish. If you need gluten-free options, choose gluten-free pasta. There are many kinds available that cook just like regular pasta. For a vegan dish, you can skip the cheese. The creamy avocado sauce stands strong on its own without it. To spice it up, add chopped jalapeños to the sauce. This gives your pasta a nice kick. For an Italian twist, use sun-dried tomatoes. They add a rich flavor that complements the avocado beautifully. Don’t be afraid to mix and match these ideas to create your perfect dish. For the complete recipe, check out the Full Recipe section! To store leftover creamy avocado pasta, place it in an airtight container. Make sure it is sealed well to keep the air out. This helps to slow down browning. You can keep it in the fridge for up to 2 days. After that, the taste and texture may change. Always check for any off smells or changes in color before eating. If you want to freeze creamy avocado pasta, follow these steps. First, let the pasta cool completely. Then, place it in a freezer-safe container or bag. Try to remove as much air as possible. You can freeze it for up to 2 months. When you’re ready to eat, thaw it in the fridge overnight. To reheat, place the pasta in a pot over low heat. Add a splash of water or extra olive oil. Stir gently until it warms through. You may need to add a bit more avocado or lemon juice to bring back the creaminess. Enjoy your meal as if it was freshly made! Can I make creamy avocado pasta ahead of time? Yes, you can make creamy avocado pasta ahead. However, the sauce may brown due to oxidation. To slow this, add lemon juice to the sauce. Store it in an airtight container in the fridge. When ready to eat, just mix it with freshly cooked pasta. What can I substitute for avocado? If you don’t have avocados, try using silken tofu. It gives a creamy texture without the fat. Another option is to use cooked butternut squash. Both will alter the flavor but still create a delicious sauce. How do I know when avocados are ripe? To check if avocados are ripe, gently squeeze them. They should feel slightly soft but not mushy. The skin should also be dark green or black, depending on the variety. If you see a stem, you can pop it off. If it’s green underneath, the avocado is ripe. Can I use other types of pasta? Absolutely! You can use any pasta you like. Whole wheat, gluten-free, or even spiralized veggies work well. The key is to cook the pasta al dente. This means it should be firm when bitten. Is creamy avocado pasta healthy? Yes! Creamy avocado pasta is packed with healthy fats from avocados. It also has fiber and vitamins. The dish is a great option for a balanced meal. Just watch the portion sizes if you are mindful of calories. How can I reduce calories in this dish? To lower the calories, use less pasta and more veggies. You can also skip the cheese or use a lighter version. Reducing the amount of olive oil in the sauce can help too. For a lighter meal, serve it with a side salad. For the full recipe, check out the [Full Recipe]. This blog post covered how to make creamy avocado pasta easily and deliciously. You learned about the main ingredients, step-by-step instructions, tips for flavor, and how to store leftovers. You can also customize the dish with proteins and dietary swaps. Enjoy experimenting with flavors and making it your own. This dish is not just tasty; it can fit many diets too. Try it out today and share your creation!

Creamy Avocado Pasta Quick and Simple Recipe

Are you ready to whip up a dish that’s both creamy and vibrant? My Creamy Avocado Pasta recipe takes just

To make a tasty savory oatmeal bowl, gather these main items: - 1 cup rolled oats - 3 cups vegetable broth - 1 cup spinach, chopped - 1 medium tomato, diced - 1/2 cup grated Parmesan cheese - 1/4 cup cooked chickpeas (canned or lightly roasted) - 1 tablespoon olive oil - 1 teaspoon garlic powder - Salt and pepper to taste - Red pepper flakes (optional, for garnish) - Fresh herbs (like parsley or basil) for garnish These ingredients come together to create a warm, filling meal. The oats provide a hearty base while the broth adds rich flavor. Spinach and tomato offer nutrients and color. Cheese and chickpeas add protein for a healthy boost. You can make your savory oatmeal even better with toppings. Here are some ideas: - A drizzle of extra olive oil - A sprinkle of red pepper flakes - Extra grated cheese on top - Sliced avocado or a poached egg - Chopped nuts or seeds These toppings not only add flavor but also enhance the dish's look. Feel free to mix and match! If you have special dietary needs, you can still enjoy savory oatmeal. Here are some easy swaps: - Use gluten-free oats if you avoid gluten. - Replace Parmesan with nutritional yeast for a vegan option. - Use vegetable stock or water instead of broth for lower sodium. - Add any veggies you like, such as kale or bell peppers. These changes keep the dish tasty and fit for your diet. You can create a delicious bowl that meets your needs. For the full recipe, check out the section above! To start, grab a medium saucepan and pour in 3 cups of vegetable broth. Heat it over medium heat until it boils. This broth gives the oats great flavor. Once it boils, add 1 cup of rolled oats. Stir well and reduce the heat to medium-low. Cook for 5 to 7 minutes. You want the oats to absorb most of the liquid and become creamy. Next, stir in 1 cup of chopped spinach and 1 medium diced tomato. Add 1/4 cup of cooked chickpeas, too. They add protein and texture. Sprinkle in 1 teaspoon of garlic powder for extra taste. Cook everything for another 2 to 3 minutes. The spinach should be wilted, and the dish should feel warm. Now, take the saucepan off the heat. Mix in 1/2 cup of grated Parmesan cheese until it melts into the oatmeal. Season with salt and pepper to taste. If you like some heat, add red pepper flakes. Spoon the oatmeal into bowls. Drizzle a little olive oil on top. Finish with fresh herbs for color and flavor. Serve it warm and enjoy your savory oatmeal bowl! You can find the Full Recipe above for more details. To make creamy oatmeal, I use vegetable broth instead of water. The broth adds rich flavor. Start by bringing the broth to a boil. Then, add the rolled oats and lower the heat. Stir often while cooking. This helps the oats absorb the broth well. Cook for about 5-7 minutes until thickened and creamy. Savory oatmeal works best with fresh vegetables and proteins. I love adding spinach, tomatoes, and chickpeas. They bring color and taste. You can also try bell peppers or mushrooms. For a cheesy touch, add grated Parmesan. It melts in beautifully. Season with garlic powder, salt, and pepper for depth. To boost nutrition, add seeds or nuts. Chia seeds or walnuts provide healthy fats. Fresh herbs like parsley or basil add vitamins and flavor. You can use leftovers, too! Cooked veggies or proteins from meals work great. This way, you waste less food while creating a hearty dish. For the full recipe, check out Savory Oatmeal Bowls. {{image_2}} Want to make a vegan version? It's simple! Just swap out the Parmesan cheese for nutritional yeast. This gives a cheesy flavor without dairy. You can also add avocado slices for creaminess. Try using vegetable broth or water for cooking. Toss in any of your favorite veggies, like mushrooms or bell peppers. These options boost the taste and nutrients! If you need gluten-free oatmeal, choose certified gluten-free rolled oats. Most oats come from farms that process other grains. This can cause cross-contamination. Always check the label for safety. You can still enjoy the same savory flavors. Use chickpeas, spinach, and herbs as toppings. These ingredients are naturally gluten-free and delicious! Looking to spice things up? Think about global flavors. You might try an Asian twist with soy sauce and ginger. For a Mexican flair, use black beans and avocado. You could make a Mediterranean bowl with olives and sun-dried tomatoes. The options are endless! With each variation, you create a new dish. These choices keep your meals fun and fresh. For the full recipe, check out Savory Oatmeal Bowls. After making savory oatmeal, let it cool first. Then, store it in an airtight container. It will last for about three to four days in the fridge. Make sure it is sealed well to keep out air. This helps keep the flavors fresh and prevents it from drying out. You can freeze savory oatmeal for later use. First, let it cool completely. Then, place it in freezer-safe containers or bags. Label them with the date. Frozen oatmeal can stay good for up to three months. When you are ready to eat it, thaw it in the fridge overnight. To reheat savory oatmeal, add a splash of water or broth. This helps restore creaminess. Heat it on the stove over medium heat or in the microwave. Stir it every 30 seconds in the microwave to avoid hot spots. If you want to enjoy the full flavor, add fresh herbs or a drizzle of olive oil before serving. Feel free to check out the Full Recipe for more details on making this dish! The best way to prepare savory oatmeal is to start with vegetable broth. It adds rich flavor. Bring the broth to a boil, then add rolled oats. Cook on medium-low heat until creamy. Stir in fresh vegetables like spinach and tomatoes for added nutrients. Top it off with cheese and seasonings for a delicious meal. This method ensures you get the best taste and texture. Yes, you can prepare savory oatmeal in advance! Cook the oatmeal as directed and let it cool. Store it in an airtight container in the fridge. When ready to eat, simply reheat it on the stove or in the microwave. If the oatmeal thickens too much, add a splash of broth or water to loosen it up. This way, you save time during busy mornings. Savory oatmeal is packed with health benefits. It is high in fiber, which helps digestion. The oats provide long-lasting energy, making it a great breakfast. Adding vegetables boosts vitamins and minerals, while chickpeas add protein. This meal is also low in sugar compared to sweet oats. You can enjoy a hearty and nutritious bowl that supports your wellness goals. For the full recipe, see above. Savory oatmeal bowls are a tasty and healthy choice. We explored the main ingredients, toppings, and dietary substitutions. You learned how to make your base oatmeal and add veggies and protein. We shared tips on cooking methods, flavor pairings, and nutrition. You can create vegan and gluten-free versions or try global flavors. Lastly, we discussed storage and reheating methods. Enjoy your savory oatmeal adventure! Remember, it’s simple to customize and makes for a great meal at any time.

Savory Oatmeal Bowls Flavorful and Nutritious Meal

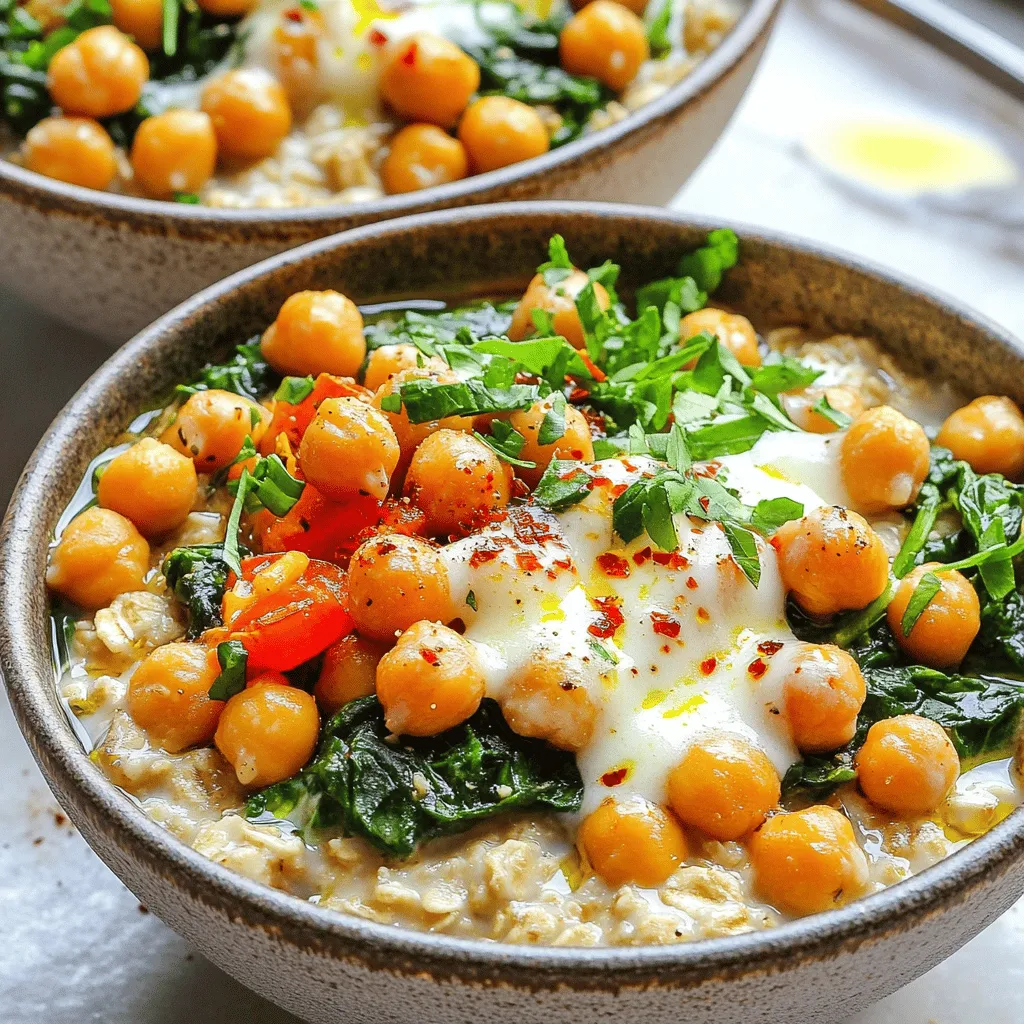
Are you ready to transform your breakfast routine? Savory oatmeal bowls are a tasty and healthy option you won’t want

- 2 cups all-purpose flour - 1 cup fresh cranberries, halved - 1 large orange, zested and juiced - 3/4 cup granulated sugar - 1/2 cup unsalted butter, melted - 1/2 cup buttermilk - 2 large eggs - 2 teaspoons baking powder - 1 teaspoon baking soda - 1/2 teaspoon salt - 1 teaspoon vanilla extract - 1/4 cup rolled oats (for topping) What can I use instead of cranberries? If you cannot find cranberries, you can use blueberries or raspberries. Both add a sweet-tart flavor. What can I use for gluten-free flour? Use a 1:1 gluten-free flour blend. This works well in most recipes. What dairy-free options are there for buttermilk? You can make buttermilk with almond milk or soy milk. Just add a teaspoon of vinegar to each cup. 1. Preheat your oven to 375°F (190°C). This helps your muffins bake evenly. 2. Line a muffin tin with paper liners or grease it with nonstick spray. This keeps the muffins from sticking. 3. In a large mixing bowl, whisk together: - 2 cups all-purpose flour - 2 teaspoons baking powder - 1 teaspoon baking soda - 1/2 teaspoon salt Mix until everything is well combined. This step ensures your muffins rise properly. 1. In another bowl, beat together: - 1/2 cup melted unsalted butter - 3/4 cup granulated sugar Mix until creamy and smooth. 2. Next, add: - 2 large eggs - 1/2 cup buttermilk - Juice from 1 large orange - 1 teaspoon vanilla extract Stir until everything is well combined. The mixture should be smooth and slightly thick. 1. Gently fold in: - Zest of 1 large orange - 1 cup halved fresh cranberries 2. Gradually mix in the dry ingredients. Stir until just combined. The batter should be slightly lumpy; do not overmix. 3. Spoon the batter into your prepared muffin tin. Fill each cup about 3/4 full. 4. For extra texture, sprinkle: - 1/4 cup rolled oats on top of each muffin. 5. Bake in your preheated oven for 18-20 minutes. Check for doneness by inserting a toothpick. It should come out clean. 6. Let the muffins cool in the pan for 5 minutes. Then transfer them to a wire rack. Enjoy your warm muffins! You can find the complete instructions in the Full Recipe. To make great muffins, you must avoid overmixing the batter. Overmixing can make your muffins tough. Mix just until you see no dry flour. The batter should look slightly lumpy. This will give you soft, fluffy muffins. To check if your muffins are done, use a toothpick. Insert it in the center of a muffin. If it comes out clean, the muffin is ready. If it has wet batter on it, bake a few minutes more. Cranberry orange muffins shine when served warm. Add a dab of butter on top for extra flavor. You can also sprinkle a bit of orange zest for a pop of color. These muffins are great for breakfast or as a snack. Pair them with yogurt or a cup of tea. They also go well with a light salad for lunch. To make your muffins even better, think about adding spices. A pinch of cinnamon or nutmeg can boost the flavor. These spices pair well with the tart cranberries and sweet orange. You can also add nuts or seeds for crunch. Chopped walnuts or sunflower seeds work well. They add a nice texture and make the muffins even more satisfying. For the full recipe, check out the Cranberry Orange Bliss Muffins section. {{image_2}} You can easily change the flavor of your cranberry orange muffins. Adding chocolate chips gives a sweet twist. I like to mix in about 1 cup of semi-sweet chocolate chips. You can also add nuts like walnuts or pecans for a nice crunch. Just use 1/2 cup of chopped nuts. You can also play with citrus flavors. Try mixing in lemon or lime juice with the orange juice. This adds a nice zing to the muffins. Just use the same amount of juice as you would for orange. Want to make your muffins a bit healthier? You can reduce the sugar. Try 1/2 cup of sugar instead of 3/4 cup. This still keeps the muffins sweet but cuts down on the sugar. You can also use whole wheat flour instead of all-purpose flour. This adds fiber and makes the muffins more filling. If you want a heartier muffin, try adding oats. Replace 1/2 cup of flour with 1/2 cup of rolled oats. Making mini muffins is fun and easy! Just adjust the bake time. Bake mini muffins for about 12-15 minutes. Check them with a toothpick to make sure they are done. Mini muffins are perfect for snacks or parties. I like to serve them with a side of cream cheese or a fruit spread. They look cute and taste great! For the best flavor, serve them warm right out of the oven. For the full recipe, check out the Cranberry Orange Bliss Muffins. To keep your cranberry orange muffins fresh, store them in an airtight container. They stay good in the fridge for up to one week. If you want to keep them longer, freezing is a great option. - Refrigerator Storage: Let them cool completely. Place muffins in a single layer. Use parchment paper between layers to prevent sticking. Seal tightly with a lid or plastic wrap. - Freezing Muffins: Wrap each muffin in plastic wrap. Then, place them in a freezer bag. You can freeze them for up to three months. Label the bag with the date for easy tracking. To enjoy your muffins warm, reheating is key. Here’s how to do it right. - Reheat for Best Texture: Preheat your oven to 350°F (175°C). Place muffins on a baking sheet. Heat for about 10 minutes. This keeps them soft and moist. - Refreshing Muffins After Freezing: If frozen, remove the muffin from the bag. Let it thaw in the fridge overnight. Reheat in the oven as mentioned. You can also microwave for about 20 seconds, but this may make them a bit chewy. Enjoy your muffins fresh every time! For the full recipe, refer to the Cranberry Orange Bliss Muffins 🫓 section. To keep muffins moist, use buttermilk or yogurt in the batter. These ingredients add moisture. Avoid overmixing your batter, as this can make muffins dry. Also, bake them just until a toothpick comes out clean. If you leave them in the oven too long, they can lose moisture. - Use buttermilk or yogurt - Don’t overmix the batter - Bake until toothpick is clean Yes, you can use frozen cranberries. Just toss them into the batter while still frozen. This helps them keep their shape during baking. Fresh cranberries have a bright flavor, but frozen work well too. They can be a great option when fresh ones are out of season. - Toss frozen cranberries directly into batter - Fresh cranberries have a brighter taste - Frozen cranberries are good for off-season baking If you have leftover muffins, don't worry! You can repurpose them in fun ways. Crumble stale muffins over yogurt or ice cream for a treat. You can also make a bread pudding by soaking them in a custard mixture. Another idea is to freeze them for later use. - Crumble over yogurt or ice cream - Make bread pudding with a custard mix - Freeze for later use To zest an orange, use a microplane or a fine grater. Hold the orange firmly and rub it against the grater. Be careful not to grate the white pith, as it tastes bitter. You only want the colorful outer skin. This zest adds a bright flavor to your muffins. - Use a microplane or fine grater - Rub the orange against the grater - Avoid grating the white pith for better taste This blog post showed how to make delicious cranberry orange muffins. We covered all the key ingredients, from flour to fresh cranberries, and how to mix them. You also learned some handy tips to bake perfect muffins every time. Remember, you can tweak this recipe to fit your taste. Try adding different flavors or using substitutes if needed. Enjoy your time baking and sharing these tasty treats!

Cranberry Orange Muffins Delightful and Simple Recipe

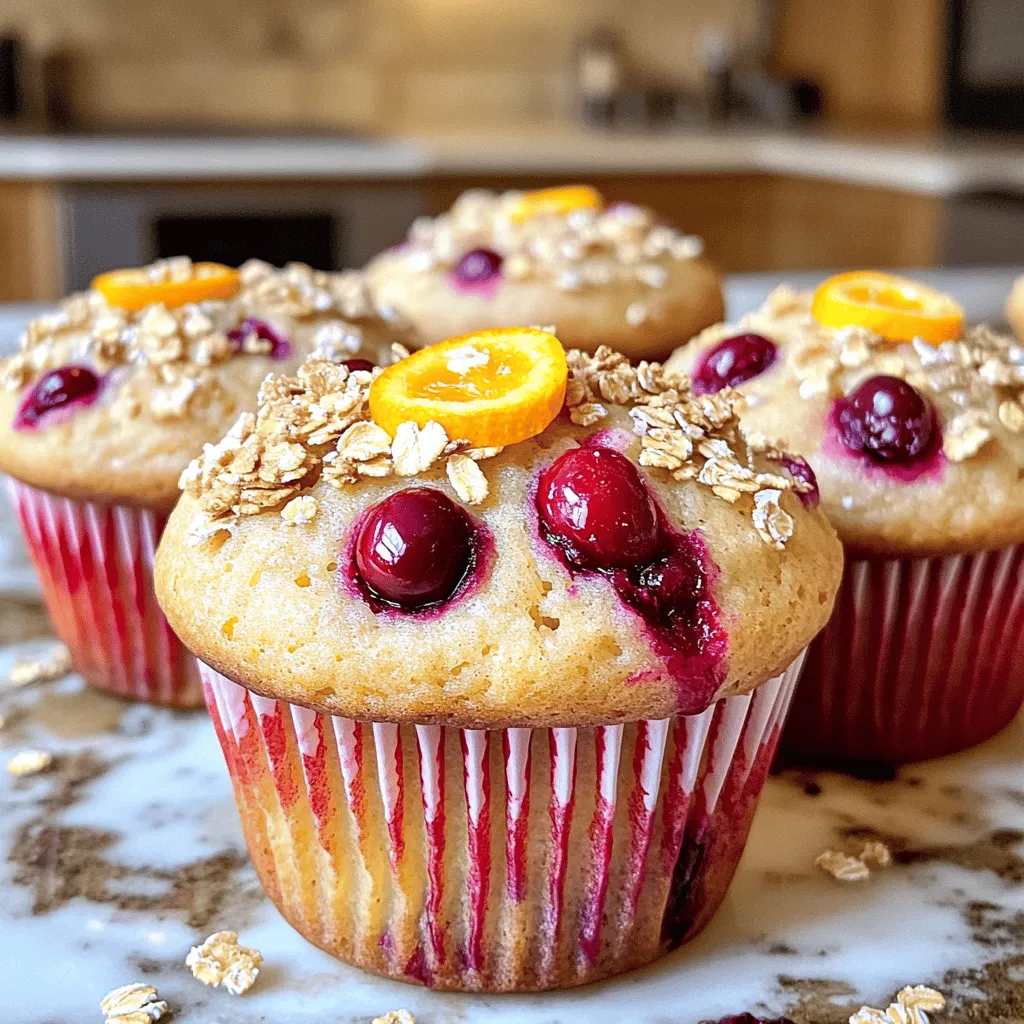
Welcome to my simple and delightful recipe for cranberry orange muffins! These muffins burst with fresh flavors and are easy

- 3 ripe bananas - 1/3 cup melted butter - 1 teaspoon baking soda - Pinch of salt - 3/4 cup sugar - 1 large egg - 1 teaspoon vanilla extract - 1 1/2 cups all-purpose flour - 1/2 cup chocolate chips - 1/4 cup chopped walnuts (optional) When making chocolate chip banana bread, I love using ripe bananas. They add natural sweetness and moisture. The melted butter gives the bread a rich flavor. Baking soda helps it rise and makes it fluffy. A pinch of salt balances the sweetness. Sugar sweetens the bread, while the egg adds richness and binds everything together. I always add vanilla extract for a warm flavor. All-purpose flour forms the base of the bread. Chocolate chips offer that sweet, melty surprise in every bite. If you want a crunch, add chopped walnuts. Understanding volume vs weight is key for baking. Volume measures how much space an ingredient takes. Weight measures how heavy the ingredient is. Both methods work, but weight gives more accuracy. Precise measurements are vital. Too much flour can make the bread dry. Too little sugar can make it bland. I always use a kitchen scale for best results. This way, I ensure my chocolate chip banana bread turns out perfect every time. First, gather all your ingredients. You will need ripe bananas, melted butter, baking soda, salt, sugar, an egg, vanilla extract, flour, chocolate chips, and chopped walnuts if you want. Measure each ingredient carefully. This helps your bread come out just right. Next, preheat your oven to 350°F (175°C). This step is key. A hot oven ensures even baking. While the oven heats, you can mix your ingredients. In a mixing bowl, combine your melted butter with the mashed bananas. Use a wooden spoon for this. Stir until smooth. Then, add the baking soda and salt. Mix well. Now, stir in the sugar, beaten egg, and vanilla extract. Make sure it's all blended together. After that, gently add the flour. Mix just until the flour disappears. Overmixing can make the bread tough. Finally, fold in the chocolate chips and walnuts. Pour the batter into a greased 9x5-inch loaf pan. Smooth the top with your spatula. Bake it in the oven for 60 to 65 minutes. To check if your bread is done, insert a toothpick into the center. If it comes out clean, it’s ready. If there is batter on the toothpick, bake it a few more minutes. For a moist center, avoid opening the oven too soon. This can cause the bread to sink. After baking, let it cool for ten minutes in the pan. Then, transfer it to a wire rack to cool completely. Enjoy your delicious treat! To make the best chocolate chip banana bread, avoid overmixing. When you combine the flour, mix just until you see no dry spots. Overmixing can make the bread tough. Use ripe bananas; they give the bread a sweet flavor and moist texture. If your bananas are not ripe, gently bake them at 300°F for 15-20 minutes. This speeds up the ripening process. To ripen bananas faster, place them in a brown paper bag. The gas they give off speeds up ripening. For chocolate, I prefer dark or semi-sweet chips. They balance well with the sweet bananas. You can also try using chopped chocolate bars for a different texture. Slice the banana bread once it has cooled. Serve it warm for the best taste. A dollop of whipped cream or a sprinkle of powdered sugar adds flair. For a fun touch, place a few chocolate chips on the cut surfaces. This makes it look inviting and delicious. For more detailed steps, check the Full Recipe. {{image_2}} To make gluten-free chocolate chip banana bread, swap the all-purpose flour for gluten-free flour. Use a blend that includes xanthan gum for the best texture. The flavor remains rich and sweet, thanks to ripe bananas and chocolate chips. You may notice a slightly different crumb, but it will still taste great. For a vegan version, replace the egg with a flax egg, made by mixing one tablespoon of ground flaxseed with three tablespoons of water. Use coconut oil or a vegan butter substitute instead of regular butter. This keeps the bread moist and tasty. Bake it like the original recipe, and you’ll enjoy a delicious treat without animal products. You can customize your banana bread by adding mix-ins. Consider folding in berries like blueberries or raspberries for a fruity twist. You can also add spices like cinnamon or nutmeg for warmth. These small changes make your bread unique and fun. Adjust the chocolate chips if you want to balance the sweetness. Experiment with flavors that you love! To keep your banana bread fresh, follow these simple tips: - Cool Completely: Let the bread cool on a wire rack. - Wrap Well: Use plastic wrap or foil to cover the bread. - Store in a Container: Place it in an airtight container. For short-term storage, keep it at room temperature for up to 3 days. This helps maintain its soft texture. If you want to store it longer, the fridge is a good option, but it may dry out. Freezing your banana bread is easy. Here’s how: 1. Cool Completely: Make sure the bread is cool before freezing. 2. Wrap It Tight: Wrap the bread in plastic wrap. Then, wrap it in foil for extra protection. 3. Label and Date: Write the date on the foil so you remember. To thaw and reheat, follow these steps: - Thaw Overnight: Place the bread in the fridge overnight. - Warm It Up: Reheat slices in the microwave for about 10-15 seconds. This makes your chocolate chip banana bread taste fresh again! You can find the Full Recipe for even more details on making this delicious treat. Yes, you can use frozen bananas. They work great in banana bread. Frozen bananas are soft and easy to mash. They add natural sweetness and moisture. Just thaw them before using. They may even enhance the flavor! Chocolate chip banana bread stays fresh for about 3-4 days at room temperature. Keep it in an airtight container. If you store it in the fridge, it can last up to a week. You can also freeze it for up to three months. Sure! If you want a less sweet version, skip the chocolate chips. You can also add nuts or dried fruits instead. They give a nice texture and flavor without the extra sweetness. Dense banana bread often happens for a few reasons. Overmixing the batter can cause this. Using too many bananas or not enough flour can also lead to density. Make sure to mix just until combined and measure your ingredients accurately. Yes, you can double the recipe! Just use a larger mixing bowl and a bigger loaf pan. You may need to adjust the baking time. Check for doneness using a toothpick. The center should be clean when it's fully baked. For the full recipe, refer to the previous section. In this blog post, I covered how to make chocolate chip banana bread. I shared key ingredients and their measurements, along with step-by-step instructions for baking. We explored tips for perfect texture and flavor, including ways to customize your bread. Plus, I discussed storage methods to keep it fresh. This delightful treat is easy to make and versatile. You can adapt it to fit your needs. Enjoy your baking journey!

Chocolate Chip Banana Bread Simple and Delicious Treat

If you’re craving a simple and tasty treat, look no further than chocolate chip banana bread! This recipe combines the

To make One-Pot Creamy Tuscan Pasta, gather these simple ingredients: - 12 oz (340g) pasta (penne or fusilli works well) - 2 tablespoons olive oil - 3 cloves garlic, minced - 1 teaspoon red pepper flakes (optional for heat) - 2 cups cherry tomatoes, halved - 1 cup fresh spinach leaves - 1 cup heavy cream - 1 cup vegetable broth - 1 teaspoon Italian seasoning - ½ cup grated Parmesan cheese - Salt and pepper to taste - Fresh basil leaves for garnish You can swap ingredients to match your taste. Try different pasta shapes like spaghetti or farfalle. If you love more heat, add extra red pepper flakes. You can use whole garlic cloves for a milder flavor. Fresh herbs like oregano or thyme can replace Italian seasoning. For a lighter dish, substitute heavy cream with half-and-half or a plant-based cream. If you want more veggies, add zucchini or bell peppers. Using fresh ingredients makes a big difference in taste. Fresh spinach adds color and nutrients. Ripe cherry tomatoes burst with flavor and sweetness. Fresh basil gives a bright aroma. The quality of your olive oil also matters; a good oil enhances the dish's richness. Always aim for the freshest ingredients you can find. This will ensure your One-Pot Creamy Tuscan Pasta is tasty and satisfying. For the complete cooking process, check the Full Recipe. To make One-Pot Creamy Tuscan Pasta, start by gathering your ingredients. You need pasta, olive oil, garlic, red pepper flakes, cherry tomatoes, spinach, heavy cream, vegetable broth, Italian seasoning, Parmesan cheese, salt, and pepper. This dish takes about 10 minutes to prep. 1. Heat olive oil in a large pot over medium heat. 2. Add minced garlic and red pepper flakes. Sauté for about 1 minute. 3. Add halved cherry tomatoes. Cook for 3-4 minutes until they soften. 4. Stir in pasta, vegetable broth, heavy cream, and Italian seasoning. Mix well. 5. Bring to a simmer, cover, and cook for 12-15 minutes. Stir occasionally. 6. When pasta is al dente, add spinach and Parmesan cheese. Mix until the spinach wilts. 7. Season with salt and pepper. Serve immediately and garnish with basil leaves. - Use a large pot to avoid sticking. - Stir the pasta often while cooking. - Taste the pasta a minute before time is up. - Remember, it will keep cooking after you remove it from heat. - If the sauce is too thick, add a splash of broth or water. Following these steps will help you create a creamy, flavorful dish. You can find the full recipe for One-Pot Creamy Tuscan Pasta in the previous section. Enjoy your cooking! One big mistake is overcooking the pasta. Always check it a minute early. It should be al dente, not mushy. Another mistake is not using enough seasoning. Taste as you cook. This dish needs salt and pepper to shine. Lastly, don’t skip the fresh basil. It adds a bright touch that makes the dish pop. To boost flavors, think about adding spices. You can try smoked paprika for a warm taste. A pinch of cayenne pepper gives it a nice kick. If you love herbs, fresh thyme or oregano work well. Just a little can elevate your pasta. Don’t forget to experiment with the red pepper flakes. If you like heat, add more! Texture makes a dish exciting. To keep your pasta creamy, stir well as it cooks. This helps blend the sauce with the pasta. You can also add a splash of pasta water for a silkier sauce. If you want some crunch, top your dish with toasted pine nuts. They add a delightful crunch that contrasts the creaminess. For the complete recipe, feel free to check the Full Recipe above! {{image_2}} You can make this dish vegetarian easily. Simply skip the meat and use more veggies. Zucchini, bell peppers, or mushrooms add great flavor. You can also use extra spinach for a healthy twist. Try adding some artichokes for a unique taste. These options keep the dish hearty and delicious without meat. If you want to add protein, chicken or shrimp work well. For chicken, cut it into small pieces and cook it first in the pot. Add garlic and red pepper flakes before the tomatoes. For shrimp, add them just before the pasta is done cooking. They only take a few minutes to cook. This makes the dish more filling and tasty. To make this dish vegan, swap out the heavy cream and cheese. Use coconut cream or cashew cream for a rich texture. Nutritional yeast can replace Parmesan cheese for a cheesy flavor. Make sure to use vegetable broth that is vegan-friendly. These changes keep the creamy taste while being plant-based. Check out the Full Recipe for more details. To keep your creamy Tuscan pasta fresh, store it in an airtight container. Make sure it cools down first. Place it in the fridge. It will stay good for up to three days. If you want to keep it longer, consider freezing it. When it’s time to reheat, you can use the stove or microwave. For the stove, place the pasta in a pot. Add a splash of water or broth to help it heat evenly. Stir often over low heat until warm. If using the microwave, place it in a microwave-safe bowl. Cover it loosely and heat in short bursts, stirring in between. This helps avoid dry spots. If you want to freeze the pasta, make sure it is cooled completely. Scoop portions into freezer bags. Squeeze out the air and seal tightly. Label the bags with the date. You can freeze it for up to three months. When ready to eat, thaw it overnight in the fridge before reheating. You can use penne or fusilli for this dish. Both types hold the sauce well. I like penne for its smooth edges. Fusilli twists grab more sauce and ingredients. You can also try rotini or farfalle if you want a fun shape. The key is to pick a pasta that cooks evenly and mixes well with the creamy sauce. Yes, you can make this dish dairy-free! Use coconut cream or cashew cream instead of heavy cream. For cheese, try a dairy-free alternative or nutritional yeast. You can also add more vegetables for flavor and texture. Just remember to check labels for any hidden dairy ingredients. To add heat, increase the red pepper flakes. You can add a little cayenne pepper too. For a fresh kick, try sliced jalapeños or a dash of hot sauce. Remember to adjust based on your spice level. Taste as you go to find your perfect heat! This blog post covered key ingredients, cooking steps, and handy tips for pasta. I stressed the need for fresh ingredients to boost taste. I also shared common mistakes and how to fix them. Consider different variations like vegetarian or vegan options to suit your needs. Storing your leftovers properly ensures they still taste great later. Use these tips to make your pasta dishes shine and impress your guests!

One-Pot Creamy Tuscan Pasta Delightful Weeknight Meal

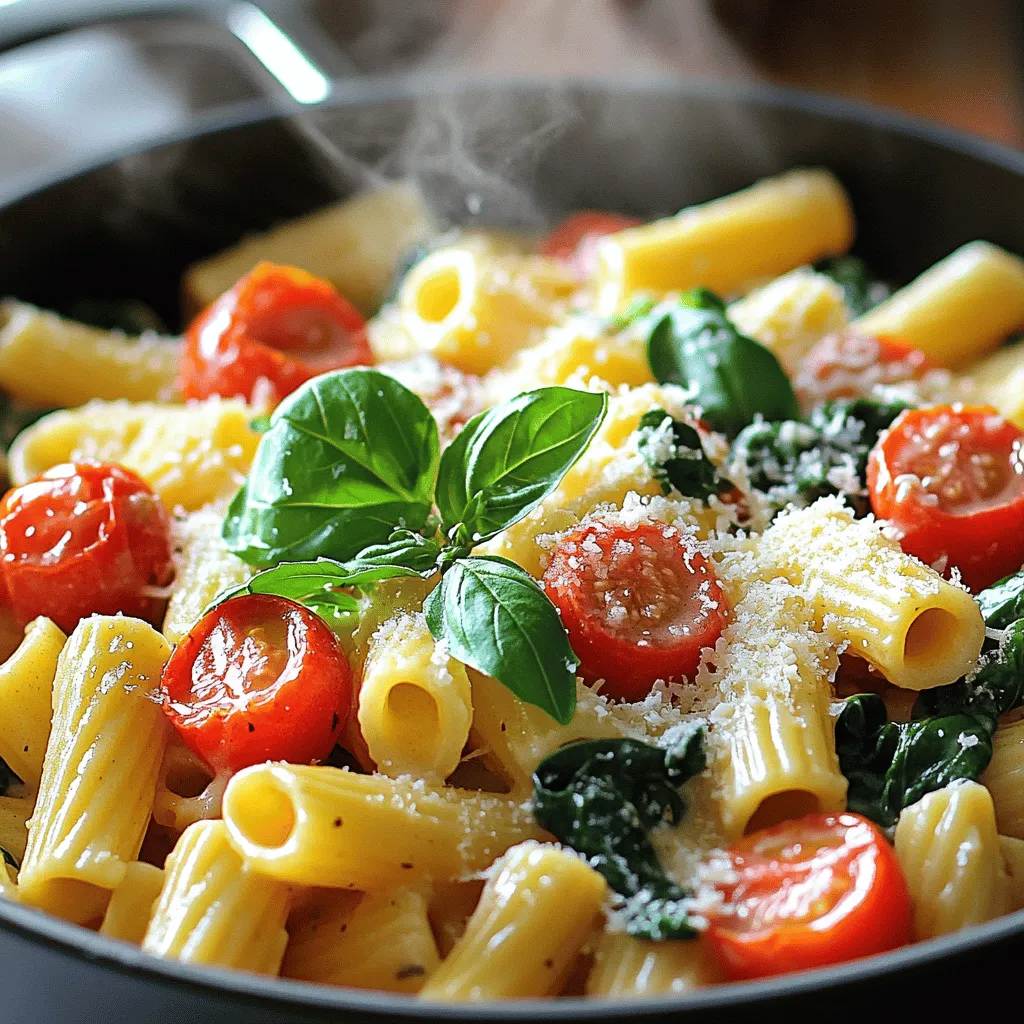
Are you ready to transform your weeknight dinner routine? My One-Pot Creamy Tuscan Pasta is quick, simple, and so full

- Whole wheat tortilla - Shredded mozzarella cheese - Black beans - Corn kernels - Bell peppers (red and yellow) - Zucchini - Spices (cumin and chili powder) - Olive oil - Salt and pepper - Fresh cilantro (optional) - Salsa for serving To make tasty veggie quesadillas, you need a few simple ingredients. Start with a whole wheat tortilla. It adds a nice texture and flavor. Next, grab some shredded mozzarella cheese. This cheese melts beautifully, making your quesadilla gooey. Add black beans for protein. They also boost the dish's fiber. Don't forget corn kernels for sweetness and crunch. Bell peppers give a pop of color and taste. Use both red and yellow for a rainbow effect. Zucchini is another great veggie. It cooks quickly and adds moisture. Spices are key for flavor. Cumin and chili powder bring warmth and depth. You will also need olive oil for cooking. It helps the veggies sauté well. Salt and pepper enhance all the flavors, so use them to taste. Finally, fresh cilantro adds a nice touch, but it's optional. Serve your quesadillas with salsa for dipping. For the full recipe, check out the Rainbow Veggie Quesadillas section! - Heat 1 tablespoon of olive oil in a non-stick skillet over medium heat. - Add 1/4 cup diced red bell pepper, 1/4 cup diced yellow bell pepper, and 1/4 cup thinly sliced zucchini. Sauté these for 3-4 minutes until they soften a bit. - Stir in 1/4 cup black beans, 1/4 cup corn kernels, 1/4 teaspoon cumin, 1/4 teaspoon chili powder, and salt and pepper to taste. Cook for another 2 minutes until heated through. Set this vegetable mix aside. - Clean the skillet and place it back on heat. Put 1 whole wheat tortilla in the skillet. - Sprinkle half of 1/2 cup shredded mozzarella cheese on one half of the tortilla. - Evenly layer the cooked veggie mix on the cheese, then add the rest of the mozzarella on top. - Fold the tortilla over to cover the filling and press down gently. Cook for 2-3 minutes until the bottom turns golden brown and the cheese melts. - Flip the quesadilla carefully and cook for another 2-3 minutes until both sides are golden and crispy. - Remove from heat and let it cool for a minute. Slice the quesadilla into wedges. - Garnish with fresh cilantro if you like. - Serve with salsa for dipping. For the full recipe, check out the Rainbow Veggie Quesadillas. - Ensure even cooking on both sides. Flip carefully to avoid spills. - Use fresh vegetables for better flavor. Fresh produce adds bright tastes. - Experiment with cheese alternatives. Try cheddar, goat cheese, or a dairy-free option. - Use a tortilla press for even thickness. This helps cook evenly and crisp well. - Keep the skillet at medium heat for best results. This prevents burning while cooking. - Ideal side dishes for your veggie quesadilla include a fresh salad or guacamole. - Best beverages to complement the meal are light beers, lemonade, or sparkling water. For more details, check out the Full Recipe. {{image_2}} You can easily change this recipe to fit your needs. Here are some ideas: - Gluten-free tortilla options: Use corn tortillas or gluten-free wraps. Both work great. - Vegan cheese substitutions: Try almond, cashew, or soy cheese. They melt well and taste good. - Additional protein sources: Add tofu or tempeh for more protein. Both are tasty when cooked right. Want to make your quesadillas pop? Here are some flavor boosters: - Adding different spices or herbs: Try oregano, paprika, or fresh basil. Each adds a new twist. - Incorporating avocado or guacamole: Add creaminess and healthy fats. They make every bite better. - Using different types of cheese: Mix in sharp cheddar or pepper jack. These add unique flavors and melt nicely. Using local and seasonal ingredients makes a big difference. Here are some ideas: - Using seasonal vegetables: Try zucchini in summer or pumpkin in fall. Fresh veggies taste better. - Regional spice variations: Use spices from different regions. For example, add chipotle for a Mexican kick or smoked paprika for Southwestern flair. Feel free to explore these options. Your veggie quesadillas can be unique and delicious! For the full recipe, check out the Rainbow Veggie Quesadillas. To keep your veggie quesadillas fresh, store them in an airtight container. Place a piece of parchment paper between layers to prevent sticking. Refrigerate them right after they cool down. They will stay good for about 3 to 4 days. If you want to keep them longer, consider freezing. When reheating, the skillet is the best choice. Heat it over medium heat. This method helps keep the quesadilla crispy. If you use a microwave, place a paper towel underneath. This will absorb extra moisture and keep it from getting soggy. Heat in short bursts, checking often. Freezing quesadillas is easy. Wrap each one tightly in plastic wrap and then foil. Label them with the date. For best taste, use them within 2 to 3 months. When you’re ready to eat, remove the wrap and heat from frozen in the skillet. This will help maintain that lovely crispy texture. You can use several cheese options. Try cheddar, Monterey Jack, or pepper jack. If you want a vegan option, go for cashew cheese or tofu-based cheese. Each choice brings a unique flavor. Cheddar adds sharpness, while pepper jack gives a spicy kick. Choose what you like best for your quesadilla! Yes, you can prepare veggie quesadillas in advance. Cook the filling and let it cool. Fill the tortillas and wrap them tightly in foil or plastic wrap. Store them in the fridge for up to two days. When you are ready to eat, just heat them in a pan or the oven. This helps save time on busy days! To achieve a crispy quesadilla, use a hot skillet. Preheat the skillet on medium heat before adding oil. Use enough oil to coat the pan lightly. Press down on the quesadilla while cooking. This helps the cheese melt and the tortilla crisp up. Flip it carefully to cook both sides evenly. Enjoy that perfect crunch! Absolutely! Frozen vegetables work great in quesadillas. They are quick to use and often pre-washed. Just thaw and drain them before adding to your filling. This saves prep time and still gives you tasty results. Fresh herbs can elevate your quesadilla. Try adding cilantro, parsley, or green onions. These herbs add freshness and brightness to the dish. Sprinkle them on before serving or mix into the filling. They make your quesadilla even more delicious! Yes, you can! Simply swap whole wheat tortillas for gluten-free ones. Corn tortillas are a great choice. They offer a nice texture and taste. Just check the label to ensure they are certified gluten-free. To store leftovers, let them cool completely. Place them in an airtight container. They can last in the fridge for up to three days. For best results, reheat them in a skillet for a crispy finish. Avoid the microwave if you want to keep that crunch! Salsa is a classic choice. You can also try guacamole or sour cream. A lime crema adds a nice twist. These sauces complement the flavors of your quesadilla well. Feel free to mix and match based on your taste! For a full recipe, check out the Rainbow Veggie Quesadillas! These veggie quesadillas are simple to make and full of flavor. We covered ingredients, preparation steps, cooking tips, and serving ideas. You can customize them with different veggies or spices. Remember, fresh ingredients make a big difference. Storing leftovers and reheating properly keeps them tasty. Whether you're vegan or gluten-free, there are variations to fit your needs. Enjoy making and sharing this tasty meal with others.

Veggie Quesadillas Tasty and Easy Recipe Guide

Are you ready to make veggie quesadillas that are tasty and simple? I’ll guide you through every step. Using easy-to-find

- 1 lb chicken breast, cut into 1-inch cubes - 1/4 cup honey - 1/4 cup dijon mustard - 1 tablespoon olive oil - 2 cloves garlic, minced - 1 teaspoon paprika - Salt and pepper to taste - 1 bell pepper, cut into 1-inch pieces - 1 red onion, cut into 1-inch pieces - Wooden skewers (soak in water for 30 minutes) - Metal skewers Gather these items to make your honey mustard chicken skewers delicious. The chicken breast is the star here, and cutting it into cubes helps it cook fast and evenly. Honey and dijon mustard blend into a sweet and tangy marinade that makes the chicken shine. Don’t skip the olive oil, garlic, and paprika. Olive oil keeps the chicken moist, while garlic adds flavor. Paprika gives the skewers a lovely color and mild spice. You can use any bell pepper and onion color you like. They add crunch and sweetness. For skewers, wooden ones are great but soak them first. This step stops them from burning. Metal skewers are reusable and won’t need soaking. Check the full recipe for more details. These ingredients create a fun and tasty meal that everyone will love! To make the marinade, whisk together the honey, dijon mustard, olive oil, minced garlic, paprika, salt, and pepper in a large bowl. This blend creates a sweet and tangy flavor that pairs well with chicken. Next, add the cubed chicken to the bowl. Stir gently to ensure the chicken is well coated with the marinade. Cover the bowl and let it sit in the refrigerator for at least 30 minutes. For a stronger flavor, marinate for up to 2 hours. Now it's time to assemble the skewers. When you thread the chicken onto the skewers, it helps to alternate with pieces of bell pepper and red onion. This not only adds flavor but also makes the skewers look colorful. To thread onto the skewers, push the ingredients through in a pattern, leaving some space between each piece for even cooking. If you use wooden skewers, soak them in water for 30 minutes before grilling to prevent burning. Preheat your grill or grill pan over medium-high heat. This step is crucial for getting those nice grill marks. Once the grill is hot, place the skewers on it. Cook for about 10-12 minutes, turning occasionally. Make sure the chicken reaches an internal temperature of 165°F for safety. After grilling, remove the skewers from the heat and let them rest for a few minutes. This resting period allows the juices to redistribute, keeping the chicken tender and juicy. Enjoy your delicious Honey Mustard Chicken Skewers! For the complete recipe, check out the Full Recipe. For the best flavor, marinate the chicken for at least 30 minutes. If you want a stronger taste, marinate for up to 2 hours. You can add other flavors to your marinade. Try adding fresh herbs like thyme or rosemary. A splash of lemon juice gives a nice tang. Experiment with different mustards, too! To avoid common grilling mistakes, make sure your grill is clean and hot before cooking. This helps prevent sticking. Turn the skewers less often to get those perfect grill marks. Grill them for about 10-12 minutes, turning occasionally. Look for a golden-brown color and an internal temp of 165°F. Pair your honey mustard chicken skewers with fresh sides. A light salad or grilled vegetables works well. For a fun touch, serve with homemade dipping sauces. You can use the leftover marinade, just simmer it first to make it safe. Present the skewers on a colorful platter, garnished with fresh herbs for a beautiful look. For the full recipe, check out the Honey Mustard Chicken Skewers section above! {{image_2}} You can easily swap chicken for turkey or tofu in this recipe. Turkey has a similar texture and flavor. Just remember to adjust the cooking time. Turkey may need a few more minutes on the grill. For tofu, use firm or extra-firm varieties. Cut it into cubes and marinate it like chicken. Tofu cooks faster than meat, so keep an eye on it. Add some heat by mixing in hot sauce or cayenne pepper to the marinade. This gives your skewers a nice kick. If you want a fresh twist, add chopped herbs like parsley, cilantro, or thyme. These herbs brighten up the dish and add depth to the flavor. Skewering veggies is fun and tasty! Bell peppers and red onions work great, but you can use others too. Try zucchini, mushrooms, or cherry tomatoes. Seasonal veggies like asparagus in spring or butternut squash in fall can bring new life to your skewers. Mix and match for color and taste. For the full recipe, check out the Honey Mustard Chicken Skewers section. To keep your honey mustard chicken skewers fresh, store them in the fridge. Use an airtight container to prevent moisture loss. If you want to save them longer, freeze the skewers. Wrap each skewer tightly in plastic wrap, then place them in a freezer bag. This helps avoid freezer burn. To reheat without drying them out, use the oven or a skillet. Preheat your oven to 350°F. Place the skewers on a baking sheet, cover with foil, and heat for about 10 minutes. If using a skillet, add a splash of water and cover. This keeps the chicken moist. For an extra punch, brush them with a bit of leftover marinade before reheating. Honey mustard chicken skewers can last in the fridge for 3 to 4 days. In the freezer, they stay good for up to 3 months. Always check for signs of spoilage. If the chicken smells off or has a slimy texture, it's best to discard it. Yes, you can make the skewers ahead of time. This saves you time on busy days. You can prepare them and store them in the fridge. Make sure to keep them covered. The downside is that the chicken might lose some juiciness. Freshly grilled skewers taste better. If you do prep them early, grill them just before serving for the best flavor. There are many great sides to enjoy with these skewers. Here are some popular options: - Rice or quinoa for a filling base - Grilled veggies like zucchini or corn - A fresh green salad with a light vinaigrette - Garlic bread for a tasty addition - Dips like ranch or extra honey mustard These sides make your meal colorful and fun. They also help balance the sweet and tangy flavors of the chicken. To check the chicken's doneness, use a meat thermometer. Insert it into the thickest part of the chicken. The safe internal temperature is 165°F. If you don’t have a thermometer, cut a piece of chicken. The meat should be white, not pink. Juices should run clear. This ensures your skewers are safe to eat and perfectly cooked. This blog post covered the essentials for making delicious honey mustard chicken skewers. We discussed key ingredients, how to marinate the chicken, and grilling tips for perfect results. Remember to experiment with flavors and ingredients to suit your taste. With the right techniques, you can impress your friends and family. Enjoy the savory experience of grilling these tasty skewers. They are a fun and easy meal option for any occasion. Happy cooking!

Honey Mustard Chicken Skewers Flavorful Grilling Recipe

Get ready to impress your taste buds with my Honey Mustard Chicken Skewers! This quick and easy grilling recipe combines

To make these delightful Raspberry Lemonade Bars, you need five key ingredients: - 1 cup all-purpose flour - 1/2 cup unsalted butter, softened - 2 cups fresh raspberries (you can use frozen too) - 1 cup granulated sugar - 3 large eggs These ingredients form the base of the bars. The flour gives structure, while the butter adds richness. Fresh raspberries bring a tart flavor that pairs well with the sweetness of sugar and the tang of lemons. You can enhance your bars with a couple of optional ingredients: - Powdered sugar for dusting - Lemon zest Using powdered sugar adds a nice touch on top. Lemon zest will boost the lemon flavor too. Both are easy to find and elevate your treat. For the best results, gather these kitchen tools: - Mixing bowls - Whisk - Baking dish Having the right tools makes cooking simple. Mixing bowls help combine the ingredients well. A whisk works perfectly for mixing, and a baking dish ensures even baking. For the full recipe, check out the details above. Enjoy making these bars! - Preheat your oven to 350°F (175°C). - Grease an 8x8 inch baking dish or line it with parchment paper. This makes it easy to lift the bars out later. - In a medium bowl, mix together 1 cup of all-purpose flour and 1/4 cup of powdered sugar. - Cut in 1/2 cup of softened unsalted butter. Use a pastry cutter or your fingers. Mix until it looks like coarse crumbs. - Press this mixture evenly into the bottom of your prepared baking dish. - In a large bowl, combine 2 cups of fresh raspberries, 1 cup of granulated sugar, 3 large eggs, 1/4 cup of freshly squeezed lemon juice, 1 teaspoon of lemon zest, 1/2 teaspoon of baking powder, and 1/4 teaspoon of salt. - Whisk gently until it's well mixed. Be careful not to mash the raspberries too much; leave some whole for nice texture. - Pour this raspberry-lemon mixture over your pre-baked crust. Now that you have everything ready, you can follow the [Full Recipe] for the next steps in baking these delicious bars! To get the right texture, use cold butter. This helps your crust stay flaky. Cut the butter into the flour until it looks like sand. Press it firmly but gently into the dish. For even baking, preheat your oven fully. Bake until the crust is golden, about 15-20 minutes. Keep an eye on it to prevent burning. Let it cool slightly before adding the filling. Want more lemon? Add extra lemon zest or a splash of lemon juice. This will brighten the bars and make them pop. To balance sweetness, taste the mixture before baking. If it’s too sweet, add a bit more lemon juice. The tartness from the lemon will bring out the raspberry flavor. Serve Raspberry Lemonade Bars on a pretty platter. Add fresh mint leaves and extra raspberries for color. They look great and taste even better! For drinks, pair them with iced tea or lemonade. The tartness of the bars matches perfectly with a refreshing beverage. If you want a fun twist, try serving them with sparkling water. {{image_2}} You can switch up the flavor by using strawberries or blueberries. Strawberries add a sweet touch, while blueberries give a burst of color. Mixing different berries creates a fruity blend. Try combining raspberries with blueberries for a fun twist. Each fruit brings its own flavor and makes the bars exciting. For a gluten-free version, you can use almond flour or gluten-free all-purpose flour. This swap keeps the bars tasty while being safe for those with gluten issues. Make sure to check labels for hidden gluten in other ingredients. To make these bars vegan, replace the eggs with flax eggs or applesauce. One flax egg is made by mixing one tablespoon of flaxseed meal with three tablespoons of water. Let it sit for a few minutes to thicken. Applesauce works well too, using a quarter cup for each egg. This keeps the bars moist and delicious, perfect for plant-based diets. You can find the full recipe above to get started on these fun variations! To keep your Raspberry Lemonade Bars fresh, store them in an airtight container. Make sure to place parchment paper between layers if stacking. This helps prevent sticking and keeps them intact. They stay fresh in the fridge for up to five days. If you want to enjoy them later, freezing is a great option. To freeze Raspberry Lemonade Bars, first, let them cool completely. Once cooled, cut them into squares. Wrap each square tightly in plastic wrap. Then, place the wrapped bars in a freezer-safe container or bag. They can last up to three months in the freezer. When you are ready to eat them, thaw in the fridge overnight. If you have leftovers that you want to warm up, preheat your oven to 350°F (175°C). Place the bars on a baking sheet and warm them for about 10 minutes. This brings back their soft, gooey texture. You can also enjoy them cold; they taste great right from the fridge! For an added touch, dust with extra powdered sugar before serving. Raspberry Lemonade Bars can stay fresh for about four to five days. Store them in an airtight container in the fridge. This keeps them cool and tasty. If they are left out, they may dry out. Always check for any signs of spoilage before eating. Yes, you can use frozen raspberries. Just make sure to thaw them first. Drain any extra juice before mixing. This will help keep the filling from getting too watery. Frozen raspberries work great and still add that tangy flavor. To cut the bars cleanly, use a sharp knife. Dip the knife in hot water before each cut. Wipe it dry after each slice. This way, the bars will not stick to the knife. It makes for neat squares and a pretty presentation. Absolutely! You can make Raspberry Lemonade Bars a day or two in advance. Just keep them in the fridge until you are ready to serve. They taste even better after chilling. This is a great way to save time when hosting. Raspberry Lemonade Bars are a treat that you can easily make at home. We covered essential ingredients like flour, fresh raspberries, and eggs, along with handy kitchen tools. I shared step-by-step instructions to help you create a perfect crust and filling. You also learned tips to enhance the flavor and different variations to try. Remember, these bars can be stored or frozen for later enjoyment. Enjoying them with friends makes every bite sweeter! Get ready to impress with your baking skills; these bars will delight everyone!

Raspberry Lemonade Bars Easy and Refreshing Recipe

Are you craving a sweet and tart treat? My Raspberry Lemonade Bars are the perfect answer! This easy recipe combines

In this section, I will share the ingredients needed for savory breakfast muffins. These muffins are packed with flavor and easy to make. They are perfect for breakfast or a snack. You can find the full recipe at the end of this section. Here’s what you need for the muffins: - 1 ½ cups all-purpose flour - 1 teaspoon baking powder - 1 teaspoon baking soda - ½ teaspoon salt - ½ teaspoon black pepper - 3 large eggs - ¾ cup milk (dairy or non-dairy) - ¼ cup olive oil - 1 cup shredded cheese (cheddar or a mix) - 1 cup cooked spinach (chopped) - ½ cup sun-dried tomatoes (chopped) - ½ cup diced bell pepper (any color) - ¼ cup green onions (sliced) You can customize these muffins with extra ingredients. Here are some options to consider: - Cooked bacon or sausage for added protein - Zucchini or mushrooms for more veggies - Fresh herbs like basil or parsley for extra flavor - Different cheeses like feta or mozzarella for a twist Feel free to mix and match based on your taste! Start by preheating your oven to 375°F (190°C). This step ensures even baking. Next, grab a muffin tin. You can line it with paper liners or grease it well with cooking spray. In a large bowl, combine your dry ingredients: sift together 1 ½ cups of all-purpose flour, 1 teaspoon of baking powder, 1 teaspoon of baking soda, ½ teaspoon of salt, and ½ teaspoon of black pepper. This mix will give your muffins a great rise and flavor. In another bowl, whisk together 3 large eggs, ¾ cup of milk (dairy or non-dairy), and ¼ cup of olive oil. Make sure everything blends well. Now, pour these wet ingredients into the dry mix. Stir gently until just combined. Be careful not to overmix; lumps are fine. Now, it’s time for the fun part! Fold in 1 cup of shredded cheese, 1 cup of chopped cooked spinach, ½ cup of chopped sun-dried tomatoes, ½ cup of diced bell pepper, and ¼ cup of sliced green onions. This adds flavor and color to your muffins. Spoon the batter into your prepared muffin tin. Fill each cup about three-quarters full for the best rise. Now, it’s baking time! Place the tin in the oven and bake for 18 to 20 minutes. Your muffins should turn golden brown. To check for doneness, insert a toothpick into the center. If it comes out clean, they are ready! After baking, take the muffins out of the oven. Let them cool in the pan for 5 minutes. This helps them set and makes them easier to remove. Then, transfer the muffins to a wire rack to cool completely. When serving, I love to garnish them with a sprinkle of extra cheese and a few slices of avocado on top. They pair wonderfully with fresh fruit for a full breakfast. For a detailed recipe, check the Full Recipe section. Enjoy your savory breakfast muffins! To make perfect savory breakfast muffins, focus on mixing. Do not overmix the batter. Overmixing makes muffins tough. Mix just until the dry and wet ingredients blend. Add your favorite cheese for extra taste. Cheddar works great, but feel free to swap. Fresh herbs can also add flavor. Try basil or parsley for a twist. One common mistake is skipping the baking powder. This can cause your muffins to be dense. Also, ensure your ingredients are at room temperature. Cold eggs or milk can affect the batter. Don’t forget to grease your muffin tin well. This helps the muffins pop out easily after baking. Enhancing flavors is simple with this recipe. Add spices like garlic powder or paprika. These spices give your muffins a kick. You can also experiment with different veggies, like zucchini or mushrooms. Mixing your vegetables adds color and taste. Lastly, serve the muffins warm with a dollop of yogurt. This adds creaminess and complements the savory flavors. For the full recipe, check the section above. {{image_2}} You can easily adjust this recipe for different diets. For a gluten-free option, use gluten-free flour instead of all-purpose flour. Many brands offer blends that work well in muffins. If you want a vegan version, swap eggs for flax eggs. Mix one tablespoon of ground flaxseed with three tablespoons of water and let it sit for five minutes. Use plant-based milk and cheese for a fully vegan muffin. These changes let everyone enjoy the savory goodness. Feel free to get creative with your ingredients. You can swap out cheddar for mozzarella or feta cheese. Each cheese adds its own unique flavor. Explore different vegetables too. Try zucchini, mushrooms, or even kale instead of spinach. You can mix and match based on what you have at home. This flexibility helps you use up leftovers and create new tastes. Experiment with flavors to make these muffins even more exciting. Add herbs like basil or oregano for a fresh touch. You can also include spices like smoked paprika for a smoky flavor. For a kick, toss in some diced jalapeños. If you want a sweeter muffin, mix in some corn or a hint of maple syrup. The options are endless, and you can find your perfect blend. Check the Full Recipe to get started! To keep your muffins fresh, store them in an airtight container. Place a paper towel inside to absorb moisture. This helps prevent sogginess. You can leave them at room temperature for up to three days. For longer storage, consider freezing them. To freeze your muffins, first let them cool completely. Wrap each muffin tightly in plastic wrap. Then, place the wrapped muffins in a freezer bag. Be sure to label the bag with the date. They can stay in the freezer for up to three months. This way, you always have a savory treat on hand. Reheating is easy! For best results, use the oven. Preheat it to 350°F (175°C). Place muffins on a baking sheet for about 10 minutes. This warms them through and keeps them fluffy. You can also use a microwave. Heat each muffin for about 20-30 seconds. Enjoy your muffins warm for a delicious breakfast! For the complete recipe, check out the Full Recipe. A breakfast muffin is savory when it has herbs, cheese, or cooked veggies. In our recipe, we use cheese, spinach, sun-dried tomatoes, and bell peppers. These ingredients add rich flavors and make the muffins hearty. The mix of textures and tastes gives you a great start to your day. Yes, you can make these muffins ahead of time. They stay fresh for about three days at room temperature. Just cover them well to keep them moist. You can also freeze them for up to three months. To enjoy later, thaw them overnight and reheat in the oven or microwave. To make fluffy muffins, avoid overmixing the batter. Mix just until the ingredients combine. This keeps the muffins light. Also, make sure your baking powder and baking soda are fresh. They help the muffins rise well. Lastly, fill each muffin cup about three-quarters full for the best shape. You can serve these muffins with a side of fresh fruit for balance. A dollop of yogurt adds creaminess too. For a heartier meal, try pairing them with scrambled eggs or avocado slices. These sides complement the flavors and make your breakfast more filling. For the full recipe, check out the details above! You learned how to make tasty savory breakfast muffins. We covered the key ingredients and steps, plus tips to make them perfect. You can even add fun flavors based on your tastes. Remember, how you store and reheat muffins matters for freshness. These muffins are great for breakfast or snack time. Now, go ahead and bake a batch that your family will love! Enjoy delicious, fluffy treats today.

Savory Breakfast Muffins Tasty and Easy Recipe

Are you tired of the same old breakfast routine? Try my savory breakfast muffins! They are easy to make and

- 1 lb fresh asparagus, trimmed - 3 tablespoons olive oil - 4 cloves garlic, minced Lemon garlic roasted asparagus shines with its fresh taste and bright flavors. The asparagus spears are the star of this dish. Choose firm and vibrant green ones for the best result. The olive oil adds richness and helps the garlic stick. Minced garlic gives a strong flavor that pairs well with lemon. - Zest of 1 lemon - 2 tablespoons fresh lemon juice - 1 teaspoon sea salt - ½ teaspoon black pepper - ¼ teaspoon red pepper flakes (optional for a little heat) Lemon zest and juice bring a bright, tangy flavor that lifts the dish. Sea salt enhances all the flavors, while black pepper adds a hint of spice. If you want some heat, add red pepper flakes. They give a little kick without overpowering the dish. - 2 tablespoons grated Parmesan cheese (optional, for garnish) - Fresh parsley, chopped (for garnish) For a touch of savory richness, sprinkle Parmesan cheese on top. It melts slightly, adding a creamy layer. Fresh parsley brightens the dish with its color and flavor. This dish looks great with just a few sprigs on top. You can find the full recipe [here](#). Preheating your oven to 425°F (220°C) is key. The right temperature helps the asparagus cook evenly. If your oven is too cool, the asparagus may turn soggy. A hot oven gives you that perfect crisp at the tips. Start by mixing the olive oil, minced garlic, lemon zest, lemon juice, sea salt, black pepper, and red pepper flakes in a bowl. Each ingredient adds a punch of flavor. The olive oil helps everything stick to the asparagus. The lemon zest brings a fresh taste. Garlic adds depth. Mix it well to create a balanced marinade. Add the trimmed asparagus to the bowl. Toss the asparagus gently to coat each spear in the marinade. Make sure all the spears get that tasty mix. Spread them out on a baking sheet lined with parchment paper. This helps with cleanup and keeps the asparagus from sticking. Roast them in your preheated oven for 12-15 minutes. Look for tender spears with crispy tips. Enjoy the aroma as they cook! When picking asparagus, look for firm, bright green spears. The tips should be closed and compact. If the tips are open or wilted, choose another bunch. Fresh asparagus is crisp and has a slight sheen. You can snap the ends to check for freshness. If they snap easily, they’re good to go! To know if your asparagus is perfectly roasted, look for a few signs. The spears should be bright green and tender. The tips should be slightly crispy. A good roasting time is around 12 to 15 minutes at 425°F. If they are fork-tender but still have a slight bite, you’ve nailed it. To boost the flavor of your dish, try adding fresh herbs. Basil, thyme, or rosemary work well with asparagus. You can mix these herbs into the marinade for a tasty twist. If you enjoy a bit of heat, consider adding chili flakes or smoked paprika. These spices can elevate your dish and make it even more enjoyable. Always remember, a little goes a long way! {{image_2}} You can change the taste of Lemon Garlic Roasted Asparagus by adding herbs. Fresh herbs like thyme or rosemary bring a new layer of flavor. Simply chop them finely and mix them into your marinade. This small step can elevate your dish. Thyme offers a warm, earthy note, while rosemary adds a fragrant touch. Experiment with these herbs to find what you love. If you want a vegan dish, skip the cheese. The lemon and garlic flavors shine on their own. You can even add nutritional yeast for a cheesy taste without dairy. It gives you a savory kick, perfect for plant-based diets. This keeps the dish light and fresh while catering to different diets. You don’t have to stick to oven roasting. Grilling is a fun way to cook asparagus. It adds a smoky flavor that is hard to beat. Simply toss your seasoned asparagus on the grill for a few minutes. Turn them often until they are tender and slightly charred. Both methods work well, so try them to see which you prefer. For the full recipe, check out the Zesty Lemon Garlic Asparagus Delight 🥦. To keep roasted asparagus fresh, allow it to cool completely. Then, place it in an airtight container. Store it in the fridge for up to three days. Avoid stacking the spears too tightly, as this can cause them to become soggy. If you want to keep them crisp, line the bottom of the container with a paper towel. This helps absorb moisture. When reheating roasted asparagus, aim to use an oven or an air fryer. Preheat your oven to 350°F (175°C). Place the asparagus on a baking sheet, and heat for about 5-10 minutes. This method keeps the asparagus crispy. If using a microwave, heat in short bursts of 30 seconds. Check often to avoid overcooking, as this can make them mushy. Yes, you can freeze Lemon Garlic Roasted Asparagus! However, the texture may change. To freeze, let the asparagus cool and place it in a freezer-safe bag. Remove as much air as possible before sealing. Freeze for up to three months. When you are ready to use it, thaw in the fridge overnight. Then, reheat as mentioned above for the best taste. Roasting asparagus at 425°F takes about 12 to 15 minutes. The time can change based on the size of the asparagus spears. Look for spears that are tender and a bit crispy at the tips. This quick cooking time helps keep the bright green color and crisp texture. Yes, you can prepare this dish ahead of time. You can wash and trim the asparagus and mix the marinade in advance. Store the asparagus and marinade separately in the fridge. When you're ready to eat, toss them together and roast. This saves time on busy nights. Lemon Garlic Roasted Asparagus goes great with many dishes. Try it with grilled chicken for a light meal. It also pairs well with fish, especially salmon. For a vegetarian option, serve it with quinoa or pasta. The bright lemon flavor complements these proteins and grains well. You can find the complete recipe details for Lemon Garlic Roasted Asparagus [here](#). This recipe is simple and packed with flavor, making it a must-try! In this post, we explored how to make Lemon Garlic Roasted Asparagus. I covered the key ingredients and their roles, along with simple steps for perfecting the dish. Don't forget to try fun variations with herbs or different cooking methods. Making this dish is easy and rewarding, plus it pairs well with many meals. Now you have all the tools to enjoy fresh and tasty asparagus at home. Enjoy your cooking!

Lemon Garlic Roasted Asparagus Fresh and Simple Dish

If you’re looking for a fresh and simple dish, Lemon Garlic Roasted Asparagus is perfect. This vibrant vegetable shines when

Older posts
Newer posts
← Previous Page1 … Page83 Page84 Page85 Page86 Next →

dsad

© 2026 Emmas Dish • Built with GeneratePress

Our Policies

  • Copyright Policy
  • Cookie Policy
  • GDPR Policy
  • Privacy Policy
  • Disclaimer
  • Terms Of Use

More Information

  • Home
  • About
  • Contact
  • Appetizers
  • Dessert
  • Dinner
  • Drinks
©2026, Emmas Dish About Back To Top