Skip to content
DisclaimerTerms Of UseGDPR PolicyCookie Policy

Emmas Dish

  • Home
  • Drinks
  • Appetizers
  • Dinner
  • Dessert
  • About
  • Contact
  • Privacy Policy
DisclaimerTerms Of UseGDPR PolicyCookie Policy

NO-ING-IMG

To make a delicious Spaghetti Aglio e Olio, you need simple, fresh ingredients. Here’s what you’ll need: - 400g spaghetti - 5 cloves garlic, thinly sliced - 1/2 cup extra virgin olive oil - 1/2 teaspoon red pepper flakes (adjust for heat preference) - Zest of 1 lemon - Juice of 1 lemon - 1/2 cup fresh parsley, chopped - Salt, to taste - Freshly grated Parmesan cheese (optional for serving) These ingredients create a dish that’s both simple and full of flavor. The garlic and olive oil blend beautifully, while the lemon adds a refreshing zing. Adjust the red pepper flakes to match your spice preference. This recipe is not just quick to make; it’s also a great way to impress guests with minimal effort. You can find the full recipe in the earlier section. Enjoy the cooking process! First, bring a large pot of salted water to a boil. The salt adds flavor to the pasta. Once the water is boiling, add 400g of spaghetti. Cook it according to the package instructions until it is al dente, which means it should be firm but not hard. This usually takes about 8 to 10 minutes. Reserve 1 cup of the pasta water before you drain the spaghetti. Next, heat 1/2 cup of extra virgin olive oil in a large skillet over medium heat. It’s important to use good-quality olive oil for the best flavor. Add 5 cloves of thinly sliced garlic to the skillet. Sauté the garlic for about 2 minutes. You want it to turn golden brown, but not burnt. Be careful, as burnt garlic can make the dish taste bitter. Now, it’s time to bring everything together. Add the drained spaghetti directly into the skillet with the garlic oil. Toss the spaghetti to coat it evenly. If the pasta looks dry, gradually add some of that reserved pasta water. This will help create a silky sauce. Next, squeeze in the juice of 1 lemon and add the zest. Finally, mix in 1/2 cup of chopped fresh parsley. Toss everything well and season with salt to taste. Enjoy this simple, flavorful dish! For the complete instructions, check the Full Recipe. To get the best garlic flavor, watch your heat. Use medium heat when you sauté garlic. This helps it cook evenly and turn golden. If you burn the garlic, it will taste bitter. Keep a close eye on it and stir often. For heat, adjust the red pepper flakes. If you like it spicy, add more. If you prefer less heat, use fewer flakes. Start with half a teaspoon and taste as you go. Using reserved pasta water is key. After draining the spaghetti, save a cup of that starchy water. When you mix the pasta with the garlic oil, add small amounts of this water. It helps the sauce stick to the pasta. To balance the lemon flavor, add the zest first. This adds a bright touch. Then squeeze the lemon juice in. Taste your dish and adjust as needed. You want it fresh, not too sour. Garnishing makes your dish pop. Use lemon wedges and a sprinkle of parsley. This adds color and makes it look fancy. When serving, add freshly grated Parmesan cheese on top. This cheese gives a creamy finish. It also brings a rich flavor that pairs well with the garlic and lemon. Enjoy your beautiful plate of Spaghetti Aglio e Olio! For the complete recipe, check the Full Recipe section. {{image_2}} You can add sautéed spinach or cherry tomatoes to your dish. This gives it bright colors and fresh flavors. The spinach adds a nice green touch. The tomatoes bring a sweet burst with each bite. To do this, sauté the vegetables before adding the garlic. They will cook quickly and add a healthy twist to your meal. Adding shrimp or chicken can make your spaghetti even better. Shrimp cooks fast and adds a nice seafood taste. Chicken adds heartiness and goes well with garlic flavors. Cook the shrimp or chicken first, then mix it with the spaghetti. This way, you get a complete meal in one dish. You can change the flavor by using fresh herbs like basil or oregano. Basil gives a sweet and aromatic touch. Oregano adds a warm and earthy flavor. Chop these herbs and toss them in before serving. This simple addition can elevate your dish and make it feel gourmet. For the full experience, check out the Full Recipe. To keep your Spaghetti Aglio e Olio fresh, store it in the fridge. Place the pasta in an airtight container. This helps prevent it from drying out. It will stay good for up to three days. When you want to reheat, use a skillet. Add a splash of olive oil to keep it moist. Heat it over low heat, stirring gently. This method keeps the garlic flavor strong. If you want to freeze your spaghetti, use freezer-safe containers. Make sure they seal well. You can also use freezer bags. Just remove as much air as possible. When you are ready to eat, take it out and thaw it in the fridge overnight. For reheating, warm it in a skillet. Add a bit of olive oil or pasta water to help. This keeps the meal tasty and fresh. Spaghetti Aglio e Olio is a simple Italian dish. It mainly uses spaghetti, garlic, and olive oil. The name means "spaghetti with garlic and oil." This dish comes from Naples, Italy. It is a favorite among many for its bold flavor and ease of preparation. The key is to cook the garlic until golden, then mix it with pasta. This dish is perfect for busy nights. Yes, you can make Spaghetti Aglio e Olio vegan! To do this, skip the Parmesan cheese. You can add nutritional yeast for a cheesy flavor without dairy. This keeps the dish rich and tasty. You can also use a bit more olive oil to balance the flavors. To make this dish gluten-free, choose gluten-free pasta. Many brands offer tasty gluten-free spaghetti made from rice or corn. Cook it just like regular pasta. The method stays the same, and the flavors still shine through. Enjoy your gluten-free Spaghetti Aglio e Olio without worry! This post covered Spaghetti Aglio e Olio from start to finish. We explored key ingredients, simple steps, and useful tips. I shared ideas to add veggies or protein, plus ways to store extras. Remember, this dish is flexible. You can tweak flavors to fit your taste. Whether you're a novice or a pro, enjoy making this classic. It's all about good food and fun cooking!

Spaghetti Aglio e Olio Simple and Flavorful Recipe

Want a quick, delicious meal? Spaghetti Aglio e Olio is your answer! This simple dish relies on just a few

- 1 lb Brussels sprouts, trimmed and halved - 3 tablespoons olive oil - 2 tablespoons Sriracha sauce - 2 tablespoons honey - 2 cloves garlic, minced - Salt and pepper to taste - 1 tablespoon sesame seeds - Chopped green onions for garnish Sriracha honey Brussels sprouts shine with their bright flavors and crispy edges. You need fresh Brussels sprouts for the best taste. Trim them well and cut them in half. This helps them cook evenly. You’ll mix the Brussels sprouts with olive oil, Sriracha, honey, and minced garlic. The Sriracha adds heat, while honey gives a sweet touch. Each bite brings a mix of spicy and sweet. For extra flavor, season with salt and pepper. Add sesame seeds and chopped green onions for a nice crunch and color. These optional ingredients make the dish pop! You can easily find them at your local grocery store. This dish pairs well with many meals. Serve it alongside grilled chicken or fish. It also works great on a veggie platter. This recipe is fun to make and brings joy to any table. For more details, check the Full Recipe section. - Preheat your oven to 425°F (220°C). - Line a baking sheet with parchment paper. These steps set the stage for roasting. The high heat gives the Brussels sprouts a nice caramelization. The parchment paper helps with cleanup, making your cooking easier. - Combine Brussels sprouts with olive oil, Sriracha, honey, garlic, salt, and pepper in a bowl. In a large bowl, add the trimmed and halved Brussels sprouts. Pour in the olive oil, Sriracha, honey, minced garlic, salt, and pepper. Mix everything well. Each sprout should be coated evenly. This mixture gives the sprouts a spicy and sweet flavor. - Spread on the baking sheet and roast for 20-25 minutes, flipping halfway through. Now, spread the Brussels sprouts in a single layer on the baking sheet. Make sure the cut side is down for maximum browning. Roast in the oven for about 20-25 minutes. Flip them halfway through to cook evenly. When they are done, they should be golden brown and crispy on the edges. Enjoy your delicious side dish! To get the best crunch from your Brussels sprouts, place them cut side down on the baking sheet. This helps them brown nicely. Keep an eye on them while roasting. You want crispy edges, so check for doneness at about 20 minutes. If they look golden brown, they're ready! Want to spice things up? Try adding paprika or cayenne pepper to your mix. These spices give a nice kick that pairs well with the Sriracha and honey. Feel free to play with different spices to find your perfect flavor. The beauty of this dish is its versatility! {{image_2}} You can switch up how you cook Brussels sprouts for different tastes. - Grilling Brussels sprouts for a smokier flavor. Grilling adds a nice char. Just toss the halved sprouts in olive oil and Sriracha mix. Place them on a grill basket over medium heat. Grill for about 10-15 minutes, turning often. You’ll love the smoky taste! - Sautéing instead of roasting for a quicker option. If you’re short on time, sautéing works great. Heat a pan over medium heat and add olive oil. Toss in your coated Brussels sprouts. Stir for about 8-10 minutes until they’re tender and browned. Quick and easy! Get creative with other flavors to change the dish. - Adding balsamic vinegar for a tangy twist. Drizzle some balsamic vinegar over the sprouts before roasting. The sweet and tangy taste pairs well with Sriracha and honey. It brings a bright touch to each bite. - Incorporating nuts for added crunch. Toss in your favorite nuts, like almonds or pecans, before roasting. They add a lovely crunch and nutty flavor. Just chop them coarsely and mix them in with the Brussels sprouts. Enjoy the extra texture! Store leftover Brussels sprouts in an airtight container in the fridge for up to 3 days. This helps keep them fresh and tasty. If you want to enjoy them later, make sure they cool down before sealing them up. Reheat your Brussels sprouts in the oven for crispiness. Set your oven to 350°F (175°C) and bake them for about 10 minutes. This brings back their crunch. If you need a quick option, use the microwave. Heat them for 1-2 minutes, but they might not be as crispy. Enjoy your flavorful side dish any time! You can easily make Sriracha Honey Brussels Sprouts vegan. Just substitute honey with maple syrup or agave nectar. Both options add sweetness and flavor while keeping it plant-based. This simple swap lets everyone enjoy this dish. Yes, you can prepare the mixture ahead of time. Just mix the Brussels sprouts with the other ingredients. Store it in the fridge until you are ready to roast. This way, you save time when meal prepping or hosting. These Brussels sprouts pair well with many dishes. Serve them with grilled meats for a hearty meal. They also go great with rice or as part of a vegetable platter. You can mix them in with other sides for a colorful feast. For the complete details on making Sriracha Honey Brussels Sprouts, see the Full Recipe section above. Sriracha Honey Brussels Sprouts are simple and delicious. We discussed essential and optional ingredients, step-by-step instructions, and useful tips. Roasting brings out the best flavors, and variations add even more fun. You can store leftovers easily, making them a great snack. Whether you're new to cooking or a pro, this recipe can fit your needs. Try it out today for a tasty dish you’ll love!

Sriracha Honey Brussels Sprouts Irresistible Side Dish

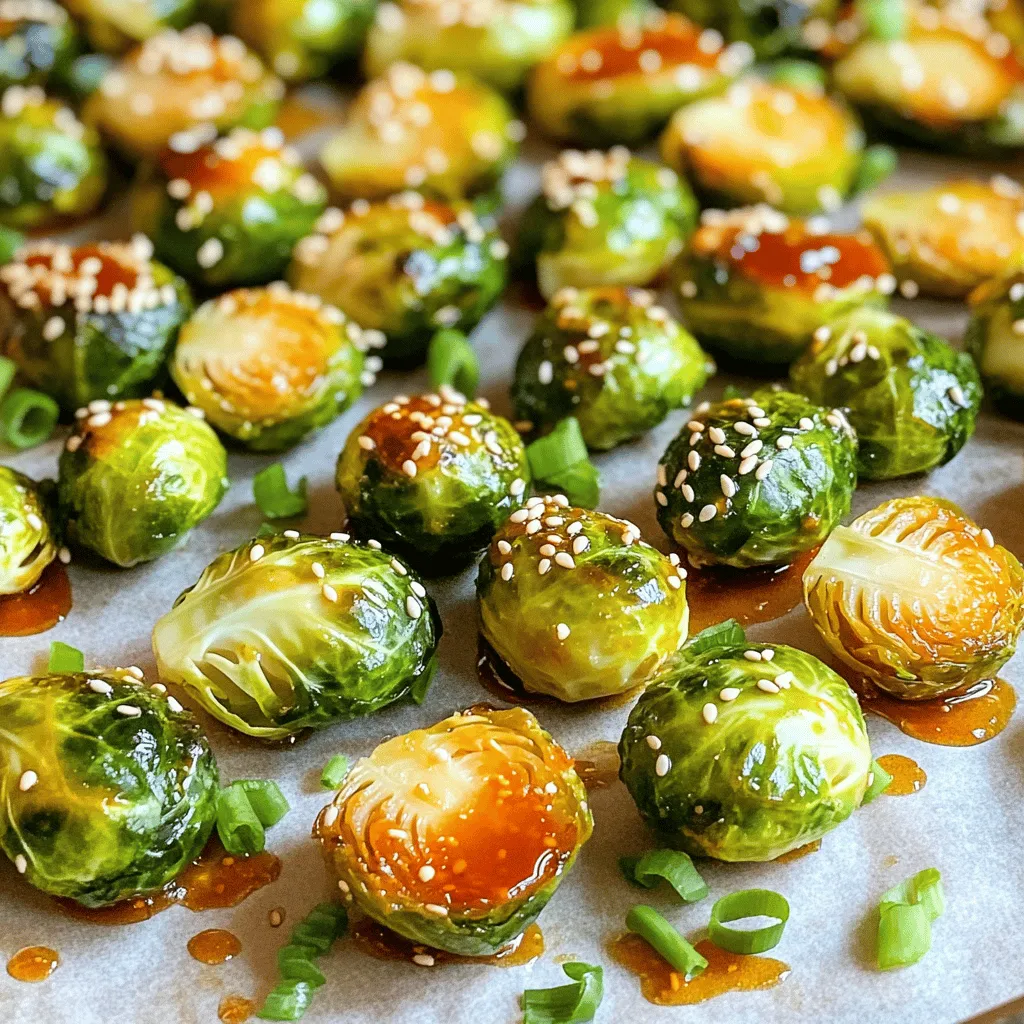
Looking for a side dish that’s both tasty and easy to make? Sriracha Honey Brussels Sprouts tick all the boxes!

- 1 pound shrimp, peeled and deveined - 1 tablespoon olive oil - 1 teaspoon chili powder - 1 teaspoon cumin - 1 garlic clove, minced - 1 lime, juiced - 1/2 teaspoon salt - 1/4 teaspoon black pepper - 8 small corn tortillas - 1 cup shredded red cabbage - 1/2 cup diced tomatoes - 1 avocado, sliced - Fresh cilantro, chopped (for garnish) - Lime wedges (for serving) These ingredients work together to create bold and fresh flavors. The shrimp are the star. They soak up the spices and lime juice, giving them a zesty kick. The olive oil helps cook the shrimp evenly. Chili powder and cumin add warmth and depth. Garlic brings in a savory note that balances everything. The fresh toppings make every bite exciting. Shredded cabbage adds crunch, while tomatoes bring juiciness. Sliced avocado adds creaminess. Fresh cilantro gives a burst of flavor. Each component plays a role in making these tacos a delight. - Calories per serving: Approximately 300 - Macronutrient breakdown: - Protein: 25g - Fats: 15g - Carbohydrates: 30g This meal provides a good balance of protein and healthy fats. The carbs mainly come from the tortillas and veggies, making it a wholesome choice. - Servings: 4 - Prep Time: 15 minutes - Cook Time: 15 minutes You can have these tasty tacos ready in just 30 minutes. They are perfect for a fun dinner or a casual gathering. For the full recipe, check the earlier section. To marinate shrimp effectively, mix shrimp with olive oil, chili powder, cumin, garlic, lime juice, salt, and black pepper in a bowl. Coat the shrimp well. Marinate for about 15 minutes. This time lets the shrimp soak up all the great flavors. If you skip marinating, you miss out on a lot of taste. For perfect shrimp, heat a non-stick skillet over medium-high heat. This temperature is key. When the skillet is hot, add the shrimp in a single layer. Cook for about 2-3 minutes on each side. The shrimp should turn pink and opaque. Avoid crowding the pan; this helps them cook evenly. To assemble the tacos, first warm the corn tortillas in another pan or microwave. Then, place a few shrimp on each tortilla. Top with shredded red cabbage, diced tomatoes, and slices of avocado. For an extra kick, garnish with fresh cilantro and squeeze lime juice over the tacos. This step adds a burst of flavor and freshness. Don’t forget, you can find the full recipe for these zesty shrimp tacos in my guide! To make your shrimp tacos pop, consider adding some extra spices. Here are a few I love: - Smoked paprika: This gives a deep, smoky taste. - Cayenne pepper: A little heat goes a long way. - Oregano: This adds a fresh herb flavor. For sauces, you can't go wrong with a zesty lime crema. Mix sour cream, lime juice, and a pinch of salt for a creamy touch. You might also try a spicy salsa or a mango chutney to balance the shrimp's zest. Get that smoky flavor by grilling the shrimp. If you don't have a grill, use a cast-iron skillet. It holds heat well and gives a nice sear. To avoid overcooking shrimp, remove them from the heat as soon as they turn pink and opaque. This usually takes just 2-3 minutes per side. Keep an eye on them; shrimp can go from perfect to rubbery quickly. An attractive taco arrangement makes your dish shine. Stack the tortillas, then layer the shrimp and toppings neatly. For garnishes, fresh cilantro adds color and flavor. Lime wedges on the side let your guests add their own zing. You could also sprinkle a little feta or cotija cheese on top for extra flair. {{image_2}} You can switch things up by using fish or chicken instead of shrimp. Grilled white fish works great. It has a mild taste and absorbs flavors well. Chicken adds a different texture and flavor. Just marinate it like the shrimp. For a vegetarian or vegan option, try using grilled portobello mushrooms or marinated tofu. These options still give you a tasty taco experience. Toppings make your tacos special. You can explore a variety of toppings for more flavor. Try adding pico de gallo for a fresh twist. You can also use mango salsa for a sweet touch. If you like crunch, include radishes or jalapeños. They add a spicy kick. Don't forget about cheese! Cotija or queso fresco enhance the flavor. Adjusting the spice level is easy. If you want milder tacos, use less chili powder. Add more lime juice to brighten the flavors. For a bolder taste, try chipotle seasoning. It gives a smoky kick. You can also add Thai spices for an exciting twist. Use ingredients like fish sauce or lemongrass for a unique flavor profile. Experiment to find what you love best! For the complete recipe, check out the Full Recipe section. To keep your shrimp tacos fresh, store them in an airtight container. Place cooked shrimp and toppings separately to preserve texture. Use the following tips for best results: - Cooked shrimp: Store in the fridge for up to 3 days. - Tortillas: Keep them in a sealed bag for up to 5 days. - Toppings: Shredded cabbage and diced tomatoes last about 2 days in the fridge. When reheating shrimp, avoid microwaving them too long. This can make them tough. Instead, follow these steps: - Skillet method: Heat a non-stick skillet over medium heat. Add shrimp for about 2 minutes until warm. - Tortilla method: Reheat tortillas in a pan or microwave. Use a damp paper towel to keep them soft. Can you freeze shrimp tacos? Yes, but with a few steps: - Shrimp: Freeze cooked shrimp in a sealed bag for up to 3 months. - Tortillas and toppings: Freeze separately. Toppings like cabbage and tomatoes may not freeze well. To thaw, place shrimp in the fridge overnight. Reheat gently and enjoy your tacos again! For the full recipe, check out the details above. To reduce spice levels, start by cutting back on chili powder. You can also use sweet paprika instead. Another option is to skip the cumin, which adds a warm flavor. If you want heat, serve mild salsa on the side. This way, each person can choose how much spice they want. Yes, you can use frozen shrimp for these tacos. Just remember to thaw them first. The best way is to leave them in the fridge overnight. If you're short on time, place them in a bowl of cold water for about 15 minutes. Once they are thawed, peel and devein them before cooking. Great sides for shrimp tacos include: - Mexican rice - Black beans - Grilled corn salad These sides add flavor and texture. For drinks, I suggest serving limeade or a light beer. They balance the shrimp's zestiness perfectly. If you prefer non-alcoholic options, try a refreshing iced tea with mint. For the full recipe, check the beginning of this article. This blog post covered all you need to know for delicious shrimp tacos. We discussed essential ingredients, nutritional facts, and detailed cooking steps. I shared tips to enhance flavor and suggested variations for every taste. You learned how to store and reheat leftovers efficiently. Finally, I answered common questions about spice levels and sides. Enjoying shrimp tacos is simple, tasty, and fun. Now, gather your ingredients and start cooking! You’ll impress everyone with this great dish.

Zesty Shrimp Tacos Flavorful and Fresh Delight

Are you ready for a fiesta of flavors? My Zesty Shrimp Tacos are the perfect blend of fresh ingredients and

- 2 medium zucchinis: Choose firm zucchinis. Look for shiny skin and no soft spots. Fresh zucchinis taste best and hold their shape when cooked. - 1 cup breadcrumbs: I recommend panko breadcrumbs. They are lighter and crunchier than regular ones. You can also use whole wheat or gluten-free options for a twist. - 1/2 cup grated Parmesan cheese: Fresh Parmesan is key here. It has a rich flavor that pre-grated cheese lacks. Grate it yourself for the best taste and texture. When preparing your crispy Parmesan zucchini fries, make sure to slice the zucchini evenly. This helps them cook at the same rate. Also, don’t skip the olive oil; it helps achieve that golden, crispy finish. If you want the full recipe, just check out the earlier section. First, you need to preheat your oven to 425°F (220°C). This high heat helps the fries get crispy. While the oven warms up, line a baking sheet with parchment paper. This makes cleanup easy and prevents sticking. Next, mix your breadcrumbs and seasoning. In a shallow bowl, combine 1 cup of breadcrumbs, 1/2 cup of grated Parmesan cheese, 1 teaspoon of garlic powder, 1 teaspoon of onion powder, and 1 teaspoon of dried oregano. Add some salt and pepper to taste. Stir well until everything is blended. This mixture gives the zucchini fries their delicious flavor. Now, let’s dip the zucchini. In another bowl, beat 2 large eggs until they are frothy. Take each zucchini stick and dip it into the egg mixture. Let any extra egg drip off. This step helps the breadcrumbs stick. Now, it’s time for coating. Roll the dipped zucchini sticks in the breadcrumb mix. Press lightly to make sure the coating sticks well. Place the coated zucchini fries on the baking sheet. If you want extra crispiness, lightly spray them with olive oil or drizzle 2 tablespoons of olive oil over them. Finally, bake the zucchini fries in your preheated oven for 20-25 minutes. Flip them halfway through to ensure they bake evenly. You’ll know they are done when they are golden brown and crispy. Once baked, let them cool for a few minutes before serving. Enjoy them warm! For the full recipe, check the earlier section. To make your zucchini fries crispy, try baking instead of frying. Baking gives a great crunch without too much oil. Baking is also easier and less messy. Preheat your oven to 425°F (220°C) to get the right heat. Even spacing on the baking sheet is key. If the fries touch, they will steam instead of crisp up. Give them room to breathe! Use parchment paper for easy cleanup and to help them crisp more. If your fries turn out soggy, there are a few fixes. First, ensure your zucchini is dry before coating. Use paper towels to remove excess moisture. You can also bake them longer, but watch closely to avoid burning. Different ovens can cook unevenly. If yours runs hot or cold, adjust the time and temperature. Use a kitchen thermometer to check the heat. You may need to rotate the baking sheet halfway through for even cooking. This way, all sides get that perfect golden brown. {{image_2}} You can boost the taste of your crispy Parmesan zucchini fries easily. Try adding spices or herbs to the breadcrumb mix. Some great options are: - Smoked paprika for a smoky flavor. - Italian seasoning for a classic touch. - Cayenne pepper for some heat. You can also switch up the cheese. If you want a different taste, consider using: - Asiago cheese for a sharper bite. - Cheddar cheese for a rich flavor. You can even mix in bits of fresh herbs like basil or parsley for a fresh twist. Just make sure to adjust the amount of salt, as some cheeses are saltier than Parmesan. Zucchini is a star, but you can use other veggies for “fries” too. Here are some tasty options: - Eggplant offers a unique texture. - Sweet potatoes add natural sweetness. - Carrots bring a nice crunch. When using different vegetables, adjust cooking times. For example: - Sweet potatoes may need 25-30 minutes at 425°F, as they take longer to cook. - Eggplant fries might be done in about 20 minutes, so keep an eye on them. Experimenting with these variations keeps your snack exciting and healthy. For the full recipe, check out the Crispy Parmesan Zucchini Fries section above and enjoy your culinary adventure! To keep your crispy Parmesan zucchini fries fresh, store them in an airtight container. Place a paper towel in the container to absorb extra moisture. This helps keep the fries crispy. Store them in the fridge for up to three days. When you're ready to enjoy your leftovers, reheating is key. The best way to maintain crispiness is to use the oven. Preheat your oven to 375°F (190°C). Spread the fries on a baking sheet in a single layer. Heat them for about 10 minutes. This method revives their crunch and flavor. If you want to keep your zucchini fries for longer, freezing is a great option. Start by placing the cooled fries on a baking sheet in a single layer. Freeze them for about an hour until solid. This prevents them from sticking together. Once frozen, transfer the fries into a freezer-safe bag or container. Remove as much air as possible to avoid freezer burn. You can freeze them for up to three months. When it's time to cook from frozen, preheat your oven to 425°F (220°C). Place the frozen fries on a baking sheet. Bake for about 25-30 minutes, flipping halfway through. Keep an eye on them to ensure they get crispy. Enjoy your homemade snack with ease! For the full recipe, check out the details above. How do I make my zucchini fries less watery? To reduce water, start by salting the zucchini. Cut the zucchinis into sticks and sprinkle them with salt. Let them sit for about 15 minutes. This process draws out moisture. Afterward, pat them dry with a paper towel. This step helps them become crispier when baked. Can I make Crispy Parmesan Zucchini Fries in an air fryer? Yes, you can use an air fryer! Preheat the air fryer to 400°F (200°C). Arrange the zucchini fries in a single layer. Cook them for about 10-15 minutes, shaking the basket halfway through. This makes them crispy without extra oil. What dipping sauces pair well with zucchini fries? Zucchini fries taste great with many dips! Try marinara sauce, ranch dressing, or garlic aioli. Hummus is also a fun choice. These sauces add flavor and make each bite even better. For a twist, mix some spices into your dips for extra zing. If you want the full recipe, check out the details above! In this post, we explored how to make Crispy Parmesan Zucchini Fries. We talked about selecting the best zucchini and using fresh Parmesan for great taste. You learned the step-by-step process from preparation to cooking, along with useful tips to get maximum crispiness. Don't forget the variations and storage info to keep them fresh. Zucchini fries can be a hit, so enjoy experimenting in your kitchen! Make it your own with flavors and enjoy the health benefits!

Crispy Parmesan Zucchini Fries Healthy and Simple Snack

Looking for a healthier snack that still satisfies your cravings? Try Crispy Parmesan Zucchini Fries! They’re simple to make and

- 4 large portobello mushrooms, stems removed - 1 cup cooked quinoa - 1 small zucchini, finely diced - 1 red bell pepper, finely diced - 1 small red onion, finely chopped - 1 cup fresh spinach, chopped - 1/2 cup feta cheese, crumbled - 1/4 cup pine nuts, toasted - 2 cloves garlic, minced - 2 tablespoons olive oil - 1 teaspoon dried oregano - Salt and pepper to taste - Fresh parsley for garnish When you gather these ingredients, you create a dish that is both tasty and healthy. Portobello mushrooms give a rich flavor and meaty texture. Quinoa adds protein and fiber, making it filling. The veggies, like zucchini and bell pepper, bring color and crunch. Feta cheese adds a creamy and salty bite, while pine nuts give a nice crunch. Olive oil helps to sauté the veggies, making them soft and flavorful. Garlic and oregano add depth to the dish. Finally, fresh parsley brightens everything up. Stuffed portobello mushrooms are packed with key nutrients. They are low in calories but high in fiber. Portobello mushrooms are a great source of vitamins like B and D. Quinoa is a complete protein, meaning it has all nine essential amino acids. The spinach provides iron and antioxidants. Zucchini is low in carbs and high in water, keeping you hydrated. Feta cheese adds calcium and protein, while pine nuts offer healthy fats. Overall, this dish supports heart health and muscle function. Using these wholesome ingredients, you can enjoy a meal that nourishes your body. Each bite bursts with flavor and health benefits. For the full recipe, check out the instructions above! Start by cleaning the portobello mushrooms. Use a damp cloth to wipe the caps. Remove the stems carefully. Preheat your oven to 375°F (190°C). This temperature cooks the mushrooms perfectly. Next, prepare the vegetables and quinoa. Cook the quinoa if you haven’t done so yet. It takes about 15 minutes. Dice the zucchini and bell pepper finely. Chop the red onion and spinach. This helps them cook evenly and blend well. Now, it's time to cook. Heat two tablespoons of olive oil in a large skillet over medium heat. Add the chopped onion and minced garlic. Sauté until the onion turns clear. This usually takes about 3-4 minutes. Then, add the diced zucchini and red bell pepper. Cook them for about five minutes until they are soft. Stir in the chopped spinach until it wilts. Remove the skillet from the heat. In a large bowl, mix the cooked quinoa, sautéed vegetables, crumbled feta, and toasted pine nuts. Sprinkle in dried oregano, salt, and pepper. Stir well to combine everything. Fill each portobello mushroom with the quinoa mixture. Press gently to pack the filling. Place the stuffed mushrooms gill-side up on a baking sheet. Bake them in the preheated oven for 25-30 minutes. Check for tenderness; the tops should be slightly golden. Once baked, take the mushrooms out of the oven. Let them cool for a few minutes. Garnish the stuffed mushrooms with fresh parsley for a pop of color. Serve them warm on a nice platter. Enjoy this tasty and simple dish with friends and family. For the full recipe, don’t forget to check the earlier section! To clean portobello mushrooms, use a damp cloth. This keeps dirt from sticking. Avoid soaking them in water. They soak it up and become soggy. When stuffing, make sure the filling is not too wet. If it is, it can make the mushrooms soggy. Use cooked quinoa as a base. It is fluffy and absorbs moisture well. Add fresh herbs to boost flavor. Try basil, thyme, or rosemary. These herbs add a nice touch to the dish. For toppings, consider adding breadcrumbs for crunch. You can also sprinkle extra cheese on top. A drizzle of balsamic glaze adds sweetness that pairs well with mushrooms. {{image_2}} Stuffed portobello mushrooms are great for vegetarians. You can swap the feta cheese for vegan cheese. Try using beans like black beans or chickpeas for protein. You can also add diced eggplant or carrots for extra flavor. Another tasty option is to use cooked lentils with spices. Each of these choices makes a filling meal that is plant-based and tasty. If you want to add meat or seafood, there are many options. Ground turkey or chicken works well when mixed with the veggies. You can also use cooked shrimp or crab meat. Just make sure to cook the meat first, then mix it with your stuffing. This way, you add protein without losing flavor. The stuffed mushrooms become hearty and satisfying with these additions. You can easily make this dish gluten-free. Replace quinoa with brown rice or cauliflower rice. Both options taste great and keep the dish light. If you like to use breadcrumbs for texture, choose gluten-free ones. This way, everyone can enjoy your stuffed portobello mushrooms, no matter their diet. For the full recipe, you can refer to the earlier section. To store leftover stuffed Portobello mushrooms, first let them cool down. Place them in an airtight container. This will keep them fresh. You can keep them in the fridge for up to three days. If you want to enjoy them later, make sure to check for any signs of spoilage. For freezing, wrap each stuffed mushroom in plastic wrap. Then, place them in a freezer bag. This keeps them safe from freezer burn. When you’re ready to eat, thaw them in the fridge overnight. Reheat them in the oven at 350°F (175°C) until heated through. This usually takes about 15-20 minutes. Leftover stuffed Portobello mushrooms are best eaten within three days. If you freeze them, they can last for about three months. Always check for any off smells or changes in texture before eating leftovers. Enjoy your tasty mushrooms safely! How to reheat stuffed Portobello mushrooms? To reheat stuffed Portobello mushrooms, place them in an oven set to 350°F (175°C). Bake for about 10-15 minutes. This keeps them warm and tasty. You can also use the microwave. Heat them for 1-2 minutes, but the oven is best for texture. Can you make stuffed Portobello mushrooms ahead of time? Yes, you can make stuffed Portobello mushrooms ahead of time. Prepare the filling and stuff the mushrooms. Cover them and store in the fridge for up to a day. Bake them right before serving for the best taste. What can I substitute for feta cheese? If you need a substitute for feta cheese, try goat cheese or ricotta. Both add creaminess and taste. You can also use vegan cheese if you want a dairy-free option. How to adjust cooking time for larger or smaller mushrooms? If your mushrooms are larger, increase the baking time by 5-10 minutes. For smaller mushrooms, reduce the time by about 5 minutes. Always check for tenderness to know when they are done. Can I prepare the stuffing separately and fill the mushrooms later? Yes, you can prepare the stuffing separately. Just store it in the fridge. When you are ready, fill the mushrooms and bake them. This method is great if you want to enjoy a fresh meal later. Stuffed Portobello mushrooms are tasty, healthy, and fun to make. We covered the ingredients, cooking steps, and ways to store leftovers. You can add your favorite flavors or adjust for dietary needs. With these tips and tricks, your dish will impress. Remember, enjoying food should be easy and delicious. Try this recipe, share it with friends, and have fun in the kitchen!

Stuffed Portobello Mushrooms Tasty and Simple Recipe

Are you ready to impress your friends and family with a delicious dish? Stuffed Portobello mushrooms are a tasty and

- 4 medium ripe peaches, peeled and sliced - 1 cup fresh blueberries - 1 tablespoon lemon juice - 1 tablespoon cornstarch - ½ cup granulated sugar - 1 teaspoon cinnamon - 1 teaspoon vanilla extract - 1 cup rolled oats - ½ cup all-purpose flour - ½ cup brown sugar, packed - ½ cup cold unsalted butter, cubed - Pinch of salt Gathering the right ingredients makes all the difference in your peach and blueberry crisp. First, choose ripe peaches. They should feel soft and smell sweet. Fresh blueberries add color and flavor. Look for berries that are firm and plump. For the baking essentials, lemon juice helps balance the sweetness. Cornstarch thickens the fruit mixture. Granulated sugar adds sweetness, while cinnamon gives a warm spice. Vanilla extract enhances the flavors, making them pop. Now, for the topping, rolled oats provide a hearty crunch. All-purpose flour helps bind the topping together. Brown sugar adds a rich, caramel note. Cold unsalted butter is key. It creates a crumbly texture. Lastly, a pinch of salt brings all the flavors together. Collect these items before you start. This will make cooking easier and more fun. For the full recipe, check back to combine these delicious ingredients! - Preheat your oven to 350°F (175°C). - In a large bowl, combine sliced peaches, fresh blueberries, lemon juice, cornstarch, granulated sugar, cinnamon, and vanilla extract. Mix gently to coat the fruit evenly. The lemon juice brightens the flavors, while the cornstarch helps thicken any juices. This combination creates a sweet and tangy base for your crisp. - In another bowl, mix rolled oats, flour, brown sugar, and a pinch of salt. - Add the cold unsalted butter, cubed. Use your fingers or a pastry cutter to mix until it looks crumbly. The butter gives the topping a rich flavor and a satisfying crunch. Make sure to work quickly so the butter stays cold. - Transfer the fruit mixture into an 8x8-inch baking dish. Spread it out evenly. This ensures every bite is filled with fruit. - Sprinkle the crumb topping evenly over the fruit. Bake in your preheated oven for 30-35 minutes. Look for a golden-brown topping and bubbling fruit. This means it’s ready to enjoy! You can find the full recipe above for detailed steps. - Choose ripe peaches for the best flavor. - Adjust sugar based on the sweetness of fruit. When picking peaches, look for ones that are soft but not mushy. Ripe peaches have a sweet scent and a warm color. If your fruit is not very sweet, lower the sugar. This keeps the crisp from being too sweet. - Check for bubbling fruit and golden topping for doneness. - Allow to cool for improved texture and flavor. Baking is key to a great crisp. Watch for the fruit to bubble and the topping to turn golden brown. This shows it’s ready. After baking, let it sit for about ten minutes. This cooling time helps the flavors blend and the texture improve. - Serve warm with vanilla ice cream and garnished peaches and blueberries. For a lovely touch, serve your crisp warm. Top it with a scoop of vanilla ice cream. Add a few fresh blueberries and peach slices for color. This makes your dish look and taste even better! You can find the full recipe in the article for more guidance. {{image_2}} You can change the fruits in your crisp for fun. Combine peaches and blueberries with raspberries or blackberries for a twist. This mix adds a tartness that balances the sweetness. You can also use nectarines instead of peaches. Nectarines bring a slightly different flavor but still taste great. Want to make a healthier version? Substitute brown sugar with coconut sugar. It has a lower glycemic index and adds a unique flavor. You can also use whole wheat flour in the topping. This adds more fiber and makes the dish a bit healthier without losing taste. Let’s make it even more interesting! You can mix in chopped nuts for crunch. Walnuts or almonds work well. They add texture and a nutty flavor. You can also add spices like nutmeg for extra warmth. This small change can elevate the dish and make it feel cozy. For the Full Recipe, check the main article! - Allow to cool completely before refrigerating. - Store in an airtight container in the fridge for 3-4 days. Keeping your Peach and Blueberry Crisp fresh is easy. After it cools, put it in the fridge. This way, you can enjoy it later without losing flavor or texture. The crisp topping stays nice and crunchy for a few days. - Freeze before baking for up to 3 months. - Bake directly from the freezer, adding extra time as needed. If you want to save some for later, freezing works well. Just prepare the crisp and place it in the freezer. You can bake it straight from the freezer. Just remember to add some extra baking time. This method lets you enjoy summer flavors even in winter. - Reheat in the oven for best results; use microwave for quick warm-up. When it’s time to eat your leftovers, reheating is key. For the best taste, use the oven. This keeps the topping crispy. If you need a quick fix, the microwave works fine too. Just be careful not to overheat it. Each method helps you enjoy your Peach and Blueberry Crisp again! Yes, but reduce sugar as frozen fruit can be sweeter. Frozen fruit is often picked at peak ripeness. This method locks in the sweetness. When using frozen fruit in your crisp, it’s best to thaw and drain excess liquid. This way, your crisp won’t become too watery. Use gluten-free oats and a suitable flour alternative. Almond flour or coconut flour works well. Be sure to check that your oats are certified gluten-free. This simple swap keeps the flavor while making it safe for gluten-sensitive folks. Best served warm with ice cream or whipped cream on top. The hot crisp contrasts nicely with cold ice cream. For extra flair, add some fresh blueberries or peach slices on top. This not only adds flavor but also a beautiful presentation. Yes, just use a larger baking dish and adjust baking time as needed. For a double batch, keep an eye on the crisp while baking. You might need to bake it a bit longer to ensure everything cooks evenly. Enjoy making this delightful treat! This blog post explored a delicious fruit crisp recipe, blending ripe peaches and blueberries. You learned about the key ingredients, including baking essentials and toppings. We covered simple instructions for preparing, assembling, and baking the dish. I shared tips for perfecting the recipe and fun variations to try. Remember to store leftovers properly for later enjoyment. Whether you're new to baking or a pro, this crisp is a treat. Dive in and enjoy the sweet goodness with your own twist!

Peach and Blueberry Crisp Flavorful Summer Delight

Summer is here, and what better way to celebrate than with a Peach and Blueberry Crisp? This delicious dish brings

To make Lemon Garlic Roasted Broccoli, you will need simple and fresh ingredients. Here’s what you need: - 1 large head of broccoli, cut into florets - 3 tablespoons olive oil - 4 cloves garlic, minced - Zest of 1 lemon - Juice of 1 lemon - 1 teaspoon red pepper flakes (optional) - Salt and pepper to taste - 2 tablespoons grated Parmesan cheese (optional) - Fresh lemon wedges for garnish These ingredients create a bright and tasty side dish. Broccoli is the star here, but garlic and lemon give it a lively flavor. Olive oil helps roast the broccoli evenly. The red pepper flakes add a nice kick, but you can leave them out if you want a milder dish. Parmesan is a great finishing touch, giving a savory note. Don't forget the lemon wedges for a fresh zing! For the full recipe, check out Zesty Garlic Lemon Broccoli Delight 🥦. - Preheat your oven to 425°F (220°C). This high heat helps the broccoli roast well. - Cut the large head of broccoli into small florets. This size helps them cook evenly. - In a large bowl, mix the broccoli florets with 3 tablespoons of olive oil. - Add 4 cloves of minced garlic, the zest of 1 lemon, and the juice of 1 lemon. - If you want some heat, toss in 1 teaspoon of red pepper flakes. - Season with salt and pepper to taste. Mix everything well so each piece gets coated. - Spread the seasoned broccoli evenly on a baking sheet. Make sure they are in a single layer. - Roast in the oven for 20-25 minutes. Toss the broccoli halfway through. This step ensures even roasting. - You can find the full recipe for Zesty Garlic Lemon Broccoli Delight 🥦 here. To get crispy edges on your roasted broccoli, it's key to spread the florets out. When you place them in a single layer, the heat circulates better. This prevents steaming and helps create that nice, crunchy texture. Toss the broccoli halfway through roasting to ensure even cooking. This will also help achieve that perfect golden brown color. You can boost the flavor by adding other veggies. Try bell peppers, carrots, or Brussels sprouts. Mixing different colors makes the dish pop! For seasoning, consider using smoked paprika or Italian herbs. These can add a fun twist to the lemon and garlic flavors. When serving, arrange the broccoli nicely on a platter. Add some lemon wedges for a bright touch. Drizzle a bit of olive oil over the top for shine. This dish pairs well with grilled chicken, fish, or even quinoa. The lemon garlic flavor complements many proteins and grains, making it a versatile side. For the complete experience, check out the Full Recipe for Zesty Garlic Lemon Broccoli Delight. {{image_2}} You can change up the oils and vinegars in this recipe. For instance, swap olive oil for avocado oil for a different taste. Try adding balsamic vinegar instead of lemon juice for a sweet twist. Cheese lovers can mix and match too. If you want a dairy-free option, use nutritional yeast instead of Parmesan. You can also add feta for a tangy flavor boost. If you want to make this dish vegan, skip the Parmesan. The recipe is still full of flavor without it. Use more lemon juice or add a splash of soy sauce for a savory kick. For gluten-free eaters, you’re in luck! This dish is naturally gluten-free. Just ensure any added sauces or cheeses are also gluten-free. Roasting in the oven gives the broccoli nice crispy edges. But you can also use an air fryer for a quicker option. Set the air fryer to 400°F (200°C) and cook for about 15 minutes. This method keeps the broccoli tender and adds a great crunch. Grilling is another fun way to prepare it. Brush the broccoli with olive oil and grill until charred. This method adds a smoky flavor that pairs well with the lemon and garlic. To store leftover lemon garlic roasted broccoli, first let it cool. Place it in an airtight container. Store it in the fridge for up to four days. If you want to keep it longer, freezing is a great option. Use a freezer-safe container or bag. Make sure to remove as much air as possible. This helps prevent freezer burn. To reheat, use the oven or a skillet. The oven keeps the broccoli crispy. Preheat it to 350°F (175°C). Bake for about 10 minutes. If you use a skillet, heat it on medium. Add a splash of water to help steam. This method retains the flavor and texture. You can also microwave it for quick reheating. Just cover it loosely to avoid sogginess. Lemon garlic roasted broccoli lasts in the fridge for about four days. After that, it may lose flavor and texture. Signs of spoilage include a mushy texture and odd smell. If you see any mold, throw it away. Always trust your senses—when in doubt, toss it out. The best temperature for roasting broccoli is 425°F (220°C). This heat cooks the broccoli evenly. It helps achieve tender florets with crispy edges. Roasting at this temperature enhances the flavor and texture. Yes, you can use frozen broccoli. However, fresh broccoli gives better results. If using frozen, thaw it first and pat it dry. This helps avoid excess water. Roasting time may be slightly shorter for frozen broccoli. To add spice, mix in red pepper flakes. You can adjust the amount to your taste. For more heat, try adding chopped fresh chili peppers. A dash of hot sauce also works well. You can prep this dish ahead. Toss the broccoli with the lemon and garlic mix. Store it in the fridge for up to 24 hours. When ready to roast, simply spread it on a baking sheet and cook. For the detailed preparation of Zesty Garlic Lemon Broccoli Delight 🥦, check the Full Recipe. This post covered how to make Zesty Garlic Lemon Broccoli Delight. We discussed the right ingredients, step-by-step instructions, and helpful tips. You learned how to roast broccoli for the best flavors and textures. We also explored variations and storage options to keep it fresh. In summary, this dish is easy and tasty. It's perfect for any meal. Give it a try, and enjoy the bright flavors!

Lemon Garlic Roasted Broccoli Flavorful Side Dish

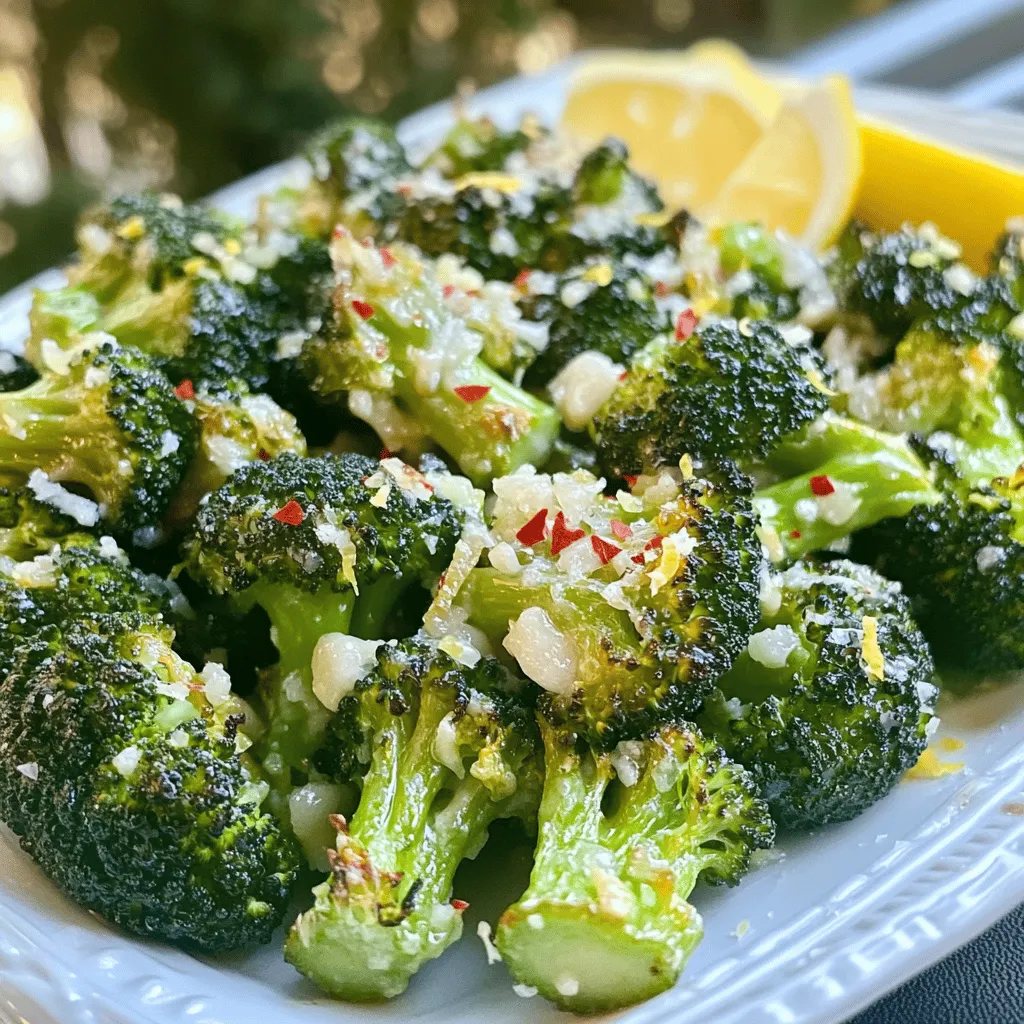
Looking for a side dish that’s both tasty and easy to make? You’re in the right place! Lemon Garlic Roasted

- 6 large eggs - 1/2 cup milk - 1 cup spinach, chopped - 1/2 cup cherry tomatoes, halved - 1/2 cup bell pepper, diced - 1/4 cup red onion, finely chopped - 1/2 cup feta cheese, crumbled - 1 teaspoon garlic powder - 1 teaspoon dried oregano - Salt and pepper to taste - 2 tablespoons olive oil When I make a vegetable frittata, I focus on fresh ingredients. Fresh veggies bring out great flavors. I love using a mix of bell peppers for color and taste. Cherry tomatoes add a nice sweetness. Spinach gives it a bright green look and packs in nutrients. For the eggs, I choose large ones. They hold up well in the frittata. The milk adds creaminess but is not too heavy. Feta cheese crumbles add a salty kick. - Choose Seasonal Vegetables: This gives your frittata the best flavor. Look for local produce at farmers' markets. - Inspect for Freshness: Check for firm, bright vegetables. Avoid any that feel soft or look dull. - Store Properly: Keep eggs and veggies in the fridge. This keeps them fresh longer. - Prep Ahead: Wash and chop your veggies before cooking. This saves time and makes cooking easier. Using fresh, high-quality ingredients sets the stage for a delicious vegetable frittata. If you want to try this recipe, check out the Full Recipe for more details! Start by preheating your oven to 375°F (190°C). This step ensures the frittata cooks evenly. In a large bowl, mix together six large eggs, 1/2 cup of milk, garlic powder, oregano, and salt and pepper. Whisk these ingredients well until they blend smoothly. Next, heat two tablespoons of olive oil in an oven-safe skillet over medium heat. I prefer using a cast iron skillet for better heat retention. Add 1/4 cup of finely chopped red onion and 1/2 cup of diced bell pepper. Sauté them for about 3-4 minutes until the onions are soft. Then, toss in 1 cup of chopped spinach and 1/2 cup of halved cherry tomatoes. Cook for another 2 minutes, stirring often, until the spinach wilts. Pour the egg mixture over the sautéed vegetables. Stir gently to mix everything well. Sprinkle 1/2 cup of crumbled feta cheese on top. Cook on the stove for 2 minutes to set the edges. Then, transfer the skillet to the oven. Bake for 15-20 minutes until the frittata is puffed and the center is set. Once done, remove it from the oven and let it cool for a few minutes before slicing. For more details, refer to the Full Recipe. To make a great vegetable frittata, you need to focus on texture. A frittata should be soft but firm. Start by cooking the vegetables just enough. This way, they stay tender and keep their flavor. Sauté them on medium heat for about 5-6 minutes. This helps to release their juices without making them mushy. Using an oven-safe skillet is key. A cast iron skillet works best. It heats evenly and keeps the frittata warm. Plus, it can go straight from the stove to the oven. This makes cooking easier and helps the frittata rise nicely. Feel free to switch up the veggies. You can use zucchini, mushrooms, or even broccoli. Just remember to chop them small for even cooking. If you have leftover veggies, throw them in too! This makes the dish fun and unique each time. Cheese can change the whole taste. Feta is a great choice, but try cheddar or goat cheese for something different. You can also add spices. A pinch of paprika or red pepper flakes can give a nice kick. Herbs like basil or thyme can add freshness. Use what you love! For more ideas, check out the Full Recipe for inspiration. {{image_2}} You can easily make this vegetable frittata fit many diets. For a vegetarian version, just leave out any meat. The recipe is already vegetarian-friendly because it uses eggs and fresh veggies. If you want to make it vegan, replace the eggs with a mixture of chickpea flour and water. This mix gives a nice texture and taste. Also, skip the cheese or use a vegan cheese alternative. For gluten-free options, you don’t need to worry at all! The frittata is naturally gluten-free since it uses no flour. Just make sure all your ingredients, like cheese or any added spices, are gluten-free. This way, everyone can enjoy a hearty and healthy breakfast. To make your frittata even more special, try adding different herbs. For a fresh twist, mix in basil, thyme, or rosemary. These herbs add a burst of flavor that brightens the dish. You can also try a blend of herbs for a unique taste. If you want to include meats, think about adding cooked bacon, ham, or sausage. These meats add a savory note that pairs well with the eggs. You can also add cooked chicken for a protein boost. Just remember to cook the meat before adding it to the frittata mix. This helps ensure everything cooks evenly. For the complete recipe, check out the [Full Recipe]. To keep your vegetable frittata fresh, store it in the fridge. Place it in an airtight container. This helps prevent it from drying out. You can keep it for up to three days. If you want to save it longer, consider freezing it. For freezing, let the frittata cool completely. Then, wrap it tightly in plastic wrap and place it in a freezer-safe bag. This way, it can stay fresh for up to two months. When you're ready to eat, just thaw it in the fridge overnight. Reheating frittata requires care to maintain its texture and flavor. The best method is using the oven. Preheat your oven to 350°F (175°C). Place the frittata on a baking sheet. Heat it for about 10-15 minutes. This warms it evenly without making it rubbery. You can also use a microwave if you’re in a hurry. Cut a slice and place it on a microwave-safe plate. Heat it for 30 seconds to 1 minute. Check it often to avoid overheating. Enjoy your frittata warm and tasty, just like when you first made it! Can you make frittata ahead of time? Yes, you can make a frittata ahead of time. It keeps well in the fridge. After baking, let it cool. Store it in an airtight container. It will stay fresh for up to three days. To serve, simply reheat it in the oven or microwave. This makes it a great choice for busy mornings. What vegetables work best in a frittata? Many vegetables work well in a frittata. Spinach and bell peppers add great flavor. Tomatoes bring juiciness, while onions add depth. You can also use zucchini, mushrooms, or broccoli. The key is to sauté them first. This enhances their taste and texture. Nutritional Information Overview A vegetable frittata is a healthy meal option. It is packed with protein from eggs. Each serving offers vitamins from fresh vegetables. It is also a good source of healthy fats, especially from feta and olive oil. This dish can be low in carbs, making it suitable for various diets. Benefits of Eating Vegetables in Breakfast Dishes Eating vegetables at breakfast offers many benefits. It helps you start the day with energy. Veggies provide fiber, which aids digestion. Having them in the morning can also support weight management. Plus, they boost your immune system with essential nutrients. Enjoying a vegetable frittata gives your body a healthy kick. For a tasty frittata, check out the Full Recipe. In this article, we explored the key ingredients and steps for a delicious vegetable frittata. We covered techniques to ensure the right texture and shared customization options for various diets. You learned how to store leftovers for freshness and reheating tips. A vegetable frittata is not just tasty; it’s also packed with nutrients. Enjoy making this dish and feel great about the healthy choices you’re making. Keep experimenting with flavors and vegetables!

Vegetable Frittata Hearty and Healthy Breakfast Recipe

Are you looking for a quick, healthy breakfast? Try this Vegetable Frittata! It’s packed with fresh veggies and full of

For mango sticky rice, you need a few key items. Here’s what to gather: - 1 cup glutinous (sticky) rice - 1 ½ cups coconut milk - 1 ripe mango, peeled and sliced - ¼ cup sugar - ¼ teaspoon salt - 1 tablespoon sesame seeds (optional) - Fresh mint leaves for garnish (optional) Each ingredient plays a role in making this dessert delicious. The sticky rice gives a nice chewy texture. The coconut milk adds creaminess and sweetness. The mango brings bright flavor and color. Choosing the right mango is very important. You want to use ripe, sweet mangoes. They should feel soft but not mushy. A great mango will enhance your dish. It adds a fresh taste that balances the rich coconut milk. I always pick mangoes that have a bright yellow color. This shows they are ripe and ready to eat. You will need some basic tools to make this dessert. Here’s a quick list: - A steamer (or a pot with a steaming basket) - A mixing bowl - A saucepan - A spoon for stirring - A knife for slicing mangoes These tools help ensure the rice cooks well and the flavors mix nicely. The steamer is key for cooking the sticky rice properly. Use a mixing bowl to combine the rice with the coconut milk. Having the right tools makes cooking easier and more fun. For the full recipe, check out Mango Paradise Sticky Rice. First, you need glutinous rice. Rinse 1 cup of it under cold water. Keep rinsing until the water is clear. This step helps wash away the starch. Then, soak the rice in water for at least 4 hours. Soaking overnight works best, too. After soaking, drain the rice. Place it in a steamer lined with cheesecloth. Steam the rice for 25 to 30 minutes. You want the rice to be translucent and tender. While the rice steams, let's make the coconut milk mixture. In a saucepan, mix 1 ½ cups of coconut milk with ¼ cup of sugar and ¼ teaspoon of salt. Heat this over low to medium heat. Stir it until the sugar dissolves. Be careful not to let it boil. You want the flavors to blend without losing the creaminess. Once the sticky rice is ready, transfer it to a large bowl. Pour about 1 cup of the warm coconut milk mixture over the rice. Gently mix it until the rice is well-coated. Let it sit for 15 to 20 minutes. This allows the rice to soak up the flavors. Now, you can serve it! Place a scoop of sticky rice on a plate. Top it with sliced mango. Drizzle some extra coconut milk on top. If you like, add sesame seeds for crunch and mint leaves for color. Enjoy your Mango Sticky Rice Delight! For the complete recipe, check out the Full Recipe. To get the right sticky texture, use glutinous rice. Rinse it well to remove starch. Soaking is key; aim for at least four hours. For best results, soak overnight. After soaking, steam the rice until it turns clear. This step keeps the grains moist and sticky. To boost flavor, use coconut milk, sugar, and a pinch of salt. Heat the coconut milk gently; do not boil it. Stir until the sugar dissolves completely. Pour a cup of this mixture over the sticky rice after cooking. Let the rice absorb these flavors for 15 to 20 minutes. Presentation matters! Start with a scoop of sticky rice on a plate. Arrange fresh mango slices artfully on top. Drizzle additional coconut milk over the dish. For a crunchy touch, sprinkle sesame seeds on top. Garnish with fresh mint leaves for a pop of color. Serve it warm for the best experience. For the full recipe, check the details above. {{image_2}} You can swap mango for other fruits. Try ripe bananas, sweet papayas, or juicy berries. Each fruit brings a unique flavor. For example, bananas add creaminess, while berries add a pop of tartness. This keeps your dessert fresh and fun. You can mix fruits, too! A blend of mango and strawberries can make a colorful, tasty dish. Mango sticky rice is easy to make vegan. Use coconut milk instead of any dairy. Coconut milk gives that creamy taste you love. You could also use almond or cashew milk. Just make sure to check the labels for added sugars. Keep the recipe light and sweet without any dairy. Different regions have their own twists on mango sticky rice. In Thailand, they may top it with mung beans. In Cambodia, they might add a sprinkle of toasted peanuts. This gives the dish a nice crunch. You can also find variations that use different sweeteners, like palm sugar. Each change adds new flavors and textures. Explore these variations to find your favorite! For the full recipe, check out the details above. To keep your mango sticky rice fresh, store it in an airtight container. This method protects it from drying out. Place the container in the fridge if you plan to eat it within a couple of days. The rice may harden, but it will still taste great. For the best flavor, try to eat it within three days. When reheating, avoid the microwave if possible. Instead, use a stovetop method. Place the rice in a pan with a splash of coconut milk. Heat it gently over low heat. Stir it often to ensure it warms evenly. This method keeps the rice soft and moist. If you must use the microwave, cover the rice with a damp paper towel. This helps retain moisture during heating. You can freeze mango sticky rice for later enjoyment. First, let it cool completely. Then, scoop it into a freezer-safe container. Make sure to leave space for expansion. Label the container with the date. When you’re ready to enjoy it, thaw it in the fridge overnight. Reheat it using the stovetop method for the best results. Enjoy this delightful dessert whenever you crave it! You use glutinous rice, also called sticky rice. This rice has a high starch content. It cooks up soft and chewy. Regular rice will not work for this dish. Glutinous rice gives Mango Sticky Rice its unique texture. You can find it in Asian grocery stores or online. Always rinse the rice to remove excess starch before cooking. Yes, you can make Mango Sticky Rice ahead of time. Cook the sticky rice and store it in the fridge. Keep the coconut milk mixture separate until you are ready to serve. This will keep the rice fresh and moist. When ready to eat, warm the rice and mix in the coconut milk. Fresh mango slices should be added right before serving. Mango Sticky Rice is great on its own, but you can add more. Fresh fruits like strawberries or kiwi can add color. You can also serve it with a side of coconut ice cream. A sprinkle of sesame seeds or nuts adds crunch. For a twist, drizzle some honey or maple syrup on top. Enjoy this sweet dish in many ways! Mango sticky rice is a delightful treat. We covered the key ingredients, focusing on quality mangoes and essential tools. I showed you how to prepare sticky rice, make the coconut milk, and assemble the dish. You learned tips for texture and flavor, along with presentation ideas. We explored variations, storage tips, and answered common questions. Now you can make your own mango sticky rice with ease. Use these steps to enjoy this tasty dish anytime!

Mango Sticky Rice Delightful and Easy Dessert Recipe

Mango Sticky Rice is a simple yet delightful treat you can easily make at home. This dessert combines sweet mangoes

To make Baked Cherry Almond Oatmeal, gather these simple ingredients: - 2 cups rolled oats - 1 ¾ cups almond milk (or any milk of choice) - ½ cup pitted cherries, halved (fresh or frozen) - ⅓ cup almond butter - ¼ cup maple syrup (or honey) - 1 teaspoon vanilla extract - 1 teaspoon baking powder - ½ teaspoon cinnamon - ¼ teaspoon salt - ⅓ cup sliced almonds (for topping) - ¼ cup brown sugar (for topping) These ingredients blend well to create a tasty and filling breakfast. You can easily swap some ingredients based on what you have. Use oat milk or coconut milk instead of almond milk for a different taste. If you don’t have cherries, try blueberries or sliced bananas. Peanut butter works well if you don’t have almond butter. For sweetness, honey is a great choice in place of maple syrup. You can use vanilla extract or vanilla bean paste for a richer flavor. If you want to avoid sugar, use mashed ripe bananas for natural sweetness. This oatmeal is packed with nutrients. Each serving has about: - Calories: 210 - Protein: 6 grams - Fiber: 4 grams - Sugar: 8 grams The oats provide complex carbs for energy. Cherries add fiber and antioxidants. Almonds bring healthy fats and protein. This dish is not just tasty; it also fuels your body for the day ahead. You can find the Full Recipe in the section above. Start by preheating your oven to 375°F (190°C). Use a 9x9 inch baking dish and lightly grease it. In a large bowl, mix 2 cups of rolled oats and 1 ¾ cups of almond milk. Add ⅓ cup of almond butter and ¼ cup of maple syrup to the bowl. Pour in 1 teaspoon of vanilla extract, 1 teaspoon of baking powder, ½ teaspoon of cinnamon, and ¼ teaspoon of salt. Stir until everything blends well. Now, gently fold in ½ cup of halved cherries. Once your mixture is ready, pour it into the greased baking dish. Spread the mixture evenly across the dish. In a small bowl, combine ⅓ cup of sliced almonds and ¼ cup of brown sugar. Sprinkle this mix over the top of the oatmeal. Bake in your preheated oven for 30 to 35 minutes. The top should turn golden, and the oatmeal will set nicely. After baking, let it cool for a few minutes before slicing into squares. Serve your Baked Cherry Almond Oatmeal warm for the best flavor. For a special touch, add more almond butter or a drizzle of maple syrup on top. You can also garnish with fresh cherries and sliced almonds for color. This makes your dish look appealing and delicious! To get that perfect texture in your Baked Cherry Almond Oatmeal, start with rolled oats. They absorb liquid well and create a hearty base. Use almond milk for creaminess, but any milk works too. Mix the ingredients well to ensure even cooking. If you like it softer, add a little more milk. If you prefer it firmer, reduce the milk slightly. Bake it until the top is golden brown. This makes the edges crispy while keeping the center soft. To boost the flavor, add spices like nutmeg or cardamom. These spices will give your oatmeal a warm, cozy taste. You can also swap cherries for other fruits, like blueberries or apples. Consider adding vanilla extract for sweetness and aroma. For more richness, try different nut butters like peanut or cashew. Topping with sliced almonds and brown sugar adds a sweet crunch that you’ll love. One common mistake is not measuring the ingredients correctly. Use measuring cups for accuracy. Another mistake is overbaking. Check the oatmeal around 30 minutes; it should be set but not dry. Avoid skipping the cooling time after baking. This helps the oatmeal firm up, making it easy to cut into squares. Finally, don’t forget to let your creativity shine by adding your personal twist to the recipe. Enjoy the process and have fun! For the complete recipe, check the [Full Recipe]. {{image_2}} You can change up the fruit in your baked oatmeal. Try using blueberries, raspberries, or apples. These fruits add their own flavors and textures. You can mix in dried fruits like cranberries or apricots for added sweetness. Just remember to adjust the sugar if your fruit is sweet. If you want to change the sweetness, many options exist. You can use honey, agave syrup, or coconut sugar. Each offers a unique taste and health benefits. Try stevia or monk fruit for a low-calorie choice. Adjust the amount based on your preferred sweetness level. Nut butter adds creaminess and flavor to your oatmeal. While almond butter is tasty, peanut or cashew butter works well too. Each brings its own twist to the dish. You can also try sunflower seed butter for a nut-free option. Mix and match to find your favorite combination. For the full recipe, refer to the section above. To store leftovers, let the baked oatmeal cool completely. Then, cut it into squares. Place these squares in an airtight container. This will keep them fresh for up to five days in the fridge. If you want to enjoy them later, store them separately from any toppings. You can freeze individual squares for later use. Wrap each square tightly in plastic wrap. Then, place them in a freezer-safe bag or container. This way, they can last for up to three months. When you’re ready to eat, just take out what you need. Reheat leftovers in the microwave for about 30-60 seconds. If you prefer, you can also warm them in the oven at 350°F (175°C). Bake them for about 10-15 minutes until they are hot. Add a drizzle of almond butter or maple syrup when serving to bring back the fresh taste. For the full recipe, check the detailed instructions above. Yes, you can use regular milk. Almond milk gives a nice nutty flavor. If you prefer cow's milk, it works just as well. The texture and taste may change slightly, but it will still be delicious. To make Baked Cherry Almond Oatmeal gluten-free, choose certified gluten-free oats. Regular oats may contain gluten due to cross-contamination. Check labels for safety. You can also ensure other ingredients, like baking powder, are gluten-free. Absolutely! You can prepare it the night before. Just mix all the ingredients and place them in the baking dish. Cover it and store it in the fridge. When you’re ready, bake it in the morning. This saves time and makes breakfast easy. For the full recipe, check the previous section! In this post, we explored the essential ingredients for Baked Cherry Almond Oatmeal. We discussed preparation steps and the baking process. You also learned tips for texture and flavor. We looked at variations to make it your own and how to store leftovers. Remember, this dish is flexible and fun. Use these ideas to create something delicious and unique. Enjoy your cooking adventure!

Baked Cherry Almond Oatmeal for a Healthy Breakfast

If you’re seeking a quick, healthy breakfast, look no further than Baked Cherry Almond Oatmeal. This dish combines the sweet

Older posts
Newer posts
← Previous Page1 … Page84 Page85 Page86 Next →

dsad

© 2026 Emmas Dish • Built with GeneratePress

Our Policies

  • Copyright Policy
  • Cookie Policy
  • GDPR Policy
  • Privacy Policy
  • Disclaimer
  • Terms Of Use

More Information

  • Home
  • About
  • Contact
  • Appetizers
  • Dessert
  • Dinner
  • Drinks
©2026, Emmas Dish About Back To Top