Skip to content
DisclaimerTerms Of UseGDPR PolicyCookie Policy

Emmas Dish

  • Home
  • Drinks
  • Appetizers
  • Dinner
  • Dessert
  • About
  • Contact
  • Privacy Policy
DisclaimerTerms Of UseGDPR PolicyCookie Policy

NO-ING-IMG

To make teriyaki chicken rice bowls, you need these main ingredients: - 2 boneless, skinless chicken breasts - 1 cup jasmine rice - 1 cup water - 1 bell pepper (red or yellow), sliced - 1 cup broccoli florets The flavor comes from a simple marinade. Gather these items: - 1 tablespoon sesame oil - 2 tablespoons soy sauce (low sodium) - 2 tablespoons honey - 1 tablespoon rice vinegar - 1 teaspoon fresh ginger, grated - 2 cloves garlic, minced - Salt and pepper to taste Garnishes add a nice touch. Use these to enhance your bowls: - 2 green onions, sliced - Sesame seeds To marinate chicken, start with a bowl. Mix soy sauce, honey, rice vinegar, ginger, and garlic. This mix adds great taste. Place the chicken breasts in the bowl. Make sure they are fully coated in the marinade. Let it sit for at least 15 minutes. For stronger flavor, marinate up to 1 hour. This process helps the chicken soak up the sauce. First, rinse the jasmine rice under cold water. Keep rinsing until the water is clear. This step removes extra starch. Then, place the washed rice in a pot with 1 cup of water. Bring it to a boil. Lower the heat to a simmer and cover. Cook for 15 minutes. After cooking, turn off the heat and let it rest for 5 minutes. Fluff the rice with a fork before serving. This makes the rice light and fluffy. In a skillet, heat sesame oil over medium heat. Add the marinated chicken to the pan. Cook for about 5-6 minutes on each side. The chicken should be golden brown and fully cooked. Check the internal temperature; it should reach 165°F. After cooking, let the chicken rest for 5 minutes before slicing. In the same skillet, add sliced bell pepper and broccoli florets. Sauté the veggies for about 4-5 minutes. They should be tender but still crisp. Lastly, add the reserved marinade to the pan and cook for 2-3 minutes. This helps thicken the sauce, making it even tastier. For the full recipe, check out the ingredients and instructions above. To get tender chicken, first marinate it. The marinade helps soften the meat. Use soy sauce, honey, and vinegar. Let it soak for at least 15 minutes. For best results, marinate it for an hour. Cook the chicken over medium heat. This keeps it juicy. Always check the internal temperature. It should reach 165°F for safety. Fluffy rice starts with rinsing the jasmine rice. Rinse until the water runs clear. This removes excess starch. Use a 1:1 ratio of rice to water. Bring the water to a boil first. Once boiling, lower the heat and cover. Let it simmer for 15 minutes. After cooking, let it rest for 5 minutes. This makes it light and fluffy. You can boost flavor with simple add-ins. Try adding bell peppers and broccoli. These complement the teriyaki sauce well. You can also use sesame seeds or green onions as toppings. These add texture and freshness. For a spicy kick, add sliced jalapeños. Feel free to get creative with your choices. Check out the Full Recipe for more ideas! {{image_2}} You can easily swap chicken for tofu in teriyaki bowls. Use firm tofu for the best results. Press the tofu to remove extra water. Cut it into cubes and marinate just like the chicken. Cook it until golden brown for a tasty vegetarian option. This version is just as satisfying and packed with flavor. Feel free to mix in various vegetables. Try snap peas, carrots, or mushrooms. Each veggie adds its own taste and texture. You can use frozen or fresh produce, depending on what you have. Sauté until they are just tender for the best crunch. Experimenting keeps your bowls exciting and fun. You can create your own teriyaki sauce for a personal touch. Start with soy sauce as a base. Add honey or brown sugar for sweetness. A splash of lime juice brightens the sauce. Want a kick? Add some chili paste or sriracha. Play with flavors to find your favorite blend. Check out the Full Recipe for ideas on how to make it your own. Store any leftover teriyaki chicken rice bowls in an airtight container. This keeps the dish fresh and tasty. Make sure to separate the chicken, rice, and veggies if possible. This way, they stay crisp and flavorful longer. When ready to eat your leftovers, reheat them gently. You can use the microwave or a skillet. If using a microwave, cover the bowl to keep moisture in. Heat in short bursts, stirring in between until warm. If using a skillet, add a splash of water to help steam the rice and veggies. Leftover teriyaki chicken rice bowls stay good in the fridge for about 3-4 days. For longer storage, you can freeze them. Place the cooled dish in a freezer-safe container. It will last up to 3 months in the freezer. To enjoy, thaw overnight in the fridge and reheat as mentioned above. For the best taste, use the Full Recipe within a few days of making it. Serve Teriyaki Chicken Rice Bowls hot. Start with a bed of fluffy jasmine rice. Top it with sliced chicken and colorful veggies. Drizzle extra teriyaki sauce on top for added flavor. Garnish with sesame seeds and green onions. This adds a nice crunch and fresh taste. Enjoy it right away for the best experience. Yes, you can use different rice types. Brown rice is a healthy choice. It adds more fiber and nutrients. Sushi rice works well too, giving a sticky texture. Quinoa can be a fun swap, adding protein. Just remember to adjust the cooking times and water ratios for each rice type. To adjust the marinade, consider using low-sodium soy sauce. This helps reduce salt intake. You can replace honey with maple syrup for a vegan option. Use coconut aminos as a soy-free alternative. For gluten-free needs, choose tamari instead of soy sauce. Feel free to experiment to fit your taste! Teriyaki chicken rice bowls are tasty and easy to make. We covered key ingredients, marinating tips, and cooking steps. You learned how to make fluffy rice and tender chicken. Plus, I shared some variations for vegetarians and creative sauces. Don’t forget to store leftovers properly to keep them fresh. Enjoy experimenting with flavors and ingredients. You now have the tools to create your own delicious teriyaki bowls at home. Dive in and make this dish your own!

Teriyaki Chicken Rice Bowls Flavorful and Easy Meal

Are you ready to make a meal that’s both tasty and simple? Teriyaki Chicken Rice Bowls bring bold flavor and

- Zucchini and Tofu - 2 medium zucchinis, spiralized - 1 cup firm tofu, cubed - Sauces and Seasonings - 2 tablespoons peanut butter - 2 tablespoons soy sauce (or tamari for gluten-free) - 1 tablespoon lime juice - 1 tablespoon tamarind paste - 1 tablespoon coconut sugar (or brown sugar) - 2 cloves garlic, minced - 1 tablespoon sesame oil - Garnishes - 2 green onions, chopped - 1/4 cup bean sprouts - Crushed peanuts for garnish - Lime wedges for serving - Fresh cilantro for garnish This Zucchini Noodle Pad Thai is a fun twist on the classic dish. You get the same great taste with a lighter touch. Zucchini noodles are fresh and full of flavor. They soak up the sauce well, making each bite delicious. Tofu adds a nice protein boost and absorbs all the flavors. To start, spiralize the zucchinis into noodles. This gives you that nice, noodle-like texture. Next, cube your firm tofu. This will help it brown nicely and hold its shape while cooking. For the sauces, we mix peanut butter, soy sauce, lime juice, tamarind paste, and coconut sugar. This blend creates a sweet and tangy sauce that brings everything together. Don't forget the garnishes! Green onions and bean sprouts add a nice crunch and freshness. Crushed peanuts give a delightful crunch, while lime wedges add a tangy kick. Fresh cilantro ties it all together with its unique taste. If you want the full recipe, check it out for all the steps. Enjoy cooking and eating this healthy, tasty meal! To start, you need to prepare the tofu. Cut the firm tofu into small cubes. Heat 1 tablespoon of sesame oil in a non-stick skillet over medium heat. Once hot, add the tofu. Cook it for about 5 to 7 minutes. You want it golden brown on all sides. When done, remove the tofu from the skillet and set it aside. This step adds protein and gives a nice texture. Next, let's make the sauce. In a small bowl, combine 2 tablespoons of peanut butter, 2 tablespoons of soy sauce, 1 tablespoon of lime juice, 1 tablespoon of tamarind paste, and 1 tablespoon of coconut sugar. Whisk these ingredients together until smooth. Taste it, and adjust if needed. This sauce will bring the flavors together in your dish. Now, it's time to cook the zucchini noodles. In the same skillet, add 2 cloves of minced garlic. Sauté it for about 30 seconds until it smells great. Then, add the spiralized zucchini noodles. Cook them for 2 to 3 minutes. You want them soft but still a bit crunchy. This helps keep the nutrients intact. After the zucchini noodles are cooked, add the tofu back into the skillet. Pour the prepared sauce over everything. Toss the noodles and tofu until they are well-coated with sauce. Cook for another 1 to 2 minutes. This step ensures every bite is full of flavor. Next, stir in 2 chopped green onions and 1/4 cup of bean sprouts. Cook for one more minute. This adds a fresh crunch to your dish. It also boosts the nutrient content, making it even healthier. To serve, divide the Zucchini Noodle Pad Thai among your plates. Garnish with crushed peanuts, fresh cilantro, and lime wedges. This adds color and flavor. Enjoy your delicious meal that is both flavorful and healthy! For the full recipe, check out the details above. To get the best zucchini noodles, start by spiralizing your zucchinis. Use a spiralizer for even noodles. If you don’t have one, a vegetable peeler works too. Aim for thin, long strands to mimic traditional noodles. Once you spiralize, make sure to salt them lightly. This helps draw out excess moisture. Let them sit for about 10 minutes, then pat them dry with paper towels. This step keeps the dish from becoming watery. When cooking, sauté the noodles for just 2-3 minutes. You want them tender but still a bit crunchy. Overcooking can make them mushy. If you want to change up the flavors, there are many options. Here are a few ideas: - Add protein: Try shrimp, chicken, or tempeh for more texture. - Use different nuts: Swap crushed peanuts for cashews or almonds. - Spice it up: Add red pepper flakes or sriracha for heat. - Fresh herbs: Toss in basil or mint for a fragrant twist. The right tools make cooking easier and more fun. Here’s what I recommend: - Spiralizer: For making perfect zucchini noodles. - Non-stick skillet: Prevents sticking and makes cooking simple. - Whisk: For mixing your sauce smoothly. - Measuring spoons: To ensure you get the right amounts. These tools help you create a delicious Zucchini Noodle Pad Thai that impresses every time. For the full recipe, check out the details above. {{image_2}} You can add more protein to your Zucchini Noodle Pad Thai. Cooked chicken, shrimp, or even tempeh work well. To keep it simple, just cube the protein and cook it in the skillet. For vegan options, stick with tofu or try chickpeas. They add a nice texture and flavor. This dish can easily fit a vegan or gluten-free diet. Use tamari instead of soy sauce for a gluten-free option. For a vegan twist, swap the eggs with extra tofu or some veggies. You can also use coconut aminos for a sweet and savory touch without soy. You can change the flavors to match your taste. Want it spicy? Add red pepper flakes or sriracha to the sauce. For a sweeter taste, add more coconut sugar. If you like tang, squeeze in more lime juice. This recipe allows you to play with the flavors, making it your own. For the complete Zucchini Noodle Pad Thai recipe, check out the Full Recipe section. To keep your Zucchini Noodle Pad Thai fresh, place leftovers in an airtight container. This keeps moisture in but prevents any odors from other foods. Store it in the fridge for up to three days. Make sure the dish cools down before sealing the container. This will help avoid steam build-up, which can make the noodles soggy. Reheating Zucchini Noodle Pad Thai is easy. You can use either the microwave or the stove. If using the microwave, place the leftovers in a bowl, cover it loosely, and heat for about one to two minutes. Stir halfway through for even heating. If you prefer the stove, add a splash of water or oil in a skillet over medium heat. Heat for about three to five minutes, stirring gently. This method helps refresh the texture of the noodles. You can freeze Zucchini Noodle Pad Thai, but the texture changes when thawed. To freeze, let the dish cool completely. Then, portion it into freezer-safe bags or containers. Remove as much air as possible to prevent freezer burn. It can last for up to three months in the freezer. When you’re ready to eat, thaw it overnight in the fridge before reheating. For best results, consider cooking fresh zucchini noodles when you’re ready to serve. For the Full Recipe, check back to master this delightful dish! Zucchini noodles are low in calories and carbs. They add vitamins and minerals to your diet. Zucchini is high in fiber, which helps digestion. Using zucchini noodles instead of traditional pasta makes meals lighter. This swap also boosts your veggie intake. They are gluten-free, making them a great choice for many people. You can easily spiralize zucchini at home, which is fun and simple. Plus, they soak up flavors well, making your Zucchini Noodle Pad Thai even tastier. Yes, you can prepare Zucchini Noodle Pad Thai in advance. Cook the dish, then store it in an airtight container. Keep it in the fridge for up to three days. When you're ready to eat, just reheat it in a skillet. This method helps save time for busy days. However, the zucchini noodles may lose some crunch after reheating. To keep them fresh, consider making the sauce and tofu ahead, then add the zucchini noodles just before serving. To add heat, try using chili paste or sriracha. Mix it into the sauce for a spicy kick. You can also add red pepper flakes when cooking the zucchini. If you enjoy fresh heat, toss in sliced fresh chili peppers. Start with a little, then taste to see if you want more. Remember, you can always add spice, but it’s hard to take it away. Pad Thai pairs well with light side dishes. Try a simple cucumber salad for a refreshing crunch. A Thai-style mango salad adds sweetness and flavor. You can also serve spring rolls with a dipping sauce. These options keep the meal balanced and fun. They enhance your dining experience without overshadowing the main dish. You can find tamarind paste in many grocery stores. Look in the international aisle, especially near Asian or Indian foods. It is often near other sauces and pastes. You can also find it in health food stores. If you prefer online shopping, many websites sell tamarind paste. This ingredient adds a unique tangy flavor to your Zucchini Noodle Pad Thai. If you can't find it, consider using lime juice as a substitute, though the taste will differ. In this blog post, I covered the key ingredients for a tasty Zucchini Noodle Pad Thai. You learned how to prepare tofu, make the sauce, and cook zucchini noodles. I shared tips for achieving the right texture, along with storage and serving ideas. Consider trying variations to suit your taste, like adding proteins or enhancing flavors. Embrace the creativity in cooking this dish. Enjoy your Pad Thai adventure!

Zucchini Noodle Pad Thai Flavorful and Healthy Meal

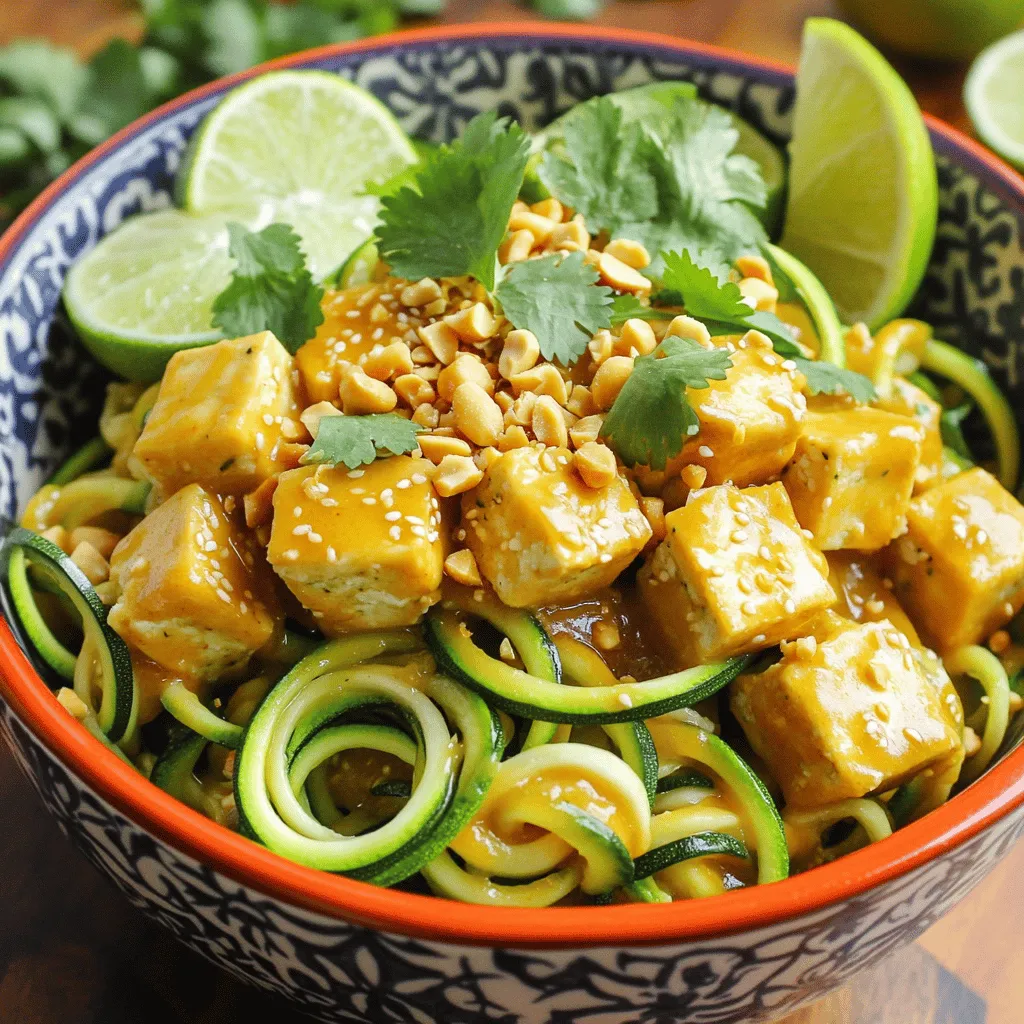
Looking for a healthy twist on Pad Thai? You’ve found it! Zucchini Noodle Pad Thai is a delicious way to

Newer posts
← Previous Page1 … Page85 Page86

dsad

© 2026 Emmas Dish • Built with GeneratePress

Our Policies

  • Copyright Policy
  • Cookie Policy
  • GDPR Policy
  • Privacy Policy
  • Disclaimer
  • Terms Of Use

More Information

  • Home
  • About
  • Contact
  • Appetizers
  • Dessert
  • Dinner
  • Drinks
©2026, Emmas Dish About Back To Top