Go Back
Here are the ingredients you need for your no-bake peanut butter bars: - 1 cup creamy peanut butter - 1 cup rolled oats - 1/2 cup honey or maple syrup - 1/4 cup coconut oil, melted - 1/2 cup dark chocolate chips - 1/4 teaspoon sea salt - 1 teaspoon vanilla extract - Optional toppings: crushed nuts or sprinkles Each ingredient plays a key role. The creamy peanut butter gives the bars their rich flavor. Rolled oats add texture and help bind everything together. Honey or maple syrup sweetens the mix and keeps it sticky. Melted coconut oil adds creaminess and helps the bars set. Dark chocolate chips provide a delicious topping that makes these bars even more tempting. Sea salt enhances the flavors, while vanilla extract rounds it all out. If you want a little crunch or color, add crushed nuts or sprinkles on top. Gather these ingredients, and you’re ready to make a treat that’s quick and easy! {{ingredient_image_1}} First, grab a big mixing bowl. Add one cup of creamy peanut butter to the bowl. Then, measure out half a cup of honey or maple syrup. Pour this in, too. Next, take a quarter cup of melted coconut oil and add it. Finally, add one teaspoon of vanilla extract. Stir everything together until the mixture is smooth and creamy. This step is key. It helps blend the flavors well. After mixing, it’s time to add more texture. Measure one cup of rolled oats and a quarter teaspoon of sea salt. Add these to the peanut butter mix. Stir until the oats are well mixed in. The mixture should feel sticky and thick. Now, line an 8x8 inch baking dish with parchment paper. Leave some paper hanging over the edges. This makes it easy to pull the bars out later. Next, press the peanut butter and oat mix into the dish. Use a spatula to make it even. Press down firmly to pack it well. Now, let’s melt the chocolate. Take half a cup of dark chocolate chips and put them in a microwave-safe bowl. Heat them in the microwave for 30 seconds. Take them out and stir. If they’re not melted, heat them again in 30-second bursts. Keep stirring until the chocolate is smooth. Once melted, pour the chocolate over the pressed peanut butter base. Use a spatula to spread the chocolate evenly. This will create a nice, smooth top. If you want, sprinkle some crushed nuts or colorful sprinkles on top. Gently press them in to help them stick. You can easily change the flavor of your bars. Try adding a dash of cinnamon for warmth. You can also swap creamy peanut butter for crunchy peanut butter. This adds a fun texture. If you want a nut-free option, use sunflower seed butter instead. This keeps the taste delicious while being safe for nut allergies. To make your bars chewier, add more rolled oats. You can also mix in some crushed nuts for a crunchier bite. If you prefer softer bars, use less oat and more peanut butter. This will give you a smooth, rich texture. Experiment with the ratios to find your perfect bar. Presentation makes a big difference. Arrange the bars on a nice platter. Drizzle melted chocolate on top for a fancy touch. You can also sprinkle crushed nuts or colorful sprinkles over the chocolate. This adds some fun and makes the bars look appealing. Pro Tips Use Natural Peanut Butter: For a healthier option, opt for natural peanut butter without added sugars or oils. It provides a richer flavor and a more wholesome bar. Chill for Perfect Texture: Allow the bars to chill longer than 2 hours for a firmer texture, making them easier to cut and handle. Experiment with Mix-Ins: Feel free to add in your favorite mix-ins like dried fruits, seeds, or protein powder to customize the bars to your liking. Store Properly: Keep the bars in an airtight container in the refrigerator for up to one week, or freeze them for longer storage. {{image_2}} You can easily make these bars nut-free. Replace peanut butter with sun butter. Sun butter tastes great and works well. You can also use almond butter if you prefer. Just make sure the butter is creamy for the best texture. Mix-ins can add fun flavors and textures to your bars. Try adding dried fruits like raisins or cranberries. You can also toss in some seeds like chia or pumpkin seeds. For a chocolate twist, use different kinds of chocolate chips. Just fold them in during the mixing stage. To keep this recipe vegan, use maple syrup instead of honey. Also, check that your chocolate chips are dairy-free. This small change keeps the bars tasty and plant-based. Enjoy a sweet treat that fits your diet! To keep your no-bake peanut butter bars fresh, store them in the fridge. Use an airtight container to avoid drying out. If you want to keep them longer, freeze the bars. Wrap each piece in plastic wrap before placing it in a freezer-safe bag. This way, they stay fresh for your next craving. These bars can last up to one week in the fridge. If you choose to freeze them, they can last up to three months. Just remember to label the bag with the date you made them. This helps you keep track of how long they’ve been stored. You can enjoy these bars cold, or warm them up a bit. To reheat, place a bar on a microwave-safe plate. Heat for about 10 to 15 seconds. This warms them but keeps the chocolate from melting too much. Enjoy them as a quick snack or dessert! Yes, you can use natural peanut butter. Natural peanut butter has no added sugars or oils. It may make the bars a bit softer. If you want a firmer texture, use creamy peanut butter with added oil. Both work well, but the choice affects texture and taste. Absolutely! You can prepare these bars up to one week in advance. Just store them in the fridge. If you want to keep them longer, freeze them. Wrap each bar in plastic wrap, then place them in a freezer bag. They will last for about three months in the freezer. You will know the bars are set when they feel firm to the touch. They should hold their shape when you press lightly. After refrigerating for at least two hours, check for a slightly hard surface. If they feel soft, give them more time in the fridge. In this blog post, we covered a simple and tasty recipe for peanut butter bars. You learned about key ingredients and step-by-step instructions. I shared tips for flavor and texture, along with fun variations. Storage advice helps keep your bars fresh and tasty. These bars are easy to make and great for snacks. Enjoy your homemade treats and feel free to get creative with your favorite mix-ins!

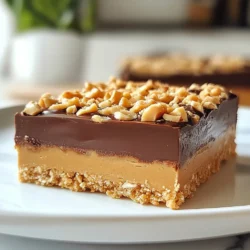
Peanut Butter Dream Bars

Deliciously creamy and chocolatey bars made with peanut butter and oats.
Prep Time 15 minutes
Total Time 2 hours 15 minutes
Course Dessert
Cuisine American
Servings 16
Calories 150 kcal

Ingredients
  

  • 1 cup creamy peanut butter
  • 1 cup rolled oats
  • 1/2 cup honey or maple syrup
  • 1/4 cup coconut oil, melted
  • 1/2 cup dark chocolate chips
  • 1/4 teaspoon sea salt
  • 1 teaspoon vanilla extract
  • to taste crushed nuts or sprinkles for topping (optional)

Instructions
 

  • In a mixing bowl, combine the creamy peanut butter, honey (or maple syrup), melted coconut oil, and vanilla extract. Stir until smooth and well combined.
  • Add the rolled oats and sea salt to the mixture, and mix until the oats are fully integrated and the mixture is sticky.
  • Line an 8x8 inch square baking dish with parchment paper, leaving some overhang for easy removal.
  • Press the peanut butter and oat mixture firmly into the bottom of the prepared baking dish, smoothing it out evenly with a spatula.
  • In a microwave-safe bowl, melt the dark chocolate chips in 30-second intervals, stirring in between until fully melted and smooth.
  • Pour the melted chocolate over the pressed peanut butter layer, spreading it evenly to cover the entire surface.
  • Sprinkle crushed nuts or sprinkles on top of the chocolate if desired, and gently press them into the surface to help them stick.
  • Refrigerate the bars for at least 2 hours, or until set. Once firm, remove from the dish using the parchment overhang and cut into squares or rectangles.

Notes

Arrange the bars on a platter, and drizzle a little extra melted chocolate on top for an elegant finish.
Keyword bars, dessert, no-bake, peanut butter